2010 KIA Rio Service
[x] Cancel search: ServicePage 119 of 236

47
Driving your vehicle
(Continued)
• Do not shift from N (Neutral) or P(Park) into D (Drive), or R (Reverse)
when the engine is above idle speed.
Transaxle ranges
P (Park)
This position locks the transaxle and pre-
vents the front wheels from rotating.
Always come to a complete stop before
shifting into this position.
✽ ✽ NOTICE
The transaxle may be damaged if you
shift into P (Park) while the vehicle is in
motion.
R (Reverse)
Use this position to drive the vehicle
backward.
✽ ✽NOTICE
Always come to a complete stop before
shifting into or out of R (Reverse); you
may damage the transaxle if you shift
into R while the vehicle is in motion.
N (Neutral)
With the gearshift in the N position, the
wheels and transaxle are not locked. The
vehicle will roll freely even on the slight-
est incline unless the parking brake or
service brakes are applied.
D (Drive)
This is the normal forward driving posi-
tion. The transaxle will automatically shift
through a 4-gear sequence, providing the
best fuel economy and power.
For extra power when passing another
vehicle or climbing grades, depress the
accelerator fully, at which time the
transaxle will automatically downshift to
the next lower gear.
✽ ✽NOTICE
Always come to a complete stop before
shifting into D (Drive).
(Continued)
Before leaving the driver’s seat,
always make sure the shift lever
is in the P (Park) position. Set the
parking brake fully, shut the
engine off and take the key with
you. Unexpected and sudden
vehicle movement can occur if
you do not follow these precau-
tions in the order specified.
Never leave a child unattended in a vehicle.
WARNING
Shifting into P (Park) while thevehicle is in motion will cause the
drive wheels to lock which will
cause you to lose control of the
vehicle.
Do not use the P (Park) position in place of the parking brake.
Always make sure the shift lever
is latched in the P (Park) position
so that it cannot be moved unless
the lock release button is pushed
in, AND set the parking brake fully.
(Continued)
Page 120 of 236

Driving your vehicle
84
2 (Second Gear)
Use 2 (Second Gear) for more power
when climbing hills and for increased
braking when going down hills. This posi-
tion also helps reduce wheel spin on slip-
pery surfaces. When the shift lever is
placed in 2 (Second Gear), the transaxle
will automatically shift from first to sec-
ond gear.
L (Low)
Move the shift lever to this position in
hard pulling situations and for climbing
steep grades.
O/D (Over Drive) system
(if equipped)
Pressing the O/D system button cancels
and engages the overdrive system.
When the O/D system is cancelled, the
O/D OFF indicator illuminates and the
transaxle gear range is limited to 1st
through 3rd. The transaxle will not shift to
4th gear until the O/D system button is
pressed again to release the switch.
When driving down a sloping road with
the transaxle in O/D (4th), you can
decrease the vehicle speed without using
the brakes by pressing the O/D button.
When the ignition is switched OFF, O/D
OFF mode is automatically cancelled.
O/D OFF Indicator ( )
This indicator light illuminates in the
instrument panel when the O/D mode is
cancelled.
Moving up a steep grade from a
standing start
To move up a steep grade from a stand-
ing start, depress the brake pedal, shift
the shift lever to D (Drive). Select the
appropriate gear depending on load
weight and steepness of the grade, and
release the parking brake. Depress the
accelerator gradually while releasing the
service brakes.
O/D
OFF
CAUTION
Do not exceed the recommended
maximum speeds in 2 (Second Gear) or L (Low). Operating thevehicle at speeds above the maxi-mum recommended, for 2 (SecondGear) or L (Low) may cause exces-sive heat to develop which couldresult in damage to or failure of theautomatic transaxle.
OJB030404
Page 121 of 236

49
Driving your vehicle
Shift lock system
For your safety, the Automatic Transaxle
has a shift lock system which prevents
shifting the transaxle out of P (Park)
unless the brake pedal is depressed.
To shift the transaxle out of P (Park):
1. Depress and hold the brake pedal.
2. Start the engine or turn the ignition tothe ON position.
3. Depress the lock release button and move the shift lever.
If the brake pedal is repeatedly
depressed and released with the shift
lever in the P (Park) position, a chattering
sound near the shift lever may be heard.
This is a normal condition.
Ignition key interlock system
The ignition key cannot be removed
unless the shift lever is in the P (Park)
position. If the ignition switch is in any
other position, the key cannot be
removed.
BRAKE SYSTEM
Power brakes
Your vehicle has power-assisted brakes
that adjust automatically through normal
usage.
In the event that the power-assisted
brakes lose power because of a stalled
engine or some other reason, you can
still stop your vehicle by applying greater
force to the brake pedal than you nor-
mally would. The stopping distance, how-
ever, will be longer.
When the engine is not running, the
reserve brake power is partially depleted
each time the brake pedal is applied. Do
not pump the brake pedal when the
power assist has been interrupted.
Pump the brake pedal only when neces-
sary to maintain steering control on slip-
pery surfaces.
In the event of brake failure
If service brakes fail to operate while the
vehicle is in motion, you can make an
emergency stop with the parking brake.
The stopping distance, however, will be
much greater than normal.
WARNING- Parking brake
Pulling the parking brake while the
vehicle is moving at normal speeds
can cause a sudden loss of control
of the vehicle. If you must use the
parking brake to stop the vehicle,
use great caution in applying the
brake.
WARNING - Brakes
Do not drive with your foot rest- ing on the brake pedal. This will
create abnormal high brake tem-
peratures, excessive brake lining
and pad wear, and increased
stopping distances.
When descending a long or steep hill, shift to a lower gear and
avoid continuous application of
the brakes. Continuous brake
application will cause the brakes
to overheat and could result in a
temporary loss of braking per-
formance.
(Continued)
Page 122 of 236

Driving your vehicle
10
4
Disc brakes wear indicator
Your vehicle has disc brakes.
When your brake pads are worn and it's
time for new pads, you will hear a high-
pitched warning sound from your front
brakes or rear brakes (if equipped). You
may hear this sound come and go or it
may occur whenever you depress the
brake pedal.
Please remember that some driving
conditions or climates may cause a
brake squeal when you first apply (or
lightly apply) the brakes. This is nor-
mal and does not indicate a problem
with your brakes.
✽ ✽
NOTICE
To avoid costly brake repairs, do not
continue to drive with worn brake pads.
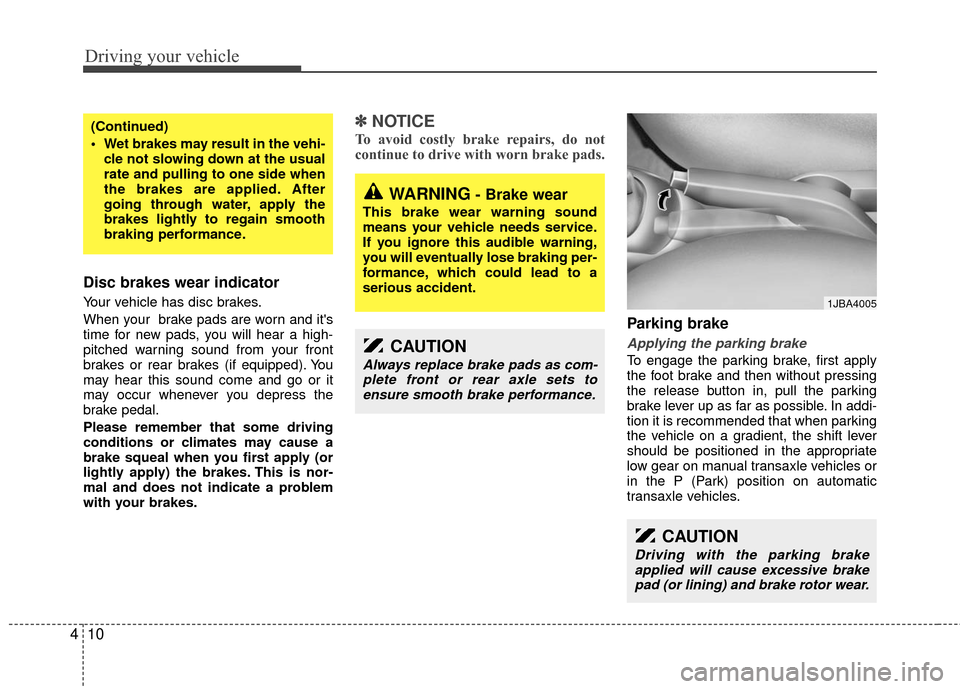
Parking brake
Applying the parking brake
To engage the parking brake, first apply
the foot brake and then without pressing
the release button in, pull the parking
brake lever up as far as possible. In addi-
tion it is recommended that when parking
the vehicle on a gradient, the shift lever
should be positioned in the appropriate
low gear on manual transaxle vehicles or
in the P (Park) position on automatic
transaxle vehicles.
(Continued)
Wet brakes may result in the vehi-
cle not slowing down at the usual
rate and pulling to one side when
the brakes are applied. After
going through water, apply the
brakes lightly to regain smooth
braking performance.
WARNING- Brake wear
This brake wear warning sound
means your vehicle needs service.
If you ignore this audible warning,
you will eventually lose braking per-
formance, which could lead to a
serious accident.
CAUTION
Always replace brake pads as com-plete front or rear axle sets toensure smooth brake performance.
CAUTION
Driving with the parking brake applied will cause excessive brakepad (or lining) and brake rotor wear.
1JBA4005
Page 140 of 236

Driving your vehicle
28
4
Low brake fluid level warning
If the warning light remains on, it may
indicate that the brake fluid level in the
reservoir is low.
If the warning light remains on:
1. Drive carefully to the nearest safe
location and stop your vehicle.
2. With the engine stopped, check the brake fluid level immediately and add
fluid as required. Then check all brake
components for fluid leaks.
3. Do not drive the vehicle if leaks are found, the warning light remains on or
the brakes do not operate properly.
Have it towed to any authorized Kia
dealer for a brake system inspection
and necessary repairs.
To check bulb operation, check whether
the parking brake and brake fluid warning
light illuminates when the ignition switch
is in the ON position.
Trunk lid open
warning (if equipped)
This warning light activates when the
trunk is not closed securely.
Door ajar warning
This warning light illuminates when a
door is not closed securely.
Low fuel level
warning
This warning light indicates the fuel tank
is nearly empty. The warning light will
come on when the fuel level has dropped
to about 5.5~6.5 liters (1.5~1.7 gallons).
Refuel as soon as possible.
Headlight high beam
indicator
This indicator illuminates when the head-
lights are on and in the high beam posi-
tion or when the turn signal lever is pulled
into the Flash-to-Pass position.
Air bag warning
(if equipped)
This warning light will blink or illuminate
for approximately 6 seconds each time
you turn the ignition switch to the ON
position.
If this indicator does not go out, or if it illu-
minates while the vehicle is being driven,
see an authorized Kia dealer for immedi-
ate service.
Check fuel filler cap
warning
This warning light indicates the fuel filler
cap is not tight securely.
Always make sure that the fuel filler cap
is tight.
WARNING
Driving the vehicle with a brake
warning light on is dangerous. If the
brake warning light remains on,
have the brakes checked and
repaired immediately by an author-
ized Kia dealer.
CHECK FUELCAP
Page 157 of 236

445
Driving your vehicle
Air conditioning system opera-
tion tips
If the vehicle has been parked in directsunlight during hot weather, open the
windows for a short time to let the hot
air inside the vehicle escape.
To help reduce moisture inside of win- dows on rainy or humid days, decrease
the humidity inside the vehicle by oper-
ating the air conditioning system.
During air conditioning system opera- tion, you may occasionally notice a
slight change in engine speed at idle
as the air conditioning compressor
cycles. This is a normal system opera-
tion characteristic.
Use the air conditioning system every month if only for a few minutes to
ensure maximum system perform-
ance.
When using the air conditioning sys- tem, you may notice clear water drip-
ping (or even pudding) on the ground
under the passenger side of the vehi-
cle. This is a normal system operation
characteristic. The air conditioning system includes a
function that automatically turns the air
conditioning compressor off if engine
coolant temperature approaches an
over heating level. The air conditioning
compressor operation will resume
once engine coolant temperature
returns to the normal range. Also, the
air conditioning compressor is auto-
matically turned off for a few seconds
when the accelerator is fully depressed
(wide open throttle).
When operating the air conditioning system use the outside (fresh) air posi-
tion.
Operating the air conditioning system in the recirculated air position does
provide maximum cooling, however,
continual operation in this mode may
cause the air inside the vehicle to
become stale.
Checking the amount of air con-
ditioner refrigerant and compres-
sor lubricant
When the amount of refrigerant is low,
the performance of the air conditioning is
reduced. Overfilling also has a bad influ-
ence on the air conditioning system.
Therefore, if abnormal operation is
found, have the system inspected by an
authorized Kia dealer.
✽ ✽ NOTICE
When the performance of the air condi-
tioning system is reduced it is important
that the correct type and amount of oil
and refrigerant is used. Otherwise,
damage to the compressor and abnor-
mal system operation may occur.
CAUTION
The air conditioning system should
be serviced by an authorized Kiadealer. Improper service may cause serious injury.
Page 173 of 236

In case of an emergency
46
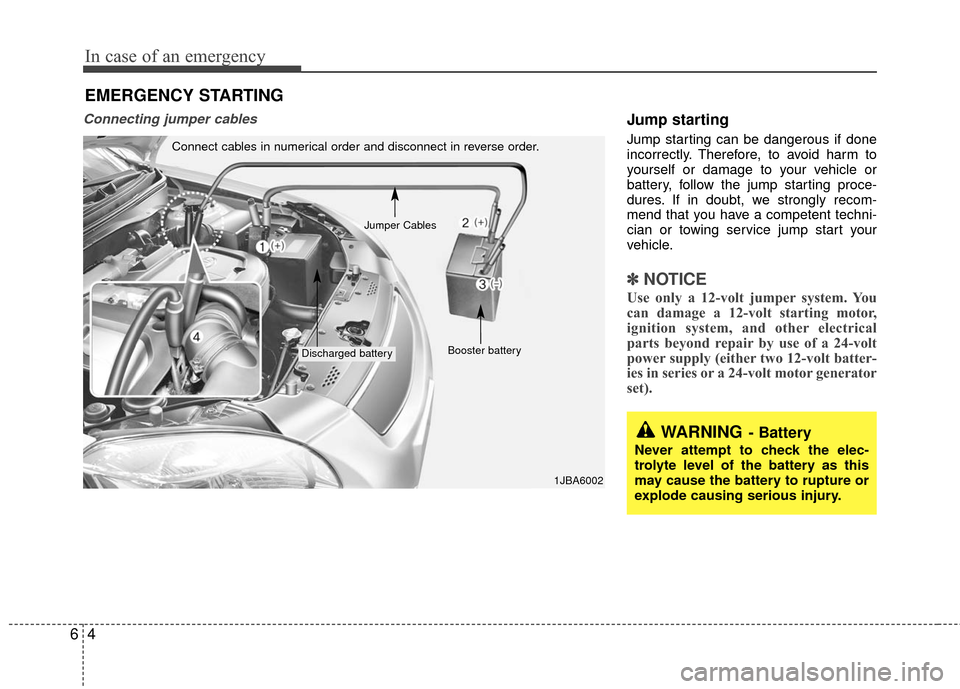
Connecting jumper cables Jump starting
Jump starting can be dangerous if done
incorrectly. Therefore, to avoid harm to
yourself or damage to your vehicle or
battery, follow the jump starting proce-
dures. If in doubt, we strongly recom-
mend that you have a competent techni-
cian or towing service jump start your
vehicle.
✽ ✽NOTICE
Use only a 12-volt jumper system. You
can damage a 12-volt starting motor,
ignition system, and other electrical
parts beyond repair by use of a 24-volt
power supply (either two 12-volt batter-
ies in series or a 24-volt motor generator
set).
Connect cables in numerical order and disconnect in reverse order.
Discharged battery Booster battery
1JBA6002
Jumper Cables
EMERGENCY STARTING
WARNING- Battery
Never attempt to check the elec-
trolyte level of the battery as this
may cause the battery to rupture or
explode causing serious injury.
Page 181 of 236

In case of an emergency
12
6
Memory fuse
Your vehicle is equipped with a memory
fuse to prevent battery discharge if your
vehicle is parked without being operated
for prolonged periods. Use the following
procedures before parking the vehicle for
prolonged period.
1. Turn off the engine.
2. Turn off the headlights and tail lights.
3. Open the driver-side knee bolster
cover and pull up the “MULT B/UP 10A
/ AUDIO 15A”.
✽ ✽NOTICE
• If the memory fuse is pulled up from
the fuse panel, the warning chime,
audio, clock and interior lamps, etc.,
will not operate. Some items must be
reset after replacement.
• Even though the memory fuse is pulled up, the battery can still be dis-
charged by operation of the head-
lights or other electrical devices.
If emergency towing is necessary, we
recommend having it done by an author-
ized Kia dealer or a commercial tow-truck
service. Proper lifting and towing proce-
dures are necessary to prevent damage
to the vehicle. The use of wheel dollies or
flatbed equipment is recommended.
For trailer towing guidelines information,
refer to section 5 “Driving Tips”.
1JBA6010
TOWING
1JBA6501