Page 14 of 522

NOTE:
•For vehicles not equipped with the Electronic Vehicle
Information Center (EVIC), features such as the power
window switches, radio, power sunroof or Sky Slider�
(if equipped), and power outlets will remain active for
45 seconds after the ignition switch is turned to the
LOCK position. Opening either front door will cancel
this feature.
•For vehicles equipped with the EVIC, features such as
the power window switches, radio, power sunroof or
Sky Slider� (if equipped), and power outlets will
remain active for up to 10 minutes after the ignition
switch is turned to the LOCK position. Opening either
front door will cancel this feature. The time for this
feature is programmable. For details, refer to “Delay
Power Off to Accessories Until Exit,” under “Personal
Settings (Customer-Programmable Features)” under
“Electronic Vehicle Information Center (EVIC)” in
Section 4 of this manual.
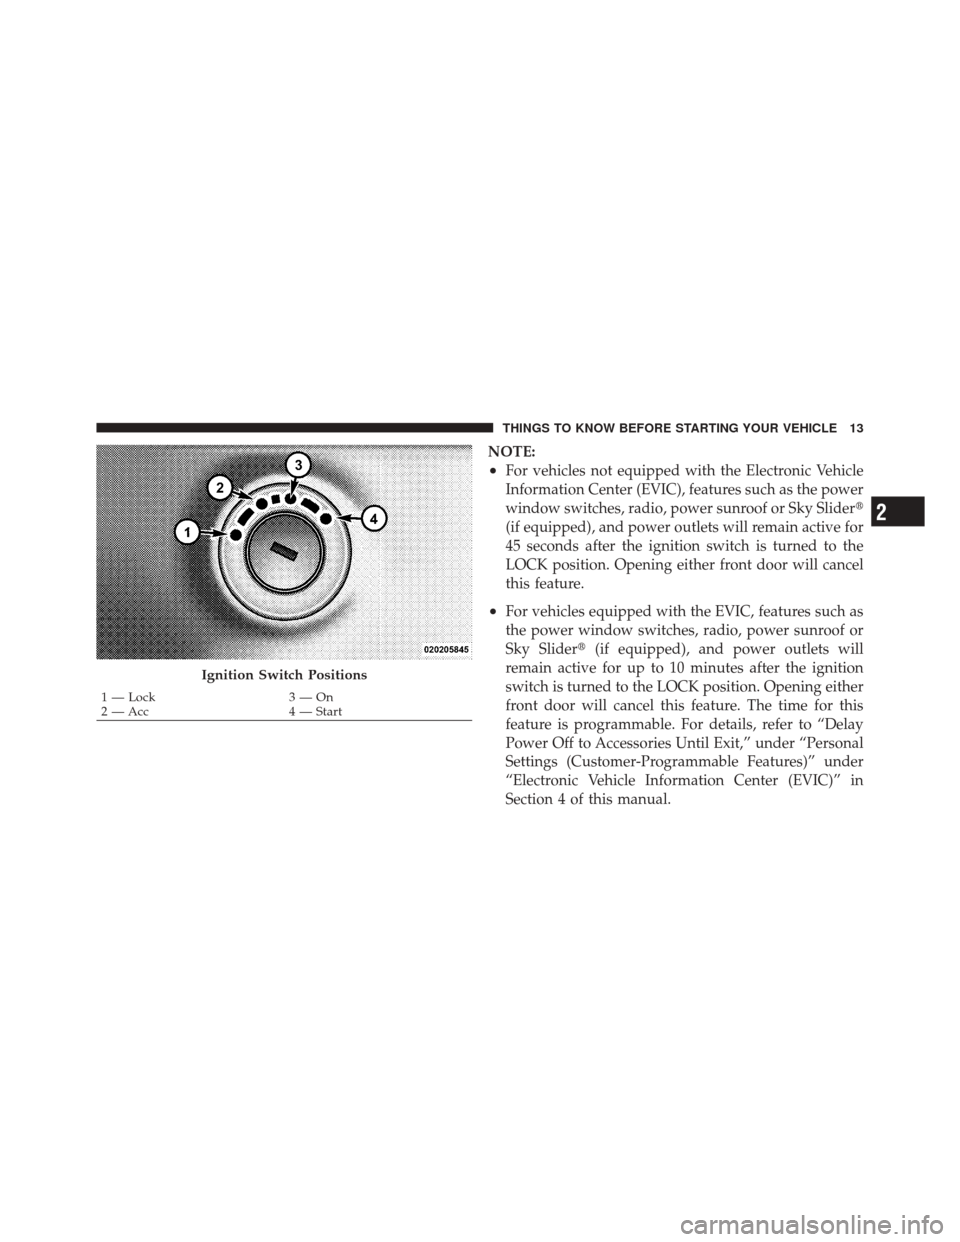
Ignition Switch Positions
1 — Lock 3 — On
2 — Acc 4 — Start
2
THINGS TO KNOW BEFORE STARTING YOUR VEHICLE 13
Page 94 of 522

▫Pinch Protect Override ................ 182
▫ Venting Sunroof — Express ............. 182
▫ Sunshade Operation .................. 182
▫ Wind Buffeting ...................... 182
▫ Sunroof Maintenance ................. 182
▫ Ignition Off Operation ................. 183
� Sky Slider™ Full Length Open Roof —
If Equipped .......................... 183
▫ Sky Slider™ Usage Precautions .......... 183
▫ Sky Slider™ Control .................. 186
▫ Opening The Sky Slider™ .............. 186
▫ Closing The Sky Slider™ ............... 187
▫ Anti-Pinch Protect Feature .............. 188 ▫
Wind Buffeting ...................... 188
▫ Sky Slider™ Maintenance .............. 188
� Electrical Power Outlet ................. 189
� Cupholders .......................... 191
� Storage ............................. 192
▫ Front Storage Compartment ............. 192
▫ Console Storage Compartment ........... 192
� Cargo Area Features ................... 193
▫ Cargo Load Floor .................... 193
� Rear Window Features .................. 199
▫ Rear Window Wiper/Washer ............ 199
▫ Rear Window Defroster ................ 200
� Roof Luggage Rack — If Equipped ......... 201
3
UNDERSTANDING THE FEATURES OF YOUR VEHICLE 93
Page 190 of 522
ELECTRICAL POWER OUTLET
Your vehicle is equipped with a fused 12 Volt (DC) power
outlet. This power outlet is located on the instrument
panel, below the climate controls. It has power available
when the ignition switch is in the ON or ACC position.Insert the cigar lighter or accessory plug into the outlet
for use to ensure proper operation.
NOTE:
•To ensure proper operation a MOPAR�
knob and
element must be used.
•Do not exceed the maximum power of 160 Watts (13
Amps) at 12 Volts.
WARNING!
To avoid serious injury or death:
•Only devices designed for use in this type of
outlet should be inserted into any 12 Volt outlet.
•Do not touch with wet hands.
•Close the lid when not in use and while driving
the vehicle.
•If this outlet is mishandled, it may cause an
electric shock and failure.Front Power Outlet
3
UNDERSTANDING THE FEATURES OF YOUR VEHICLE 189
Page 191 of 522
CAUTION!
•Many accessories that can be plugged in draw
power from the vehicle’s battery, even when not in
use (i.e., cellular phones, etc.). Eventually, if
plugged in long enough, the vehicle’s battery will
discharge sufficiently to degrade battery life
and/or prevent the engine from starting.
•Accessories that draw higher power (i.e., coolers,
vacuum cleaners, lights, etc.) will degrade the
battery even more quickly. Only use these inter-
mittently and with greater caution.
•After the use of high power draw accessories, or
long periods of the vehicle not being started (with
accessories still plugged in), the vehicle must be
driven a sufficient length of time to allow the
alternator to recharge the vehicle’s battery.(Continued)
CAUTION! (Continued)
•Power outlets are designed for accessory plugs
only. Do not hang any type of accessory or acces-
sory bracket from the plug.
190 UNDERSTANDING THE FEATURES OF YOUR VEHICLE
Page 207 of 522
INSTRUMENT PANEL FEATURES
1 — Air Outlet4 — Radio7 — Power Outlet
2 — Instrument Cluster 5 — Glove Compartment8 — Lower Switch Bank
3 — Storage Tray 6 — Climate Control9 — Storage Bin (if equipped)
206 UNDERSTANDING YOUR INSTRUMENT PANEL
Page 235 of 522

Delay Turning Headlights Off
When this feature is selected, the driver can choose to
have the headlights remain on for 0, 30, 60, or 90 seconds
when exiting the vehicle. To make your selection, press
and release the FUNCTION SELECT button until “0,”
“30,” “60,” or “90” appears.
Turn Headlights On with Remote Key Unlock
When this feature is selected, the headlights will activate
and remain on for up to 90 seconds when the doors are
unlocked with the RKE transmitter. To make your selec-
tion, press and release the FUNCTION SELECT button
until “Off,” “30 sec.,” “60 sec.,” or “90 sec.” appears.
Delay Power Off to Accessories Until Exit
When this feature is selected, the power window
switches, radio, hands–free system (if equipped), DVD
video system (if equipped), power sunroof (if equipped),
and power outlets will remain active for up to 10 minutes
after the ignition switch is turned to the LOCK position.Opening a vehicle door will cancel this feature. To make
your selection, press and release the FUNCTION SE-
LECT button until “Off,” “45 sec.,” “5 min.,” or “10 min.”
appears.
Illumination Approach
When this feature is selected, the headlights will activate
and remain on for up to 90 seconds when the doors are
unlocked with the RKE transmitter. To make your selec-
tion, press and hold the RESET button until “Off,”
“30 sec,” “60 sec,” or “90 sec” appears.
Enable/Disable the Rear Park Assist System
The Rear Park Assist system will scan for objects behind
the vehicle when the transmission is in the REVERSE and
the vehicle speed is less than 11 mph (18 km/h). The
system can be enabled with Sound Only, Sound and
Display, or turned OFF through the EVIC, to make your
selection, press and release the FUNCTION SELECT
234 UNDERSTANDING YOUR INSTRUMENT PANEL
Page 457 of 522
Cavity CartridgeFuseMini-
Fuse Description
J17 40 Amp Green — Starter Solenoid
J18 20 Amp Blue — Powertrain Control
Module (PCM) Trans-
mission Relay
J19 60 Amp Yellow — Radiator Fan
J20 30 Amp Pink — Front Wiper
J21 20 Amp Blue — Front Washer/Rear
Washer - if equipped
J22 25 Amp White — Sunroof Module - if
equipped
M1 — 15 Amp BlueStop Light Switch
Feed — Center High
Mounted Stop Light
(CHMSL)Cavity Cartridge
FuseMini-
Fuse Description
M2 — 20 Amp YellowTrailer Lighting - if
equipped
M3 — 20 Amp YellowFrt/Rr Axle Lockers -
if equipped
M4 — 10 Amp RedTrailer Tow - if
equipped
M5 — 25 Amp NaturalPower Inverter – if
equipped
M6 — 20 Amp YellowPower Outlet #1 (ci-
gar lighter)/Rain Sen-
sor - if equipped/
Trailer Tow - if
equipped
M7 — 20 Amp YellowPower Outlet #2
(BATT/ACC SELECT)
M8 — 20 Amp YellowFront Heated Seats -
if equipped
456 MAINTAINING YOUR VEHICLE
Page 461 of 522
Cavity CartridgeFuseMini-
Fuse Description
M31 — 20 Amp YellowBack-Up Lights
M32 — 10 Amp RedOccupant Restraint
Controller (ORC)
M33 — 10 Amp RedPowertrain Control
Module (PCM)
M34 — 10 Amp RedPark Assist Module -
if equipped/Heating,
Ventilation, and Air
Conditioning (HVAC)
Module - if
equipped/Compass
Module - if equipped
M35 — 10 Amp RedHeated Mirrors - if
equipped
M36 — 20 Amp YellowPower Outlet #3
(BATT)Cavity Cartridge
FuseMini-
Fuse Description
M37 — 10 Amp RedAnti-Lock Brake Sys-
tem (ABS)/Electronic
Stability Program
(ESP) Module/Stop
Light Switch
M38 — 25 Amp NaturalDoor and Liftgate
Lock/Unlock Motors
CAUTION!
•When installing the Integrated Power Module
cover, it is important to ensure the cover is prop-
erly positioned and fully latched. Failure to do so
may allow water to get into the Integrated Power
Module, and possibly result in an electrical system
failure.
(Continued)
460 MAINTAINING YOUR VEHICLE