Page 41 of 84
 transfer case, which
provides convenient full-time
four–wheel dr")
FOUR-WHEEL DRIVE
OPERATION
Quadra-Trac I®Operating
Instructions/Precautions
• The Quadra-Trac I®is a single-speed
(HI range only) transfer case, which
provides convenient full-time
four–wheel drive. No driver interaction
is required. The Brake Traction Control
(BTC) System, which combines
standard ABS and Traction Control,
provides resistance to any wheel that is
slipping to allow additional torque
transfer to wheels with traction.
Quadra-Trac II®/Quadra-Drive
II®Operating Instructions/
Precautions
• The Quadra-Trac II®/Quadra-Drive II®
transfer case is fully automatic in the
normal driving 4WD HI mode. The
Quadra-Trac II
®/Quadra-Drive II®
transfer case provides three mode
positions:
• 4WD HI
• NEUTRAL
• 4WD LOW
• This transfer case is fully automatic in the 4WD HI mode. • When additional traction is required,
the 4WD LOW position can be used to
lock the front and rear driveshafts
together and force the front and rear
wheels to rotate at the same speed.
The 4WD LOW position is intended for
loose, slippery road surfaces only.
Driving in the 4WD LOW position on dry,
hard-surfaced roads may cause
increased tire wear and damage to
driveline components.
• When operating your vehicle in 4WD LOW, the engine speed is
approximately three times that of the
4WD HI position at a given road speed.
Take care not to overspeed the engine
and do not exceed 25 mph (40 km/h).
NOTE:
• If shift conditions/interlocks are not met, or a transfer case motor
temperature protection condition
exists, a “CHECK SHIFT PROCEDURES”
message will flash from the Electronic
Vehicle Information Center (EVIC).
WARNING!
You or others could be injured if you
leave the vehicle unattended with the
transfer case in the N (Neutral)
position without first fully engaging
the parking brake. The transfer case
N (Neutral) position disengages both
the front and rear driveshafts from
the powertrain and will allow the
vehicle to move regardless of the
transmission position. The parking
brake should always be applied when
the driver is not in the vehicle.
39
OFF-ROAD CAPABILITIES
Page 42 of 84
, key ON or engine
running, shift the transmission into
NEUTRAL, and raise the transfer case
T-handle. Th")
Shifting Procedures
4WD HI To 4WD LOW
• With the vehicle at speeds of 0 to 3 mph(0 to 5 km/h), key ON or engine
running, shift the transmission into
NEUTRAL, and raise the transfer case
T-handle. The “4WD LOW” indicator
light in the instrument cluster will
begin to flash and remain on solid
when the shift is complete. Release the
T-handle.
• Shifting into or out of 4WD LOW is possible with the vehicle completely
stopped; however, difficulty may occur
due to the mating clutch teeth not being
properly aligned. Several attempts may
be required for clutch teeth alignment
and shift completion to occur. The
preferred method is with the vehicle
rolling 0 to 3 mph (0 to 5 km/h). If the
vehicle is moving faster than 3 mph
(5 km/h), the transfer case will not
allow the shift.
4WD LOW To 4WD HI
• With the vehicle at speeds of 0 to 3 mph(0 to 5 km/h), key ON or engine
running, shift the transmission into
NEUTRAL, and raise the transfer case
T-handle. The “4WD LOW” indicator
light in the instrument cluster will flash
and go out when the shift is complete.
Release the T-handle.
NEUTRAL Shift Procedure
• Key ON, engine off.
• Vehicle stopped, with foot on brake.
• Place the transmission into NEUTRAL.
• Hold down the NEUTRAL “pin” switch
(with a pen, etc.) for four seconds until
the LED light by the switch starts to
blink indicating shift in progress. The
light will stop blinking (stay on solid)
when the NEUTRAL shift is complete. A
“4WD SYSTEM IN NEUTRAL” message
will display on the Electronic Vehicle
Information Center (EVIC).
• Repeat these Steps to shift out of NEUTRAL.
OFF-ROAD CAPABILITIES
40
Page 43 of 84
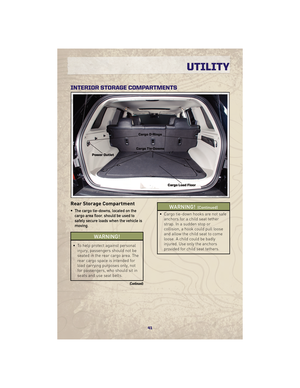
INTERIOR STORAGE COMPARTMENTS
Rear Storage Compartment
• The cargo tie-downs, located on thecargo area floor, should be used to
safely secure loads when the vehicle is
moving.
WARNING!
• To help protect against personal injury, passengers should not be
seated in the rear cargo area. The
rear cargo space is intended for
load carrying purposes only, not
for passengers, who should sit in
seats and use seat belts.
(Continued)
WARNING!(Continued)
• Cargo tie-down hooks are not safeanchors for a child seat tether
strap. In a sudden stop or
collision, a hook could pull loose
and allow the child seat to come
loose. A child could be badly
injured. Use only the anchors
provided for child seat tethers.
41
UTILITY
Page 44 of 84
TRAILER TOWING WEIGHTS (MAXIMUM TRAILER WEIGHT RATINGS)Engine/Model ModelGCWR
(Gross Combined Wt.
Rating) Frontal Area
Max. GTW
(Gross Trailer Wt.) Max. Trailer Tongue
Wt. (See Note)
3.7L 4x2 8,400 lbs (3 810 kg) 40 sq ft (3.72 sq m) 3,500 lbs (1 587 kg) 350 lbs (159 kg)
3.7L 4x4 8,500 lbs (3 855 kg) 40 sq ft (3.72 sq m) 3,500 lbs (1 587 kg) 350 lbs (159 kg)
5.7L 4x2 12,300 lbs (5 578 kg) 60 sq ft (5.57 sq m) 7,400 lbs (3 357 kg) 740 lbs (336 kg)
5.7L 4x4 12,300 lbs (5 578 kg) 60 sq ft (5.57 sq m) 7,200 lbs (3 266 kg) 720 lbs (327 kg)
Refer to local laws for maximum trailer towing speeds.
NOTE: The trailer tongue weight must be considered as part of the combined weight of occupants and cargo, and should
never exceed the weight referenced on the Tire and Loading Information placard.
42
UTILITY
Page 45 of 84

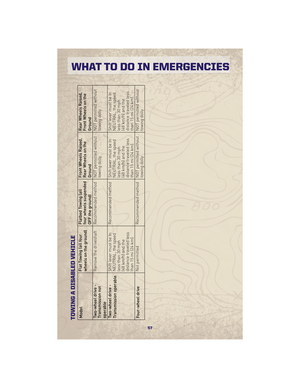
Towing - Two-Wheel Drive
Models
• Recreational towing is allowed ONLY ifthe driveshaft is removed. Towing with
the rear wheels on the ground while
the dr")
RECREATIONAL TOWING
(BEHIND MOTORHOME,
ETC.)
Towing - Two-Wheel Drive
Models
• Recreational towing is allowed ONLY ifthe driveshaft is removed. Towing with
the rear wheels on the ground while
the driveshaft is connected can result
in severe transmission damage.
WARNING!
If the driveshaft is removed, the
vehicle can roll even if the
transmission is in PARK, which could
cause serious injury or death.
• The parking brake must be firmly engaged and the wheels chocked
during driveshaft removal and
installation. The parking brake must
remain engaged unless the vehicle is
securely and properly connected to the
tow vehicle, or the driveshaft is
completely reinstalled. See your
authorized dealer for proper driveshaft
removal and reinstallation procedures,
including flange orientation/alignment,
use of thread-locking compound,
proper bolt torque specifications, etc.
Towing - Quadra-Trac I®
(Single-Speed Transfer Case)
Four-Wheel Drive Models
• Recreational towing is not allowed. Thismodel does not have a NEUTRAL
position in the transfer case.
Towing - Quadra-Trac II®
/Quadra-Drive II®Four-Wheel
Drive Models
• Depress the brake pedal and turn the
ignition switch ON with the engine shut
off.
• Shift the transmission into NEUTRAL.
• Shift the transfer case into NEUTRAL by holding down the NEUTRAL Pin
switch for four seconds until the LED
starts to blink. The LED will stop
blinking and remain on when the shift
is complete.
• Start the engine and shift into DRIVE to ensure there is no vehicle movement.
• Shut the engine off and shift the transmission into PARK.
• Place the ignition switch in the OFF position and remove the key.
• Apply the parking brake, attach the vehicle to the tow vehicle with a tow
bar and release the parking brake.
• Refer to your Owner's Manual on the DVD for further details.
43
UTILITY
Page 46 of 84
BRAKE/TRANSMISSION
INTERLOCK MANUAL
OVERRIDE
• The manual override may be used inthe event that the shift lever should fail
to move from PARK with the Key Fob in
the ON position and the brake pedal
pressed.
• To operate the shift lock manual override, perform the following steps:
• Turn the Key Fob to the ON position but do not start the engine.
• Firmly set the parking brake.
• Using a flat-bladed screwdriver, carefully remove the shift lock
manual override cover which is
located on the PRNDL bezel. • Press and maintain firm pressure
on the brake pedal.
• Using the screwdriver, reach into the manual override opening. Press and
hold the shift lock lever down.
• Move the shift lever into the NEUTRAL position and start the
vehicle.
• Have your vehicle inspected by your local authorized dealer if the shift lock
manual override has been used.
UTILITY
44
Page 47 of 84

24 HOUR TOWING ASSISTANCE - U.S. ONLY
• Dial toll-free 1-800-521-2779.
• Provide your name, vehicle identification number and license plate number.
• Provide your location, including telephone number, from which you are calling.
• Briefly describe the nature of the problem and answer a few simple questions.
• You will be given the name of the service provider and an estimated time of arrival. If youfeel you are in an “unsafe situation”, please let us know. With your consent, we will
contact local police or safety authorities.
INSTRUMENT CLUSTER WARNING LIGHTS
- Electronic Stability Program (ESP) Indicator Light
• If this indicator light flashes during acceleration, apply as little throttle as possible. Whiledriving, ease up on the accelerator. Adapt your speed and driving to the prevailing road
conditions. To improve the vehicle's traction when starting off in deep snow, sand or
gravel, it may be desirable to switch the ESP system off.
- Tire Pressure Monitoring System (TPMS) Light
• A Tire Pressure Monitoring Light and a “low tire” message will display in your instrumentcluster along with an audible chime if one or more of your vehicle’s four road tires are
significantly under-inflated.
• Check the inflation pressure of each tire and inflate to the recommended pressure for your vehicle. The tire pressures recommended for your vehicle are found on the “Tire and
Loading Information” label located on the driver’s side door opening. The TPMS light
should not be used as a tire pressure gauge when adjusting your tire pressure.
• It is recommended that you check the tire pressure in the morning when tires are cool; inflate each tire to the recommended pressure for your vehicle. The light will turn off
after your vehicle’s tire pressures are properly inflated and the pressure has been
recognized. The vehicle may need to be driven for up to 20 minutes above 15 mph
(25 km/h) before the light will turn off.
• Temperature changes can affect tire pressure, causing the TPMS light to turn on. Tire pressures will also increase as the vehicle is driven – this is normal and you should not
adjust for this increased pressure.
• Driving on under-inflated tires reduces your vehicle’s fuel efficiency and tire tread life. If a spare tire is in use on the vehicle, the TPMS light may turn on.
- Brake Warning Light
• The Brake Warning light illuminates when there is either a system malfunction or theparking brake is applied. If the light is on and the parking brake is not applied, it
indicates a possible brake hydraulic malfunction, brake booster problem or an Anti-Lock
Brake System problem.
• We recommend you drive to the nearest Service Center and have the vehicle serviced immediately.
45
WHAT TO DO IN EMERGENCIES
Page 48 of 84

WARNING!
Driving a vehicle with the red brake light on is dangerous. Part of the brake system
may have failed. It will take longer to stop the vehicle. You could have an accident.
Have the vehicle checked immediately.
- Malfunction Indicator Light (MIL)
• Certain conditions, such as a loose or missing gas cap, poor fuel quality, etc., mayilluminate the MIL after engine start. The vehicle should be serviced if the light stays on
through several typical driving cycles. In most situations, the vehicle will drive normally
and not require towing.
• If the MIL flashes when the engine is running, serious conditions may exist that could lead to immediate loss of power or severe catalytic converter damage. We recommend
you do not operate the vehicle. Have the vehicle serviced as soon as possible if this
occurs.
- Electronic Stability Program (ESP) Indicator Light/Brake Assist
System (BAS) Warning Light
• If the ESP/BAS warning light comes on continuously with the engine running, a malfunction has been detected.
• If this light remains on after several ignition cycles, and the vehicle has been driven several miles (kilometers) at speeds greater than 30 mph (48 km/h), we recommend you
drive to the nearest Service Center as soon as possible to have the problem diagnosed
and corrected.
- Charging System Light
• This light shows the status of the electrical charging system. If the charging system lightremains on, it means that the vehicle is experiencing a problem with the charging
system.
• We recommend you do not continue driving if the charging system light is on. Have the vehicle serviced immediately.
- Oil Pressure Warning Light
• This light indicates low engine oil pressure. If the light turns on while driving, stop thevehicle and shut off the engine as soon as possible. A chime will sound for four minutes
when this light turns on.
• We recommend you do not operate the vehicle or engine damage will occur. Have the vehicle serviced immediately.
- Anti-Lock Brake (ABS) Light
• This light monitors the Anti-Lock Brake System (ABS).
• If the light is not on during starting, stays on, or turns on while driving, we recommendyou drive to the nearest Service Center and have the system serviced as soon as
possible.
WHAT TO DO IN EMERGENCIES
46


Engine/Model ModelGCWR
(Gross Combined Wt.
Rating) Frontal Area
Max. GTW
(Gross Trailer Wt.) Max. Trailer Tongue
Wt. (See Note)
3.7L 4x2 8,400 lb")
