Page 107 of 407

Turn Signals
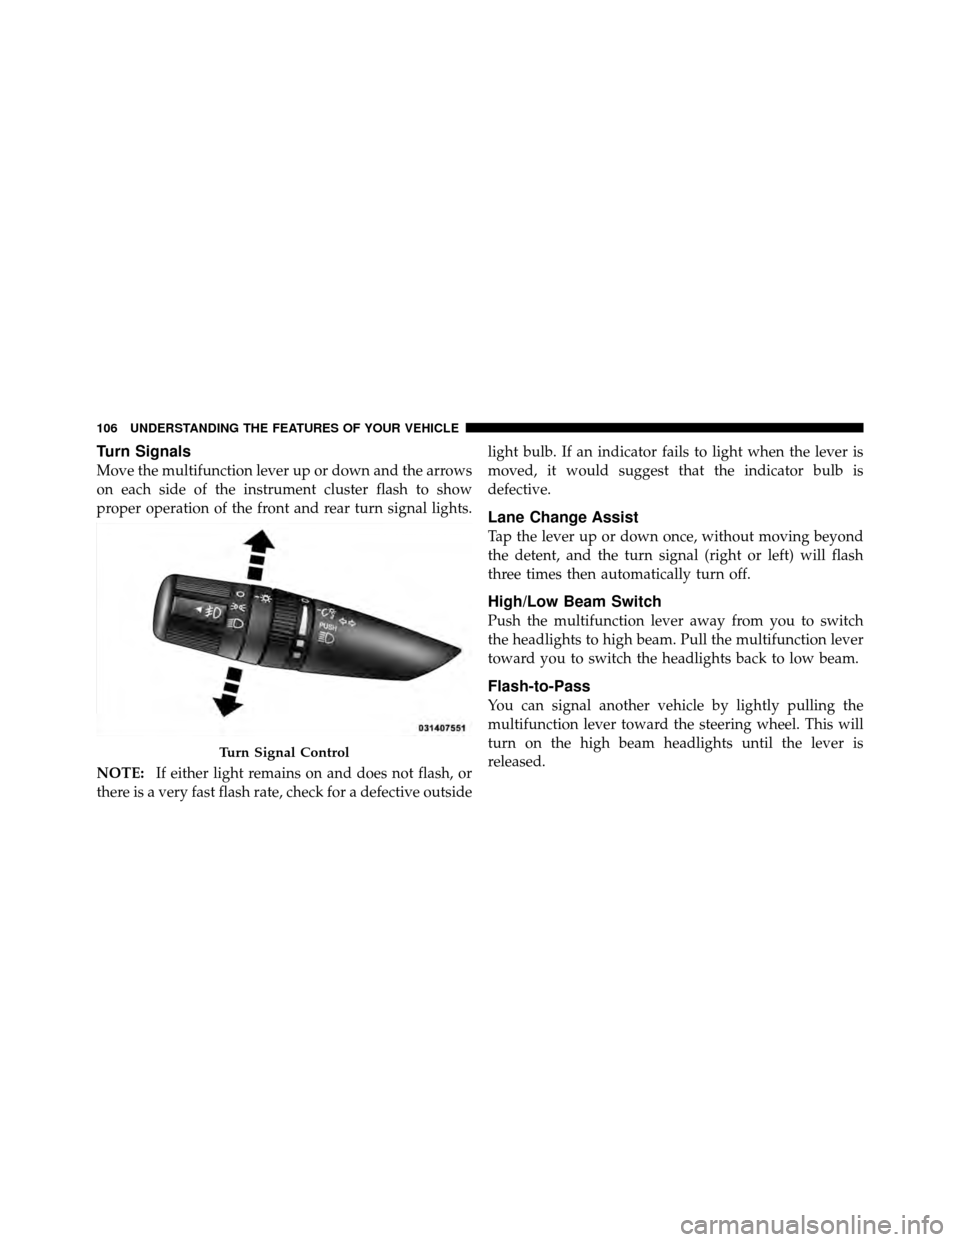
Move the multifunction lever up or down and the arrows
on each side of the instrument cluster flash to show
proper operation of the front and rear turn signal lights.
NOTE:If either light remains on and does not flash, or
there is a very fast flash rate, check for a defective outside light bulb. If an indicator fails to light when the lever is
moved, it would suggest that the indicator bulb is
defective.
Lane Change Assist
Tap the lever up or down once, without moving beyond
the detent, and the turn signal (right or left) will flash
three times then automatically turn off.
High/Low Beam Switch
Push the multifunction lever away from you to switch
the headlights to high beam. Pull the multifunction lever
toward you to switch the headlights back to low beam.
Flash-to-Pass
You can signal another vehicle by lightly pulling the
multifunction lever toward the steering wheel. This will
turn on the high beam headlights until the lever is
released.
Turn Signal Control
106 UNDERSTANDING THE FEATURES OF YOUR VEHICLE
Page 114 of 407

•Transmission in NEUTRAL Position— When the
ignition is ON, and the transmission is in the NEU-
TRAL position, the Rain Sensing system will not
operate until the wiper switch is moved, vehicle speed
is greater than 5 mph (8 km/h), or the shift lever is
moved out of the NEUTRAL position.
TILT/TELESCOPING STEERING COLUMN
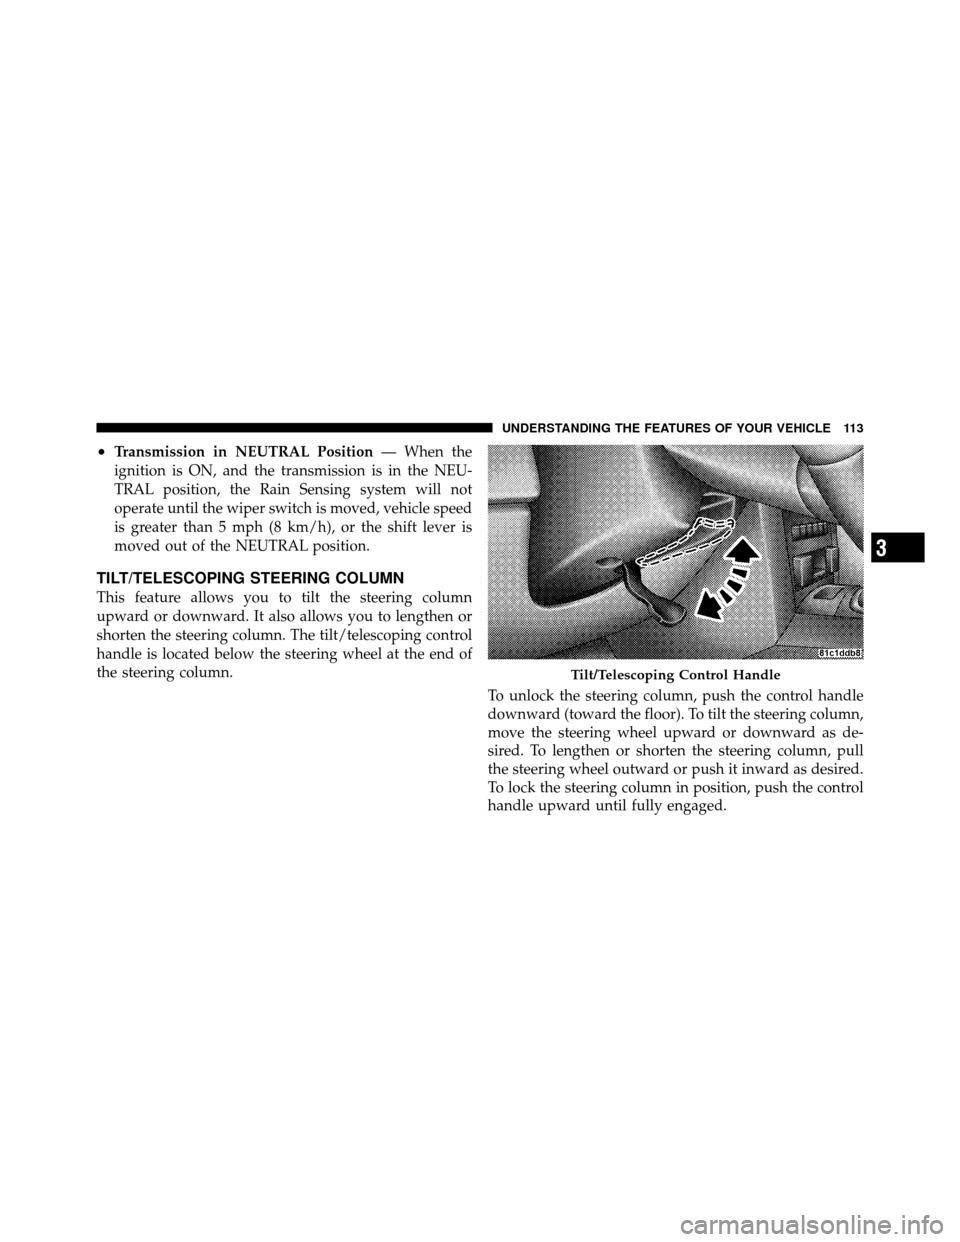
This feature allows you to tilt the steering column
upward or downward. It also allows you to lengthen or
shorten the steering column. The tilt/telescoping control
handle is located below the steering wheel at the end of
the steering column.
To unlock the steering column, push the control handle
downward (toward the floor). To tilt the steering column,
move the steering wheel upward or downward as de-
sired. To lengthen or shorten the steering column, pull
the steering wheel outward or push it inward as desired.
To lock the steering column in position, push the control
handle upward until fully engaged.
Tilt/Telescoping Control Handle
3
UNDERSTANDING THE FEATURES OF YOUR VEHICLE 113
Page 115 of 407

WARNING!
Do not adjust the steering column while driving.
Adjusting the steering column while driving or driv-
ing with the steering column unlocked, could cause
the driver to lose control of the vehicle. Be sure the
steering column is locked before driving your ve-
hicle. Failure to follow this warning may result in
serious injury or death.
ADJUSTABLE PEDALS — IF EQUIPPED
This feature allows both the brake and accelerator pedals
to move toward or away from the driver to provide
improved position with the steering wheel. The adjust-
able pedal system is designed to allow a greater range of
driver comfort for steering wheel tilt and seat position.
The position of the brake and accelerator pedals can be
adjusted without compromising safety or comfort in
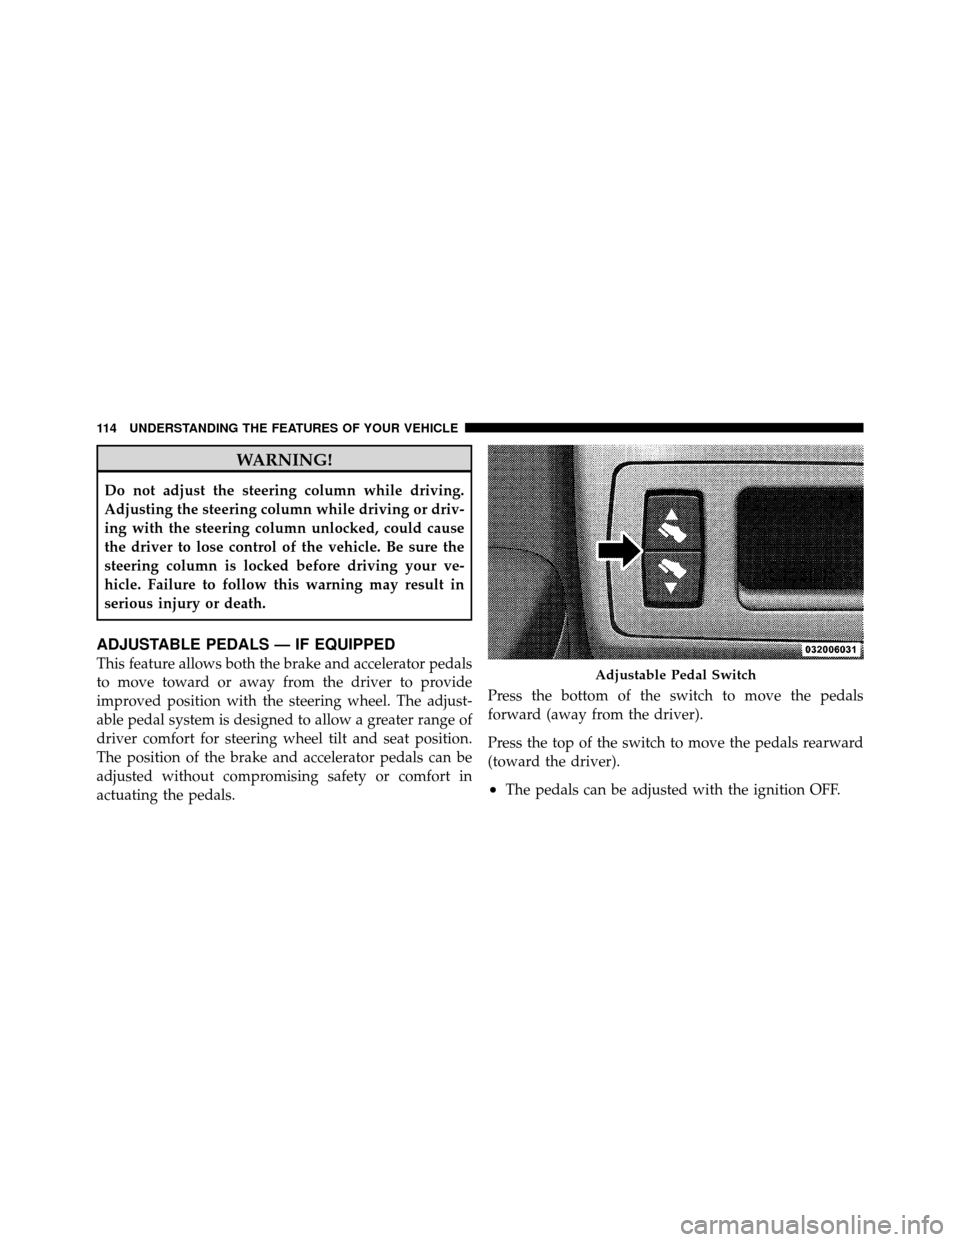
actuating the pedals.Press the bottom of the switch to move the pedals
forward (away from the driver).
Press the top of the switch to move the pedals rearward
(toward the driver).
•The pedals can be adjusted with the ignition OFF.
Adjustable Pedal Switch
114 UNDERSTANDING THE FEATURES OF YOUR VEHICLE
Page 117 of 407
ELECTRONIC SPEED CONTROL — IF EQUIPPED
When engaged, Electronic Speed Control takes over
accelerator operations at speeds greater than 25 mph
(40 km/h).
The Electronic Speed Control lever is located on the right
side of the steering wheel.NOTE:
In order to ensure proper operation, the Elec-
tronic Speed Control System has been designed to shut
down if multiple Speed Control functions are operated
simultaneously. If this occurs, the Electronic Speed Con-
trol System can be reactivated by pushing the Electronic
Speed Control ON/OFF button and resetting the desired
vehicle set speed.
To Activate
Push the ON/OFF button. The Cruise Indicator Light in
the instrument cluster will illuminate. To turn the system
OFF, push the ON/OFF button a second time. The Cruise
Indicator Light will turn off. The system should be
turned OFF when not in use.
Electronic Speed Control Lever
116 UNDERSTANDING THE FEATURES OF YOUR VEHICLE
Page 168 of 407
The EVIC consists of the following:
•System Status
•Vehicle Information Warning Message Displays
•Personal Settings (Customer-Programmable Features)
•Compass Display
•Outside Temperature Display
•Trip Computer Functions
•Surround Sound Modes (If Equipped with Driver-
Selectable Surround [DSS])
•Performance Pages (if equipped)The system allows the driver to select information by
pressing the following buttons mounted on the steering
wheel:
MENU Button
Press and release the MENU button and the
mode displayed will change between Trip
Functions, Personal Settings, and System Sta-
tus.
FUNCTION SELECT Button Press the FUNCTION SELECT button to select
the displayed function (YES (Y) or NO (N).
SCROLL Button Press the SCROLL button to scroll through Trip
Functions, Personal Settings (Customer-
Programmable Features), and System Status
Messages.
4
UNDERSTANDING YOUR INSTRUMENT PANEL 167
Page 224 of 407

REMOTE SOUND SYSTEM CONTROLS — IF
EQUIPPED
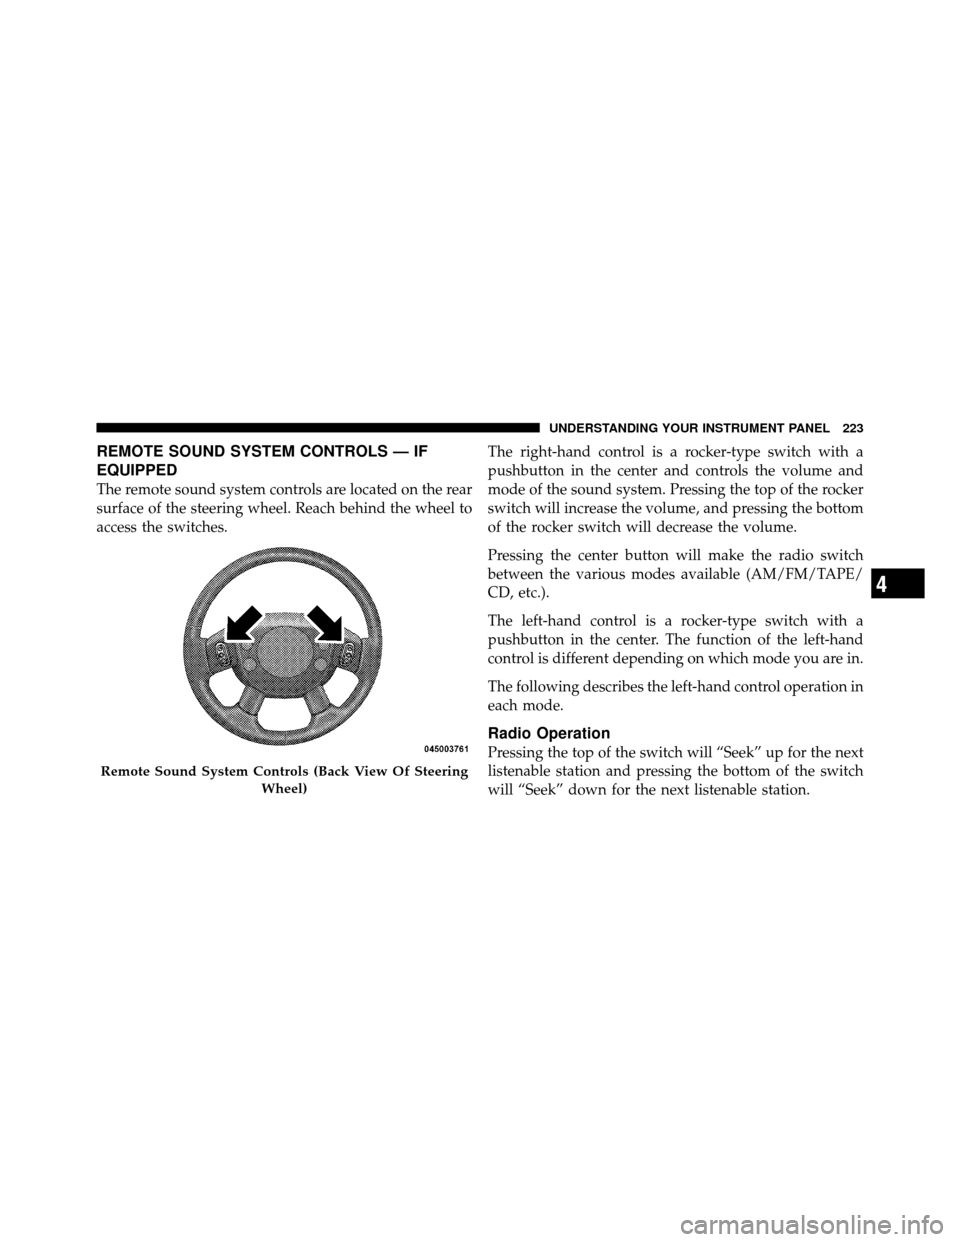
The remote sound system controls are located on the rear
surface of the steering wheel. Reach behind the wheel to
access the switches.The right-hand control is a rocker-type switch with a
pushbutton in the center and controls the volume and
mode of the sound system. Pressing the top of the rocker
switch will increase the volume, and pressing the bottom
of the rocker switch will decrease the volume.
Pressing the center button will make the radio switch
between the various modes available (AM/FM/TAPE/
CD, etc.).
The left-hand control is a rocker-type switch with a
pushbutton in the center. The function of the left-hand
control is different depending on which mode you are in.
The following describes the left-hand control operation in
each mode.
Radio Operation
Pressing the top of the switch will “Seek” up for the next
listenable station and pressing the bottom of the switch
will “Seek” down for the next listenable station.
Remote Sound System Controls (Back View Of Steering
Wheel)
4
UNDERSTANDING YOUR INSTRUMENT PANEL 223
Page 249 of 407

•The transmission will automatically shift up when
maximum engine speed is reached while AutoStick�is
engaged.
•Transmission shifting will be more noticeable when
AutoStick� is engaged.
POWER STEERING
The standard power steering system will give you good
vehicle response and increased ease of maneuverability
in tight spaces. The system will provide mechanical
steering capability if power assist is lost.
If for some reason the power assist is interrupted, it will
still be possible to steer your vehicle. Under these condi-
tions, you will observe a substantial increase in steering
effort, especially at very low vehicle speeds and during
parking maneuvers. NOTE:
•Increased noise levels at the end of the steering wheel
travel are considered normal and do not indicate that
there is a problem with the power steering system.
•Upon initial start-up in cold weather, the power steer-
ing pump may make noise for a short amount of time.
This is due to the cold, thick fluid in the steering
system. This noise should be considered normal, and it
does not in any way damage the steering system.
WARNING!
Continued operation with reduced power steering
assist could pose a safety risk to yourself and others.
Service should be obtained as soon as possible.
248 STARTING AND OPERATING
Page 250 of 407

CAUTION!
Prolonged operation of the steering system at the end
of the steering wheel travel will increase the steering
fluid temperature and it should be avoided when
possible. Damage to the power steering pump may
occur.
Power Steering Fluid Check
The power steering system requires the use of MOPAR�
Hydraulic System Power Steering Fluid or equivalent,
which meets Chrysler Material Standard MS-10838.
CAUTION!
Do not use chemical flushes in your power steering
system as the chemicals can damage your power
steering components. Such damage is not covered by
the New Vehicle Limited Warranty.
WARNING!
Do not use Automatic Transmission Fluid (ATF), or
other types of power steering fluids, when servicing
the power steering system of this vehicle. Damage to
the power steering system can result from the use of
the wrong power steering fluid.
Checking the power steering fluid level at a defined
service interval is not required. The fluid should only be
checked if a leak is suspected, abnormal noises are
apparent, and/or the system is not functioning as antici-
pated. Coordinate inspection efforts through an autho-
rized dealer.
5
STARTING AND OPERATING 249