2010 JAGUAR XFR Actuator
[x] Cancel search: ActuatorPage 1639 of 3039

Published: 11-May-2011
Speed Control - V8 5.0L Petrol/V8 S/C 5.0L Petrol - Speed Control - Overview
Description and Operation
OVERVIEW
Speed Control
The speed control system is integrated with the engine management system and uses fueling intervention to automatically
maintain a set vehicle speed. Once engaged, the system can also be used to accelerate the vehicle without using the
accelerator pedal.
The speed control system comprises the following components:
On/Off/Suspend switch
'+' and '-' (set/accelerate and decelerate) steering wheel switches
Resume switch
Clock spring
Speed control warning indicator.
Adaptive Speed Control
The adaptive speed control system uses a forward looking radar sensor to scan the road ahead, looking for objects that are
moving at a different rate to itself. When a target is identified the adaptive speed control system will monitor the time gap
between it and the target vehicle. When that gap falls below a set driver selected level the adaptive speed control system will
intervene slowing the vehicle by backing off the throttle and/ or applying the brakes, until the correct gap is attained.
The adaptive speed control system comprises the following components:
Adaptive speed control sensor
Adaptive speed control module
Steering wheel control switches
ECM (engine control module)
Electric throttle actuator
ABS (anti-lock brake system) module and pump
Adaptive speed control warning indicator (in the instrument cluster).
Page 1641 of 3039

6 Clockspring 7 APP (accelerator pedal position) sensor 8 Electric throttle actuator 9 Brake lamp/brake test switch 10 Adaptive speed control radar sensor 11 Diagnostic socket 12 Instrument cluster 13 TCM (transmission control module) 14 Adaptive speed control module
SPEED CONTROL System Operation
The speed control system uses inputs from the brake lamp/brake test switch, the APP sensor, the ECM and the ABS module.
Speed control is operated by the driver using only the steering wheel switches. When speed control is active, the ECM regulates the PWM (pulse width modulation) signals to the fuel injectors to adjust the fuel supply as required to maintain the
set speed.
During speed control operation, the ECM controls vehicle speed by adjusting fuel injection duration and timing. When the accelerator pedal is pressed with speed control active, the ECM outputs a calculated throttle angle signal in place of the actual throttle angle signals produced by the APP sensor. The calculated throttle angle is derived from fuel demand.
The minimum set speed for speed control is 18 mph (30 (km/h). Speed control is automatically suspended if the following
conditions apply:
Vehicle speed falls below 18 mph (30 km/h)
The brake pedal is pressed
The cancel button is pressed
Neutral, park or reverse gear is selected
The difference between actual speed and the set speed is too great
If the engine speed becomes near to the red line (maximum engine speed)
If the accelerator pedal is used to accelerate beyond the set speed for too long.
ADAPTIVE SPEED CONTROL
The adaptive speed control system comprises the following components:
Adaptive speed control sensor
Adaptive speed control module
Steering wheel control switches
ECM
Electric throttle actuator
ABS module and pump Adaptive speed control warning indicator.
The adaptive speed control system uses a forward looking radar sensor to scan the road ahead, looking for objects that are
moving at a different rate to itself. When a target is identified the adaptive speed control system will monitor the time gap
between it and the target vehicle. When that gap falls below a set driver selected level the adaptive speed control system will
intervene slowing the vehicle by backing off the throttle and/ or applying the brakes, until the correct gap is attained. The
driver can chose between four gap settings, 1, 1.4, 1.8 and 2.2 seconds.
The system will detect but not react to the following:
Vehicles in the oncoming lane
Stationary vehicles
Pedestrians
Vehicles not in the same lane.
Adaptive speed control is active when the vehicle is moving. Adaptive Speed Control only functions when a set speed is
entered in normal speed control mode. The adaptive speed control system only intervenes with the set speed when it detects
a target vehicle, and then only if the minimum time gap is breached.
It is important to note that the system is intended for use in limited driving situations, does not remove control and
responsibility from the driver, and at all times can be quickly overridden. The adaptive speed control system is not a collision
warning system and will not react to stationary objects. The system does not operate below a minimum speed of
approximately 30 km/h (20 mph) since it is unsuitable for use in cities or congested traffic. The system is best suited to main
roads/ highways with gradual bends.
The ECM, throttle body and throttle control are unchanged from those used for non adaptive speed control variants.
The adaptive speed control system is based on the use of a front mounted radar sensor. The sensor transmits a 1.5° wide
beam forward of the vehicle and detects the returning signals reflected off other vehicles and objects ahead.
The 1.5° wide radar beam is mechanically scanned at a rate of 10 sweeps/second across a total arc of 15° centered on the
Page 1682 of 3039

Blower motor control module retaining bolts 1 - 9 Foot duct to cross car beam retaining bolt 5 - 44 Climate control assembly to cross car beam retaining bolts 9 - 80 Climate control module retaining bolts 1 - 9 Defrost vent/register blend door actuator retaining bolts 1 - 9 Evaporator pipe bracket retaining bolts 1 - 9 Evaporator housing retaining bolts 1 - 9 Footwell vent/duct blend door actuator retaining bolt 1 - 9 Heater core housing retaining bolts 2 - 18 Sunload sensor retaining bolt 2 - 18 Evaporator core pipes mounting bracket retaining bolts 1 - 9 Evaporator core pipes to thermostatic expansion valve retaining bolt 5 - 44 Thermostatic expansion valve retaining bolts 3 - 26 www.JagDocs.com
Page 1715 of 3039

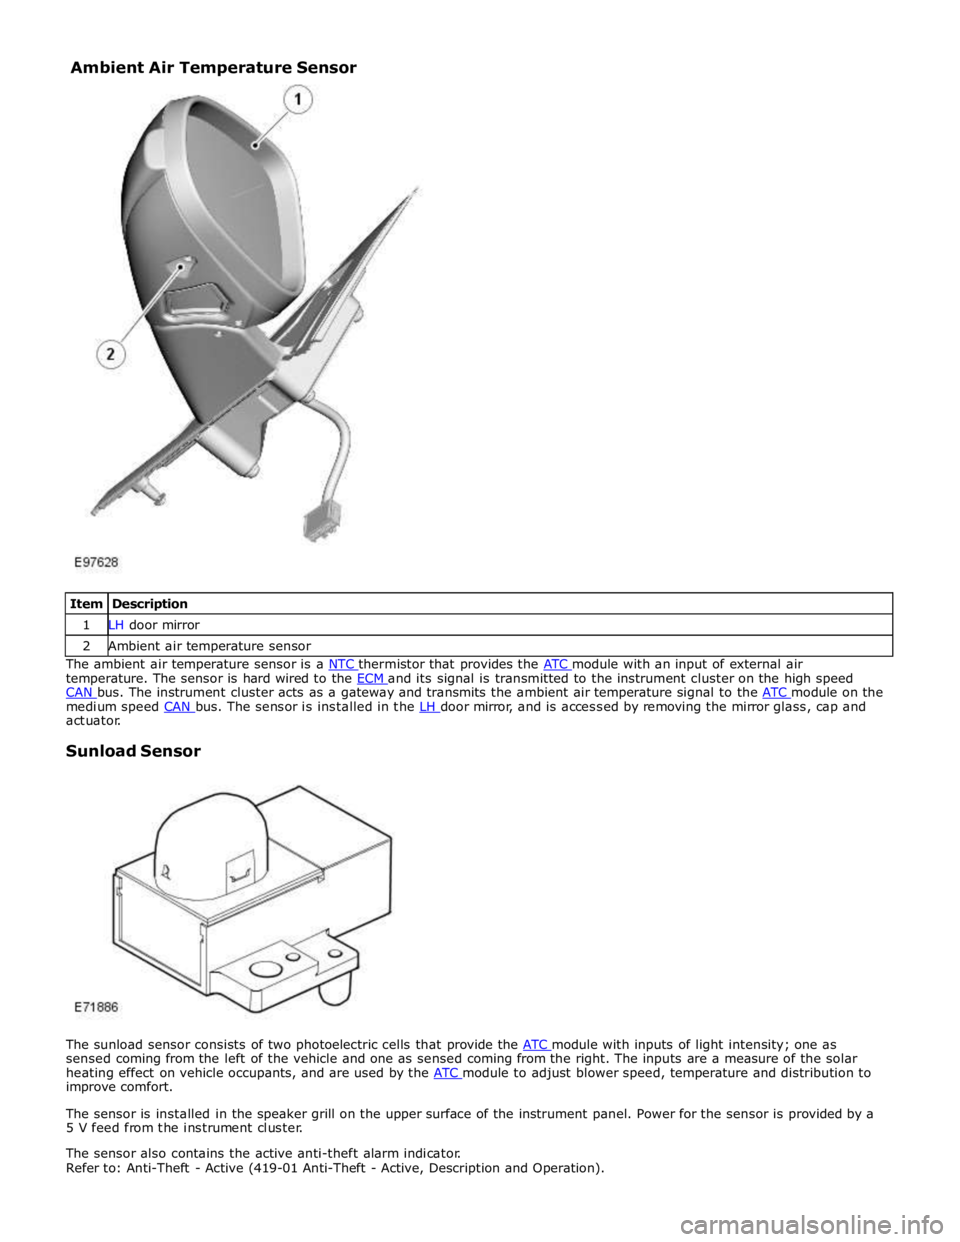
1 LH door mirror 2 Ambient air temperature sensor The ambient air temperature sensor is a NTC thermistor that provides the ATC module with an input of external air temperature. The sensor is hard wired to the ECM and its signal is transmitted to the instrument cluster on the high speed CAN bus. The instrument cluster acts as a gateway and transmits the ambient air temperature signal to the ATC module on the medium speed CAN bus. The sensor is installed in the LH door mirror, and is accessed by removing the mirror glass, cap and actuator.
Sunload Sensor
The sunload sensor consists of two photoelectric cells that provide the ATC module with inputs of light intensity; one as sensed coming from the left of the vehicle and one as sensed coming from the right. The inputs are a measure of the solar
heating effect on vehicle occupants, and are used by the ATC module to adjust blower speed, temperature and distribution to improve comfort.
The sensor is installed in the speaker grill on the upper surface of the instrument panel. Power for the sensor is provided by a
5 V feed from the instrument cluster.
The sensor also contains the active anti-theft alarm indicator.
Refer to: Anti-Theft - Active (419-01 Anti-Theft - Active, Description and Operation). Ambient Air Temperature Sensor
Page 1728 of 3039

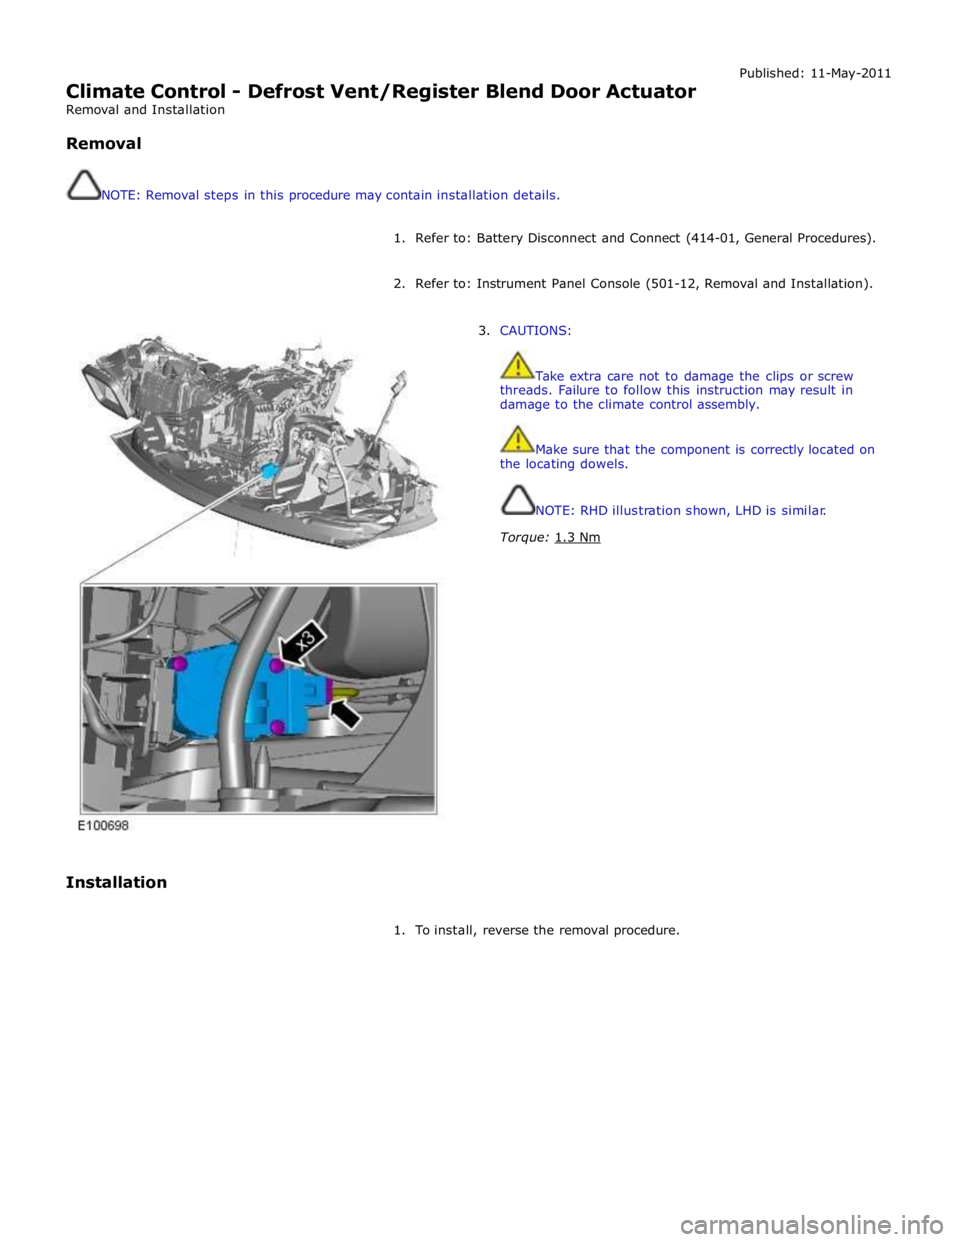
Climate Control - Defrost Vent/Register Blend Door Actuator
Removal and Installation
Removal
NOTE: Removal steps in this procedure may contain installation details. Published: 11-May-2011
1. Refer to: Battery Disconnect and Connect (414-01, General Procedures).
2. Refer to: Instrument Panel Console (501-12, Removal and Installation).
Installation
3. CAUTIONS:
Take extra care not to damage the clips or screw
threads. Failure to follow this instruction may result in
damage to the climate control assembly.
Make sure that the component is correctly located on
the locating dowels.
NOTE: RHD illustration shown, LHD is similar.
Torque: 1.3 Nm
1. To install, reverse the removal procedure.
Page 1739 of 3039

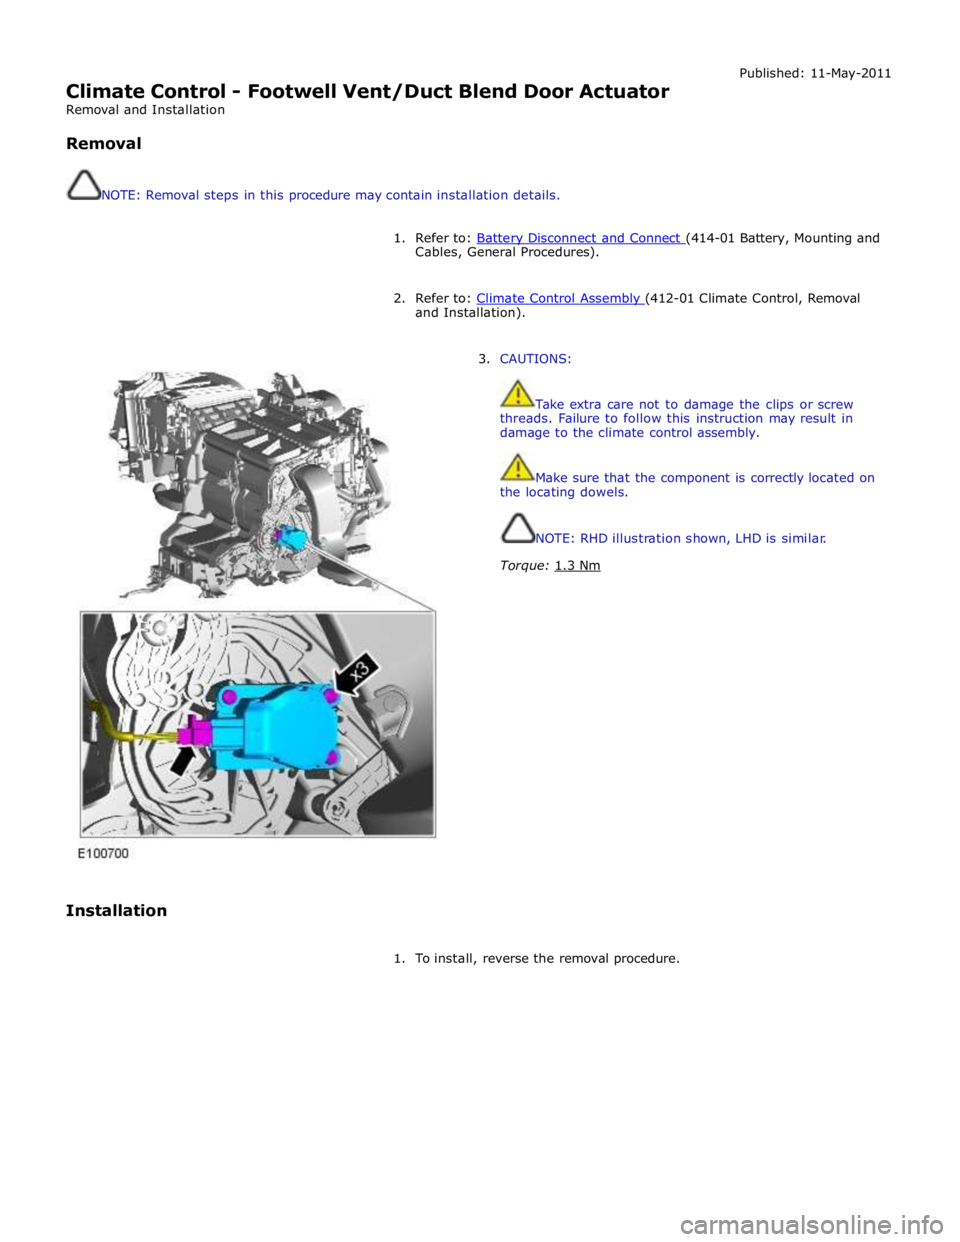
Climate Control - Footwell Vent/Duct Blend Door Actuator
Removal and Installation
Removal
NOTE: Removal steps in this procedure may contain installation details. Published: 11-May-2011
1. Refer to: Battery Disconnect and Connect (414-01 Battery, Mounting and Cables, General Procedures).
2. Refer to: Climate Control Assembly (412-01 Climate Control, Removal and Installation).
Installation
3. CAUTIONS:
Take extra care not to damage the clips or screw
threads. Failure to follow this instruction may result in
damage to the climate control assembly.
Make sure that the component is correctly located on
the locating dowels.
NOTE: RHD illustration shown, LHD is similar.
Torque: 1.3 Nm
1. To install, reverse the removal procedure.
Page 1757 of 3039

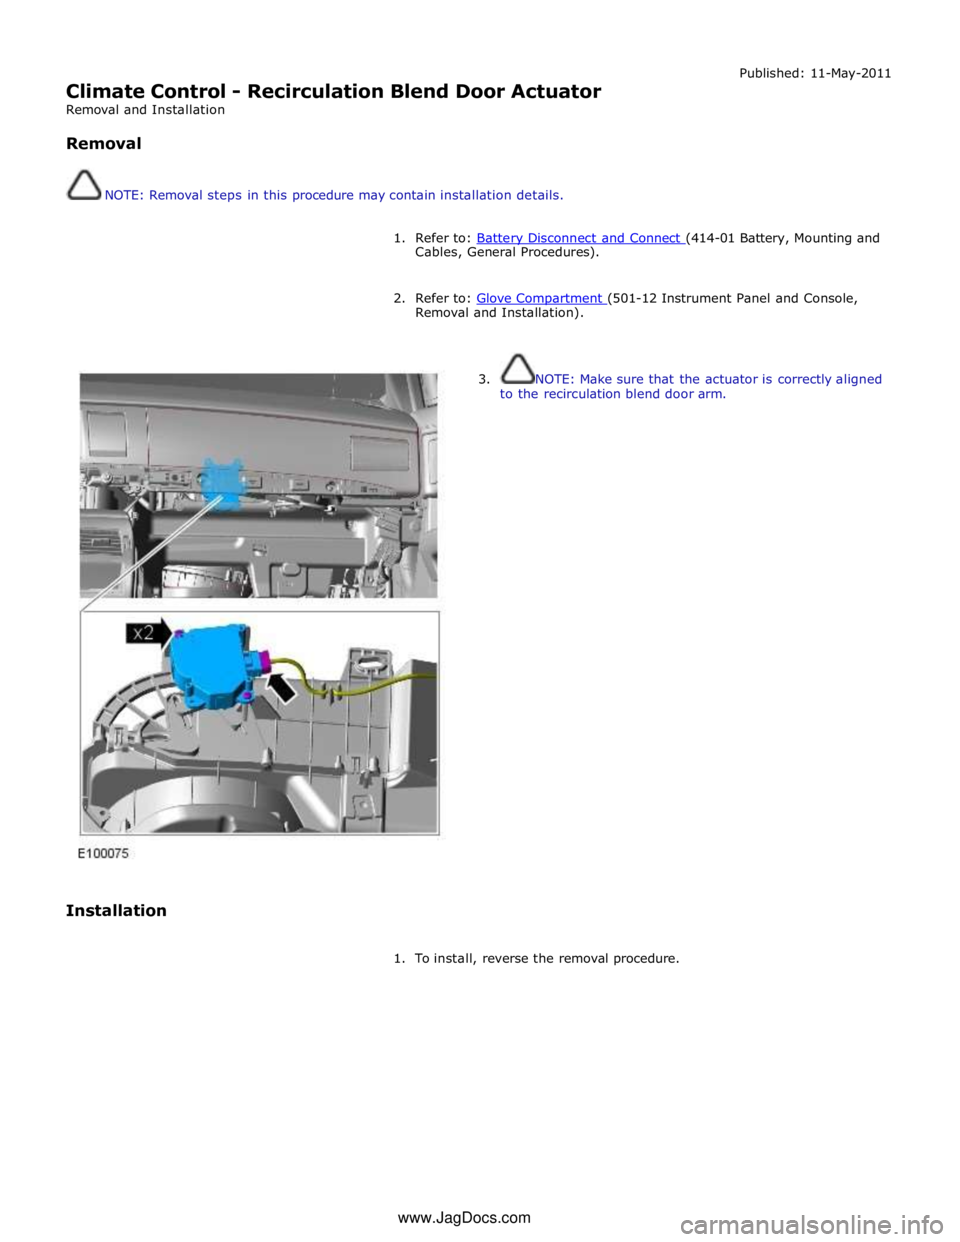
Climate Control - Recirculation Blend Door Actuator
Removal and Installation
Removal
NOTE: Removal steps in this procedure may contain installation details. Published: 11-May-2011
1. Refer to: Battery Disconnect and Connect (414-01 Battery, Mounting and Cables, General Procedures).
2. Refer to: Glove Compartment (501-12 Instrument Panel and Console, Removal and Installation).
Installation
3. NOTE: Make sure that the actuator is correctly aligned
to the recirculation blend door arm.
1. To install, reverse the removal procedure. www.JagDocs.com
Page 2096 of 3039

DTC Description Possible Causes Action B10DE15
Low Fuel Warning
Switch
Diesel run-dry switch
analogue input circuit -
short to power, open
circuit Carry out any pinpoint test associated with this DTC using the
manufacturer approved diagnostic system. Refer to the electrical
circuit diagrams and check diesel run-dry switch analogue input
circuit for short to power, open circuit B111211 Park Aid Ignition
Parking aid ignition
supply circuit - short to
ground Carry out any pinpoint test associated with this DTC using the
manufacturer approved diagnostic system. Refer to the electrical
circuit diagrams and check parking aid ignition supply circuit for
short to ground B111212 Park Aid Ignition
Parking aid ignition
supply circuit - short to
power Refer to the electrical circuit diagrams and check parking aid
ignition supply circuit for short to power B111511
High Mounted
Stop Lamp
Control
High mounted stop lamp
control circuit - short to
ground Carry out any pinpoint test associated with this DTC using the
manufacturer approved diagnostic system. Refer to the electrical
circuit diagrams and check high mounted stop lamp control circuit
for short to ground B111611 Left Tail Lamp
Left hand tail lamp
control circuit - short to
ground Carry out any pinpoint test associated with this DTC using the
manufacturer approved diagnostic system. Refer to the electrical
circuit diagrams and check left hand tail lamp control circuit for
short to ground B111711 Right Tail Lamp
Right hand tail lamp
control circuit - short to
ground Carry out any pinpoint test associated with this DTC using the
manufacturer approved diagnostic system. Refer to the electrical
circuit diagrams and check right hand tail lamp control circuit for
short to ground B111A11
Number Plate
Lamps
Right hand or left hand
number plate lamp
control circuits - short to
ground Carry out any pinpoint test associated with this DTC using the
manufacturer approved diagnostic system. Refer to the electrical
circuit diagrams and check right hand and left hand number plate
lamp control circuits for short to ground B111A12
Number Plate
Lamps
Right hand or left hand
number plate lamp
control circuits - short to
power Refer to the electrical circuit diagrams and check right hand and
left hand number plate lamp control circuits for short to power B111A13
Number Plate
Lamps
Right hand or left hand
number plate lamp
control circuits - open
circuit Refer to the electrical circuit diagrams and check right hand and
left hand number plate lamp control circuits for open circuit B111A-15
Number Plate
Lamps - circuit
short to battery
or open
Right or left side licence
plate lamp(s) inoperative
Right or left side licence
plate lamp control
circuits - short circuit to
power, open circuit, high
resistance
Refer to the electrical circuit diagrams and check right
side and left side licence plate lamp control circuits for
short circuit to power, open circuit, high resistance. Repair
wiring harness as required. Clear DTC and retest B111D12
Boot/Trunk Motor
Open
Luggage compartment lid
latch actuator control
circuit - short to power Carry out any pinpoint test associated with this DTC using the
manufacturer approved diagnostic system. Refer to the electrical
circuit diagrams and check luggage compartment lid latch
actuator control circuit for short to power B111D14
Boot/Trunk Motor
Open
Luggage compartment lid
latch actuator control
circuit - short to ground,
open circuit Carry out any pinpoint test associated with this DTC using the
manufacturer approved diagnostic system. Refer to the electrical
circuit diagrams and check luggage compartment lid latch
actuator control circuit for short to ground, open circuit B111E11 Boot/Trunk Lamps
Luggage compartment
lamp control circuit -
short to ground Carry out any pinpoint test associated with this DTC using the
manufacturer approved diagnostic system. Refer to the electrical
circuit diagrams and check luggage compartment lamp control
circuit for short to ground B111E12 Boot/Trunk Lamps
Luggage compartment
lamp control circuit -
short to power Refer to the electrical circuit diagrams and check luggage
compartment lamp control circuit for short to power