2010 INFINITI QX56 air condition
[x] Cancel search: air conditionPage 3687 of 4210
STR-12
< COMPONENT DIAGNOSIS >
S CONNECTOR CIRCUIT
S CONNECTOR CIRCUIT
DescriptionINFOID:0000000005149556
Terminal "1" (S) is the power supply for the starter motor magnetic switch. Terminal 1 is supplied with power
when the ignition switch is turned to the START position while the selector lever is in the P or N position.
Diagnosis ProcedureINFOID:0000000005149557
Regarding Wiring Diagram information, refer to STR-14, "Wiring Diagram".
CAUTION:
Perform diagnosis under the condi tion that engine cannot start by the following procedure.
1. Remove fuel pump fuse.
2. Crank or start the engine (where possi ble) until the fuel pressure is released.
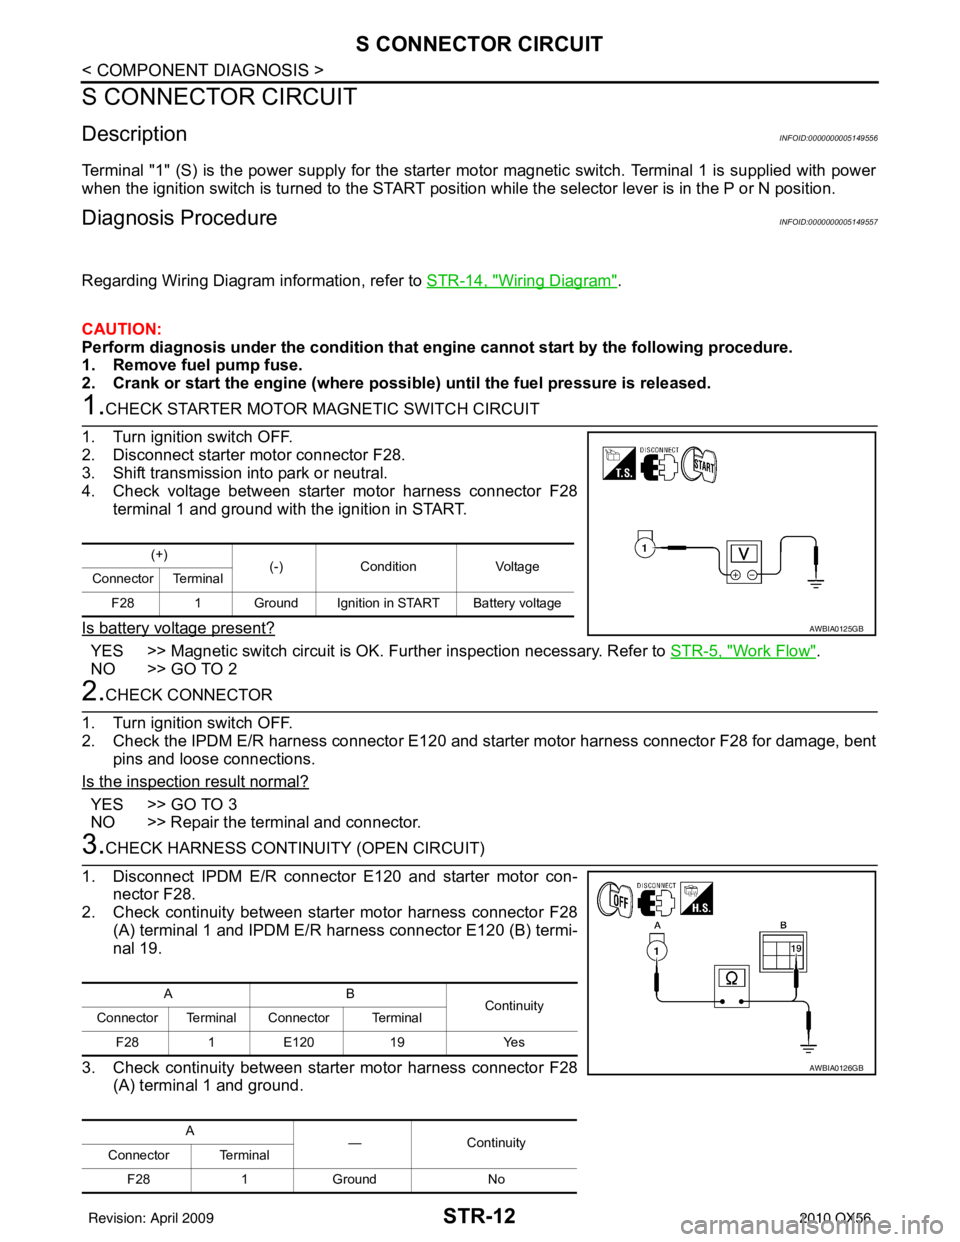
1.CHECK STARTER MOTOR MAGNETIC SWITCH CIRCUIT
1. Turn ignition switch OFF.
2. Disconnect starter motor connector F28.
3. Shift transmission into park or neutral.
4. Check voltage between starter motor harness connector F28 terminal 1 and ground with the ignition in START.
Is battery voltage present?
YES >> Magnetic switch circuit is OK. Further inspection necessary. Refer to STR-5, "Work Flow".
NO >> GO TO 2
2.CHECK CONNECTOR
1. Turn ignition switch OFF.
2. Check the IPDM E/R harness connector E120 and st arter motor harness connector F28 for damage, bent
pins and loose connections.
Is the inspection result normal?
YES >> GO TO 3
NO >> Repair the terminal and connector.
3.CHECK HARNESS CONTI NUITY (OPEN CIRCUIT)
1. Disconnect IPDM E/R connector E120 and starter motor con- nector F28.
2. Check continuity between starter motor harness connector F28
(A) terminal 1 and IPDM E/R harness connector E120 (B) termi-
nal 19.
3. Check continuity between starter motor harness connector F28 (A) terminal 1 and ground.
(+) (-)Condition Voltage
Connector Terminal
F28 1 Ground Ignition in START Battery voltage
AWBIA0125GB
AB Continuity
Connector Terminal Connector Terminal
F28 1E120 19 Yes
A —Contin u it y
Connector Terminal
F28 1Ground No
AWBIA0126GB
Revision: April 20092010 QX56
Page 3700 of 4210
DIAGNOSIS AND REPAIR WORKFLOWTM-5
< BASIC INSPECTION >
CEF
G H
I
J
K L
M A
B
TM
N
O P
BASIC INSPECTION
DIAGNOSIS AND REPAIR WORKFLOW
Work FlowINFOID:0000000005148505
INTRODUCTION
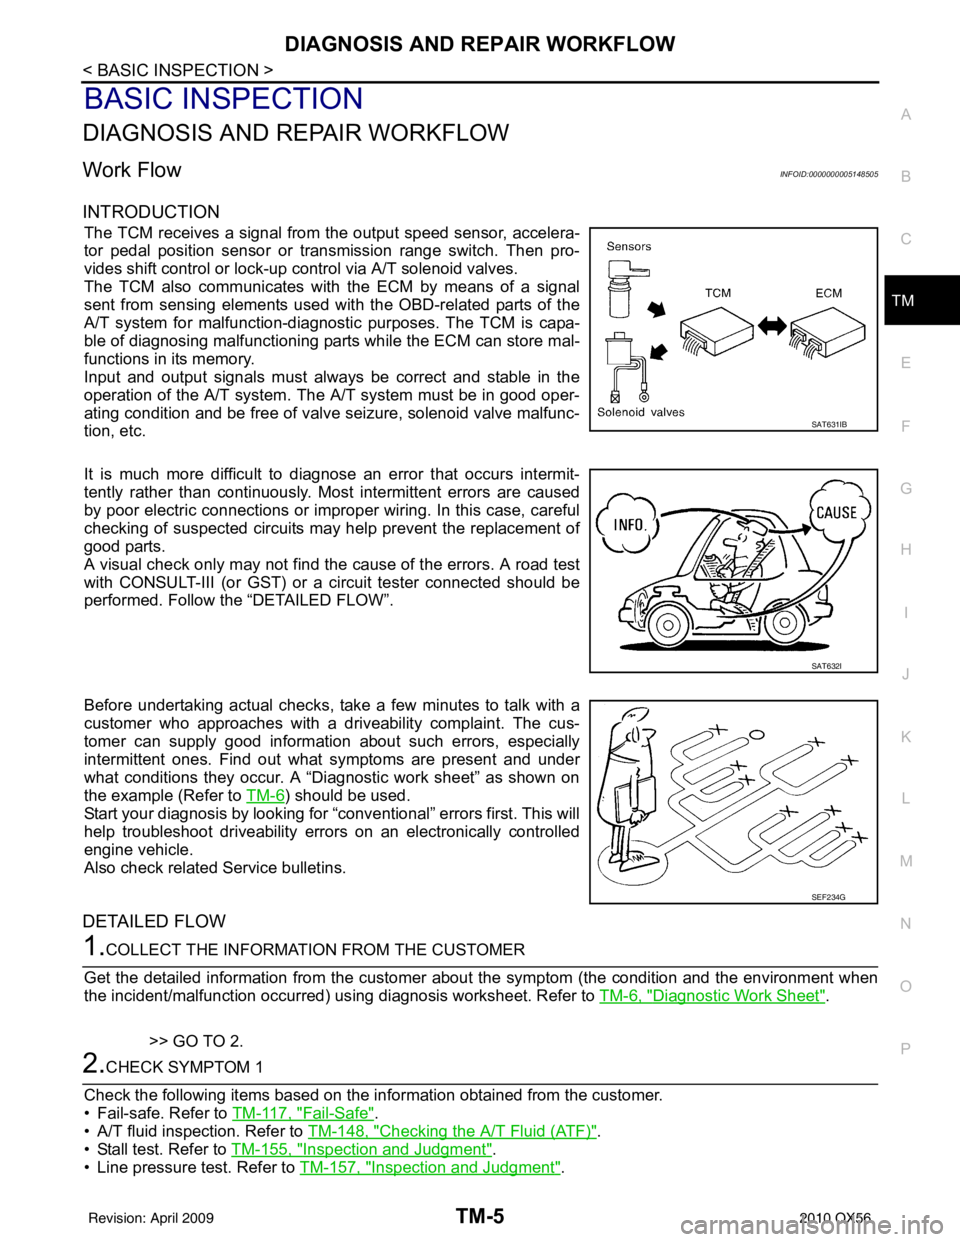
The TCM receives a signal from the output speed sensor, accelera-
tor pedal position sensor or transmission range switch. Then pro-
vides shift control or lock-up control via A/T solenoid valves.
The TCM also communicates with the ECM by means of a signal
sent from sensing elements used wit h the OBD-related parts of the
A/T system for malfunction-diagnostic purposes. The TCM is capa-
ble of diagnosing malfunctioning parts while the ECM can store mal-
functions in its memory.
Input and output signals must always be correct and stable in the
operation of the A/T system. T he A/T system must be in good oper-
ating condition and be free of valve seizure, solenoid valve malfunc-
tion, etc.
It is much more difficult to diagnose an error that occurs intermit-
tently rather than continuously. Most intermittent errors are caused
by poor electric connections or impr oper wiring. In this case, careful
checking of suspected circuits may help prevent the replacement of
good parts.
A visual check only may not find t he cause of the errors. A road test
with CONSULT-III (or GST) or a circuit tester connected should be
performed. Follow the “DETAILED FLOW”.
Before undertaking actual checks, take a few minutes to talk with a
customer who approaches with a driveability complaint. The cus-
tomer can supply good information about such errors, especially
intermittent ones. Find out what symptoms are present and under
what conditions they occur. A “Diagnostic work sheet” as shown on
the example (Refer to TM-6
) should be used.
Start your diagnosis by looking for “conventional” errors first. This will
help troubleshoot driveability errors on an electronically controlled
engine vehicle.
Also check related Service bulletins.
DETAILED FLOW
1.COLLECT THE INFORMATION FROM THE CUSTOMER
Get the detailed information from the customer about the symptom (the condition and the environment when
the incident/malfunction occurred) us ing diagnosis worksheet. Refer to TM-6, "
Diagnostic Work Sheet".
>> GO TO 2.
2.CHECK SYMPTOM 1
Check the following items based on the in formation obtained from the customer.
• Fail-safe. Refer to TM-117, "
Fail-Safe".
• A/T fluid inspection. Refer to TM-148, "
Checking the A/T Fluid (ATF)".
• Stall test. Refer to TM-155, "
Inspection and Judgment".
• Line pressure test. Refer to TM-157, "
Inspection and Judgment".
SAT631IB
SAT632I
SEF234G
Revision: April 20092010 QX56
Page 3701 of 4210
TM-6
< BASIC INSPECTION >
DIAGNOSIS AND REPAIR WORKFLOW
>> GO TO 3.
3.CHECK DTC
1. Check DTC.
2. Perform the following procedure if DTC is detected.
• Record DTC.
• Erase DTC. Refer to TM-30, "
OBD-II Diagnostic Trouble Code (DTC)".
Is any DTC detected?
YES >> GO TO 4.
NO >> GO TO 6.
4.PERFORM DIAGNOSTIC PROCEDURE
Perform “Diagnosis Procedure” for the displayed DTC.
>> GO TO 5.
5.PERFORM DTC CONFIRMATION PROCEDURE
Perform “DTC CONFIRMATION PROCEDURE”.
Is DTC detected?
YES >> GO TO 4.
NO >> GO TO 6.
6.CHECK SYMPTOM 2
Try to confirm the symptom described by the customer.
Is any malfunction present?
YES >> GO TO 7.
NO >> INSPECTION END
7.ROAD TEST
Perform “ROAD TEST”. Refer to TM-159, "
Description".
>> GO TO 8.
8.CHECK SYMPTOM 3
Try to confirm the symptom described by the customer.
Is any malfunction present?
YES >> GO TO 2.
NO >> INSPECTION END
Diagnostic Work SheetINFOID:0000000005148506
INFORMATION FROM CUSTOMER
KEY POINTS• WHAT ..... Vehicle and A/T model
• WHEN ..... Date, Frequencies
• WHERE ..... Road conditions
• HOW ..... Operating conditions, Symptoms
Customer name MR/MS Model and Year VIN
Trans. Model EngineMileage
Malfunction Date Manuf. DateIn Service Date
Frequency �† Continuous �† Intermittent ( times a day)
Revision: April 20092010 QX56
Page 3736 of 4210
P0615 STARTER RELAYTM-41
< COMPONENT DIAGNOSIS >
CEF
G H
I
J
K L
M A
B
TM
N
O P
P0615 STARTER RELAY
DescriptionINFOID:0000000005148533
TCM prohibits cranking other than at “P” or “N” position.
CONSULT-III Reference Value in Data Monitor ModeINFOID:0000000005148534
On Board Diagnosis LogicINFOID:0000000005148535
• This is not an OBD-II self-diagnostic item.
• Diagnostic trouble code “P0615 STARTER RELAY” with CONSULT-III is detected when starter relay is
switched “ON” other than at “P” or “N” position. (Or when switched “OFF” at “P” or “N” position).
Possible CauseINFOID:0000000005148536
• Harness or connectors
(The starter relay and TCM circuit is open or shorted.)
• Sarter relay
DTC Confirmation ProcedureINFOID:0000000005148537
NOTE:
If “DTC Confirmation Procedure” has been previously performed, always turn ignition switch “OFF”
and wait at least 10 seconds before performing the next test.
After the repair, perform the following procedure to confirm the malfunction is eliminated.
WITH CONSULT-III
1. Turn ignition switch “ON”. (Do not start engine.)
2. Select “DATA MONITOR” mode for “TRANSMISSION” with CONSULT-III.
3. Start engine.
4. Drive vehicle for at least 2 consecutive seconds.
5. If DTC is detected, go to TM-41, "
Diagnosis Procedure".
Diagnosis ProcedureINFOID:0000000005148538
1.CHECK STARTER RELAY
With CONSULT-III
1. Turn ignition switch “ON”. (Do not start engine.)
2. Select “SELECTION FROM MENU” in “DATA MONI TOR” mode for “TRANSMISSION” with CONSULT-III
and check monitor “STARTER RELAY” ON/OFF.
Without CONSULT-III
Item name Condition Display value
STARTER RELAY Selector lever in “N”,“P” position.
ON
Selector lever in other position. OFF
Item nameCondition Display value
STARTER RELAY Selector lever in "N'', "P'' positions.
ON
Selector lever in other positions. OFF
Revision: April 20092010 QX56
Page 3740 of 4210
P0705 TRANSMISSION RANGE SWITCH A
TM-45
< COMPONENT DIAGNOSIS >
C EF
G H
I
J
K L
M A
B
TM
N
O P
P0705 TRANSMISSION RANGE SWITCH A
DescriptionINFOID:0000000005148544
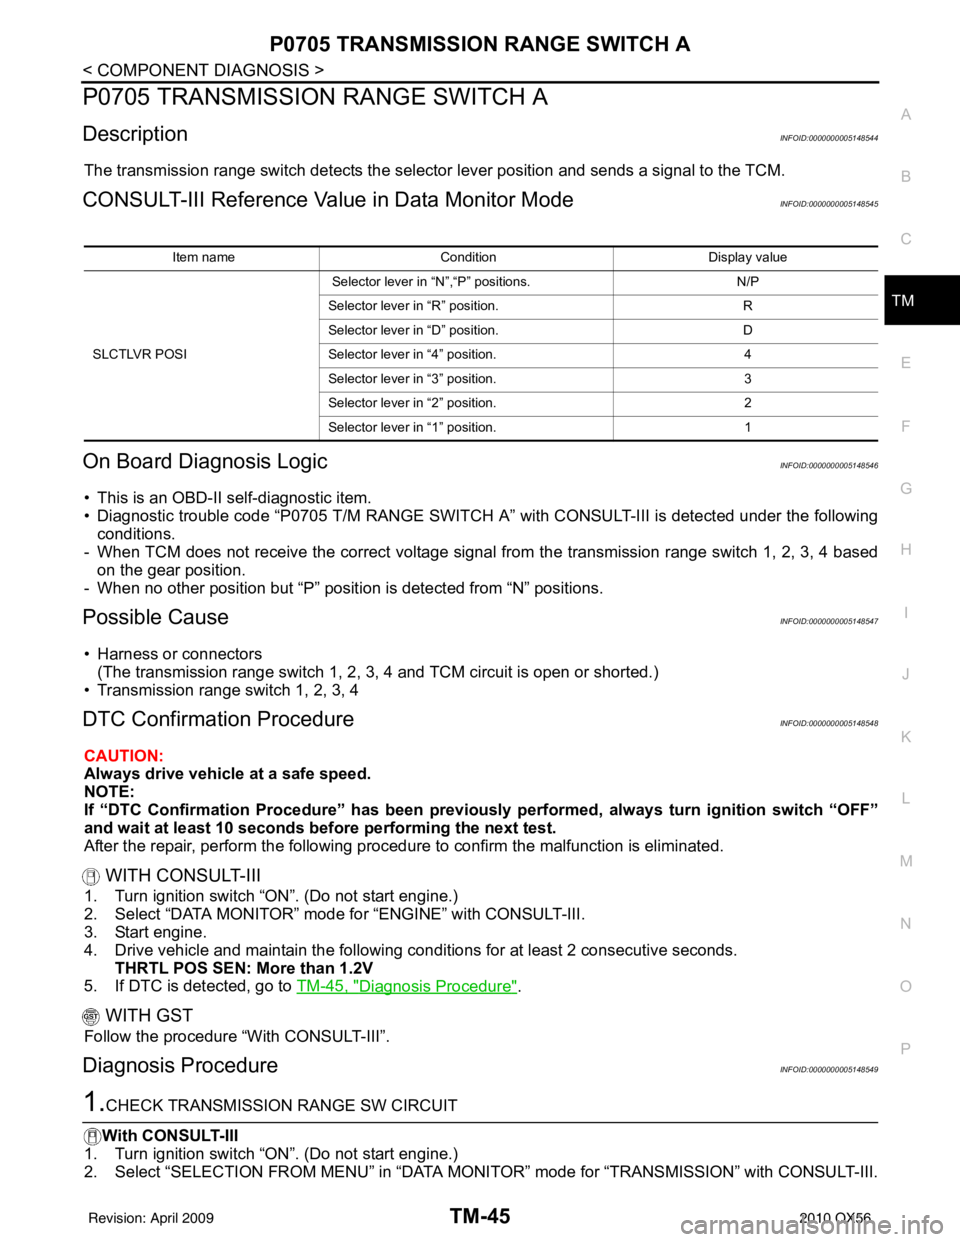
The transmission range switch detects the select or lever position and sends a signal to the TCM.
CONSULT-III Reference Value in Data Monitor ModeINFOID:0000000005148545
On Board Diagnosis LogicINFOID:0000000005148546
• This is an OBD-II self-diagnostic item.
• Diagnostic trouble code “P0705 T/M RANGE SWITCH A” wi th CONSULT-III is detected under the following
conditions.
- When TCM does not receive the correct voltage signal from the transmission range switch 1, 2, 3, 4 based
on the gear position.
- When no other position but “P” positi on is detected from “N” positions.
Possible CauseINFOID:0000000005148547
• Harness or connectors
(The transmission range switch 1, 2, 3, 4 and TCM circuit is open or shorted.)
• Transmission range switch 1, 2, 3, 4
DTC Confirmation ProcedureINFOID:0000000005148548
CAUTION:
Always drive vehicle at a safe speed.
NOTE:
If “DTC Confirmation Procedure” has been previously performed, always turn ignition switch “OFF”
and wait at least 10 seconds before performing the next test.
After the repair, perform the following procedure to confirm the malfunction is eliminated.
WITH CONSULT-III
1. Turn ignition switch “ON”. (Do not start engine.)
2. Select “DATA MONITOR” mode for “ENGINE” with CONSULT-III.
3. Start engine.
4. Drive vehicle and maintain the following conditions for at least 2 consecutive seconds. THRTL POS SEN: More than 1.2V
5. If DTC is detected, go to TM-45, "
Diagnosis Procedure".
WITH GST
Follow the procedure “With CONSULT-III”.
Diagnosis ProcedureINFOID:0000000005148549
1.CHECK TRANSMISSION RANGE SW CIRCUIT
With CONSULT-III
1. Turn ignition switch “ON”. (Do not start engine.)
2. Select “SELECTION FROM MENU” in “DATA MONI TOR” mode for “TRANSMISSION” with CONSULT-III.
Item nameCondition Display value
SLCTLVR POSI Selector lever in “N”,“P” positions.
N/P
Selector lever in “R” position. R
Selector lever in “D” position. D
Selector lever in “4” position. 4
Selector lever in “3” position. 3
Selector lever in “2” position. 2
Selector lever in “1” position. 1
Revision: April 20092010 QX56
Page 3741 of 4210
TM-46
< COMPONENT DIAGNOSIS >
P0705 TRANSMISSION RANGE SWITCH A
3. Check if correct selector lever position (N/P, R or D) is displayed as selector lever is moved into each posi-
tion.
OK or NG
OK >> GO TO 5.
NG >> GO TO 2.
2.CHECK TCM POWER SUPPLY AND GROUND CIRCUIT
Perform TCM power supply and ground circuit. Refer to TM-94, "
Diagnosis Procedure".
OK or NG
OK >> GO TO 3.
NG >> Repair or replace damaged parts.
3.DETECT MALFUNCTIONING ITEM
Check the following items:
• A/T assembly harness connector pin terminals for damage or loose connection with harness connector.
OK or NG
OK >> GO TO 4.
NG >> Repair or replace damaged parts.
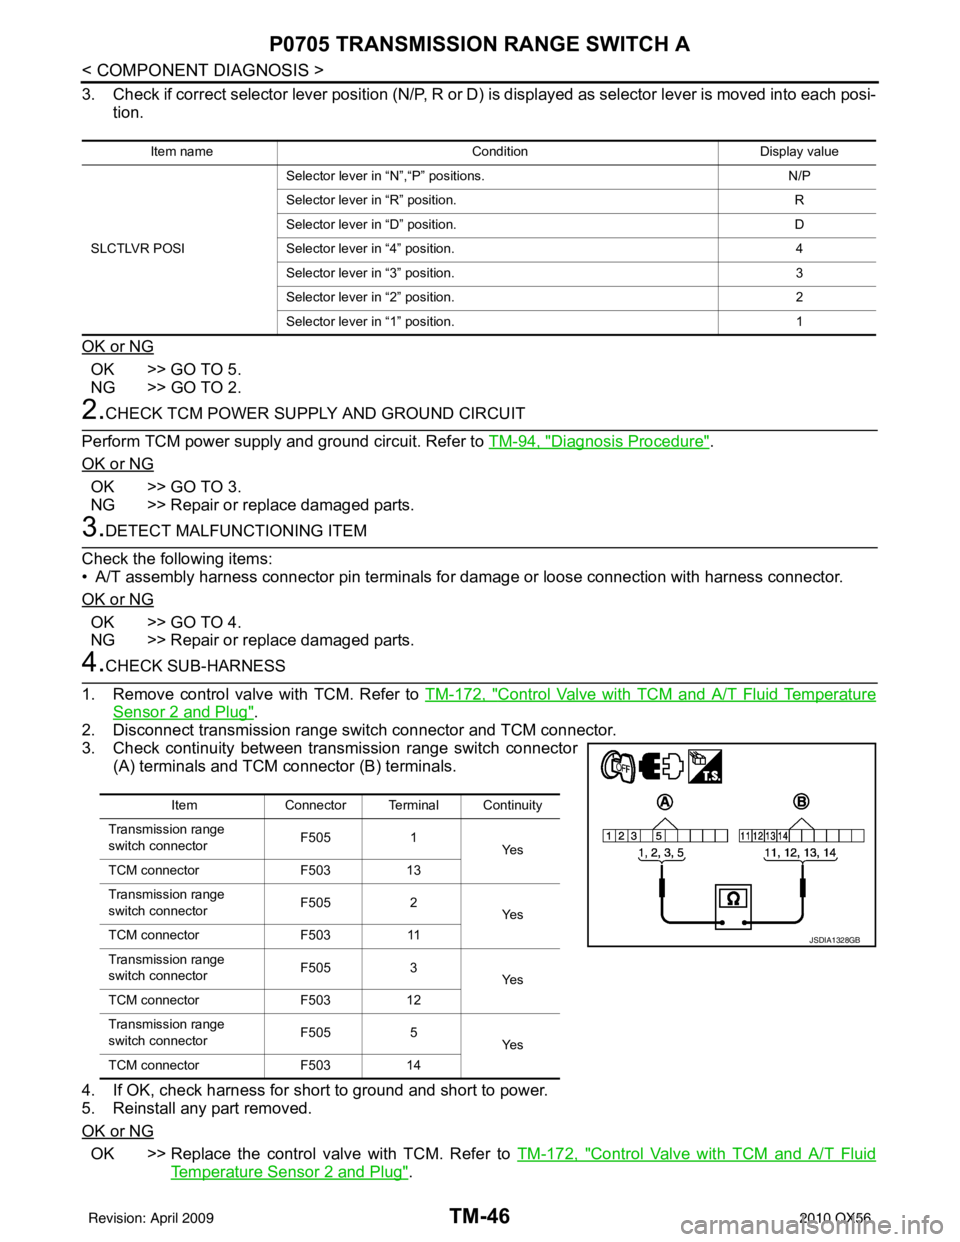
4.CHECK SUB-HARNESS
1. Remove control valve with TCM. Refer to TM-172, "
Control Valve with TCM and A/T Fluid Temperature
Sensor 2 and Plug".
2. Disconnect transmission range switch connector and TCM connector.
3. Check continuity between transmission range switch connector (A) terminals and TCM connector (B) terminals.
4. If OK, check harness for short to ground and short to power.
5. Reinstall any part removed.
OK or NG
OK >> Replace the control valve with TCM. Refer to TM-172, "Control Valve with TCM and A/T Fluid
Temperature Sensor 2 and Plug".
Item nameCondition Display value
SLCTLVR POSI Selector lever in “N
”,“P” positions. N/P
Selector lever in “R” position. R
Selector lever in “D” position. D
Selector lever in “4” position. 4
Selector lever in “3” position. 3
Selector lever in “2” position. 2
Selector lever in “1” position. 1
ItemConnector Terminal Continuity
Transmission range
switch connector F505
1
Ye s
TCM connector F50313
Transmission range
switch connector F505
2
Ye s
TCM connector F50311
Transmission range
switch connector F505
3
Ye s
TCM connector F50312
Transmission range
switch connector F505
5
Ye s
TCM connector F50314
JSDIA1328GB
Revision: April 20092010 QX56
Page 3743 of 4210

TM-48
< COMPONENT DIAGNOSIS >
P0717 INPUT SPEED SENSOR A
P0717 INPUT SPEED SENSOR A
DescriptionINFOID:0000000005148550
The input speed sensor detects input shaft rpm (revolutions per minute). It is located on the input side of the
automatic transmission. Monitors revolution of sensor 1 and sensor 2 for non-standard conditions.
CONSULT-III Reference Value in Data Monitor ModeINFOID:0000000005148551
On Board Diagnosis LogicINFOID:0000000005148552
• This is an OBD-II self-diagnostic item.
• Diagnostic trouble code “P0717 INPUT SPEED SENSOR A” with CONSULT-III is detected under the follow-
ing conditions.
- When TCM does not receive the proper voltage signal from the sensor.
- When TCM detects an irregularity only at pos ition of 4GR for input speed sensor 2.
Possible CauseINFOID:0000000005148553
• Harness or connectors
(The sensor circuit is open or shorted.)
• Input speed sensor 1, 2
DTC Confirmation ProcedureINFOID:0000000005148554
CAUTION:
Always drive vehicle at a safe speed.
NOTE:
If “DTC Confirmation Procedure” has been previously performed, always turn ignition switch “OFF”
and wait at least 10 seconds before performing the next test.
After the repair, perform the following proc edure to confirm the malfunction is eliminated.
WITH CONSULT-III
1. Turn ignition switch “ON”. (Do not start engine.)
2. Select “DATA MONITOR” mode for “TRANSMISSION” with CONSULT-III.
3. Start engine and maintain the following conditions for at least 5 consecutive seconds.
VHCL/S SE-A/T: 40 km/h (25 MPH) or more
ENGINE SPEED: 1,500 rpm or more
ACCELE POSI: 0.5/8 or more
SLCT LVR POSI: “D” position
GEAR (Input speed sensor 1): 4th or 5th position
GEAR (Input speed sensor 2): All position
Driving location: Driving the vehicle uphill (increased engine load) will help maintain the driving
conditions required for this test.
4. If DTC is detected, go to TM-48, "
Diagnosis Procedure".
WITH GST
Follow the procedure “With CONSULT-III”.
Diagnosis ProcedureINFOID:0000000005148555
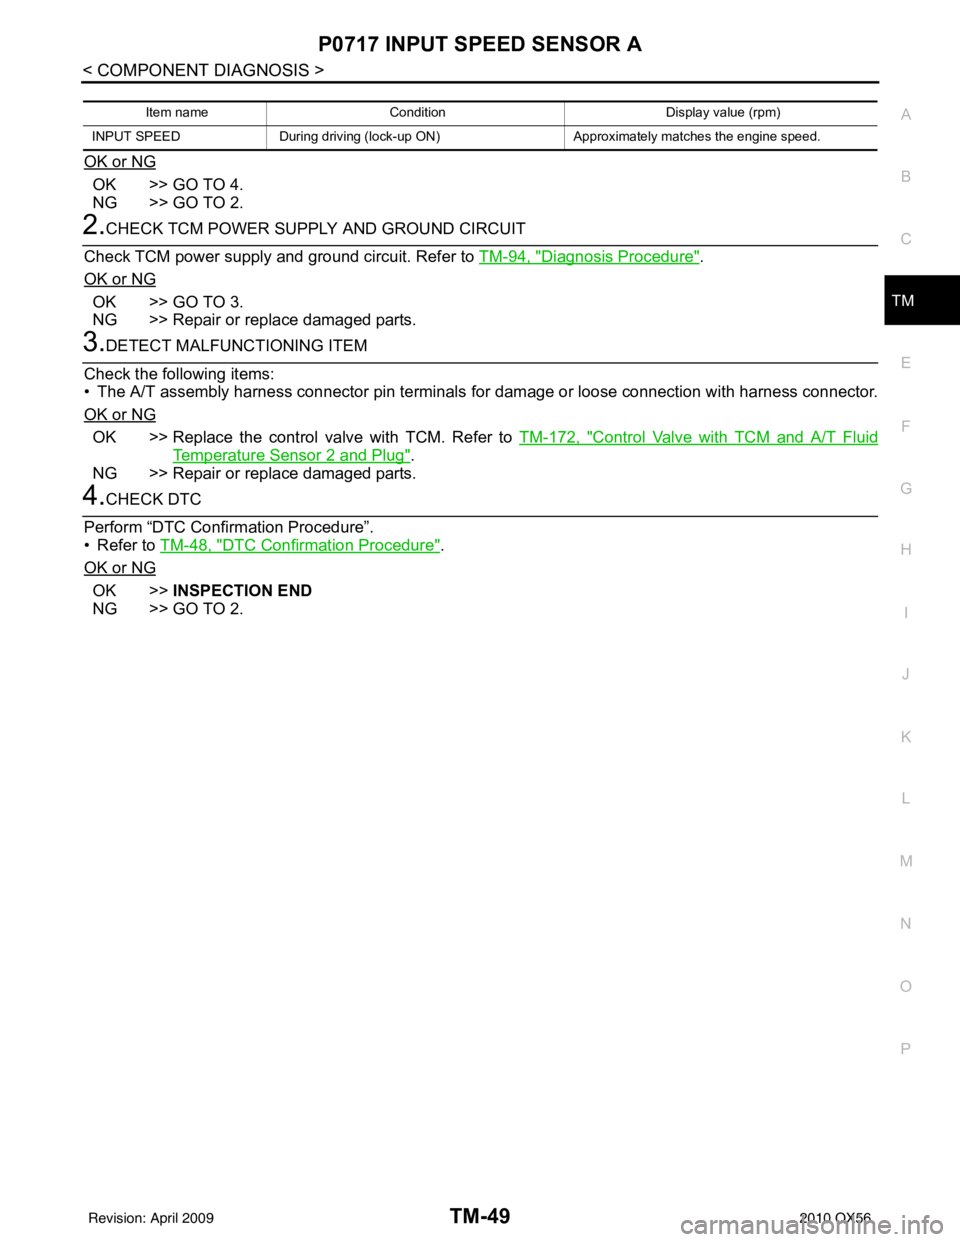
1.CHECK INPUT SIGNAL
With CONSULT-III
1. Start engine.
2. Select “ECU INPUT SIGNALS” in “DATA MONI TOR” mode for “TRANSMISSION” with CONSULT-III.
3. Vehicle start and read out the value of “INPUT SPEED”.
Item name Condition Display value (rpm)
INPUT SPEED During driving (lock-up ON) Approximately matches the engine speed.
Revision: April 20092010 QX56
Page 3744 of 4210
P0717 INPUT SPEED SENSOR ATM-49
< COMPONENT DIAGNOSIS >
CEF
G H
I
J
K L
M A
B
TM
N
O P
OK or NG
OK >> GO TO 4.
NG >> GO TO 2.
2.CHECK TCM POWER SUPPLY AND GROUND CIRCUIT
Check TCM power supply and ground circuit. Refer to TM-94, "
Diagnosis Procedure".
OK or NG
OK >> GO TO 3.
NG >> Repair or replace damaged parts.
3.DETECT MALFUNCTIONING ITEM
Check the following items:
• The A/T assembly harness connector pin terminals for damage or loose connection with harness connector.
OK or NG
OK >> Replace the control valve with TCM. Refer to TM-172, "Control Valve with TCM and A/T Fluid
Temperature Sensor 2 and Plug".
NG >> Repair or replace damaged parts.
4.CHECK DTC
Perform “DTC Confirmation Procedure”.
• Refer to TM-48, "
DTC Confirmation Procedure".
OK or NG
OK >> INSPECTION END
NG >> GO TO 2.
Item name Condition Display value (rpm)
INPUT SPEED During driving (lock-up ON) Approximately matche s the engine speed.
Revision: April 20092010 QX56