2010 INFINITI QX56 sensor
[x] Cancel search: sensorPage 1849 of 4210
![INFINITI QX56 2010 Factory Service Manual EC-496
< ON-VEHICLE REPAIR >[VK56DE]
INTAKE VALVE TIMING CONTROL
4. Remove camshaft position sensor (2) from Intake valve timing
control solenoid valve cover (LH) (1).
INSTALLATION
Installation is in INFINITI QX56 2010 Factory Service Manual EC-496
< ON-VEHICLE REPAIR >[VK56DE]
INTAKE VALVE TIMING CONTROL
4. Remove camshaft position sensor (2) from Intake valve timing
control solenoid valve cover (LH) (1).
INSTALLATION
Installation is in](/manual-img/42/57032/w960_57032-1848.png)
EC-496
< ON-VEHICLE REPAIR >[VK56DE]
INTAKE VALVE TIMING CONTROL
4. Remove camshaft position sensor (2) from Intake valve timing
control solenoid valve cover (LH) (1).
INSTALLATION
Installation is in the reverse order of removal.
CAUTION:
Replace the O-ring (3) of the cam shaft position sensor with a new on e, then lubricate O-ring with
engine oil before installing.
AWBIA0142ZZ
Camshaft position sensor bolt : 9.6 N·m (0.98 kg-m, 85 in-lb)
Revision: April 20092010 QX56
Page 1850 of 4210
![INFINITI QX56 2010 Factory Service Manual SERVICE DATA AND SPECIFICATIONS (SDS)EC-497
< SERVICE DATA AND SPECIFICATIONS (SDS) [VK56DE]
C
D
E
F
G H
I
J
K L
M A
EC
NP
O
SERVICE DATA AND SPECIFICATIONS (SDS)
SERVICE DATA AND SPECIFICATIONS (SDS INFINITI QX56 2010 Factory Service Manual SERVICE DATA AND SPECIFICATIONS (SDS)EC-497
< SERVICE DATA AND SPECIFICATIONS (SDS) [VK56DE]
C
D
E
F
G H
I
J
K L
M A
EC
NP
O
SERVICE DATA AND SPECIFICATIONS (SDS)
SERVICE DATA AND SPECIFICATIONS (SDS](/manual-img/42/57032/w960_57032-1849.png)
SERVICE DATA AND SPECIFICATIONS (SDS)EC-497
< SERVICE DATA AND SPECIFICATIONS (SDS) [VK56DE]
C
D
E
F
G H
I
J
K L
M A
EC
NP
O
SERVICE DATA AND SPECIFICATIONS (SDS)
SERVICE DATA AND SPECIFICATIONS (SDS)
Fuel PressureINFOID:0000000005149516
Idle Speed and Ignition TimingINFOID:0000000005149517
*: Under the following conditions:
• Air conditioner switch: OFF
• Electric load: OFF (Lights and heater fan)
• Steering wheel: Kept in straight-ahead position
Calculated Load ValueINFOID:0000000005149518
Mass Air Flow SensorINFOID:0000000005149519
*: Engine is warmed up to normal operating temperature and running under no load.
Intake Air Temperature SensorINFOID:0000000005149520
Engine Coolant Temperature SensorINFOID:0000000005149521
A/F Sensor 1 HeaterINFOID:0000000005149522
Fuel pressure at idling kPa (kg/cm2, psi)
Approximately 350 (3.57, 51)
Target idle speed
No-load* (in P or N position) 650±50 rpm
Air conditioner: ON In P or N position 700 rpm or more
Ignition timing In P or N position 15° ± 5 ° BTDC
Condition Calculated load value % (Using CONSULT-IIl or GST)
At idle 14.0 - 33.0
At 2,500 rpm 12.0 - 25.0
Supply voltageBattery voltage (11 - 14V)
Output voltage at idle 1.0 - 1.3V*
Mass air flow (Using CONSULT-IIl or GST) 3.0 - 9.0 g·m/sec at idle*
9.0 - 28.0 g·m/sec at 2,500 rpm*
Temperature °C ( °F) Resistance kΩ
25 (77) 1.800 - 2.200
Temperature °C ( °F) Resistance kΩ
20 (68) 2.1 - 2.9
50 (122) 0.68 - 1.00
90 (194) 0.236 - 0.260
Resistance [at 25°C (77 °F)] 1.98 - 2.66Ω
Revision: April 20092010 QX56
Page 1851 of 4210
![INFINITI QX56 2010 Factory Service Manual EC-498
< SERVICE DATA AND SPECIFICATIONS (SDS) [VK56DE]
SERVICE DATA AND SPECIFICATIONS (SDS)
Heated Oxygen sensor 2 Heater
INFOID:0000000005149523
Crankshaft Position Sensor (POS)INFOID:0000000005149 INFINITI QX56 2010 Factory Service Manual EC-498
< SERVICE DATA AND SPECIFICATIONS (SDS) [VK56DE]
SERVICE DATA AND SPECIFICATIONS (SDS)
Heated Oxygen sensor 2 Heater
INFOID:0000000005149523
Crankshaft Position Sensor (POS)INFOID:0000000005149](/manual-img/42/57032/w960_57032-1850.png)
EC-498
< SERVICE DATA AND SPECIFICATIONS (SDS) [VK56DE]
SERVICE DATA AND SPECIFICATIONS (SDS)
Heated Oxygen sensor 2 Heater
INFOID:0000000005149523
Crankshaft Position Sensor (POS)INFOID:0000000005149524
Refer to EC-203, "Component Inspection".
Camshaft Position Sensor (PHASE)INFOID:0000000005149525
Refer to EC-207, "Component Inspection".
Throttle Control MotorINFOID:0000000005149526
Fuel InjectorINFOID:0000000005149527
Fuel PumpINFOID:0000000005149528
Resistance [at 25 °C (77 °F)] 8 - 10 Ω
Resistance [at 25°C (77 °F)] Approximately 1 - 15 Ω
Resistance [at 10 - 60°C (50 - 140 °F)] 11.1 - 14.5Ω
Resistance [at 25 °C (77 °F)] 0.2 - 5.0 Ω
Revision: April 20092010 QX56
Page 1854 of 4210
PRECAUTIONSEM-3
< PRECAUTION >
C
DE
F
G H
I
J
K L
M A
EM
NP
O
PRECAUTION
PRECAUTIONS
Precaution for Supplemental
Restraint System (SRS) "AIR BAG" and "SEAT BELT
PRE-TENSIONER"
INFOID:0000000005259661
The Supplemental Restraint System such as “AIR BAG” and “SEAT BELT PRE-TENSIONER”, used along
with a front seat belt, helps to reduce the risk or severi ty of injury to the driver and front passenger for certain
types of collision. This system includes seat belt switch inputs and dual stage front air bag modules. The SRS
system uses the seat belt switches to determine the front air bag deployment, and may only deploy one front
air bag, depending on the severity of a collision and w hether the front occupants are belted or unbelted.
Information necessary to service the system safely is included in the SR and SB section of this Service Man-
ual.
WARNING:
• To avoid rendering the SRS inoper ative, which could increase the risk of personal injury or death in
the event of a collision which would result in air bag inflation, all maintenance must be performed by
an authorized NISSAN/INFINITI dealer.
• Improper maintenance, including in correct removal and installation of the SRS, can lead to personal
injury caused by unintentional act ivation of the system. For removal of Spiral Cable and Air Bag
Module, see the SR section.
• Do not use electrical test equipm ent on any circuit related to the SRS unless instructed to in this
Service Manual. SRS wiring harnesses can be identi fied by yellow and/or orange harnesses or har-
ness connectors.
PRECAUTIONS WHEN USING POWER TOOLS (AIR OR ELECTRIC) AND HAMMERS
WARNING:
• When working near the Airbag Diagnosis Sensor Un it or other Airbag System sensors with the Igni-
tion ON or engine running, DO NOT use air or el ectric power tools or strike near the sensor(s) with a
hammer. Heavy vibration could activate the sensor( s) and deploy the air bag(s), possibly causing
serious injury.
• When using air or electric power tools or hammers, always switch the Ignition OFF, disconnect the battery, and wait at least 3 minutes before performing any service.
Precaution Necessary for Steering Wheel Rotation After Battery Disconnect
INFOID:0000000005260133
NOTE:
• This Procedure is applied only to models with Intelligent Key system and NATS (NISSAN ANTI-THEFT SYS-
TEM).
• Remove and install all control units after disconnecti ng both battery cables with the ignition knob in the
″ LOCK ″ position.
• Always use CONSULT-III to perform self-diagnosis as a part of each function inspection after finishing work.
If DTC is detected, perform trouble diagnosis according to self-diagnostic results.
For models equipped with the Intelligent Key system and NATS , an electrically controlled steering lock mech-
anism is adopted on the key cylinder.
For this reason, if the battery is disconnected or if the battery is discharged, the steering wheel will lock and
steering wheel rotation will become impossible.
If steering wheel rotation is required when battery power is interrupted, follow the procedure below before
starting the repair operation.
OPERATION PROCEDURE
1. Connect both battery cables. NOTE:
Supply power using jumper cables if battery is discharged.
2. Use the Intelligent Key or mechanical key to turn the ignition switch to the ″ACC ″ position. At this time, the
steering lock will be released.
3. Disconnect both battery cables. The steering lock will remain released and the steering wheel can be
rotated.
4. Perform the necessary repair operation.
Revision: April 20092010 QX56
Page 1857 of 4210
EM-6
< PREPARATION >
PREPARATION
PREPARATION
PREPARATION
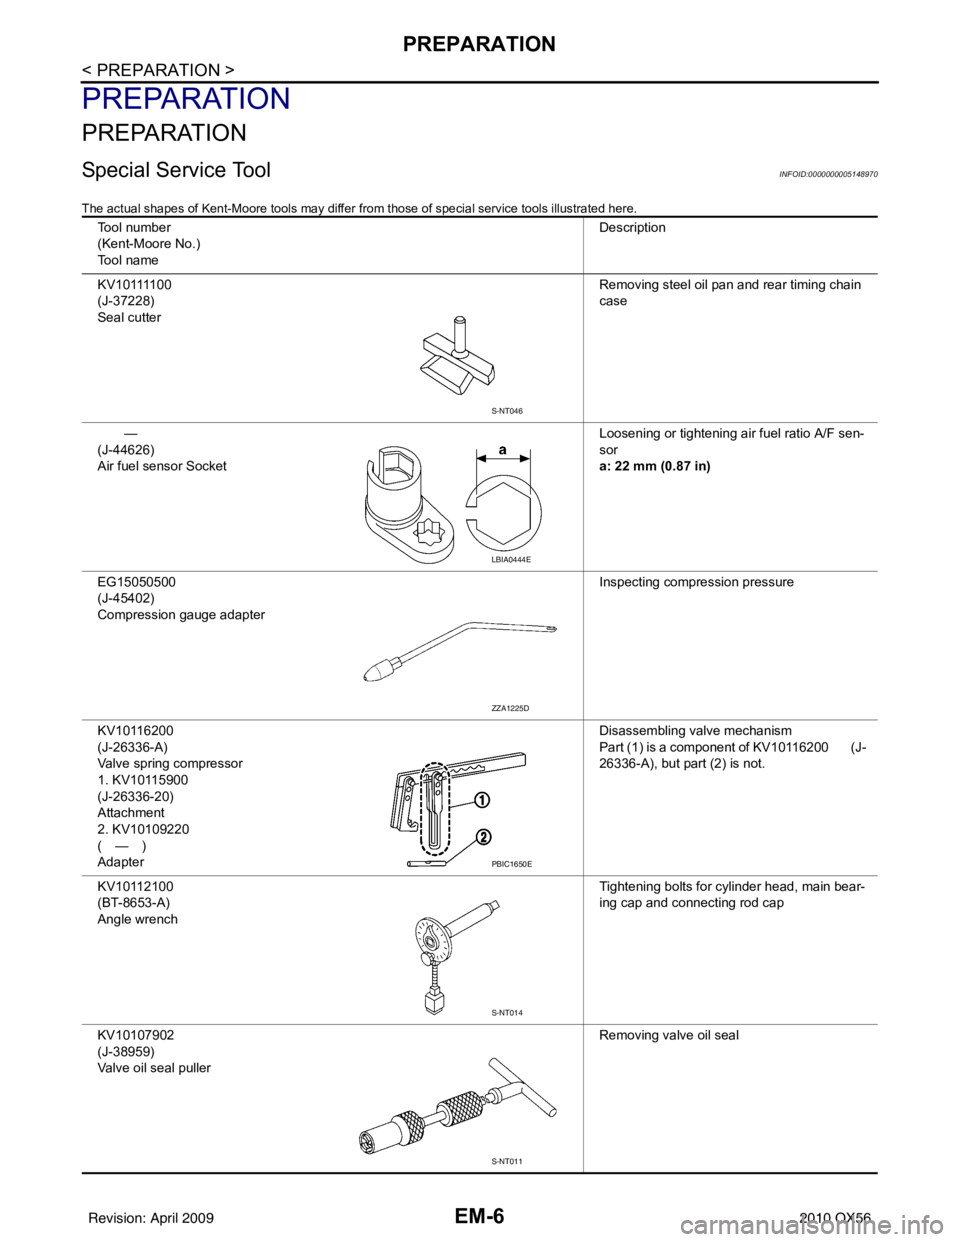
Special Service ToolINFOID:0000000005148970
The actual shapes of Kent-Moore tools may differ from those of special service tools illustrated here.
Tool number
(Kent-Moore No.)
Tool name Description
K V 1 0 1111 0 0
(J-37228)
Seal cutter Removing steel oil pan and rear timing chain
case
—
(J-44626)
Air fuel sensor Socket Loosening or tightening air fuel ratio A/F sen-
sor
a: 22 mm (0.87 in)
EG15050500
(J-45402)
Compression gauge adapter Inspecting compression pressure
KV10116200
(J-26336-A)
Valve spring compressor
1. KV10115900
(J-26336-20)
Attachment
2. KV10109220
(—)
Adapter Disassembling valve mechanism
Part (1) is a component of KV10116200 (J-
26336-A), but part (2) is not.
KV10112100
(BT-8653-A)
Angle wrench Tightening bolts for cylinder head, main bear-
ing cap and connecting rod cap
KV10107902
(J-38959)
Valve oil seal puller Removing valve oil seal
S-NT046
LBIA0444E
ZZA1225D
PBIC1650E
S-NT014
S-NT011
Revision: April 20092010 QX56
Page 1860 of 4210
PREPARATIONEM-9
< PREPARATION >
C
DE
F
G H
I
J
K L
M A
EM
NP
O
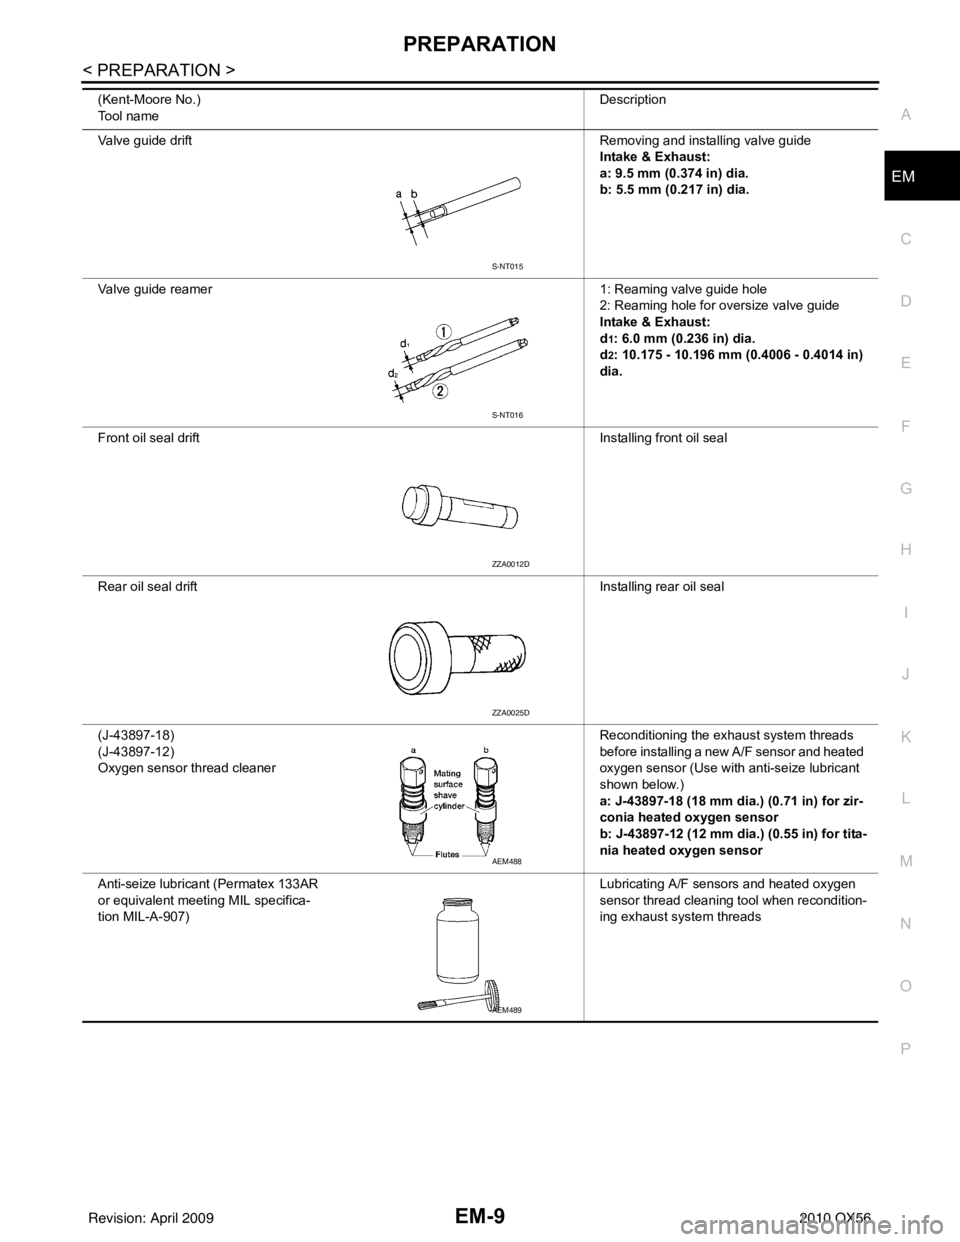
Valve guide drift
Removing and installing valve guide
Intake & Exhaust:
a: 9.5 mm (0.374 in) dia.
b: 5.5 mm (0.217 in) dia.
Valve guide reamer 1: Reaming valve guide hole
2: Reaming hole for oversize valve guide
Intake & Exhaust:
d
1: 6.0 mm (0.236 in) dia.
d
2: 10.175 - 10.196 mm (0.4006 - 0.4014 in)
dia.
Front oil seal drift Installing front oil seal
Rear oil seal drift Installing rear oil seal
(J-43897-18)
(J-43897-12)
Oxygen sensor thread cleaner Reconditioning the exhaust system threads
before installing a new A/F sensor and heated
oxygen sensor (Use with anti-seize lubricant
shown below.)
a: J-43897-18 (18 mm dia.) (0.71 in) for zir-
conia heated oxygen sensor
b: J-43897-12 (12 mm dia.) (0.55 in) for tita-
nia heated oxygen sensor
Anti-seize lubricant (Permatex 133AR
or equivalent meeting MIL specifica-
tion MIL-A-907) Lubricating A/F sensors and heated oxygen
sensor thread cleaning tool when recondition-
ing exhaust system threads
(Kent-Moore No.)
Tool name
Description
S-NT015
S-NT016
ZZA0012D
ZZA0025D
AEM488
AEM489
Revision: April 20092010 QX56
Page 1881 of 4210
EM-30
< ON-VEHICLE REPAIR >
EXHAUST MANIFOLD AND THREE WAY CATALYST
EXHAUST MANIFOLD AND THREE WAY CATALYST
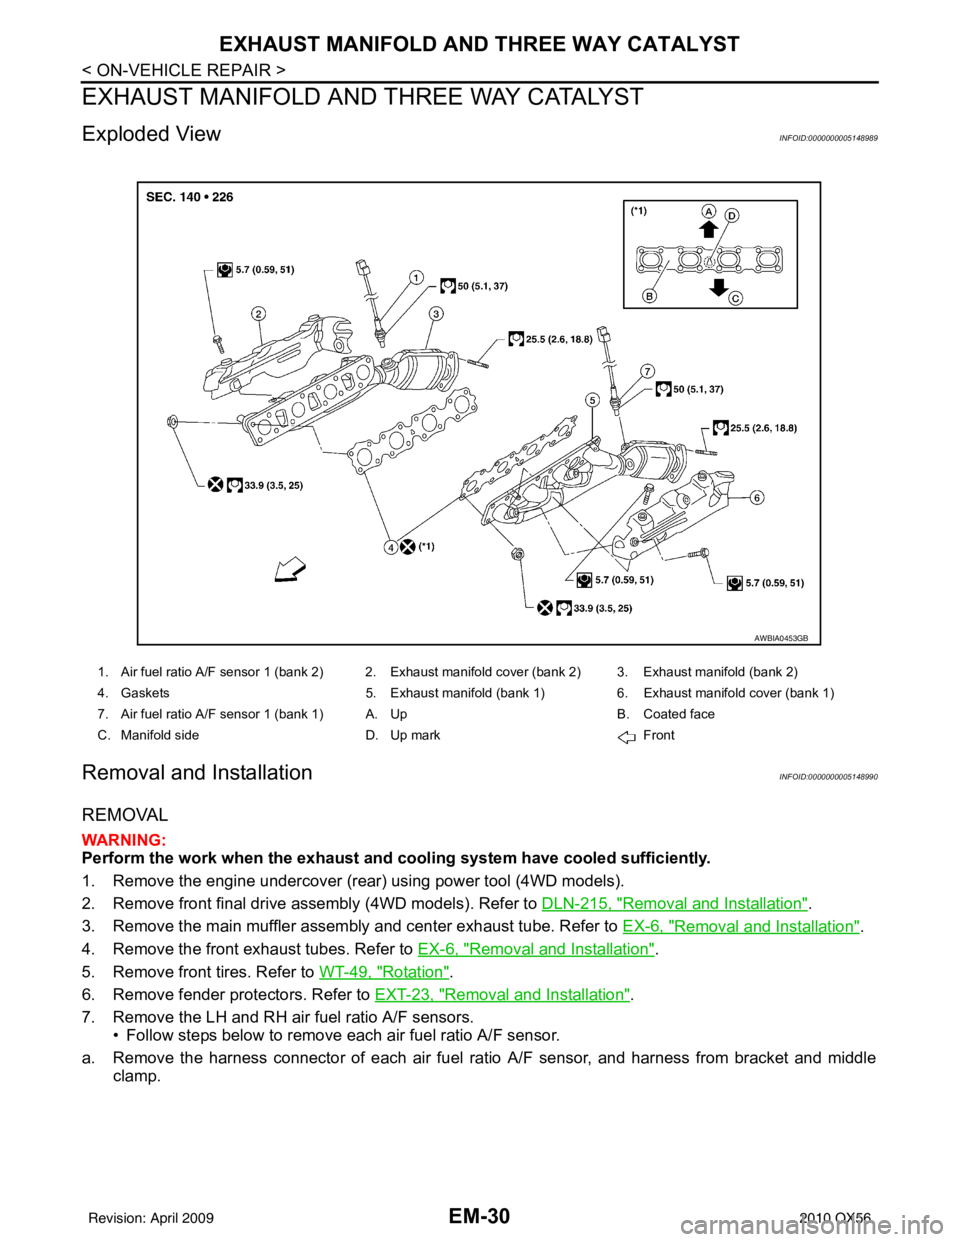
Exploded ViewINFOID:0000000005148989
Removal and InstallationINFOID:0000000005148990
REMOVAL
WARNING:
Perform the work when the exhaust and cooling system have cooled sufficiently.
1. Remove the engine undercover (rear) using power tool (4WD models).
2. Remove front final drive assembly (4WD models). Refer to DLN-215, "
Removal and Installation".
3. Remove the main muffler assembly and center exhaust tube. Refer to EX-6, "
Removal and Installation".
4. Remove the front exhaust tubes. Refer to EX-6, "
Removal and Installation".
5. Remove front tires. Refer to WT-49, "
Rotation".
6. Remove fender protectors. Refer to EXT-23, "
Removal and Installation".
7. Remove the LH and RH air fuel ratio A/F sensors. • Follow steps below to remove each air fuel ratio A/F sensor.
a. Remove the harness connector of each air fuel ra tio A/F sensor, and harness from bracket and middle
clamp.
1. Air fuel ratio A/F sensor 1 (bank 2) 2. Exhaust manifold cover (bank 2) 3. Exhaust manifold (bank 2)
4. Gaskets 5. Exhaust manifold (bank 1) 6. Exhaust manifold cover (bank 1)
7. Air fuel ratio A/F sensor 1 (bank 1) A. Up B. Coated face
C. Manifold side D. Up mark Front
AWBIA0453GB
Revision: April 20092010 QX56
Page 1882 of 4210
EXHAUST MANIFOLD AND THREE WAY CATALYST
EM-31
< ON-VEHICLE REPAIR >
C
D E
F
G H
I
J
K L
M A
EM
NP
O
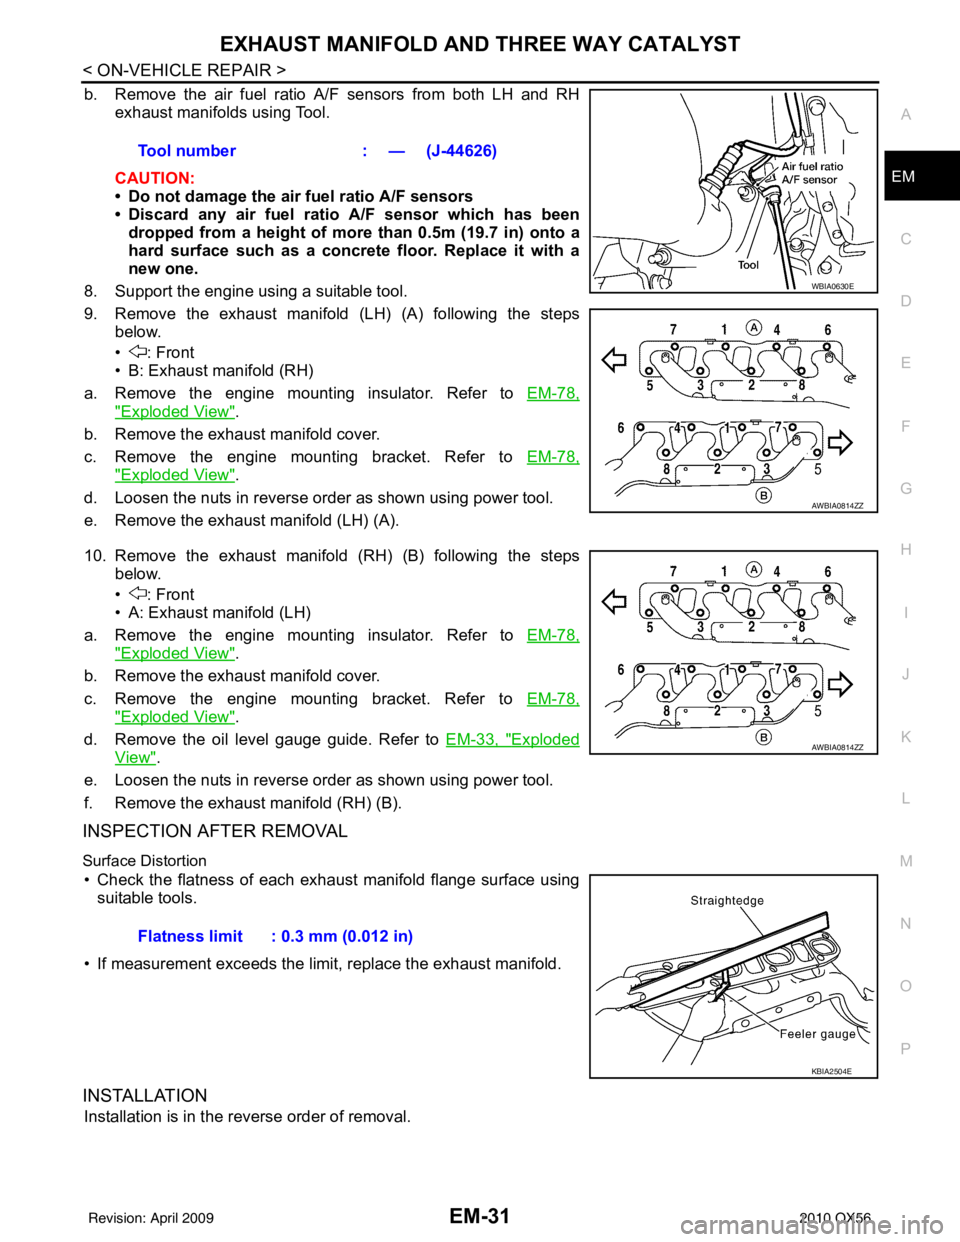
b. Remove the air fuel ratio A/F sensors from both LH and RH
exhaust manifolds using Tool.
CAUTION:
• Do not damage the air fuel ratio A/F sensors
• Discard any air fuel rati o A/F sensor which has been
dropped from a height of more than 0.5m (19.7 in) onto a
hard surface such as a concrete floor. Replace it with a
new one.
8. Support the engine using a suitable tool.
9. Remove the exhaust manifold (LH) (A) following the steps below.
• : Front
• B: Exhaust manifold (RH)
a. Remove the engine mounting insulator. Refer to EM-78,
"Exploded View".
b. Remove the exhaust manifold cover.
c. Remove the engine mounting bracket. Refer to EM-78,
"Exploded View".
d. Loosen the nuts in reverse order as shown using power tool.
e. Remove the exhaust manifold (LH) (A).
10. Remove the exhaust manifold (RH) (B) following the steps below.
• : Front
• A: Exhaust manifold (LH)
a. Remove the engine mounting insulator. Refer to EM-78,
"Exploded View".
b. Remove the exhaust manifold cover.
c. Remove the engine mounting bracket. Refer to EM-78,
"Exploded View".
d. Remove the oil level gauge guide. Refer to EM-33, "
Exploded
View".
e. Loosen the nuts in reverse order as shown using power tool.
f. Remove the exhaust manifold (RH) (B).
INSPECTION AFTER REMOVAL
Surface Distortion
• Check the flatness of each exhaust manifold flange surface using suitable tools.
• If measurement exceeds the limit, replace the exhaust manifold.
INSTALLATION
Installation is in the reverse order of removal. Tool number
: — (J-44626)
WBIA0630E
AWBIA0814ZZ
AWBIA0814ZZ
Flatness limit : 0.3 mm (0.012 in)
KBIA2504E
Revision: April 20092010 QX56