Page 2821 of 4210

MWI
COMBINATION METERMWI-59
< ECU DIAGNOSIS >
C
DE
F
G H
I
J
K L
M B A
O P
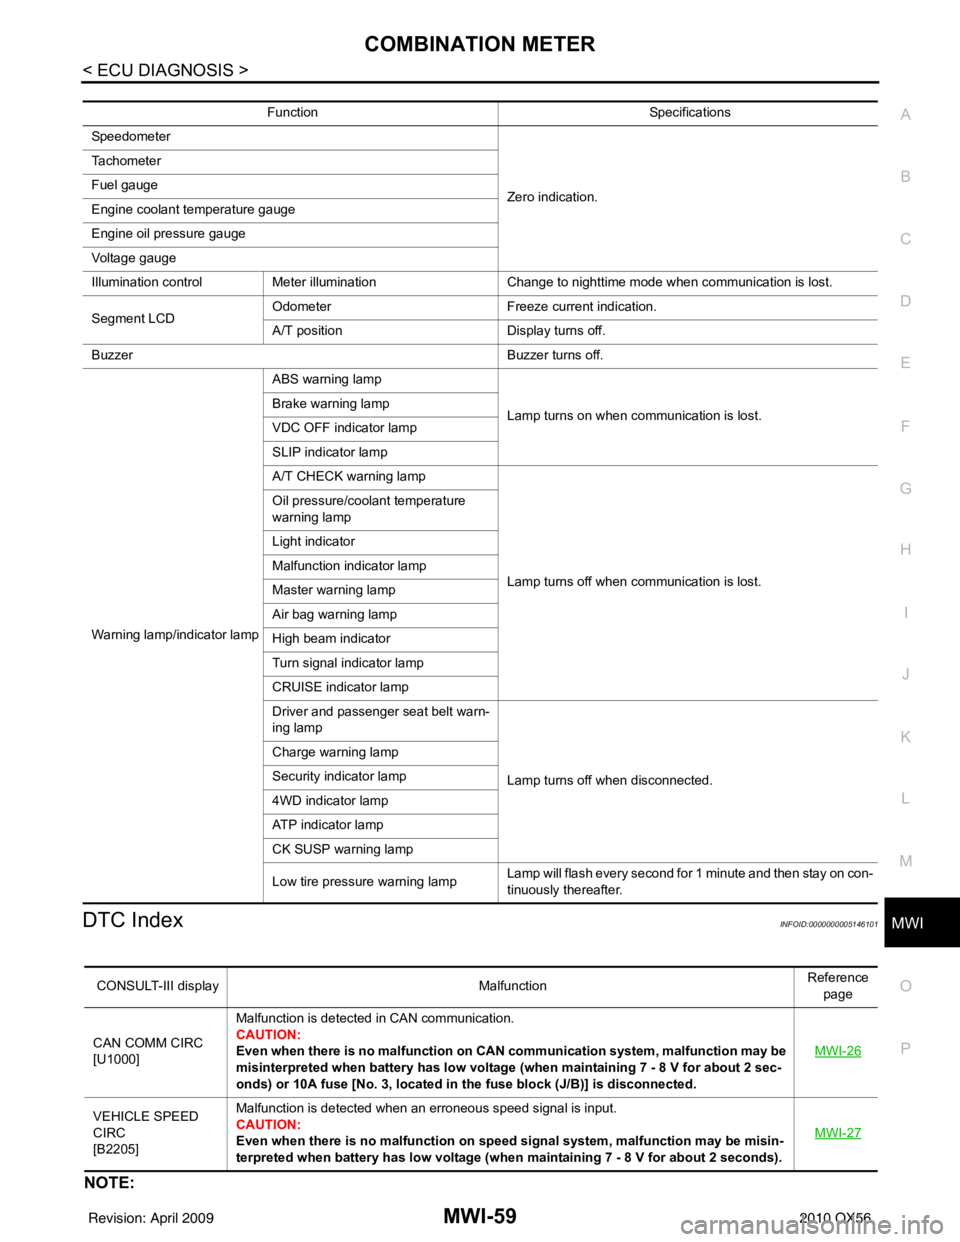
DTC IndexINFOID:0000000005146101
NOTE:
Function Specifications
Speedometer
Zero indication.
Tachometer
Fuel gauge
Engine coolant temperature gauge
Engine oil pressure gauge
Voltage gauge
Illumination control
Meter illumination Change to nighttime mode when communication is lost.
Segment LCD Odometer
Freeze current indication.
A/T position Display turns off.
Buzzer Buzzer turns off.
Warning lamp/indicator lamp ABS warning lamp
Lamp turns on when communication is lost.
Brake warning lamp
VDC OFF indicator lamp
SLIP indicator lamp
A/T CHECK warning lamp
Lamp turns off when communication is lost.
Oil pressure/coolant temperature
warning lamp
Light indicator
Malfunction indicator lamp
Master warning lamp
Air bag warning lamp
High beam indicator
Turn signal indicator lamp
CRUISE indicator lamp
Driver and passenger seat belt warn-
ing lamp
Lamp turns off when disconnected.
Charge warning lamp
Security indicator lamp
4WD indicator lamp
ATP indicator lamp
CK SUSP warning lamp
Low tire pressu
re warning lamp Lamp will flash every second for 1 minute and then stay on con-
tinuously thereafter.
CONSULT-III display
MalfunctionReference
page
CAN COMM CIRC
[U1000] Malfunction is detected in CAN communication.
CAUTION:
Even when there is no ma
lfunction on CAN communication system, malfunction may be
misinterpreted when battery has low voltag e (when maintaining 7 - 8 V for about 2 sec-
onds) or 10A fuse [No. 3, located in the fuse block (J/B)] is disconnected. MWI-26
VEHICLE SPEED
CIRC
[B2205]Malfunction is detected when an erroneous speed signal is input.
CAUTION:
Even when there is no malfunction on speed signal system, malfunction may be misin-
terpreted when battery has low voltage (whe
n maintaining 7 - 8 V for about 2 seconds). MWI-27
Revision: April 20092010 QX56
Page 2863 of 4210
MWI
CLOCK
MWI-101
< ON-VEHICLE REPAIR >
C
D E
F
G H
I
J
K L
M B A
O P
CLOCK
Removal and InstallationINFOID:0000000005146132
REMOVAL
1. Disconnect battery negative terminal.
2. Remove the cluster lid C lower. Refer to IP-15, "
Removal and Installation".
3. Detach the clock (1) from the tabs (A) and remove clock (1).
INSTALLATION
Installation is in the reverse order of removal.
ALNIA0661ZZ
Revision: April 20092010 QX56
Page 2956 of 4210

PG-46
< COMPONENT DIAGNOSIS >
HARNESS
D4 E6 B/8: Front combination lamp LH (with
daytime light system) C1 E119 W/16: IPDM E/R (intelligent power distribution
module engine room)
C2 E7 GR/2 : Fusible link box (battery) D1 E120 W/6: IPDM E/R (intelligent power distribution
module engine room)
C2 E9 — : Body ground E1 E121 BR/12: IPDM E/R (intelligent power distribution
module engine room)
D4 E11 B/8 : Front combination lamp LH (without
daytime light system) C1 E122 W/12: IPDM E/R (intelligent power distribution
module engine room)
D3 E12 B/5 : Stop lamp relay D1 E123 BR/8: IPDM E/R (intelligent power distribution
module engine room)
B2 E13 W/2 : Hood switch D1 E124 B/6: IPDM E/R (intelligent power distribution
module engine room)
D4 E14 — : Body ground F3 E125 B/47: ABS actuator and electric unit
(control unit)
C2 E15 — : Body ground D4 E126 — : Body ground
C1 E16 B/40 : ECM C2 E130 W/2 : Compressor motor relay
E4 E18 GR/2 : Front wheel sensor LH C3 E131 W/2 : Compressor motor relay
D1 E19 W/16 : To F33 D1 E134 GR/6 : ICC brake hold relay
E3 E21 GR/2 : Brake fluid level switch C2 E135 GR/2 : Transfer dropping resistor
E2 E23 GR/6 : Front wiper motor C1 E140 BR/6 : Trailer tow relay 2
D4 E24 — : Body ground B2 E153 W/2 : Transfer motor relay
F3 E25 BR/3 : Intelligent key warning buzzer B2 E154 W/2 : Transfer motor relay
C3 E27 BR/2 : Fusible link box (battery )D3 E156 L/4 : Trailer turn relay LH
C2 E30 /1 : Fusible link box (battery) D3 E157 L/4 : Trailer turn relay RH
E3 E31 B/3 : Front pressure sensor D5 E158 B/3 : Front sonar sensor LH outer
E3 E32 B/3 : Rear pressure sensor D5 E159 GR/3 : To E164
E1 E39 W/2 : To F34 B4 E160 GR/3 : To E165
D3 E40 B/3 : To E201 C3 E161 B/3 : Battery current sensor
D3 E41 SMJ : To C1 B4 E162 B/3 : Front sonar sensor LH inner
A4 E42 B/6 : ICC sensor C5 E163 B/3 : Front sonar sensor RH inner
E1 E46 B/5 : Transfer shift high relay D5 E164 GR/3 : To E159
D2 E47 B/5 : Transfer shift low relay A4 E165 GR/3 : To E160
C4 E48 B/3 : Refrigerant pressure sensor A3 E166 B/3 : Front sonar sensor RH outer
E3 E49 B/6 : Active booster Engine room sub-harness
D1 E69 L/4 : Transfer shut off relay D3 E201 B/3 : To E40
D5 E101 B/3 : Front turn/fog lamp LH C1 E202 /1 : Fusible link box (battery)
A4 E102 B/3 : Front turn/fog lamp RH C2 E203 — : Engine ground
C3 E103 B/5 : Daytime light relay C3 E204 /1 : Generator
D4 E105 BR/2 : Front and rear washer motor C3 E205 B/3 : Generator
E4 E106 BR/2 : Washer fluid level switch C3 E206 /1 : Generator
B3 E107 B/8 : Front combination lamp RH (without
daytime light system)
A3 E108 B/6 : Front combination lamp RH (with
daytime light system)
Revision: April 20092010 QX56
Page 2975 of 4210
PG
HARNESS CONNECTORPG-65
< COMPONENT DIAGNOSIS >
C
DE
F
G H
I
J
K L
B A
O P
N
• The slide-locking type connectors are disconnected by pushing or pulling the slider. Refer to the figure
below.
CAUTION:
• Do not pull the harness or wires when disconnecting the connector.
• Be careful not to damage the connector su pport bracket when disconnecting the connector.
[Example]
HARNESS CONNECTOR (LEVER LOCKING TYPE)
• Lever locking type harness connectors are used on certain control units and control modules such as ECM, ABS actuator and electric unit (control unit), etc.
• Lever locking type harness connectors are also us ed on super multiple junction (SMJ) connectors.
• Always confirm the lever is fully locked in place by mo ving the lever as far as it will go to ensure full connec-
tion.
CAUTION:
SEL769V
Revision: April 20092010 QX56
Page 3103 of 4210
PWC-118
< ON-VEHICLE REPAIR >
FRONT POWER WINDOW SWITCH
FRONT POWER WINDOW SWITCH
Removal and InstallationINFOID:0000000005147266
REMOVAL
1. Remove the front power window switch finisher (2) from the frontdoor finisher RH. Refer to INT-11, "
Removal and Installation".
: Pawl
2. Using a suitable tool (A), release the tabs and remove the front power window switch (1).
INSTALLATION
Installation is in the reverse order of removal.
ALKIA0857ZZ
Revision: April 20092010 QX56
Page 3104 of 4210
REAR POWER WINDOW SWITCHPWC-119
< ON-VEHICLE REPAIR >
C
DE
F
G H
I
J
L
M A
B
PWC
N
O P
REAR POWER WINDOW SWITCH
Removal and InstallationINFOID:0000000005147267
REMOVAL
1. Remove the rear power window switch finisher (1) from the rear door finisher. Refer to INT-11, "
Removal and Installation".
2. Using a suitable tool (A), release the tabs and remove the rear power window switch (2).
INSTALLATION
Installation is in the reverse order of removal.
ALKIA0860ZZ
Revision: April 20092010 QX56
Page 3105 of 4210
PWC-120
< ON-VEHICLE REPAIR >
REAR POWER VENT WINDOW SWITCH
REAR POWER VENT WINDOW SWITCH
Removal and InstallationINFOID:0000000005268493
REMOVAL
1. Remove the instrument lower panel LH, refer to IP-14, "Removal and Installation".
2. Using a suitable tool, release the upper and lower tabs , then remove the rear power vent window switch.
INSTALLATION
Installation is in the reverse order of removal.
1. Rear power vent window switch 2. Instrument lower panel LH Tab
ALKIA1619ZZ
Revision: April 20092010 QX56
Page 3120 of 4210

RAX-8
< REMOVAL AND INSTALLATION >
WHEEL HUB
REMOVAL AND INSTALLATION
WHEEL HUB
Removal and InstallationINFOID:0000000005148956
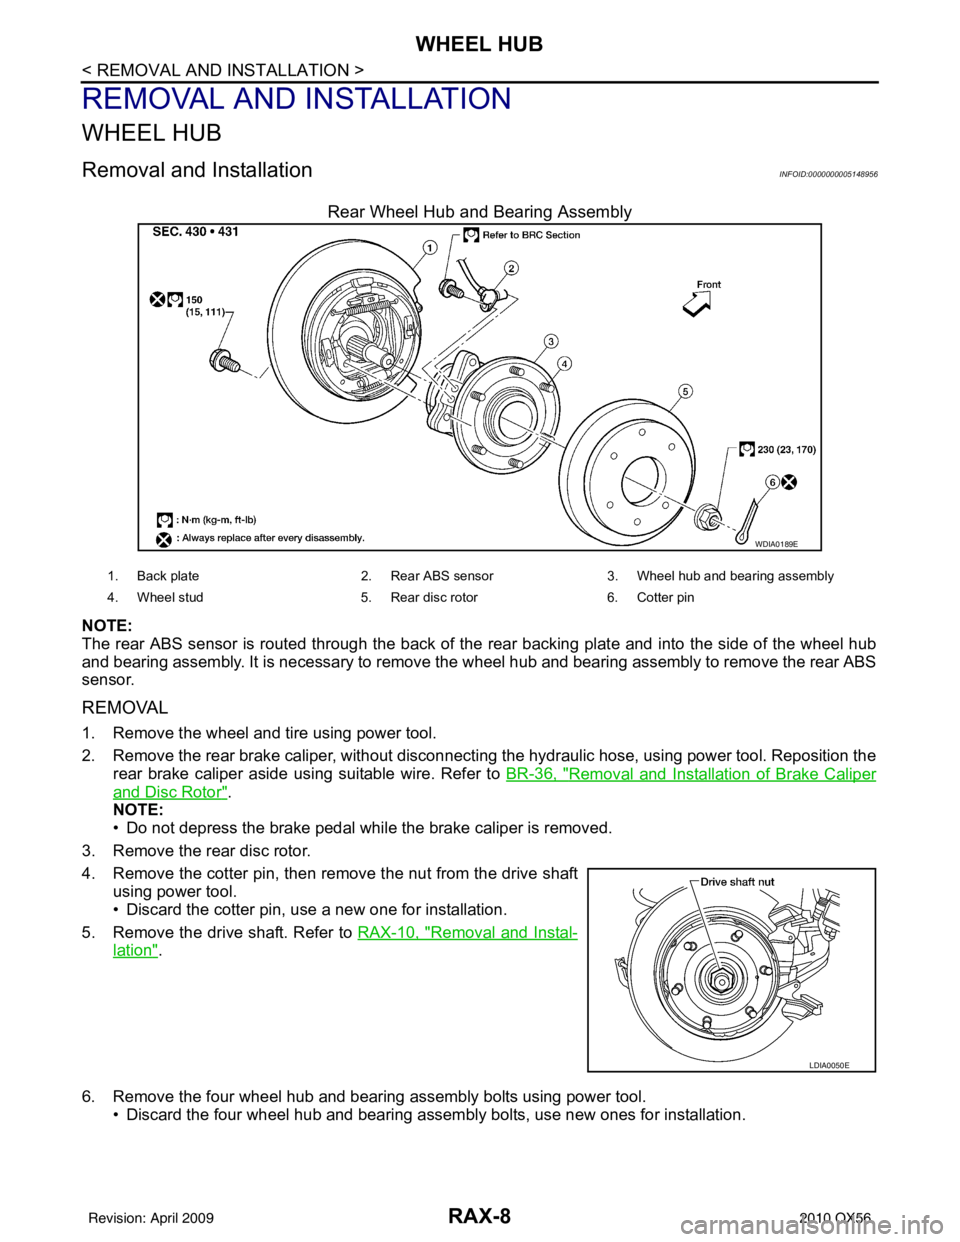
Rear Wheel Hub and Bearing Assembly
NOTE:
The rear ABS sensor is routed through the back of the rear backing plate and into the side of the wheel hub
and bearing assembly. It is necessary to remove the wheel hub and bearing assembly to remove the rear ABS
sensor.
REMOVAL
1. Remove the wheel and tire using power tool.
2. Remove the rear brake caliper, without disconnecting the hydraulic hose, using power tool. Reposition the
rear brake caliper aside using suitable wire. Refer to BR-36, "
Removal and Installation of Brake Caliper
and Disc Rotor".
NOTE:
• Do not depress the brake pedal while the brake caliper is removed.
3. Remove the rear disc rotor.
4. Remove the cotter pin, then remove the nut from the drive shaft using power tool.
• Discard the cotter pin, use a new one for installation.
5. Remove the drive shaft. Refer to RAX-10, "
Removal and Instal-
lation".
6. Remove the four wheel hub and bearing assembly bolts using power tool. • Discard the four wheel hub and bearing assembly bolts, use new ones for installation.
WDIA0189E
1. Back plate 2. Rear ABS sensor3. Wheel hub and be aring assembly
4. Wheel stud 5. Rear disc rotor6. Cotter pin
LDIA0050E
Revision: April 20092010 QX56