2010 INFINITI QX56 radio
[x] Cancel search: radioPage 885 of 4210
![INFINITI QX56 2010 Factory Service Manual HOMELINK UNIVERSAL TRANSCEIVERDLK-51
< FUNCTION DIAGNOSIS > [WITH INTELLIGENT KEY SYSTEM]
C
D
E
F
G H
I
J
L
M A
B
DLK
N
O P
HOMELINK UNIVERSAL TRANSCEIVER
Component DescriptionINFOID:0000000005146899
INFINITI QX56 2010 Factory Service Manual HOMELINK UNIVERSAL TRANSCEIVERDLK-51
< FUNCTION DIAGNOSIS > [WITH INTELLIGENT KEY SYSTEM]
C
D
E
F
G H
I
J
L
M A
B
DLK
N
O P
HOMELINK UNIVERSAL TRANSCEIVER
Component DescriptionINFOID:0000000005146899](/manual-img/42/57032/w960_57032-884.png)
HOMELINK UNIVERSAL TRANSCEIVERDLK-51
< FUNCTION DIAGNOSIS > [WITH INTELLIGENT KEY SYSTEM]
C
D
E
F
G H
I
J
L
M A
B
DLK
N
O P
HOMELINK UNIVERSAL TRANSCEIVER
Component DescriptionINFOID:0000000005146899
Item FunctionReference page
Homelink universal transceiver A maximum of 3 radio signals can be stored and transmitted to operate
the garage door, etc. Refer to Owner's
Manual
Revision: April 20092010 QX56
Page 979 of 4210
![INFINITI QX56 2010 Factory Service Manual HOMELINK UNIVERSAL TRANSCEIVERDLK-145
< COMPONENT DIAGNOSIS > [WITH INTELLIGENT KEY SYSTEM]
C
D
E
F
G H
I
J
L
M A
B
DLK
N
O P
DescriptionINFOID:0000000005147015
Homelink universal transceiver can stor INFINITI QX56 2010 Factory Service Manual HOMELINK UNIVERSAL TRANSCEIVERDLK-145
< COMPONENT DIAGNOSIS > [WITH INTELLIGENT KEY SYSTEM]
C
D
E
F
G H
I
J
L
M A
B
DLK
N
O P
DescriptionINFOID:0000000005147015
Homelink universal transceiver can stor](/manual-img/42/57032/w960_57032-978.png)
HOMELINK UNIVERSAL TRANSCEIVERDLK-145
< COMPONENT DIAGNOSIS > [WITH INTELLIGENT KEY SYSTEM]
C
D
E
F
G H
I
J
L
M A
B
DLK
N
O P
DescriptionINFOID:0000000005147015
Homelink universal transceiver can store and transmit a maximum of 3 radio signals.
Allows operation of garage doors, gates, home and office lighting, entry door locks and security system, etc.
Homelink universal transceiver power supply uses vehicle battery, which enables it to maintain every program
in case battery is discharged or removed.
ABKIA0056GB
Revision: April 20092010 QX56
Page 1838 of 4210
![INFINITI QX56 2010 Factory Service Manual PRECAUTIONSEC-485
< PRECAUTION > [VK56DE]
C
D
E
F
G H
I
J
K L
M A
EC
NP
O
•
Do not operate fuel pump when there is no fuel in lines.
• Tighten fuel hose clamps to the specified torque.
• Do no INFINITI QX56 2010 Factory Service Manual PRECAUTIONSEC-485
< PRECAUTION > [VK56DE]
C
D
E
F
G H
I
J
K L
M A
EC
NP
O
•
Do not operate fuel pump when there is no fuel in lines.
• Tighten fuel hose clamps to the specified torque.
• Do no](/manual-img/42/57032/w960_57032-1837.png)
PRECAUTIONSEC-485
< PRECAUTION > [VK56DE]
C
D
E
F
G H
I
J
K L
M A
EC
NP
O
•
Do not operate fuel pump when there is no fuel in lines.
• Tighten fuel hose clamps to the specified torque.
• Do not depress accelerator pedal when starting.
• Immediately after starting, do not rev up engine unnecessar-
ily.
• Do not rev up engine ju st prior to shutdown.
• When installing C.B. ham radio or a mobile phone, be sure to
observe the following as it may adversely affect electronic
control systems depending on installation location.
- Keep the antenna as far as possible from the electronic con-
trol units.
- Keep the antenna feeder line more than 20 cm (8 in) away
from the harness of electronic controls.
Do not let them run para llel for a long distance.
- Adjust the antenna and feeder line so that the standing-wave
radio can be kept smaller.
- Be sure to ground the radio to vehicle body.
BBIA0402E
SEF709Y
SEF708Y
Revision: April 20092010 QX56
Page 2249 of 4210

GI-26
< PRECAUTION >
PRECAUTIONS
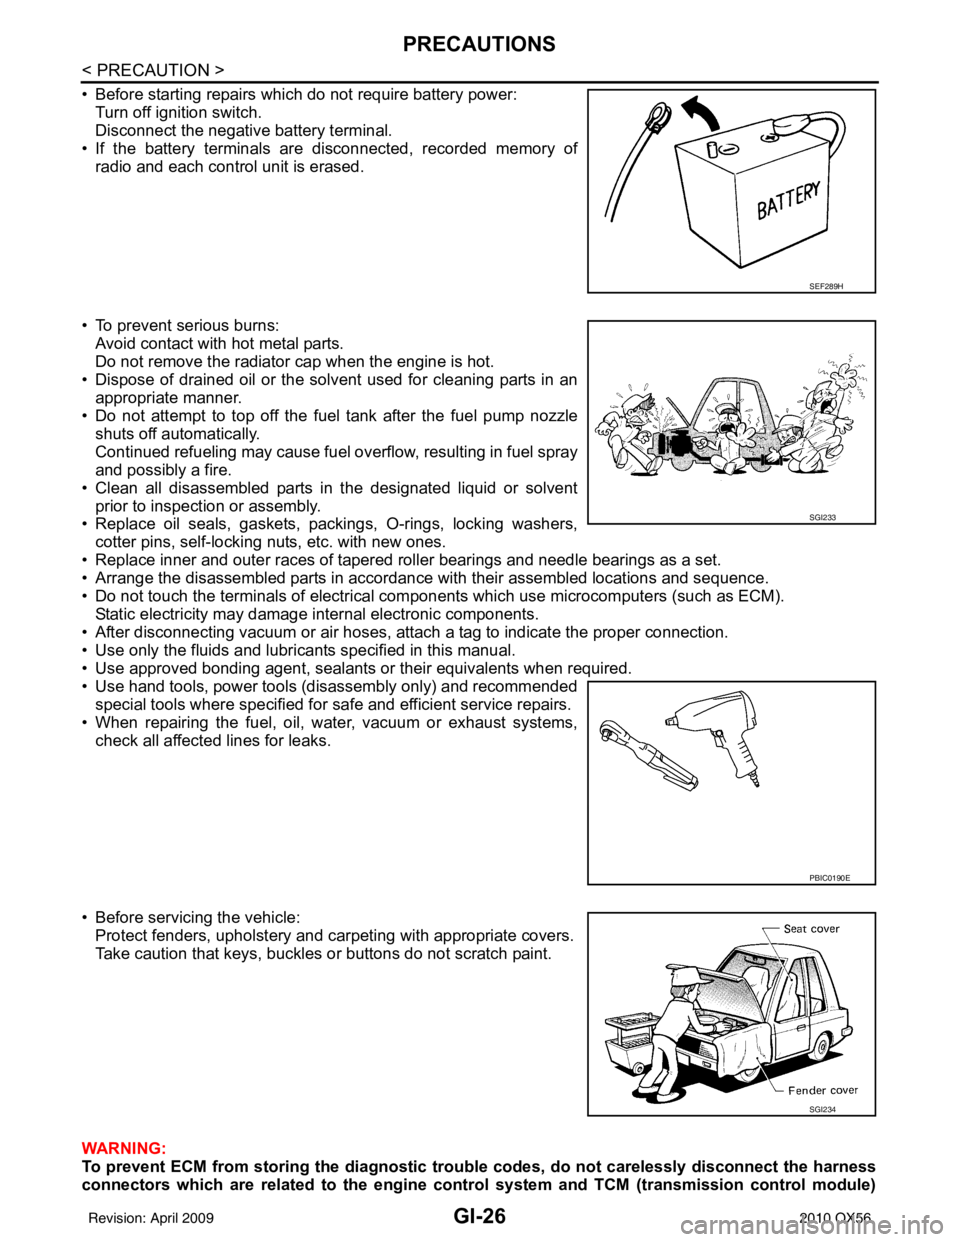
• Before starting repairs which do not require battery power:Turn off ignition switch.
Disconnect the negative battery terminal.
• If the battery terminals are disconnected, recorded memory of radio and each control unit is erased.
• To prevent serious burns: Avoid contact with hot metal parts.
Do not remove the radiator cap when the engine is hot.
• Dispose of drained oil or the solvent used for cleaning parts in an appropriate manner.
• Do not attempt to top off the fuel tank after the fuel pump nozzle
shuts off automatically.
Continued refueling may cause fuel overflow, resulting in fuel spray
and possibly a fire.
• Clean all disassembled parts in the designated liquid or solvent prior to inspection or assembly.
• Replace oil seals, gaskets, packings, O-rings, locking washers,
cotter pins, self-locking nuts, etc. with new ones.
• Replace inner and outer races of tapered roller bearings and needle bearings as a set.
• Arrange the disassembled parts in accordance with their assembled locations and sequence.
• Do not touch the terminals of electrical com ponents which use microcomputers (such as ECM).
Static electricity may damage internal electronic components.
• After disconnecting vacuum or air hoses, atta ch a tag to indicate the proper connection.
• Use only the fluids and lubricants specified in this manual.
• Use approved bonding agent, sealants or their equivalents when required.
• Use hand tools, power tools (disassembly only) and recommended special tools where specified for safe and efficient service repairs.
• When repairing the fuel, oil, water, vacuum or exhaust systems, check all affected lines for leaks.
• Before servicing the vehicle: Protect fenders, upholstery and carpeting with appropriate covers.
Take caution that keys, buckles or buttons do not scratch paint.
WARNING:
To prevent ECM from storing the diagnostic tro uble codes, do not carelessly disconnect the harness
connectors which are related to the engine control system and TCM (transmission control module)
SEF289H
SGI233
PBIC0190E
SGI234
Revision: April 20092010 QX56
Page 2257 of 4210

GI-34
< BASIC INSPECTION >
SERVICE INFORMATION FOR ELECTRICAL INCIDENT
BASIC INSPECTION
SERVICE INFORMATION FOR ELECTRICAL INCIDENT
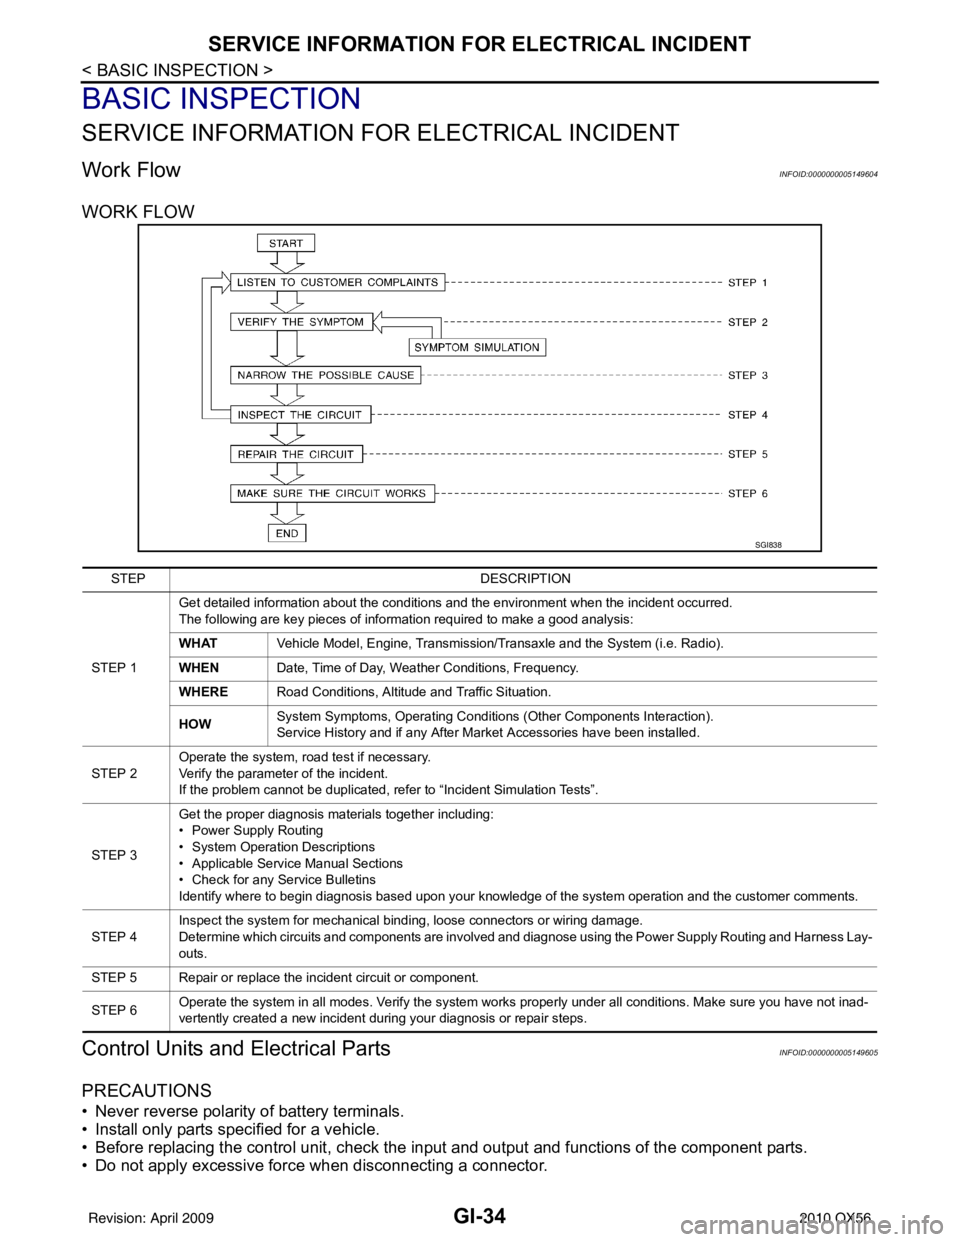
Work FlowINFOID:0000000005149604
WORK FLOW
Control Units and Electrical PartsINFOID:0000000005149605
PRECAUTIONS
• Never reverse polarity of battery terminals.
• Install only parts specified for a vehicle.
• Before replacing the control unit, check the i nput and output and functions of the component parts.
• Do not apply excessive force when disconnecting a connector.
SGI838
STEP DESCRIPTION
STEP 1 Get detailed information about the conditions and the environment when the incident occurred.
The following are key pieces of information required to make a good analysis:
WHAT
Vehicle Model, Engine, Transmission/Transaxle and the System (i.e. Radio).
WHEN Date, Time of Day, Weather Conditions, Frequency.
WHERE Road Conditions, Altitude and Traffic Situation.
HOW System Symptoms, Operating Conditions
(Other Components Interaction).
Service History and if any After Market Accessories have been installed.
STEP 2 Operate the system, road test if necessary.
Verify the parameter of the incident.
If the problem cannot be duplicated, refer to “Incident Simulation Tests”.
STEP 3 Get the proper diagnosis materials together including:
• Power Supply Routing
• System Operation Descriptions
• Applicable Service Manual Sections
• Check for any Service Bulletins
Identify where to begin diagnosis based upon your knowledge of the system operation and the customer comments.
STEP 4 Inspect the system for mechanical binding, loose connectors or wiring damage.
Determine which circuits and components are involved and diagnose using the Power Supply Routing and Harness Lay-
outs.
STEP 5 Repair or replace the incident circuit or component.
STEP 6 Operate the system in all modes. Verify the system works properly under all conditions. Make sure you have not inad-
vertently created a new incident during your diagnosis or repair steps.
Revision: April 20092010 QX56
Page 2263 of 4210

GI-40
< BASIC INSPECTION >
SERVICE INFORMATION FOR ELECTRICAL INCIDENT
An unclamped or loose harness can cause wiring to be pinched by seat components (such as slide guides)
during vehicle vibration. If the wiring runs under s eating areas, inspect wire routing for possible damage or
pinching.
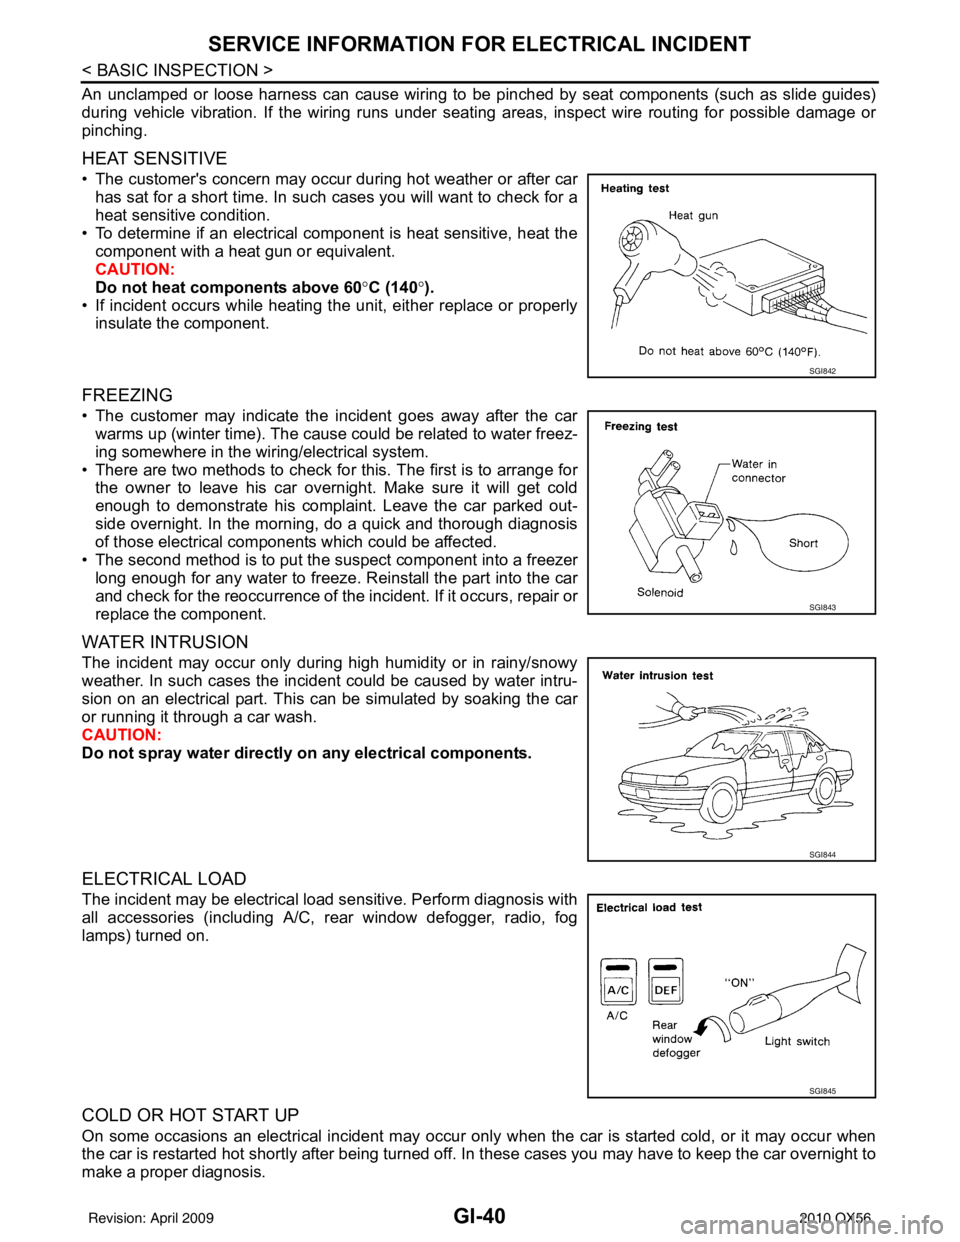
HEAT SENSITIVE
• The customer's concern may occur during hot weather or after car has sat for a short time. In such cases you will want to check for a
heat sensitive condition.
• To determine if an electrical component is heat sensitive, heat the component with a heat gun or equivalent.
CAUTION:
Do not heat components above 60 °C (140° ).
• If incident occurs while heating the unit, either replace or properly insulate the component.
FREEZING
• The customer may indicate the incident goes away after the carwarms up (winter time). The cause could be related to water freez-
ing somewhere in the wiring/electrical system.
• There are two methods to check for this. The first is to arrange for the owner to leave his car overnight. Make sure it will get cold
enough to demonstrate his complaint. Leave the car parked out-
side overnight. In the morning, do a quick and thorough diagnosis
of those electrical components which could be affected.
• The second method is to put the suspect component into a freezer long enough for any water to freeze. Reinstall the part into the car
and check for the reoccurrence of the incident. If it occurs, repair or
replace the component.
WATER INTRUSION
The incident may occur only during high humidity or in rainy/snowy
weather. In such cases the incident could be caused by water intru-
sion on an electrical part. This can be simulated by soaking the car
or running it through a car wash.
CAUTION:
Do not spray water directly on any electrical components.
ELECTRICAL LOAD
The incident may be electrical load sensitive. Perform diagnosis with
all accessories (including A/C, rear window defogger, radio, fog
lamps) turned on.
COLD OR HOT START UP
On some occasions an electrical incident may occur only when the car is started cold, or it may occur when
the car is restarted hot shortly after being turned off. In these cases you may have to keep the car overnight to
make a proper diagnosis.
SGI842
SGI843
SGI844
SGI845
Revision: April 20092010 QX56
Page 2363 of 4210
![INFINITI QX56 2010 Factory Service Manual SELF-DIAGNOSIS FUNCTIONHAC-23
< FUNCTION DIAGNOSIS > [AUTOMATIC AIR CONDITIONER]
C
D
E
F
G H
J
K L
M A
B
HAC
N
O P
SELF-DIAGNOSIS FUNCTION
A/C Auto Amp. Self-DiagnosisINFOID:0000000005147684
A/C SYSTE INFINITI QX56 2010 Factory Service Manual SELF-DIAGNOSIS FUNCTIONHAC-23
< FUNCTION DIAGNOSIS > [AUTOMATIC AIR CONDITIONER]
C
D
E
F
G H
J
K L
M A
B
HAC
N
O P
SELF-DIAGNOSIS FUNCTION
A/C Auto Amp. Self-DiagnosisINFOID:0000000005147684
A/C SYSTE](/manual-img/42/57032/w960_57032-2362.png)
SELF-DIAGNOSIS FUNCTIONHAC-23
< FUNCTION DIAGNOSIS > [AUTOMATIC AIR CONDITIONER]
C
D
E
F
G H
J
K L
M A
B
HAC
N
O P
SELF-DIAGNOSIS FUNCTION
A/C Auto Amp. Self-DiagnosisINFOID:0000000005147684
A/C SYSTEM SELF-DI AGNOSIS FUNCTION
The self-diagnosis function is built into the A/C auto amp. to quickly locate the cause of malfunctions.
DESCRIPTION
The self-diagnostic system diagnoses sensors, CAN system, and battery voltage on A/C auto amp. Refer to
applicable sections (items) for details. Fault codes (if any are present) will be displayed in the ambient temper-
ature display area. Refer to HAC-24, "
A/C System Self-Diagnosis Code Chart".
SELF-DIAGNOSTIC MODE
NOTE:
Radio must be off.
1. On the A/C and AV switch assembly, press the "SETTING" but- ton and twist the volume knob clockwise and counterclockwise
until the Self-Diagnosis screen shows on the display.
2. Scroll down to "Confirmation/Adjustment" and press the "ENTER" button.
3. Scroll down to "Climate Control" and press the "ENTER" button.
4. The fan bars will flash on the display during the self-test, and then the fault codes will display in the ambient temperature area.
They will continue scrolling until diagnostic mode is exited.
5. Exit by pressing the "BACK" button on A/C and AV switch assembly until display returns to its normal operation screen.
HVAC system will be OFF.
The self-diagnostic system diagnoses sensors, CAN system, and battery voltage on A/C auto amp. Refer to
applicable sections (items) for details. Fault codes (if any are present) will be displayed in the ambient temper-
ature display area. Refer to HAC-24, "
A/C System Self-Diagnosis Code Chart".
A/C and AV Switch A ssembly Self-DiagnosisINFOID:0000000005147685
A/C and AV switch assembly self-diagnosis function
The ON/OFF operation (continuity) of each switch in the A/C and AV switch assembly can be checked.
Self-diagnosis mode
AWNIA0098ZZ
AWIIA0081ZZ
Revision: April 20092010 QX56
Page 2918 of 4210

PG-8
< BASIC INSPECTION >
INSPECTION AND ADJUSTMENT
INSPECTION AND ADJUSTMENT
ADDITIONAL SERVICE WHEN REMOVING BATTERY NEGATIVE TERMINAL
ADDITIONAL SERVICE WHEN REMOVING BATTERY NEGATIVE TERMINAL : Spe-
cial Repair Requirement
INFOID:0000000005337686
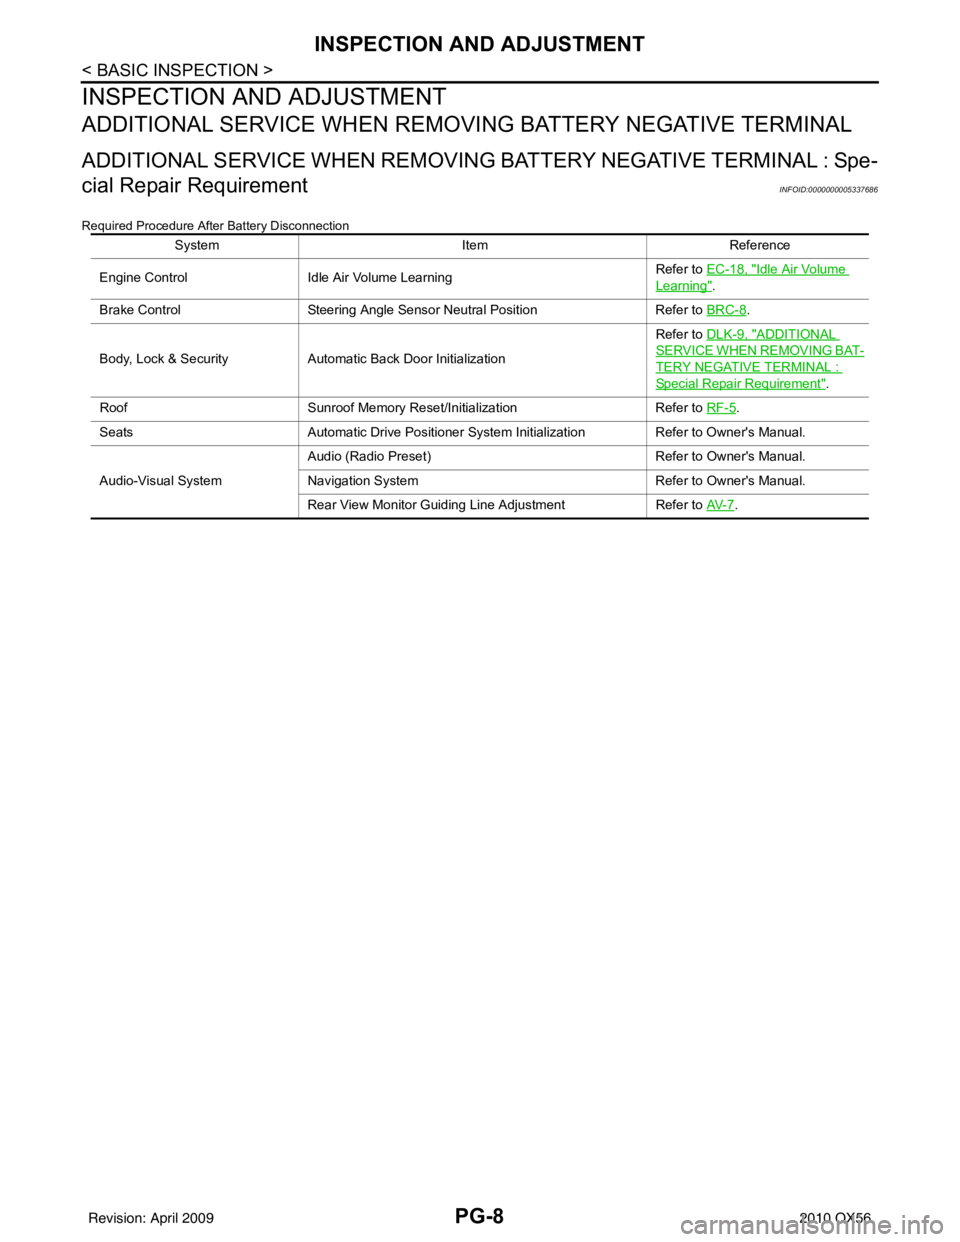
Required Procedure After Battery Disconnection
System ItemReference
Engine Control Idle Air Volume Learning Refer to EC-18, "
Idle Air Volume
Learning".
Brake Control Steering Angle Sensor Neutral Position Refer to BRC-8
.
Body, Lock & Security Automatic Back Door Initialization Refer to DLK-9, "
ADDITIONAL
SERVICE WHEN REMOVING BAT-
TERY NEGATIVE TERMINAL :
Special Repair Requirement".
Roof Sunroof Memory Reset/Initialization Refer to RF-5
.
Seats Automatic Drive Positioner System Initialization Refer to Owner's Manual.
Audio-Visual System Audio (Radio Preset)
Refer to Owner's Manual.
Navigation System Refer to Owner's Manual.
Rear View Monitor Guiding Line Adjustment Refer to AV- 7
.
Revision: April 20092010 QX56