2010 INFINITI QX56 maintenance
[x] Cancel search: maintenancePage 3858 of 4210

ROAD TESTTM-163
< ON-VEHICLE MAINTENANCE >
CEF
G H
I
J
K L
M A
B
TM
N
O P
Check engine brake.
Does engine braking effectively reduce speed in 1
1 position?
YES >> Check malfunction phenomena to repair or replace malfunctioning part. Refer to TM-121, "Symp-
tom Table".
NO >> 1. Record the malfunction. 2. Check malfunction phenomena to repair or replace malfunctioning part. Refer to TM-121,
"Symptom Table".
Vehicle Speed When Shifting GearsINFOID:0000000005148734
Refer to TM-265, "Vehicle Speed at Which Gear Shifting Occurs".
Vehicle Speed When Performing and Releasing Complete Lock-upINFOID:0000000005148735
Refer to TM-266, "Vehicle Speed at Which Lock-up Occurs/Releases".
Revision: April 20092010 QX56
Page 3859 of 4210

TM-164
< ON-VEHICLE MAINTENANCE >
A/T POSITION
A/T POSITION
Adjustment of A/T PositionINFOID:0000000005148736
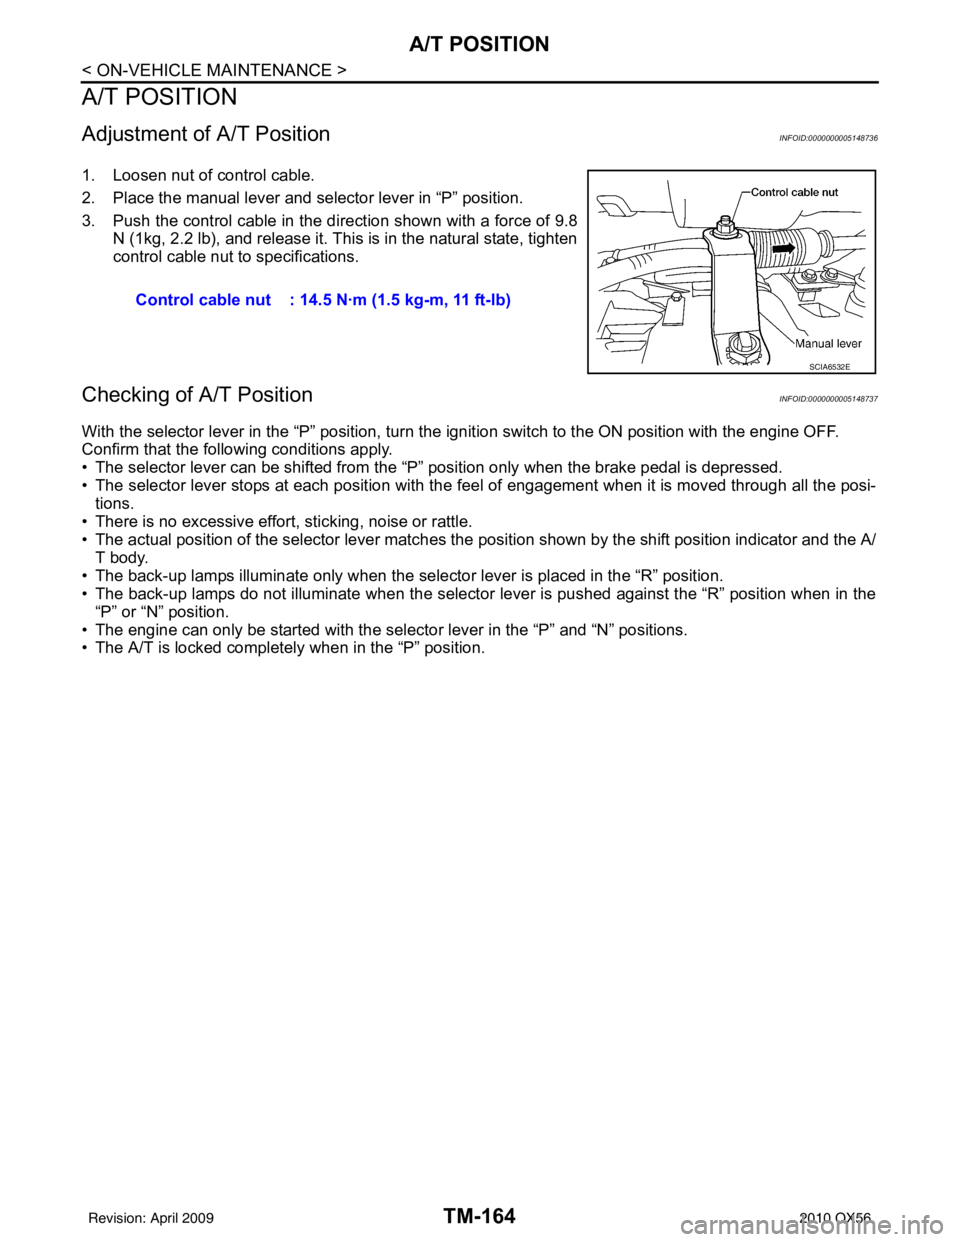
1. Loosen nut of control cable.
2. Place the manual lever and selector lever in “P” position.
3. Push the control cable in the direction shown with a force of 9.8
N (1kg, 2.2 lb), and release it. This is in the natural state, tighten
control cable nut to specifications.
Checking of A/T PositionINFOID:0000000005148737
With the selector lever in the “P” position, turn t he ignition switch to the ON position with the engine OFF.
Confirm that the following conditions apply.
• The selector lever can be shifted from the “P” position only when the brake pedal is depressed.
• The selector lever stops at each position with the f eel of engagement when it is moved through all the posi-
tions.
• There is no excessive effort, sticking, noise or rattle.
• The actual position of the selector lever matches the position shown by the shift position indicator and the A/
T body.
• The back-up lamps illuminate only when the selector lever is placed in the “R” position.
• The back-up lamps do not illuminate when the selector lever is pushed against the “R” position when in the “P” or “N” position.
• The engine can only be started with the select or lever in the “P” and “N” positions.
• The A/T is locked completely when in the “P” position. Control cable nut : 14.5 N·m (1.5 kg-m, 11 ft-lb)
SCIA6532E
Revision: April 20092010 QX56
Page 3963 of 4210

VTL-1
VENTILATION, HEATER & AIR CONDITIONER
C
DE
F
G H
J
K L
M
SECTION VTL
A
B
VTL
N
O P
CONTENTS
VENTILATION SYSTEM
PRECAUTION ....... ........................................2
PRECAUTIONS .............................................. .....2
Precaution for Supplemental Restraint System
(SRS) "AIR BAG" and "SEAT BELT PRE-TEN-
SIONER" ............................................................. ......
2
Precaution Necessary for Steering Wheel Rota-
tion After Battery Disconnect ............................... ......
2
Precaution for Working with HFC-134a (R-134a) ......3
Precaution for Procedure without Cowl Top Cover ......3
PREPARATION ............................................4
PREPARATION .............................................. .....4
Commercial Service Tool .................................... ......4
FUNCTION DIAGNOSIS ...............................5
IN-CABIN MICROFILTER .............................. .....5
Description .......................................................... ......5
ON-VEHICLE MAINTENANCE .....................6
IN-CABIN MICROFILTER .............................. .....6
Removal and Installation ...........................................6
ON-VEHICLE REPAIR .... ..............................7
CONTROL UNIT ..................................................7
Removal and Installation ...........................................7
IN-VEHICLE SENSOR ................................... .....9
Removal and Installation ...........................................9
OPTICAL SENSOR ........................................ ....10
Removal and Installation .........................................10
INTAKE SENSOR ..............................................11
Removal and Installation .........................................11
BLOWER MOTOR .......................................... ....12
Component .......................................................... ....12
Removal and Installation .........................................12
VARIABLE BLOWER CONTROL .....................14
Components ............................................................14
Removal and Installation .........................................15
HEATER & COOLING UNIT ASSEMBLY ........16
Component ..............................................................16
Removal and Installation .........................................17
EVAPORATOR .................................................19
Removal and Installation for Front Evaporator ........19
Removal and Installation for Rear Evaporator .........20
EXPANSION VALVE .........................................22
Removal and Installation for Rear Expansion
Valve .................................................................... ....
22
HEATER CORE .................................................23
Component ..............................................................23
Removal and Installation .........................................24
DEFROSTER DOOR MOTOR ..........................26
Removal and Installation .........................................26
INTAKE DOOR MOTOR ...................................27
Removal and Installation .........................................27
MODE DOOR MOTOR ......................................28
Components ............................................................28
Removal and Installation .........................................29
AIR MIX DOOR MOTOR ...................................30
Component ..............................................................30
Removal and Installation .........................................31
DUCTS AND GRILLES .....................................33
Component ..............................................................33
Removal and Installation .........................................36
Revision: April 20092010 QX56
Page 3964 of 4210

VTL-2
< PRECAUTION >
PRECAUTIONS
PRECAUTION
PRECAUTIONS
Precaution for Supplemental Restraint System (SRS) "AIR BAG" and "SEAT BELT
PRE-TENSIONER"
INFOID:0000000005403098
The Supplemental Restraint System such as “A IR BAG” and “SEAT BELT PRE-TENSIONER”, used along
with a front seat belt, helps to reduce the risk or severity of injury to the driver and front passenger for certain
types of collision. This system includes seat belt switch inputs and dual stage front air bag modules. The SRS
system uses the seat belt switches to determine the front air bag deployment, and may only deploy one front
air bag, depending on the severity of a collision and w hether the front occupants are belted or unbelted.
Information necessary to service the system safely is included in the SR and SB section of this Service Man-
ual.
WARNING:
• To avoid rendering the SRS inopera tive, which could increase the risk of personal injury or death in
the event of a collision which would result in air bag inflation, all maintenance must be performed by
an authorized NISSAN/INFINITI dealer.
• Improper maintenance, including in correct removal and installation of the SRS, can lead to personal
injury caused by unintent ional activation of the system. For re moval of Spiral Cable and Air Bag
Module, see the SR section.
• Do not use electrical test equipmen t on any circuit related to the SRS unless instructed to in this
Service Manual. SRS wiring harn esses can be identified by yellow and/or orange harnesses or har-
ness connectors.
PRECAUTIONS WHEN USING POWER TOOLS (AIR OR ELECTRIC) AND HAMMERS
WARNING:
• When working near the Airbag Diagnosis Sensor Unit or other Airbag System sensors with the Igni-
tion ON or engine running, DO NOT use air or electri c power tools or strike near the sensor(s) with a
hammer. Heavy vibration could activate the sensor( s) and deploy the air bag(s), possibly causing
serious injury.
• When using air or electric power tools or hammers , always switch the Ignition OFF, disconnect the
battery, and wait at least 3 minu tes before performing any service.
Precaution Necessary for Steering W heel Rotation After Battery Disconnect
INFOID:0000000005403099
NOTE:
• This Procedure is applied only to models with Intelligent Key system and NATS (NISSAN ANTI-THEFT SYS-
TEM).
• Remove and install all control units after disconnecting both battery cables with the ignition knob in the
″LOCK ″ position.
• Always use CONSULT-III to perform self-diagnosis as a part of each function inspection after finishing work.
If DTC is detected, perform trouble diagnosis according to self-diagnostic results.
For models equipped with the Intelligent Key system and NATS, an electrically controlled steering lock mech-
anism is adopted on the key cylinder.
For this reason, if the battery is disconnected or if the battery is discharged, the steering wheel will lock and
steering wheel rotation will become impossible.
If steering wheel rotation is required when battery pow er is interrupted, follow the procedure below before
starting the repair operation.
OPERATION PROCEDURE
1. Connect both battery cables. NOTE:
Supply power using jumper cables if battery is discharged.
2. Use the Intelligent Key or mechanical key to turn the ignition switch to the ″ACC ″ position. At this time, the
steering lock will be released.
3. Disconnect both battery cables. The steering lock will remain released and the steering wheel can be rotated.
4. Perform the necessary repair operation.
Revision: April 20092010 QX56
Page 3967 of 4210

IN-CABIN MICROFILTERVTL-5
< FUNCTION DIAGNOSIS >
C
DE
F
G H
J
K L
M A
B
VTL
N
O P
FUNCTION DIAGNOSIS
IN-CABIN MICROFILTER
DescriptionINFOID:0000000005147603
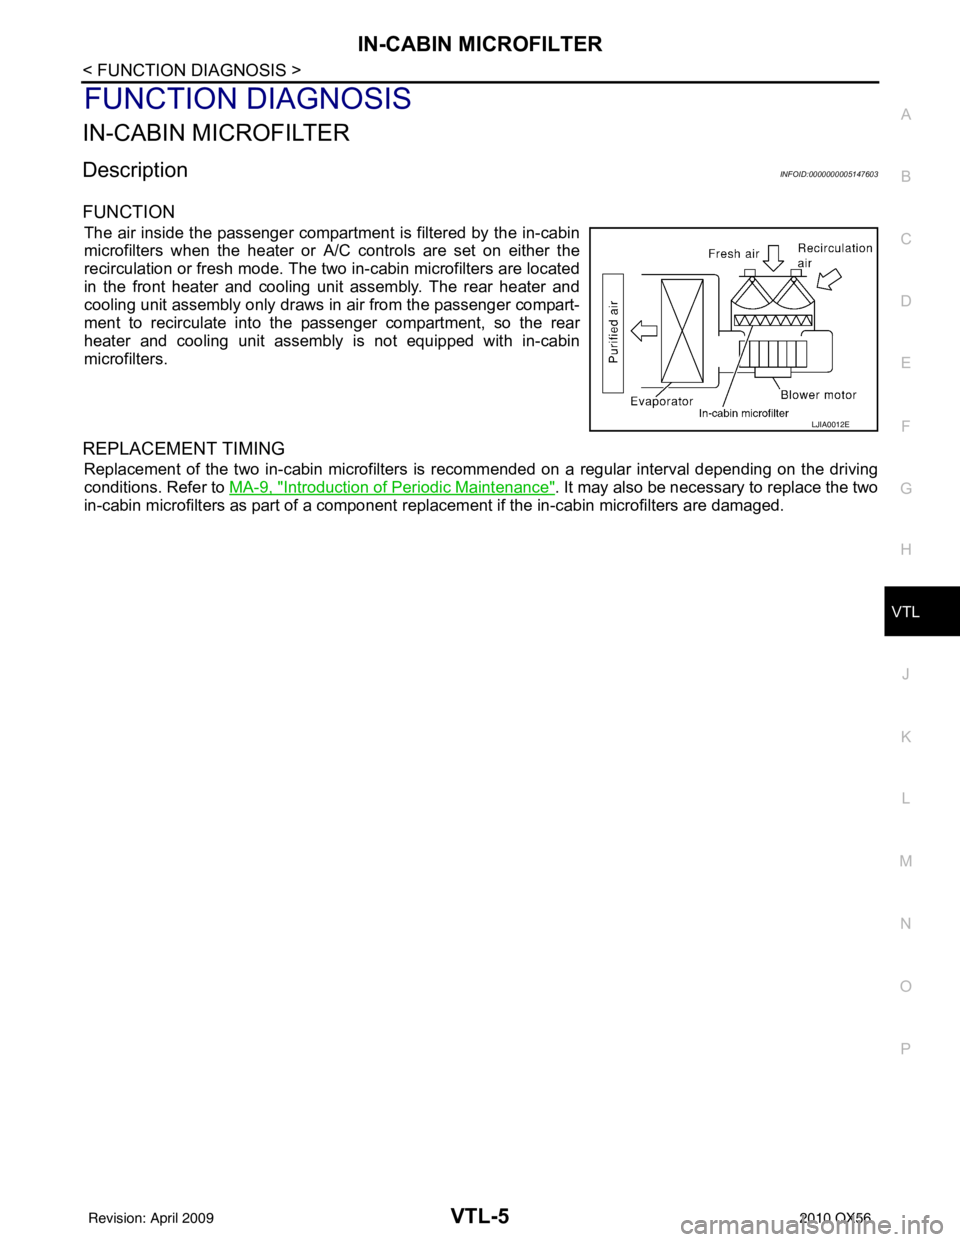
FUNCTION
The air inside the passenger compartment is filtered by the in-cabin
microfilters when the heater or A/C controls are set on either the
recirculation or fresh mode. The two in-cabin microfilters are located
in the front heater and cooling unit assembly. The rear heater and
cooling unit assembly only draws in air from the passenger compart-
ment to recirculate into the passenger compartment, so the rear
heater and cooling unit assembly is not equipped with in-cabin
microfilters.
REPLACEMENT TIMING
Replacement of the two in-cabin microfilters is recommended on a regular interval depending on the driving
conditions. Refer to MA-9, "
Introduction of Periodic Maintenance". It may also be necessary to replace the two
in-cabin microfilters as part of a component r eplacement if the in-cabin microfilters are damaged.
LJIA0012E
Revision: April 20092010 QX56
Page 3968 of 4210

VTL-6
< ON-VEHICLE MAINTENANCE >
IN-CABIN MICROFILTER
ON-VEHICLE MAINTENANCE
IN-CABIN MICROFILTER
Removal and InstallationINFOID:0000000005147604
REPLACEMENT PROCEDURE
1. Remove the glove box assembly from the instrument panel. Refer to IP-17, "Removal and Installation".
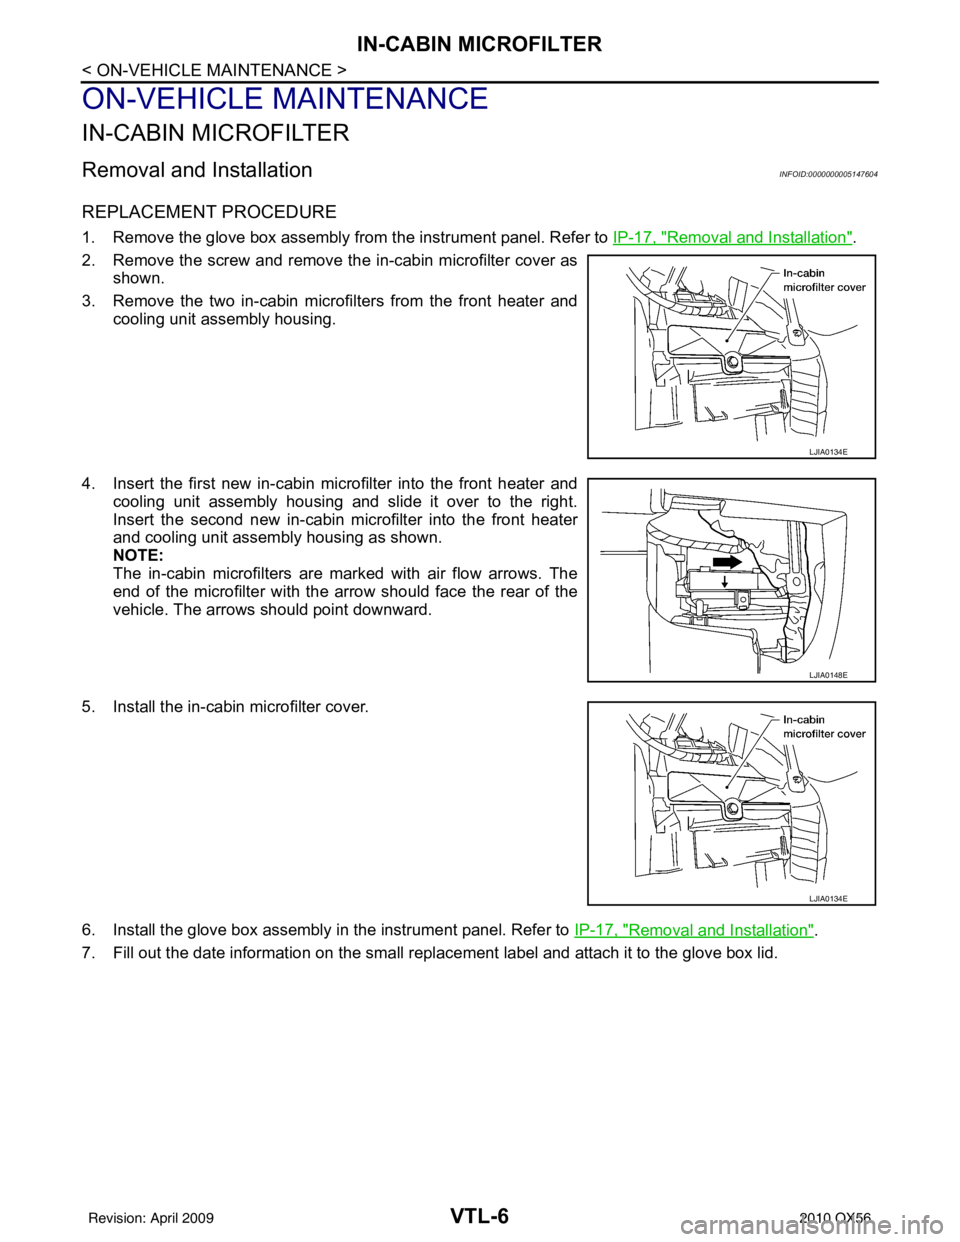
2. Remove the screw and remove the in-cabin microfilter cover as shown.
3. Remove the two in-cabin microf ilters from the front heater and
cooling unit assembly housing.
4. Insert the first new in-cabin micr ofilter into the front heater and
cooling unit assembly housing and slide it over to the right.
Insert the second new in-cabin mi crofilter into the front heater
and cooling unit assembly housing as shown.
NOTE:
The in-cabin microfilters are marked with air flow arrows. The
end of the microfilter with the arro w should face the rear of the
vehicle. The arrows should point downward.
5. Install the in-cabin microfilter cover.
6. Install the glove box assembly in the instrument panel. Refer to IP-17, "
Removal and Installation".
7. Fill out the date information on the small replac ement label and attach it to the glove box lid.
LJIA0134E
LJIA0148E
LJIA0134E
Revision: April 20092010 QX56
Page 4068 of 4210

WCS
PRECAUTIONSWCS-69
< PRECAUTION >
C
DE
F
G H
I
J
K L
M B A
O P
PRECAUTION
PRECAUTIONS
Precaution for Supplemental Restraint System (SRS) "AIR BAG" and "SEAT BELT
PRE-TENSIONER"
INFOID:0000000005238466
The Supplemental Restraint System such as “AIR BAG” and “SEAT BELT PRE-TENSIONER”, used along
with a front seat belt, helps to reduce the risk or severi ty of injury to the driver and front passenger for certain
types of collision. This system includes seat belt switch inputs and dual stage front air bag modules. The SRS
system uses the seat belt switches to determine the front air bag deployment, and may only deploy one front
air bag, depending on the severity of a collision and w hether the front occupants are belted or unbelted.
Information necessary to service the system safely is included in the SR and SB section of this Service Man-
ual.
WARNING:
• To avoid rendering the SRS inoper ative, which could increase the risk of personal injury or death in
the event of a collision which would result in air bag inflation, all maintenance must be performed by
an authorized NISSAN/INFINITI dealer.
• Improper maintenance, including in correct removal and installation of the SRS, can lead to personal
injury caused by unintentional act ivation of the system. For removal of Spiral Cable and Air Bag
Module, see the SR section.
• Do not use electrical test equipm ent on any circuit related to the SRS unless instructed to in this
Service Manual. SRS wiring harnesses can be identi fied by yellow and/or orange harnesses or har-
ness connectors.
PRECAUTIONS WHEN USING POWER TOOLS (AIR OR ELECTRIC) AND HAMMERS
WARNING:
• When working near the Airbag Diagnosis Sensor Un it or other Airbag System sensors with the Igni-
tion ON or engine running, DO NOT use air or el ectric power tools or strike near the sensor(s) with a
hammer. Heavy vibration could activate the sensor( s) and deploy the air bag(s), possibly causing
serious injury.
• When using air or electric power tools or hammers, always switch the Ignition OFF, disconnect the battery, and wait at least 3 minutes before performing any service.
Necessary for Steering Wheel Ro tation After Battery DisconnectINFOID:0000000005238467
NOTE:
• Before removing and installing any control units, first tu rn the push-button ignition switch to the LOCK posi-
tion, then disconnect both battery cables.
• After finishing work, confirm that all control unit connectors are connected properly, then re-connect both
battery cables.
• Always use CONSULT-III to perform self-diagnosis as a part of each function inspection after finishing work.
If a DTC is detected, perform trouble diagnos is according to self-diagnosis results.
This vehicle is equipped with a push-button ignition switch and a steering lock unit.
If the battery is disconnect ed or discharged, the steering wheel will lock and cannot be turned.
If turning the steering wheel is required with the battery disconnected or discharged, follow the procedure
below before starting the repair operation.
OPERATION PROCEDURE
1. Connect both battery cables. NOTE:
Supply power using jumper cables if battery is discharged.
2. Carry the Intelligent Key or insert it to the key slot and turn the push-button ignition switch to ACC position. (At this time, the steering lock will be released.)
3. Disconnect both battery cables. The steering lock will remain released with both battery cables discon- nected and the steering wheel can be turned.
4. Perform the necessary repair operation.
5. When the repair work is completed, re-connect both battery cables. With the brake pedal released, turn the push-button ignition switch from ACC position to ON position, then to LOCK position. (The steering
wheel will lock when the push-button ignition switch is turned to LOCK position.)
Revision: April 20092010 QX56
Page 4071 of 4210

WT-2
Low Tire Pressure Warning Lamp Flashes When
Ignition Switch Is Turned On ..................................
39
HAZARD WARNING LAMPS FLASH ...............40
Hazard Warning Lamps Flash When Ignition
Switch Is Turned On ............................................ ...
40
"TIRE PRESSURE" INFORMATION IN DIS-
PLAY UNIT DOES NOT EXIST .........................
41
"TIRE PRESSURE" Information in Display Unit
Does Not Exist ..................................................... ...
41
ID REGISTRATION CANNOT BE COMPLET-
ED ......................................................................
42
ID Registration Cannot Be Completed ................ ...42
NOISE, VIBRATION AND HARSHNESS
(NVH) TROUBLESHOOTING ......................... ...
43
NVH Troubleshooting Chart ................................ ...43
PRECAUTION .............................................44
PRECAUTIONS .............................................. ...44
Precaution for Supplemental Restraint System
(SRS) "AIR BAG" and "SEAT BELT PRE-TEN-
SIONER" .............................................................. ...
44
Precaution Necessary for Steering Wheel Rota-
tion After Battery Disconnect ..................................
44
PREPARATION ..........................................46
PREPARATION .............................................. ...46
Special Service Tool ............................................ ...46
Commercial Service Tool ........................................46
ON-VEHICLE MAINTENANCE ..................47
WHEEL ........................................................... ...47
Inspection ............................................................. ...47
ON-VEHICLE REPAIR ...............................48
WHEEL AND TIRE ASSEMBLY .................... ...48
Balancing Wheels ................................................ ...48
Rotation ...................................................................49
REMOVAL AND INSTALLATION ..............50
REMOVAL AND INSTALLATION .................. ...50
Transmitter (Pressure Sensor) ............................. ...50
SERVICE DATA AND SPECIFICATIONS
(SDS) .......... ................................. ...............
52
SERVICE DATA AND SPECIFICATIONS
(SDS) .............................................................. ...
52
Road Wheel ......................................................... ...52
Tire ..........................................................................52
Revision: April 20092010 QX56