2010 INFINITI QX56 light
[x] Cancel search: lightPage 1850 of 4210
![INFINITI QX56 2010 Factory Service Manual SERVICE DATA AND SPECIFICATIONS (SDS)EC-497
< SERVICE DATA AND SPECIFICATIONS (SDS) [VK56DE]
C
D
E
F
G H
I
J
K L
M A
EC
NP
O
SERVICE DATA AND SPECIFICATIONS (SDS)
SERVICE DATA AND SPECIFICATIONS (SDS INFINITI QX56 2010 Factory Service Manual SERVICE DATA AND SPECIFICATIONS (SDS)EC-497
< SERVICE DATA AND SPECIFICATIONS (SDS) [VK56DE]
C
D
E
F
G H
I
J
K L
M A
EC
NP
O
SERVICE DATA AND SPECIFICATIONS (SDS)
SERVICE DATA AND SPECIFICATIONS (SDS](/manual-img/42/57032/w960_57032-1849.png)
SERVICE DATA AND SPECIFICATIONS (SDS)EC-497
< SERVICE DATA AND SPECIFICATIONS (SDS) [VK56DE]
C
D
E
F
G H
I
J
K L
M A
EC
NP
O
SERVICE DATA AND SPECIFICATIONS (SDS)
SERVICE DATA AND SPECIFICATIONS (SDS)
Fuel PressureINFOID:0000000005149516
Idle Speed and Ignition TimingINFOID:0000000005149517
*: Under the following conditions:
• Air conditioner switch: OFF
• Electric load: OFF (Lights and heater fan)
• Steering wheel: Kept in straight-ahead position
Calculated Load ValueINFOID:0000000005149518
Mass Air Flow SensorINFOID:0000000005149519
*: Engine is warmed up to normal operating temperature and running under no load.
Intake Air Temperature SensorINFOID:0000000005149520
Engine Coolant Temperature SensorINFOID:0000000005149521
A/F Sensor 1 HeaterINFOID:0000000005149522
Fuel pressure at idling kPa (kg/cm2, psi)
Approximately 350 (3.57, 51)
Target idle speed
No-load* (in P or N position) 650±50 rpm
Air conditioner: ON In P or N position 700 rpm or more
Ignition timing In P or N position 15° ± 5 ° BTDC
Condition Calculated load value % (Using CONSULT-IIl or GST)
At idle 14.0 - 33.0
At 2,500 rpm 12.0 - 25.0
Supply voltageBattery voltage (11 - 14V)
Output voltage at idle 1.0 - 1.3V*
Mass air flow (Using CONSULT-IIl or GST) 3.0 - 9.0 g·m/sec at idle*
9.0 - 28.0 g·m/sec at 2,500 rpm*
Temperature °C ( °F) Resistance kΩ
25 (77) 1.800 - 2.200
Temperature °C ( °F) Resistance kΩ
20 (68) 2.1 - 2.9
50 (122) 0.68 - 1.00
90 (194) 0.236 - 0.260
Resistance [at 25°C (77 °F)] 1.98 - 2.66Ω
Revision: April 20092010 QX56
Page 1855 of 4210
EM-4
< PRECAUTION >
PRECAUTIONS
5. When the repair work is completed, return the ignition switch to the ″LOCK ″ position before connecting
the battery cables. (At this time, the steering lock mechanism will engage.)
6. Perform a self-diagnosis check of a ll control units using CONSULT-III.
Precaution for Drain Engine CoolantINFOID:0000000005148963
Drain engine coolant when engine is cooled.
Precaution for Disconnecting Fuel PipingINFOID:0000000005148964
• Before starting work, make sure no fire or spark producing items are in the work area.
• Release fuel pressure before disconnecting and disassembly.
• After disconnecting pipes, plug openings to stop fuel leakage.
Precaution for Removal and DisassemblyINFOID:0000000005148965
• When instructed to use special service tools, use the s pecified tools. Always be careful to work safely, avoid
forceful or uninstructed operations.
• Exercise maximum care to avoid damage to mating or sliding surfaces.
• Cover openings of engine system with tape or the equivalent, if necessary, to seal out foreign materials.
• Mark and arrange disassembly parts in an organi zed way for easy troubleshooting and assembly.
• When loosening nuts and bolts, as a basic rule, start with the one furthest outside, then the one diagonally opposite, and so on. If the order of loosening is specified, do exactly as specified. Power tools may be used
where noted in the step.
Precaution for Inspection, Repair and ReplacementINFOID:0000000005148966
Before repairing or replacing, thoroughly inspect parts. Inspect new replacement parts in the same way, and
replace if necessary.
Precaution for Assembly and InstallationINFOID:0000000005148967
• Use torque wrench to tighten bolts or nuts to specification.
• When tightening nuts and bolts, as a basic rule, equally tighten in several different steps starting with theones in center, then ones on inside and outside diagonally in this order. If the order of tightening is specified,
do exactly as specified.
• Replace with new gasket, packing, oil seal or O-ring.
• Thoroughly wash, clean, and air-blow each part. Carefully check engine oil or engine coolant passages for any restriction and blockage.
• Avoid damaging sliding or mating surfaces. Completely remove foreign materials such as cloth lint or dust. Before assembly, oil sliding surfaces well.
• Release air within route when refilling after draining engine coolant.
• Before starting engine, apply fuel pressure to fuel lines with turning ignition switch ON (with engine stopped). Then make sure that there are no leaks at fuel line connections.
• After repairing, start engine and increase engine s peed to check engine coolant, fuel, oil, and exhaust sys-
tems for leakage.
Parts Requiring Angular TighteningINFOID:0000000005148968
• For final tightening of the following engine parts use Tool:
- Cylinder head bolts
- Main bearing cap bolts
- Connecting rod cap bolts
- Crankshaft pulley bolt (No angle wrench is required as the bolt flange is provided with notches for angle tightening)
• Do not use a torque value for final tightening.
• The torque value for these parts are for a preliminary step.
• Ensure thread and seat surfaces are clean and lightly coated with engine oil. Tool number : KV10112100 (BT-8653-A)
Revision: April 20092010 QX56
Page 1856 of 4210
PRECAUTIONSEM-5
< PRECAUTION >
C
DE
F
G H
I
J
K L
M A
EM
NP
O
Precaution for Liquid GasketINFOID:0000000005148969
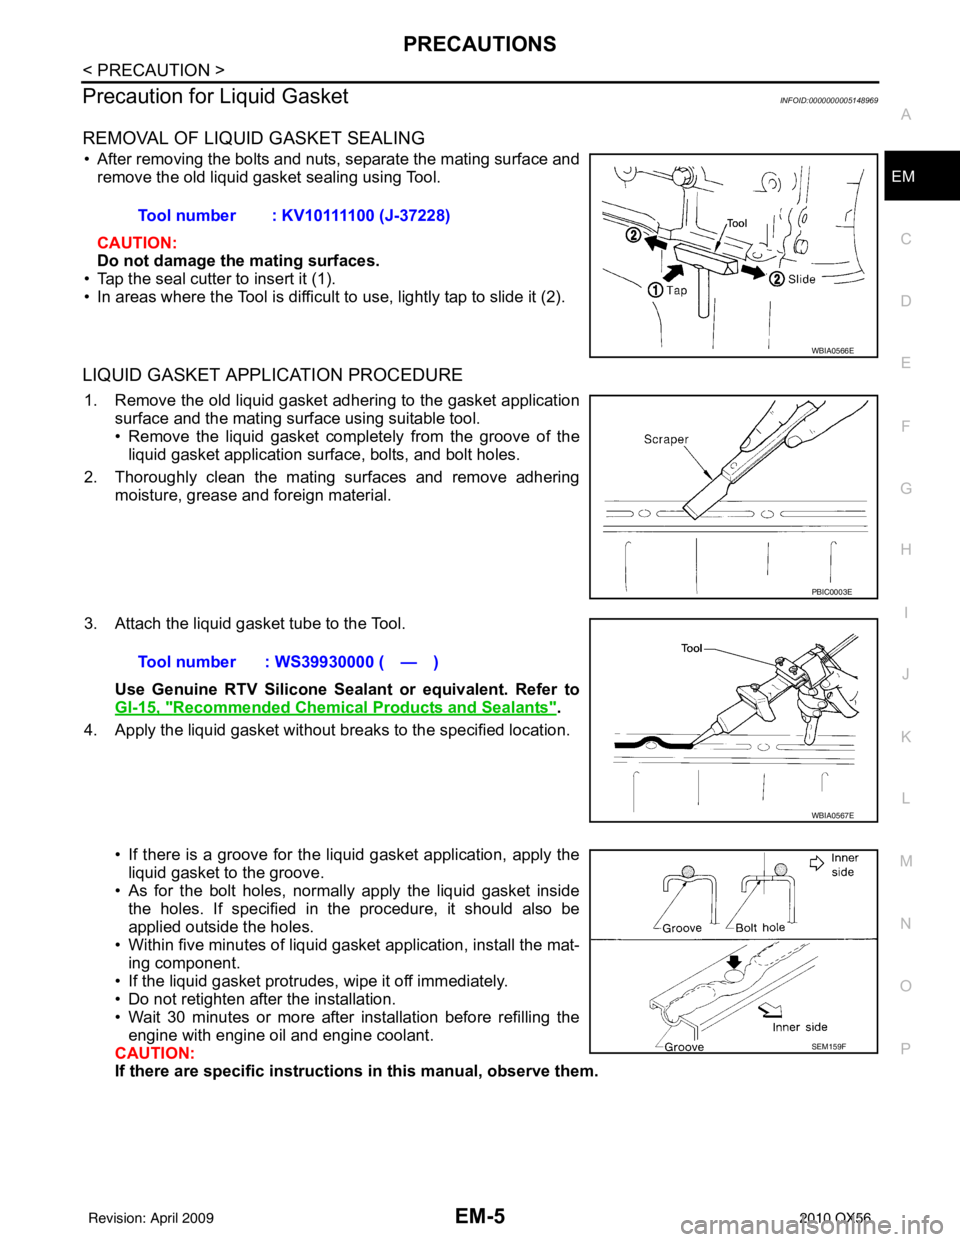
REMOVAL OF LIQUID GASKET SEALING
• After removing the bolts and nuts, separate the mating surface and
remove the old liquid gasket sealing using Tool.
CAUTION:
Do not damage the mating surfaces.
• Tap the seal cutter to insert it (1).
• In areas where the Tool is difficult to use, lightly tap to slide it (2).
LIQUID GASKET APPLICATION PROCEDURE
1. Remove the old liquid gasket adhering to the gasket application surface and the mating surface using suitable tool.
• Remove the liquid gasket completely from the groove of the
liquid gasket application surface, bolts, and bolt holes.
2. Thoroughly clean the mating surfaces and remove adhering moisture, grease and foreign material.
3. Attach the liquid gasket tube to the Tool. Use Genuine RTV Silicone Sealant or equivalent. Refer to
GI-15, "
Recommended Chemical Products and Sealants".
4. Apply the liquid gasket without breaks to the specified location.
• If there is a groove for the liquid gasket application, apply theliquid gasket to the groove.
• As for the bolt holes, normally apply the liquid gasket inside
the holes. If specified in the procedure, it should also be
applied outside the holes.
• Within five minutes of liquid gasket application, install the mat-
ing component.
• If the liquid gasket protrudes, wipe it off immediately.
• Do not retighten after the installation.
• Wait 30 minutes or more after installation before refilling the engine with engine oil and engine coolant.
CAUTION:
If there are specific instructions in this manual, observe them.
Tool number : KV10111100 (J-37228)
WBIA0566E
PBIC0003E
Tool number : WS39930000 ( — )
WBIA0567E
SEM159F
Revision: April 20092010 QX56
Page 1902 of 4210
TIMING CHAINEM-51
< ON-VEHICLE REPAIR >
C
DE
F
G H
I
J
K L
M A
EM
NP
O
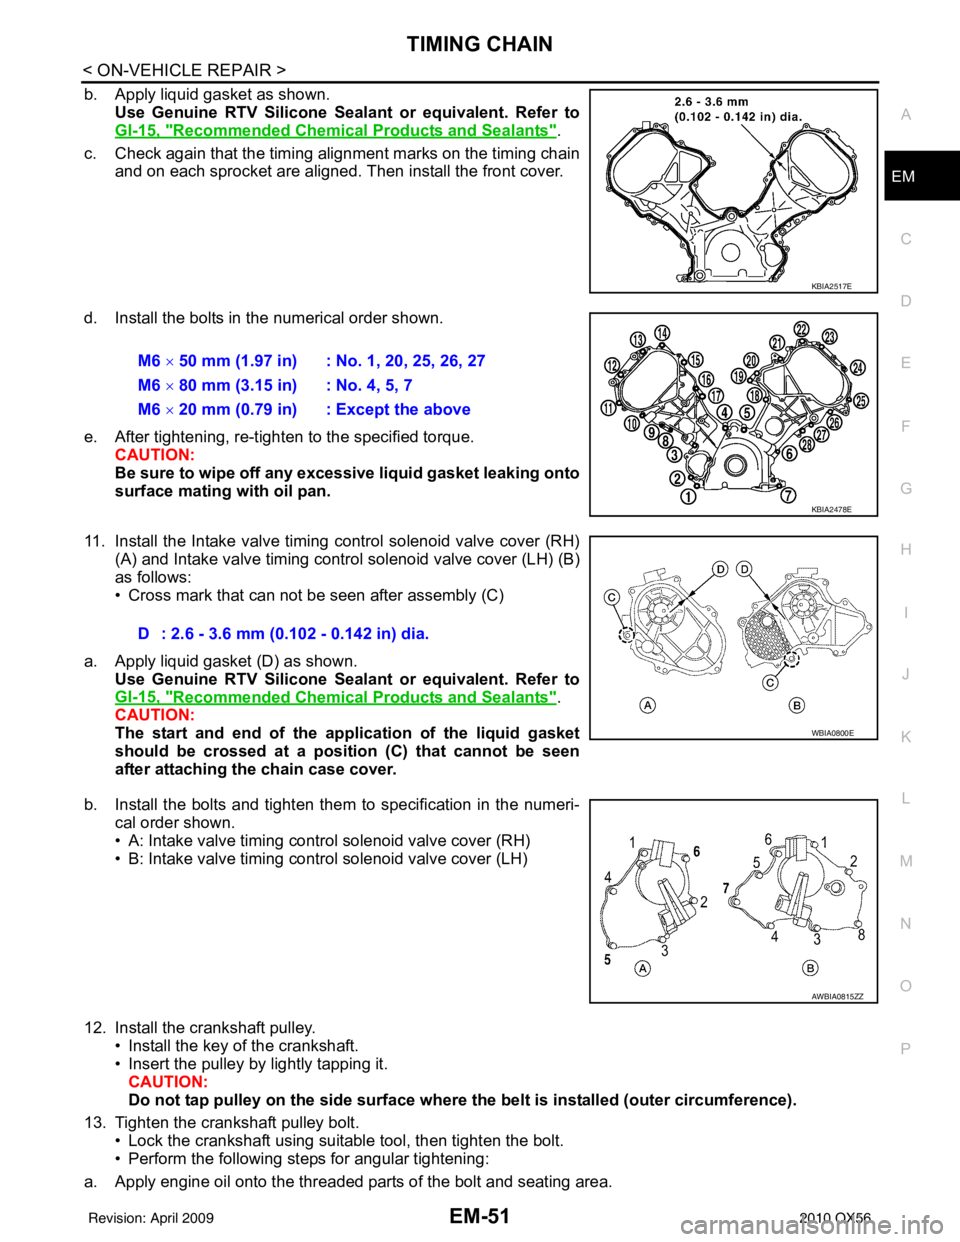
b. Apply liquid gasket as shown.
Use Genuine RTV Silicone Seal ant or equivalent. Refer to
GI-15, "
Recommended Chemical Products and Sealants".
c. Check again that the timing alignment marks on the timing chain and on each sprocket are aligned. Then install the front cover.
d. Install the bolts in the numerical order shown.
e. After tightening, re-tighten to the specified torque. CAUTION:
Be sure to wipe off any excessive liquid gasket leaking onto
surface mating with oil pan.
11. Install the Intake valve timing control solenoid valve cover (RH) (A) and Intake valve timing control solenoid valve cover (LH) (B)
as follows:
• Cross mark that can not be seen after assembly (C)
a. Apply liquid gasket (D) as shown. Use Genuine RTV Silicone Seal ant or equivalent. Refer to
GI-15, "
Recommended Chemical Products and Sealants".
CAUTION:
The start and end of the appl ication of the liquid gasket
should be crossed at a position (C) that cannot be seen
after attaching the chain case cover.
b. Install the bolts and tighten them to specification in the numeri- cal order shown.
• A: Intake valve timing control solenoid valve cover (RH)
• B: Intake valve timing control solenoid valve cover (LH)
12. Install the crankshaft pulley. • Install the key of the crankshaft.
• Insert the pulley by lightly tapping it.
CAUTION:
Do not tap pulley on the side surface where th e belt is installed (outer circumference).
13. Tighten the crankshaft pulley bolt. • Lock the crankshaft using suitable tool, then tighten the bolt.
• Perform the following steps for angular tightening:
a. Apply engine oil onto the threaded parts of the bolt and seating area.
KBIA2517E
M6 × 50 mm (1.97 in) : No. 1, 20, 25, 26, 27
M6 × 80 mm (3.15 in) : No. 4, 5, 7
M6 × 20 mm (0.79 in) : Except the above
KBIA2478E
D : 2.6 - 3.6 mm (0.102 - 0.142 in) dia.
WBIA0800E
AWBIA0815ZZ
Revision: April 20092010 QX56
Page 1938 of 4210
ENGINE UNITEM-87
< DISASSEMBLY AND ASSEMBLY >
C
DE
F
G H
I
J
K L
M A
EM
NP
O
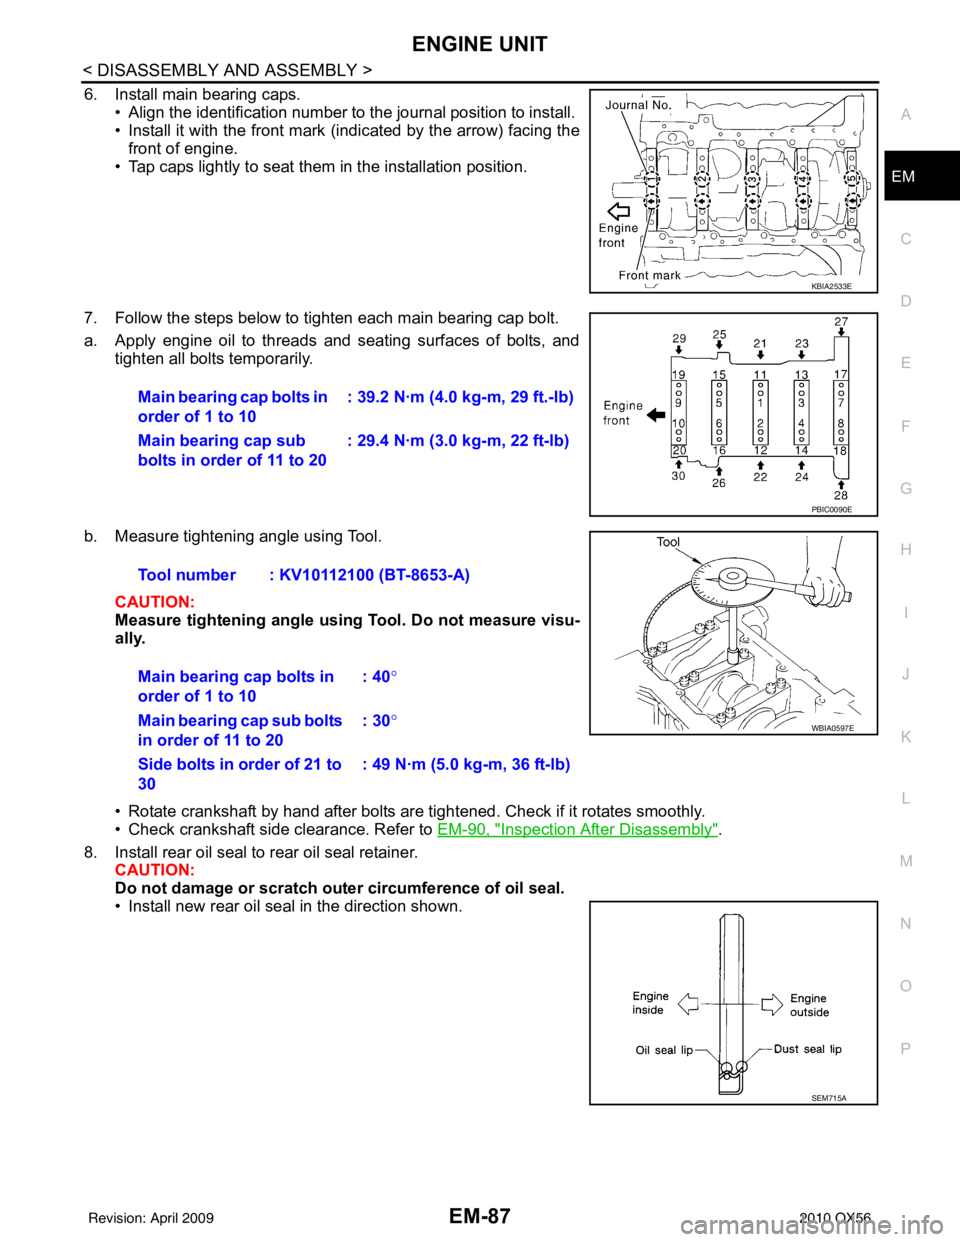
6. Install main bearing caps.
• Align the identification number to the journal position to install.
• Install it with the front mark (indicated by the arrow) facing thefront of engine.
• Tap caps lightly to seat them in the installation position.
7. Follow the steps below to tighten each main bearing cap bolt.
a. Apply engine oil to threads and seating surfaces of bolts, and tighten all bolts temporarily.
b. Measure tightening angle using Tool. CAUTION:
Measure tightening angle usin g Tool. Do not measure visu-
ally.
• Rotate crankshaft by hand after bolts are tightened. Check if it rotates smoothly.
• Check crankshaft side clearance. Refer to EM-90, "
Inspection After Disassembly".
8. Install rear oil seal to rear oil seal retainer. CAUTION:
Do not damage or scratch ou ter circumference of oil seal.
• Install new rear oil seal in the direction shown.
KBIA2533E
Main bearing cap bolts in
order of 1 to 10 : 39.2 N·m (4.0 kg-m, 29 ft.-lb)
Main bearing cap sub
bolts in order of 11 to 20 : 29.4 N·m (3.0 kg-m, 22 ft-lb)
PBIC0090E
Tool number : KV10112100 (BT-8653-A)
Main bearing cap bolts in
order of 1 to 10 : 40
°
Main bearing cap sub bolts
in order of 11 to 20 : 30
°
Side bolts in order of 21 to
30 : 49 N·m (5.0 kg-m, 36 ft-lb)
WBIA0597E
SEM715A
Revision: April 20092010 QX56
Page 1949 of 4210
EM-98
< DISASSEMBLY AND ASSEMBLY >
ENGINE UNIT
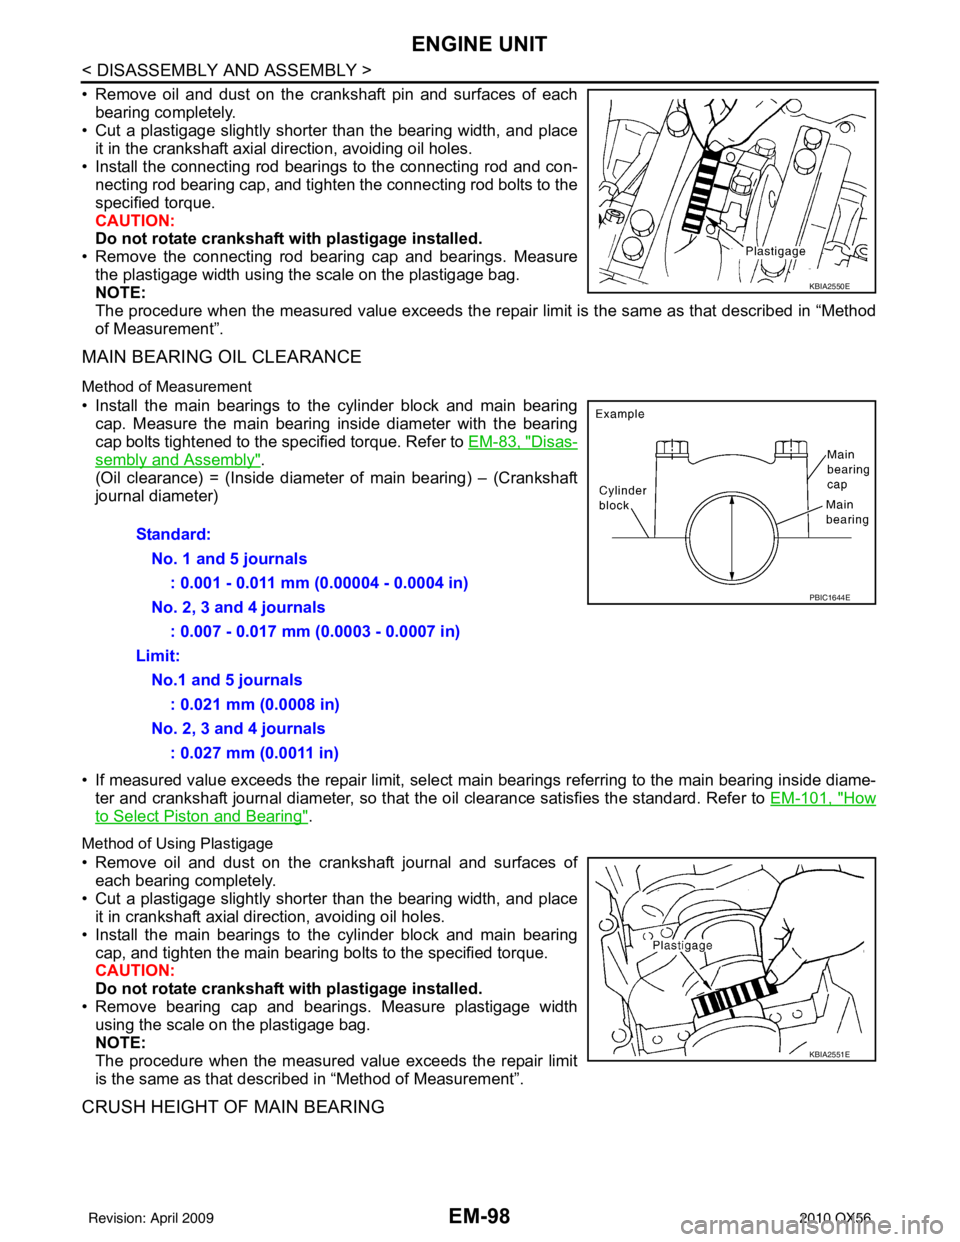
• Remove oil and dust on the crankshaft pin and surfaces of eachbearing completely.
• Cut a plastigage slightly shorter than the bearing width, and place
it in the crankshaft axial direction, avoiding oil holes.
• Install the connecting rod beari ngs to the connecting rod and con-
necting rod bearing cap, and tighten the connecting rod bolts to the
specified torque.
CAUTION:
Do not rotate crankshaft with plastigage installed.
• Remove the connecting rod bear ing cap and bearings. Measure
the plastigage width using the scale on the plastigage bag.
NOTE:
The procedure when the measured value exceeds the repair limit is the same as that described in “Method
of Measurement”.
MAIN BEARING OIL CLEARANCE
Method of Measurement
• Install the main bearings to the cylinder block and main bearing cap. Measure the main bearing inside diameter with the bearing
cap bolts tightened to the specified torque. Refer to EM-83, "
Disas-
sembly and Assembly".
(Oil clearance) = (Inside diameter of main bearing) – (Crankshaft
journal diameter)
• If measured value exceeds the repair limit, select main bearings referring to the main bearing inside diame-
ter and crankshaft journal diameter, so that the oil clearance satisfies the standard. Refer to EM-101, "
How
to Select Piston and Bearing".
Method of Using Plastigage
• Remove oil and dust on the crankshaft journal and surfaces of
each bearing completely.
• Cut a plastigage slightly shorter than the bearing width, and place it in crankshaft axial direction, avoiding oil holes.
• Install the main bearings to the cylinder block and main bearing cap, and tighten the main bearing bolts to the specified torque.
CAUTION:
Do not rotate crankshaft with plastigage installed.
• Remove bearing cap and bearings. Measure plastigage width using the scale on the plastigage bag.
NOTE:
The procedure when the measured value exceeds the repair limit
is the same as that descri bed in “Method of Measurement”.
CRUSH HEIGHT OF MAIN BEARING
KBIA2550E
Standard:
No. 1 and 5 journals : 0.001 - 0.011 mm (0.00004 - 0.0004 in)
No. 2, 3 and 4 journals : 0.007 - 0.017 mm (0.0003 - 0.0007 in)
Limit: No.1 and 5 journals : 0.021 mm (0.0008 in)
No. 2, 3 and 4 journals : 0.027 mm (0.0011 in)
PBIC1644E
KBIA2551E
Revision: April 20092010 QX56
Page 1977 of 4210
EXL-1
DRIVER CONTROLS
C
DE
F
G H
I
J
K
M
SECTION EXL
A
B
EXL
N
O P
CONTENTS
EXTERIOR LIGHTING SYSTEM
BASIC INSPECTION ....... .............................4
DIAGNOSIS AND REPAIR WORKFLOW ..... .....4
Work Flow ........................................................... ......4
FUNCTION DIAGNOSIS ...............................7
HEADLAMP .................................................... .....7
System Diagram .................................................. ......7
System Description ...................................................7
Component Parts Location ........................................7
Component Description .............................................7
DAYTIME LIGHT SYSTEM .................................9
System Diagram .................................................. ......9
System Description ...................................................9
Component Parts Location ........................................9
Component Description ...........................................10
AUTO LIGHT SYSTEM ......................................11
System Diagram ......................................................11
System Description .................................................11
Component Parts Location ......................................12
Component Description ...........................................12
HEADLAMP AIMING SYSTEM (MANUAL) .......13
System Diagram .................................................. ....13
System Description .................................................13
Component Parts Location ......................................13
Component Description ...........................................13
FRONT FOG LAMP ............................................14
System Diagram .................................................. ....14
System Description .................................................14
Component Parts Location ......................................14
Component Description ...........................................14
TURN SIGNAL AND HAZARD WARNING
LAMPS ...............................................................
15
System Diagram .................................................. ....15
System Description .................................................15
Component Parts Location ......................................15
Component Description ....................................... ....16
PARKING, LICENSE PLATE AND TAIL
LAMPS ..............................................................
17
System Diagram ......................................................17
System Description ..................................................17
Component Parts Location ......................................17
Component Description ...........................................18
DIAGNOSIS SYSTEM (BCM) ...........................19
HEADLAMP ........................................................... ....19
HEADLAMP : CONSULT-III Function (BCM -
HEAD LAMP) ...........................................................
19
FLASHER ............................................................... ....20
FLASHER : CONSULT-III Function (BCM -
FLASHER) ...............................................................
20
COMB SW .............................................................. ....20
COMB SW : CONSULT-III Function (BCM -
COMB SW) ..............................................................
20
DIAGNOSIS SYSTEM (IPDM E/R) ...................22
Diagnosis Description ..............................................22
CONSULT - III Function (IPDM E/R) .......................24
COMPONENT DIAGNOSIS .........................27
POWER SUPPLY AND GROUND CIRCUIT ....27
BCM (BODY CONTROL MODULE) ...................... ....27
BCM (BODY CONTROL MODULE) : Diagnosis
Procedure ............................................................ ....
27
IPDM E/R (INTELLIGENT POWER DISTRIBU-
TION MODULE ENGINE ROOM) .......................... ....
28
IPDM E/R (INTELLIGENT POWER DISTRIBU-
TION MODULE ENGINE ROOM) : Diagnosis Pro-
cedure .................................................................. ....
28
HEADLAMP (HI) CIRCUIT ................................30
Description ...............................................................30
Revision: April 20092010 QX56
Page 1978 of 4210

EXL-2
Component Function Check ...................................30
Diagnosis Procedure - Without Daytime Light Sys-
tem ..........................................................................
30
Diagnosis Procedure - With Daytime Light System
...
31
HEADLAMP (LO) CIRCUIT ...............................33
Description ........................................................... ...33
Component Function Check ...................................33
Diagnosis Procedure - Without Daytime Light Sys-
tem ..........................................................................
33
Diagnosis Procedure - With Daytime Light System
...
34
FRONT FOG LAMP CIRCUIT ...........................36
Description ........................................................... ...36
Component Function Check ...................................36
Diagnosis Procedure ..............................................36
PARKING LAMP CIRCUIT ................................38
Description ........................................................... ...38
Component Function Check ...................................38
Diagnosis Procedure - Without Daytime Light Sys-
tem ..........................................................................
38
Diagnosis Procedure - With Daytime Light System
...
41
TURN SIGNAL LAMP CIRCUIT ........................44
Description ........................................................... ...44
Component Function Check ...................................44
Diagnosis Procedure ..............................................44
OPTICAL SENSOR ...........................................47
Description ..............................................................47
Component Function Check ...................................47
Diagnosis Procedure ..............................................47
HEADLAMP AIMING SWITCH ..........................49
Description ........................................................... ...49
Diagnosis Procedure - Without Daytime Light Sys-
tem ..........................................................................
49
Diagnosis Procedure - With Daytime Light System
...
50
HEADLAMP .......................................................52
Wiring Diagram .................................................... ...52
DAYTIME LIGHT SYSTEM ................................56
Wiring Diagram .................................................... ...56
AUTO LIGHT SYSTEM ......................................62
Wiring Diagram .................................................... ...62
HEADLAMP AIMING SYSTEM (MANUAL) ......69
Wiring Diagram .................................................... ...69
FRONT FOG LAMP SYSTEM ...........................73
Wiring Diagram .................................................... ...73
TURN SIGNAL AND HAZARD WARNING
LAMP SYSTEM .............................................. ...
77
Wiring Diagram .................................................... ...77
PARKING, LICENSE PLATE AND TAIL
LAMPS SYSTEM ...............................................
84
Wiring Diagram .................................................... ...84
STOP LAMP ......................................................91
Wiring Diagram .................................................... ...91
BACK-UP LAMP ............................................ ...95
Wiring Diagram .................................................... ...95
TRAILER TOW .................................................100
Wiring Diagram .....................................................100
ECU DIAGNOSIS ......................................106
BCM (BODY CONTROL MODULE) ............... ..106
Reference Value .................................................. .106
Terminal Layout ....................................................109
Physical Values .....................................................109
Wiring Diagram .....................................................115
Fail Safe ...............................................................119
DTC Inspection Priority Chart .............................120
DTC Index ............................................................120
IPDM E/R (INTELLIGENT POWER DISTRI-
BUTION MODULE ENGINE ROOM) ................
122
Reference Value .................................................. .122
Terminal Layout ....................................................124
Physical Values .....................................................125
Wiring Diagram .....................................................130
Fail Safe ...............................................................133
DTC Index ............................................................135
SYMPTOM DIAGNOSIS ...........................136
EXTERIOR LIGHTING SYSTEM SYMPTOMS ..136
Symptom Table .................................................... .136
NORMAL OPERATING CONDITION ...............138
Description ........................................................... .138
BOTH SIDE HEADLAMPS DO NOT SWITCH
TO HIGH BEAM ................................................
139
Description ........................................................... .139
Diagnosis Procedure .............................................139
BOTH SIDE HEADLAMPS (LO) ARE NOT
TURNED ON .....................................................
140
Description ............................................................140
Diagnosis Procedure .............................................140
PARKING, LICENSE PLATE AND TAIL
LAMPS ARE NOT TURNED ON ......................
141
Description ........................................................... .141
Diagnosis Procedure .............................................141
BOTH SIDE FRONT FOG LAMPS ARE NOT
TURNED ON .....................................................
142
Description ............................................................142
Diagnosis Procedure .............................................142
Revision: April 20092010 QX56