2010 INFINITI QX56 belt
[x] Cancel search: beltPage 2715 of 4210
PERIODIC MAINTENANCEMA-11
< ON-VEHICLE MAINTENANCE >
C
DE
F
G H
I
J
K L
M B
MA
N
O A
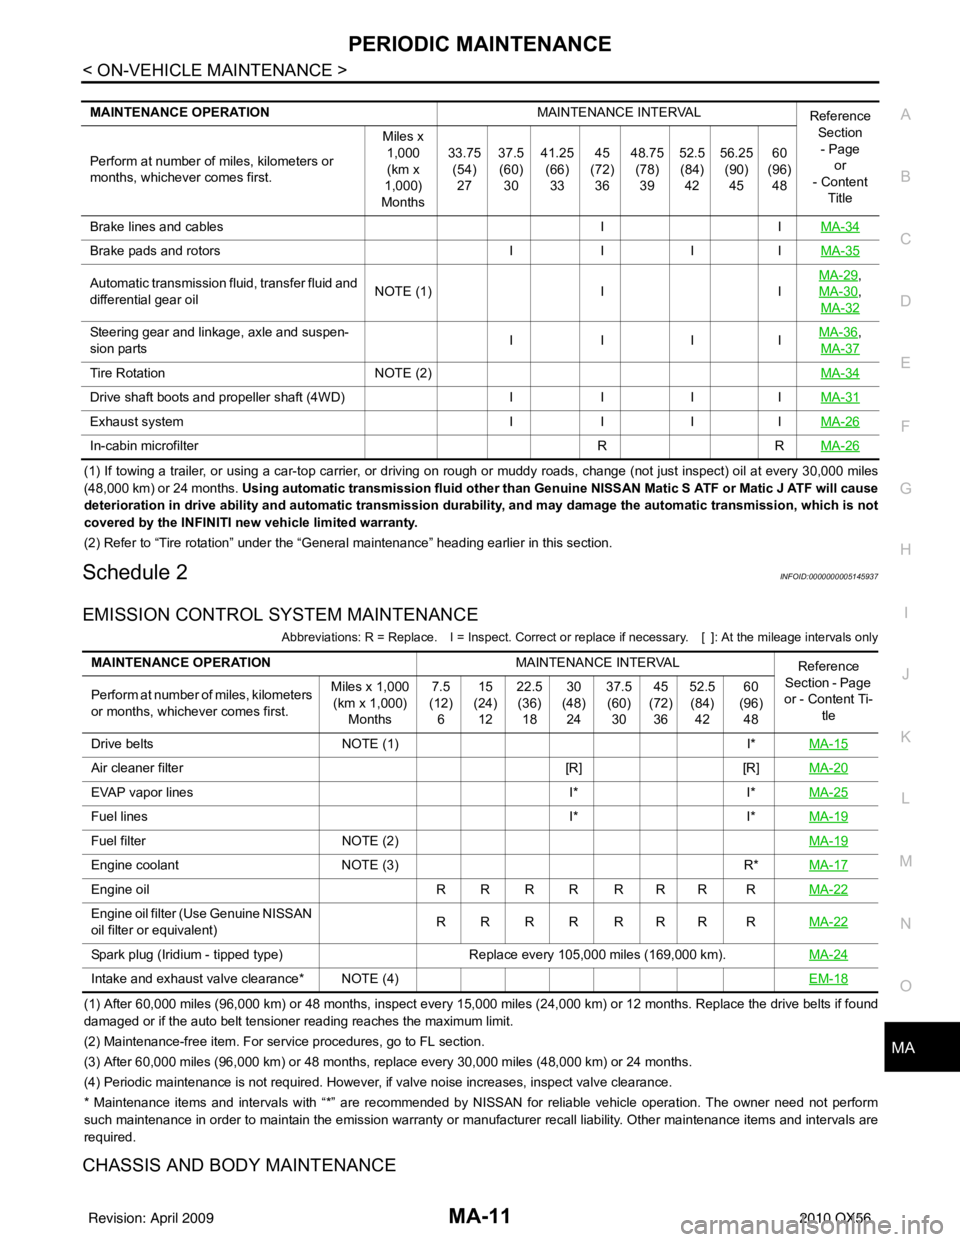
(1) If towing a trailer, or using a car-top carrier, or driving on rough or muddy roads, change (not just inspect) oil at every
30,000 miles
(48,000 km) or 24 months. Using automatic transmission fluid other than Ge nuine NISSAN Matic S ATF or Matic J ATF will cause
deterioration in drive ability and automatic transmission durability, and may damage the automatic transmission, which is not
covered by the INFINITI new vehicle limited warranty.
(2) Refer to “Tire rotation” under the “General maintenance” heading earlier in this section.
Schedule 2INFOID:0000000005145937
EMISSION CONTROL SYSTEM MAINTENANCE
Abbreviations: R = Replace. I = Ins pect. Correct or replace if necessary. [ ]: At the mileage intervals only
(1) After 60,000 miles (96,000 km) or 48 months, inspect every 15,000 miles (24,000 km) or 12 months. Replace the drive belts i f found
damaged or if the auto belt tensioner reading reaches the maximum limit.
(2) Maintenance-free item. For service procedures, go to FL section.
(3) After 60,000 miles (96,000 km) or 48 months, replace every 30,000 miles (48,000 km) or 24 months.
(4) Periodic maintenance is not required. However, if valve noise increases, inspect valve clearance.
* Maintenance items and inte rvals with “*” are recommended by NISSAN for reliable vehicle operation. The owner need not perform
such maintenance in order to maintain the emission warranty or manufacturer recall liability. Other maintenance items and inter vals are
required.
CHASSIS AND BODY MAINTENANCE
MAINTENANCE OPERATION MAINTENANCE INTERVAL
Reference
Section
- Page or
- Content
Title
Perform at number of miles, kilometers or
months, whichever comes first. Miles x
1,000(km x
1,000)
Months 33.75
(54)
27 37.5
(60)
30 41.25
(66)
33 45
(72)
36 48.75
(78)
39 52.5
(84)
42 56.25
(90)
45 60
(96)
48
Brake lines and cables IIMA-34
Brake pads and rotors IIIIMA-35
Automatic transmission fluid, transfer fluid and
differential gear oil NOTE (1)
IIMA-29,
MA-30
,
MA-32
Steering gear and linkage, axle and suspen-
sion parts IIII
MA-36,
MA-37
Tire Rotation NOTE (2) MA-34
Drive shaft boots and propeller shaft (4WD)IIIIMA-31
Exhaust system IIIIMA-26
In-cabin microfilter RRMA-26
MAINTENANCE OPERATION MAINTENANCE INTERVAL
Reference
Section - Page
or - Content Ti- tle
Perform at number of miles, kilometers
or months, whichever comes first. Miles x 1,000
(km x 1,000) Months 7.5
(12) 6 15
(24) 12 22.5
(36) 18 30
(48) 24 37.5
(60) 30 45
(72) 36 52.5
(84) 42 60
(96) 48
Drive belts NOTE (1) I*MA-15
Air cleaner filter [R][R]MA-20
EVAP vapor lines I*I*MA-25
Fuel lines I*I*MA-19
Fuel filter NOTE (2) MA-19
Engine coolantNOTE (3) R*MA-17
Engine oil R R R R R R R R MA-22
Engine oil filter (Use Genuine NISSAN
oil filter or equivalent)RRRR RRR R
MA-22
Spark plug (Iridium - tipped type) Replace every 105,000 miles (169,000 km).MA-24
Intake and exhaust valve clearance* NOTE (4) EM-18
Revision: April 20092010 QX56
Page 2719 of 4210
ENGINE MAINTENANCEMA-15
< ON-VEHICLE MAINTENANCE >
C
DE
F
G H
I
J
K L
M B
MA
N
O A
ENGINE MAINTENANCE
DRIVE BELTS
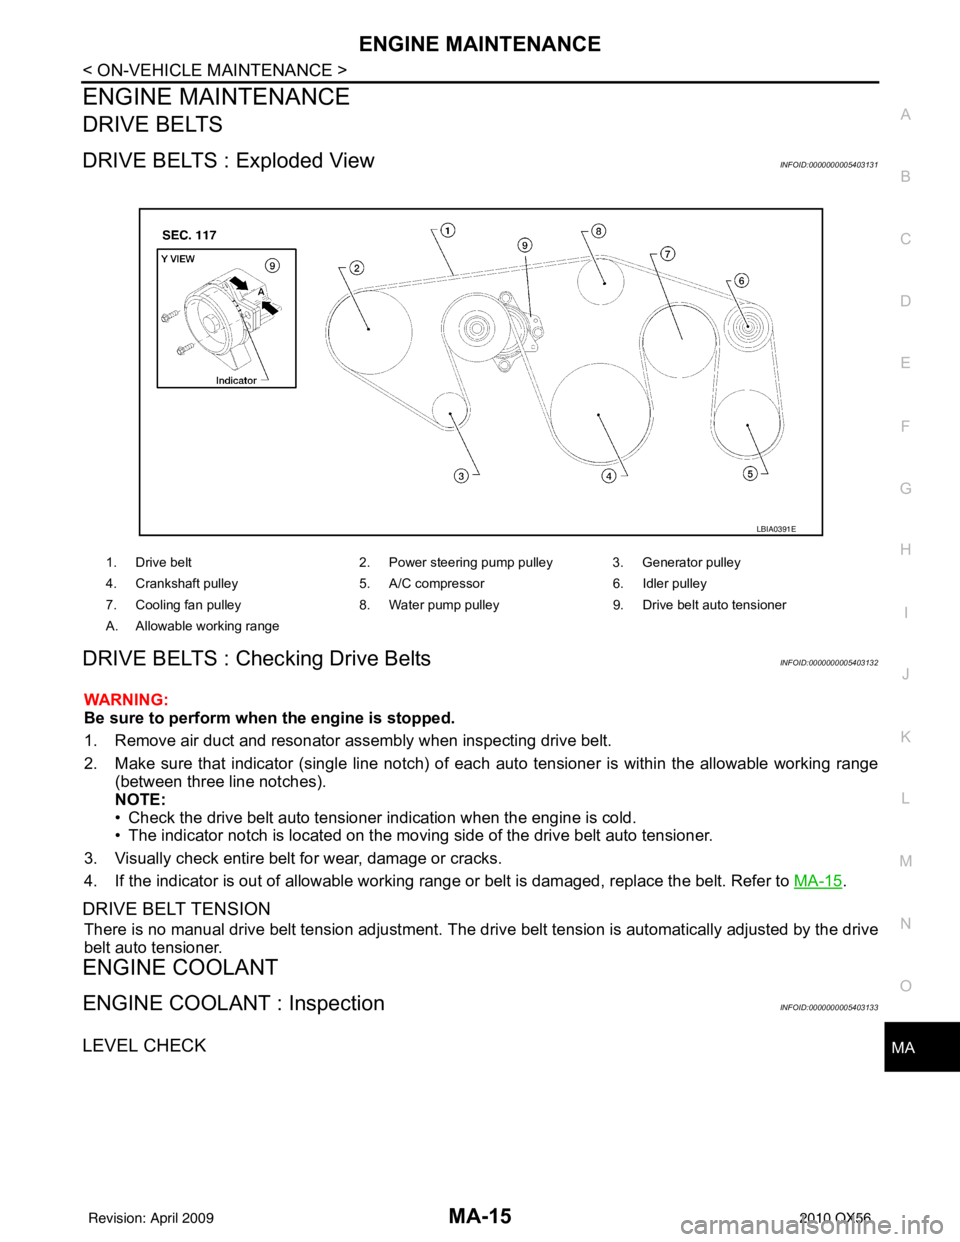
DRIVE BELTS : Exploded ViewINFOID:0000000005403131
DRIVE BELTS : Checking Drive BeltsINFOID:0000000005403132
WARNING:
Be sure to perform when the engine is stopped.
1. Remove air duct and resonator assembly when inspecting drive belt.
2. Make sure that indicator (single line notch) of eac
h auto tensioner is within the allowable working range
(between three line notches).
NOTE:
• Check the drive belt auto tensioner indication when the engine is cold.
• The indicator notch is located on the moving side of the drive belt auto tensioner.
3. Visually check entire belt for wear, damage or cracks.
4. If the indicator is out of allowable working range or belt is damaged, replace the belt. Refer to MA-15
.
DRIVE BELT TENSION
There is no manual drive belt tension adjustment. The driv e belt tension is automatically adjusted by the drive
belt auto tensioner.
ENGINE COOLANT
ENGINE COOLANT : InspectionINFOID:0000000005403133
LEVEL CHECK
1. Drive belt 2. Power steering pump pulley 3. Generator pulley
4. Crankshaft pulley 5. A/C compressor6. Idler pulley
7. Cooling fan pulley 8. Water pump pulley9. Drive belt auto tensioner
A. Allowable working range
LBIA0391E
Revision: April 20092010 QX56
Page 2721 of 4210
ENGINE MAINTENANCEMA-17
< ON-VEHICLE MAINTENANCE >
C
DE
F
G H
I
J
K L
M B
MA
N
O A
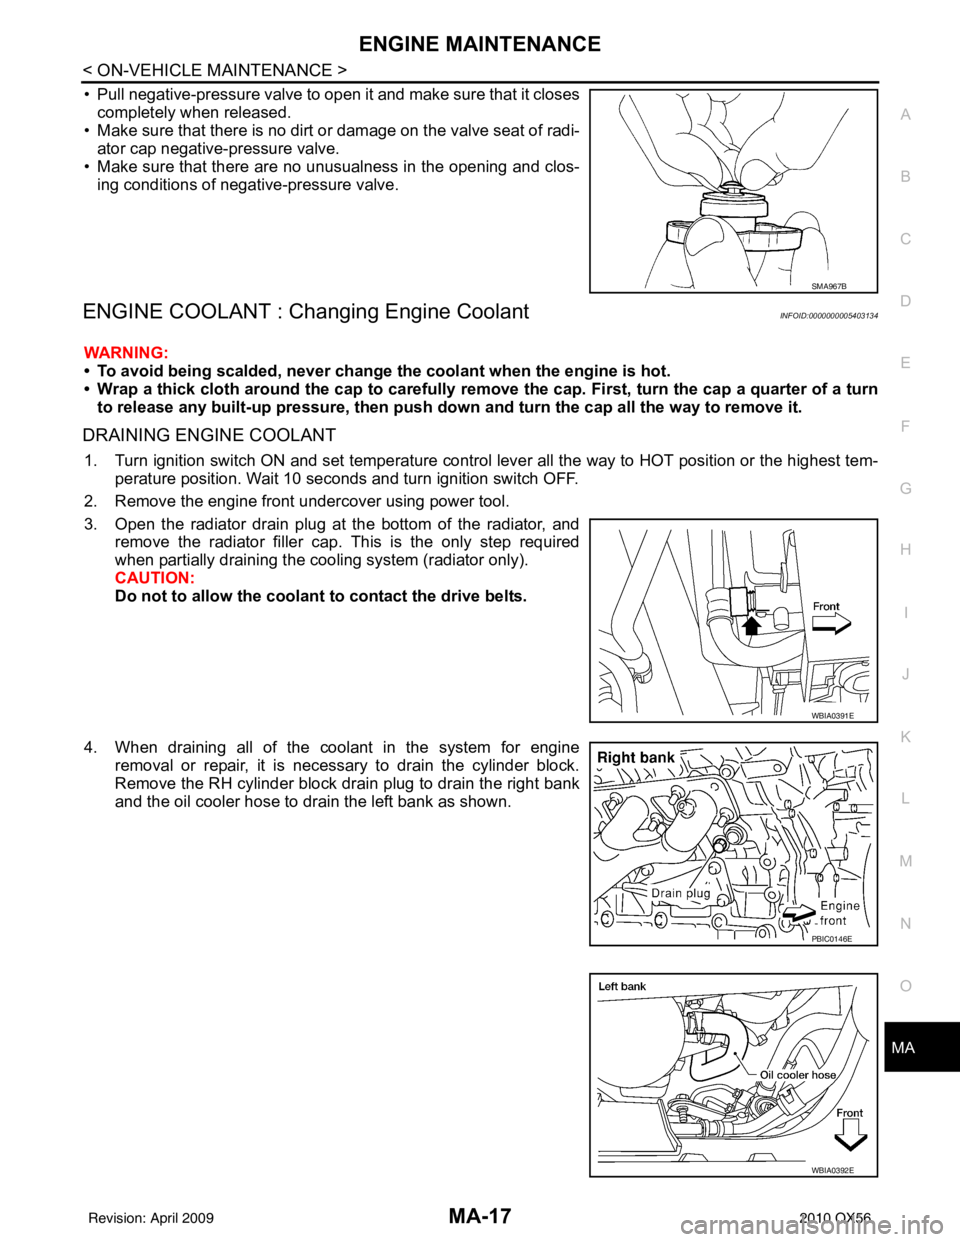
• Pull negative-pressure valve to open it and make sure that it closes
completely when released.
• Make sure that there is no dirt or damage on the valve seat of radi-
ator cap negative-pressure valve.
• Make sure that there are no unusualness in the opening and clos- ing conditions of negative-pressure valve.
ENGINE COOLANT : Chang ing Engine CoolantINFOID:0000000005403134
WARNING:
• To avoid being scalded, never change the coolant when the engine is hot.
• Wrap a thick cloth around the cap to carefully remo ve the cap. First, turn the cap a quarter of a turn
to release any built-up pressure, then push down and turn the cap all the way to remove it.
DRAINING ENGINE COOLANT
1. Turn ignition switch ON and set temperature control lever all the way to HOT position or the highest tem-
perature position. Wait 10 seconds and turn ignition switch OFF.
2. Remove the engine front undercover using power tool.
3. Open the radiator drain plug at the bottom of the radiator, and remove the radiator filler cap. This is the only step required
when partially draining the cooling system (radiator only).
CAUTION:
Do not to allow the coolant to contact the drive belts.
4. When draining all of the coolant in the system for engine removal or repair, it is necessary to drain the cylinder block.
Remove the RH cylinder block drain plug to drain the right bank
and the oil cooler hose to drain the left bank as shown.
SMA967B
WBIA0391E
PBIC0146E
WBIA0392E
Revision: April 20092010 QX56
Page 2727 of 4210
ENGINE MAINTENANCEMA-23
< ON-VEHICLE MAINTENANCE >
C
DE
F
G H
I
J
K L
M B
MA
N
O A
1. Drain the engine oil. Refer to
MA-22, "ENGINE OIL : Changing
Engine Oil".
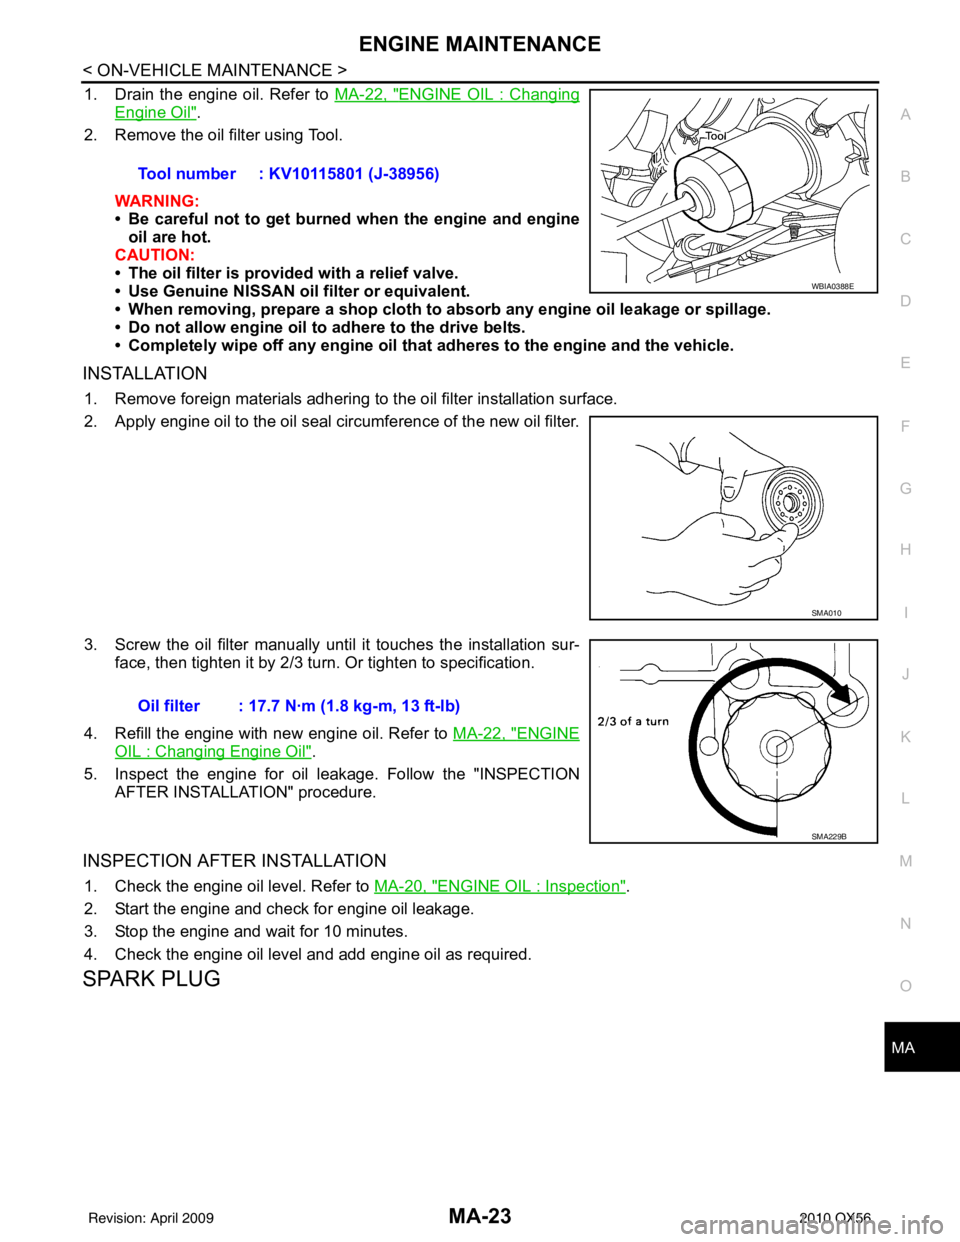
2. Remove the oil filter using Tool.
WARNING:
• Be careful not to get burned when the engine and engine
oil are hot.
CAUTION:
• The oil filter is provided with a relief valve.
• Use Genuine NISSAN oil filter or equivalent.
• When removing, prepare a shop cloth to ab sorb any engine oil leakage or spillage.
• Do not allow engine oil to adhere to the drive belts.
• Completely wipe off any engine oil that adheres to the engine and the vehicle.
INSTALLATION
1. Remove foreign materials adhering to the oil filter installation surface.
2. Apply engine oil to the oil seal circumference of the new oil filter.
3. Screw the oil filter manually until it touches the installation sur-
face, then tighten it by 2/3 turn. Or tighten to specification.
4. Refill the engine with new engine oil. Refer to MA-22, "
ENGINE
OIL : Changing Engine Oil".
5. Inspect the engine for oil leakage. Follow the "INSPECTION AFTER INSTALLATION" procedure.
INSPECTION AFTER INSTALLATION
1. Check the engine oil level. Refer to MA-20, "ENGINE OIL : Inspection".
2. Start the engine and check for engine oil leakage.
3. Stop the engine and wait for 10 minutes.
4. Check the engine oil level and add engine oil as required.
SPARK PLUG
Tool number : KV10115801 (J-38956)
WBIA0388E
SMA010
Oil filter : 17.7 N·m (1.8 kg-m, 13 ft-lb)
SMA229B
Revision: April 20092010 QX56
Page 2743 of 4210
CHASSIS AND BODY MAINTENANCEMA-39
< ON-VEHICLE MAINTENANCE >
C
DE
F
G H
I
J
K L
M B
MA
N
O A
SEAT BELT, BUCKLES, RETRAC
TORS, ANCHORS AND ADJUSTERS
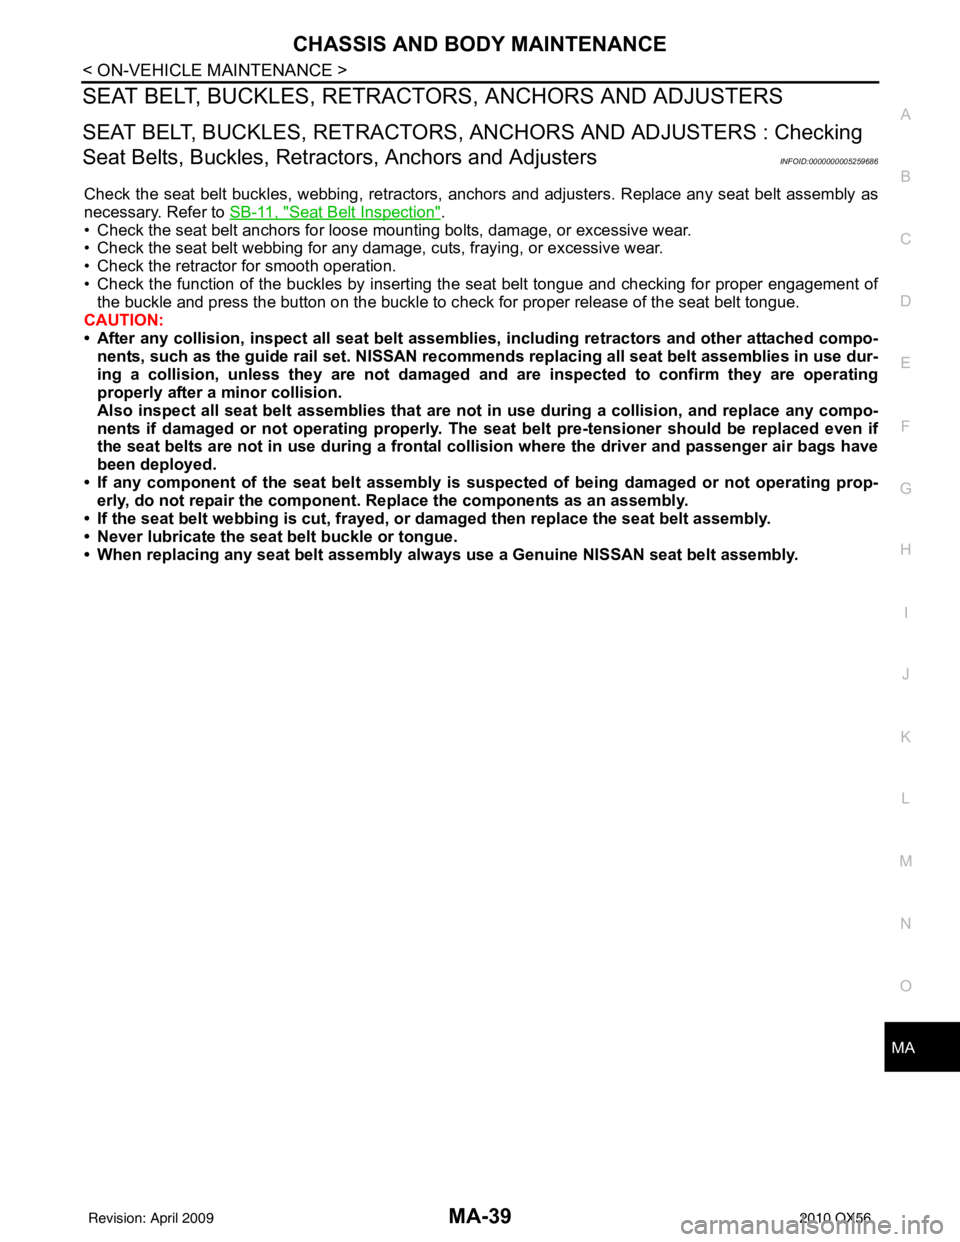
SEAT BELT, BUCKLES, RETRACTORS, ANCHORS AND ADJUSTERS : Checking
Seat Belts, Buckles, Retrac tors, Anchors and Adjusters
INFOID:0000000005259686
Check the seat belt buckles, webbing, retractors, anc hors and adjusters. Replace any seat belt assembly as
necessary. Refer to SB-11, "
Seat Belt Inspection".
• Check the seat belt anchors for loose mounting bolts, damage, or excessive wear.
• Check the seat belt webbing for any damage, cuts, fraying, or excessive wear.
• Check the retractor for smooth operation.
• Check the function of the buckles by inserting the seat belt tongue and checking for proper engagement of
the buckle and press the button on the buckle to c heck for proper release of the seat belt tongue.
CAUTION:
• After any collision, inspect al l seat belt assemblies, including retractors and other attached compo-
nents, such as the guide rail set. NISSAN recomme nds replacing all seat belt assemblies in use dur-
ing a collision, unless they are not damaged an d are inspected to confirm they are operating
properly after a minor collision.
Also inspect all seat belt assemblies that are not in use during a collision, and replace any compo-
nents if damaged or not operating properly. The seat belt pre-tensioner should be replaced even if
the seat belts are not in use during a frontal collision where the driver and passenger air bags have
been deployed.
• If any component of the seat belt assembly is susp ected of being damaged or not operating prop-
erly, do not repair the component. Replace the components as an assembly.
• If the seat belt webbing is cut, frayed, or damaged then replace the seat belt assembly.
• Never lubricate the seat belt buckle or tongue.
• When replacing any seat belt assembly alw ays use a Genuine NISSAN seat belt assembly.
Revision: April 20092010 QX56
Page 2744 of 4210
MIR-1
DRIVER CONTROLS
C
DE
F
G H
I
J
K
M
SECTION MIR
A
B
MIR
N
O P
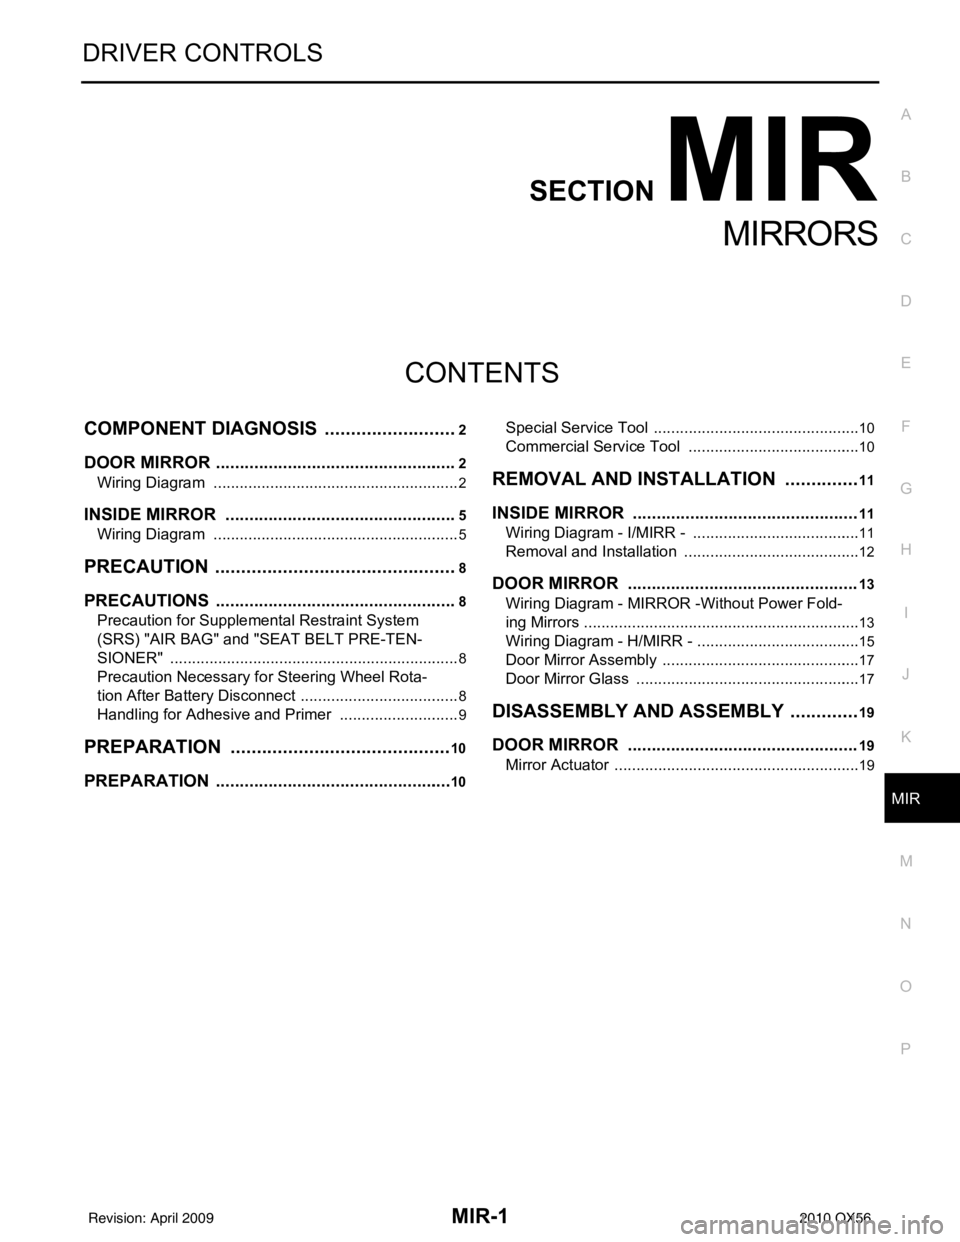
CONTENTS
MIRRORS
COMPONENT DIAGNOSIS ..........................2
DOOR MIRROR .............................................. .....2
Wiring Diagram ................................................... ......2
INSIDE MIRROR .................................................5
Wiring Diagram ................................................... ......5
PRECAUTION ...............................................8
PRECAUTIONS .............................................. .....8
Precaution for Supplemental Restraint System
(SRS) "AIR BAG" and "SEAT BELT PRE-TEN-
SIONER" ............................................................. ......
8
Precaution Necessary for Steering Wheel Rota-
tion After Battery Disconnect ............................... ......
8
Handling for Adhesive and Primer ............................9
PREPARATION ...........................................10
PREPARATION .............................................. ....10
Special Service Tool ............................................ ....10
Commercial Service Tool ........................................10
REMOVAL AND INSTALLATION ...............11
INSIDE MIRROR ...............................................11
Wiring Diagram - I/MIRR - ................................... ....11
Removal and Installation .........................................12
DOOR MIRROR ................................................13
Wiring Diagram - MIRROR -Without Power Fold-
ing Mirrors ................................................................
13
Wiring Diagram - H/MIRR - ......................................15
Door Mirror Assembly ..............................................17
Door Mirror Glass ....................................................17
DISASSEMBLY AND ASSEMBLY ..............19
DOOR MIRROR ................................................19
Mirror Actuator ..................................................... ....19
Revision: April 20092010 QX56
Page 2751 of 4210
MIR-8
< PRECAUTION >
PRECAUTIONS
PRECAUTION
PRECAUTIONS
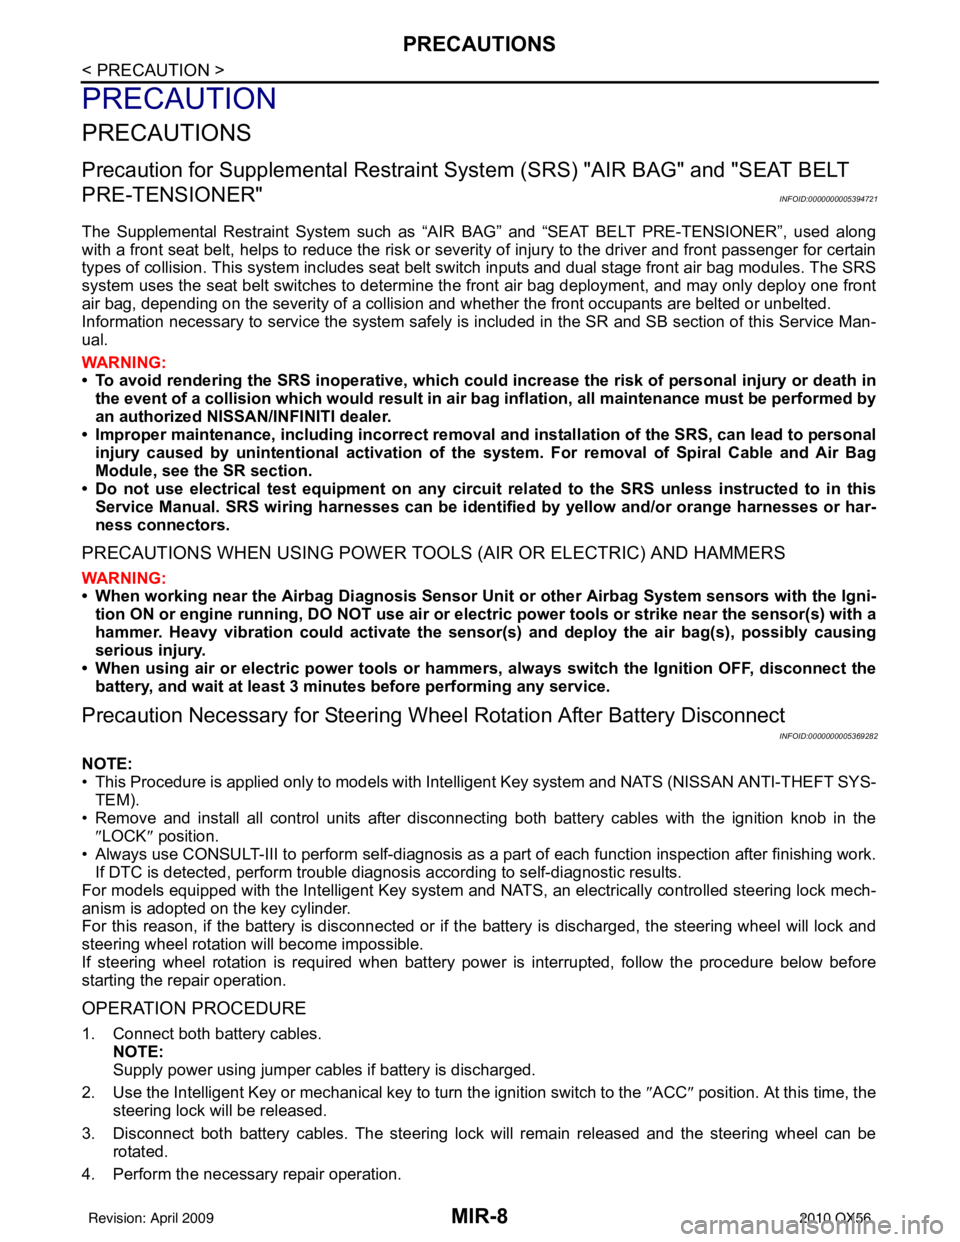
Precaution for Supplemental Restraint System (SRS) "AIR BAG" and "SEAT BELT
PRE-TENSIONER"
INFOID:0000000005394721
The Supplemental Restraint System such as “A IR BAG” and “SEAT BELT PRE-TENSIONER”, used along
with a front seat belt, helps to reduce the risk or severity of injury to the driver and front passenger for certain
types of collision. This system includes seat belt switch inputs and dual stage front air bag modules. The SRS
system uses the seat belt switches to determine the front air bag deployment, and may only deploy one front
air bag, depending on the severity of a collision and w hether the front occupants are belted or unbelted.
Information necessary to service the system safely is included in the SR and SB section of this Service Man-
ual.
WARNING:
• To avoid rendering the SRS inopera tive, which could increase the risk of personal injury or death in
the event of a collision which would result in air bag inflation, all maintenance must be performed by
an authorized NISSAN/INFINITI dealer.
• Improper maintenance, including in correct removal and installation of the SRS, can lead to personal
injury caused by unintent ional activation of the system. For re moval of Spiral Cable and Air Bag
Module, see the SR section.
• Do not use electrical test equipmen t on any circuit related to the SRS unless instructed to in this
Service Manual. SRS wiring harn esses can be identified by yellow and/or orange harnesses or har-
ness connectors.
PRECAUTIONS WHEN USING POWER TOOLS (AIR OR ELECTRIC) AND HAMMERS
WARNING:
• When working near the Airbag Diagnosis Sensor Unit or other Airbag System sensors with the Igni-
tion ON or engine running, DO NOT use air or electri c power tools or strike near the sensor(s) with a
hammer. Heavy vibration could activate the sensor( s) and deploy the air bag(s), possibly causing
serious injury.
• When using air or electric power tools or hammers , always switch the Ignition OFF, disconnect the
battery, and wait at least 3 minu tes before performing any service.
Precaution Necessary for Steering W heel Rotation After Battery Disconnect
INFOID:0000000005369282
NOTE:
• This Procedure is applied only to models with Intelligent Key system and NATS (NISSAN ANTI-THEFT SYS-
TEM).
• Remove and install all control units after disconnecting both battery cables with the ignition knob in the
″LOCK ″ position.
• Always use CONSULT-III to perform self-diagnosis as a part of each function inspection after finishing work.
If DTC is detected, perform trouble diagnosis according to self-diagnostic results.
For models equipped with the Intelligent Key system and NATS, an electrically controlled steering lock mech-
anism is adopted on the key cylinder.
For this reason, if the battery is disconnected or if the battery is discharged, the steering wheel will lock and
steering wheel rotation will become impossible.
If steering wheel rotation is required when battery pow er is interrupted, follow the procedure below before
starting the repair operation.
OPERATION PROCEDURE
1. Connect both battery cables. NOTE:
Supply power using jumper cables if battery is discharged.
2. Use the Intelligent Key or mechanical key to turn the ignition switch to the ″ACC ″ position. At this time, the
steering lock will be released.
3. Disconnect both battery cables. The steering lock will remain released and the steering wheel can be rotated.
4. Perform the necessary repair operation.
Revision: April 20092010 QX56
Page 2765 of 4210
MWI
MWI-3
C
DE
F
G H
I
J
K L
M B
A
O P
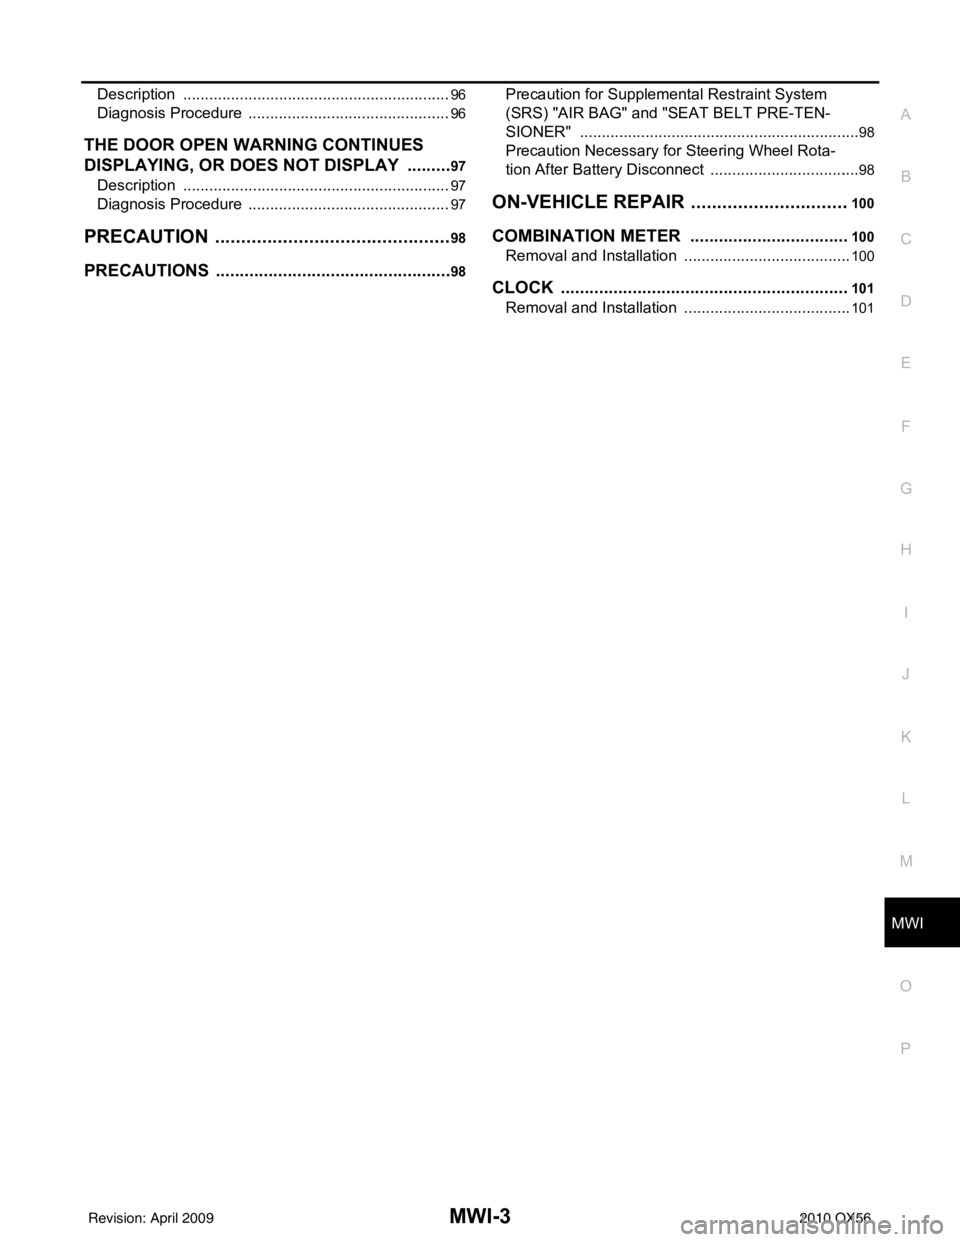
Description ..........................................................
....
96
Diagnosis Procedure ...............................................96
THE DOOR OPEN WARNING CONTINUES
DISPLAYING, OR DOES NOT DISPLAY ..........
97
Description .......................................................... ....97
Diagnosis Procedure ...............................................97
PRECAUTION ..............................................98
PRECAUTIONS .............................................. ....98
Precaution for Supplemental Restraint System
(SRS) "AIR BAG" and "SEAT BELT PRE-TEN-
SIONER" ............................................................. ....
98
Precaution Necessary for Steering Wheel Rota-
tion After Battery Disconnect ...................................
98
ON-VEHICLE REPAIR ...............................100
COMBINATION METER .................................100
Removal and Installation ..................................... ..100
CLOCK ............................................................101
Removal and Installation .......................................101
Revision: April 20092010 QX56