Page 124 of 408
445
Features of your vehicle
D150206AFD
Trip computer (if equipped)
The trip computer is a microcomputer-
controlled driver information system that
displays information related to driving on
the display when the ignition switch is in
the ON position. All stored driving infor-
mation (except odometer, distance to
empty and instant fuel consumption) is
resets if the battery is disconnected.Odometer
The odometer indicates the total dis-
tance the vehicle has been driven.
You will also find the odometer useful to
determine when periodic maintenance
should be performed.
OCM040060
Tripmeter B*
Average speed*
Outside air temperature*
Tripmeter A
Distance to empty*
Average fuel consumption*
Instant fuel consumption*
* if equipped
ECO ON/OFF*
OCM040061N
Page 126 of 408
447
Features of your vehicle
✽
✽NOTICE
• If the vehicle is not on level ground or
the battery power has been interrupt-
ed, the “Distance to empty” function
may not operate correctly.
The trip computer may not register
additional fuel if less than 1.6 gallons
(6 liters) of fuel are added to the vehi-
cle.
• The fuel consumption and distance to empty values may vary significantly
based on driving conditions, driving
habits, and condition of the vehicle.
• The distance to empty value is an esti- mate of the available driving distance.
This value may differ from the actual
driving distance available.
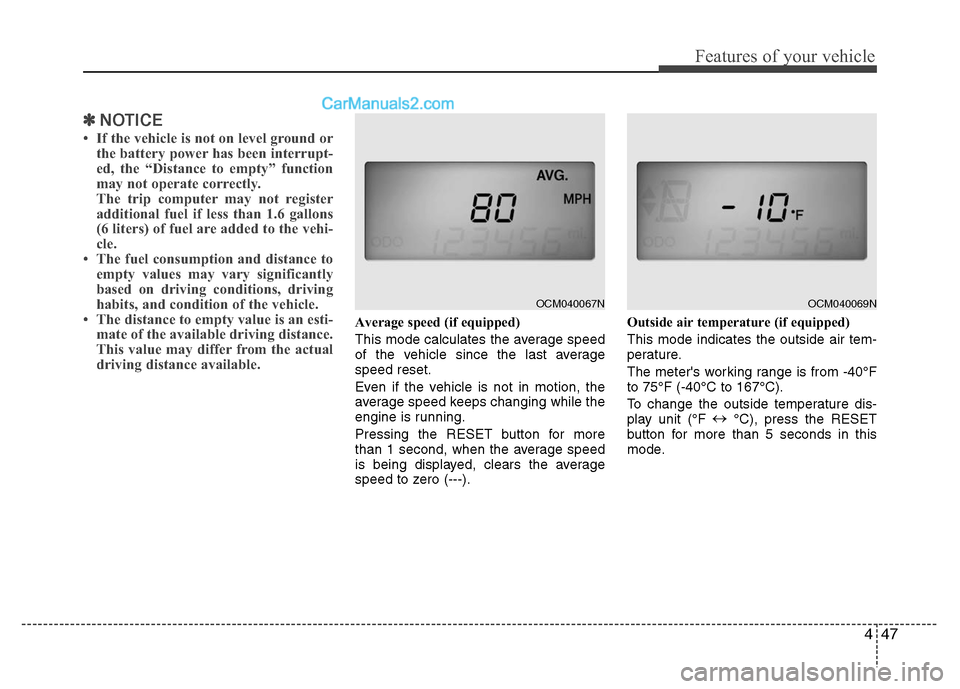
Average speed (if equipped)
This mode calculates the average speed
of the vehicle since the last average
speed reset.
Even if the vehicle is not in motion, the
average speed keeps changing while the
engine is running.
Pressing the RESET button for more
than 1 second, when the average speed
is being displayed, clears the average
speed to zero (---). Outside air temperature (if equipped)
This mode indicates the outside air tem-
perature.
The meter's working range is from -40°F
to 75°F (-40°C to 167°C).
To change the outside temperature dis-
play unit (°F
↔
°C), press the RESET
button for more than 5 seconds in this
mode.
OCM040067N
OCM040069N
Page 136 of 408
457
Features of your vehicle
D190100AUN
Battery saver function
The purpose of this feature is to pre-vent the battery from being dis-
charged. The system automatically
turns off the small light when the driver
removes the ignition key and opens the
driver- side door.
With this feature, the parking lights will be turned off automatically if the driver
parks on the side of road at night.
If necessary, to keep the lights on
when the ignition key is removed, per-
form the following :
1) Open the driver-side door.
2) Turn the parking lights OFF and ON again using the light switch on the
steering column.
D190400AUN
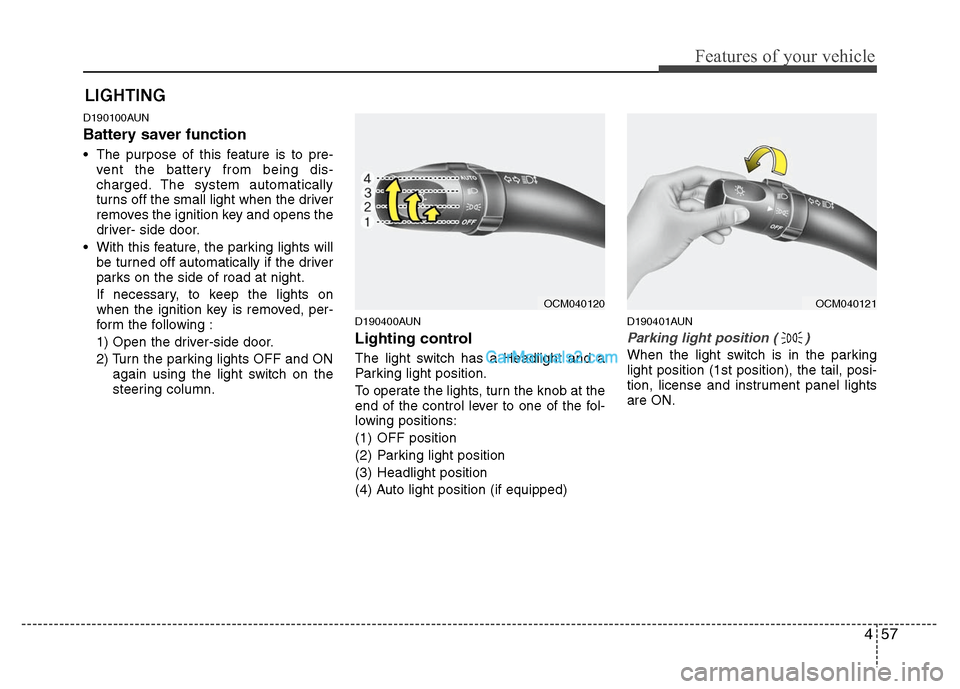
Lighting control
The light switch has a Headlight and a
Parking light position.
To operate the lights, turn the knob at the
end of the control lever to one of the fol-
lowing positions:
(1) OFF position
(2) Parking light position
(3) Headlight position
(4) Auto light position (if equipped)
D190401AUN
Parking light position ( )
When the light switch is in the parking
light position (1st position), the tail, posi-
tion, license and instrument panel lights
are ON.
LIGHTING
OCM040120
OCM040121
Page 138 of 408
459
Features of your vehicle
D190500AUN
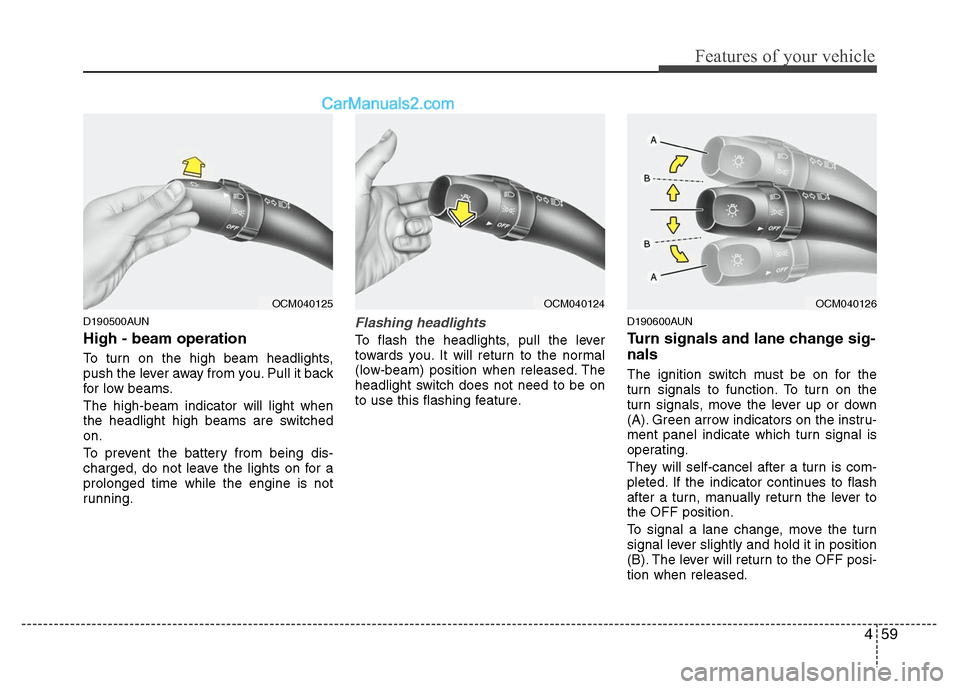
High - beam operation
To turn on the high beam headlights,
push the lever away from you. Pull it back
for low beams.
The high-beam indicator will light when
the headlight high beams are switched
on.
To prevent the battery from being dis-
charged, do not leave the lights on for a
prolonged time while the engine is not
running.
Flashing headlights
To flash the headlights, pull the lever
towards you. It will return to the normal
(low-beam) position when released. The
headlight switch does not need to be on
to use this flashing feature.
D190600AUN
Turn signals and lane change sig-
nals
The ignition switch must be on for the
turn signals to function. To turn on the
turn signals, move the lever up or down
(A). Green arrow indicators on the instru-
ment panel indicate which turn signal is
operating.
They will self-cancel after a turn is com-
pleted. If the indicator continues to flash
after a turn, manually return the lever to
the OFF position.
To signal a lane change, move the turn
signal lever slightly and hold it in position
(B). The lever will return to the OFF posi-
tion when released.
OCM040125
OCM040124
OCM040126
Page 142 of 408
463
Features of your vehicle
D210000AUN
Automatic turn off function
(if equipped)
The interior lights automatically turn off
approximately 20 minutes after the igni-
tion switch is turned off.
If your vehicle is equipped with the theft
alarm system, the interior lights automat-
ically turn off approximately 3 seconds
after the system is armed.
D210100AFD
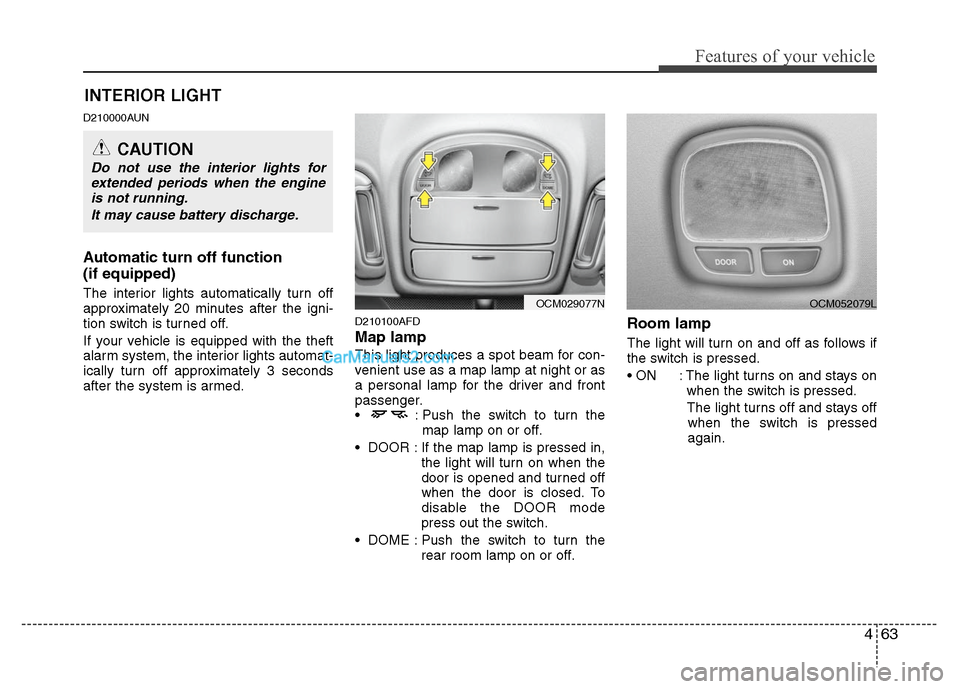
Map lamp
This light produces a spot beam for con-
venient use as a map lamp at night or as
a personal lamp for the driver and front
passenger.
: Push the switch to turn themap lamp on or off.
DOOR : If the map lamp is pressed in, the light will turn on when the
door is opened and turned off
when the door is closed. To
disable the DOOR mode
press out the switch.
DOME : Push the switch to turn the rear room lamp on or off.
Room lamp
The light will turn on and off as follows if
the switch is pressed.
: The light turns on and stays onwhen the switch is pressed.
The light turns off and stays off when the switch is pressed
again.
INTERIOR LIGHT
CAUTION
Do not use the interior lights for extended periods when the engineis not running.
It may cause battery discharge.
OCM029077N
OCM052079L
Page 159 of 408
Features of your vehicle
80
4
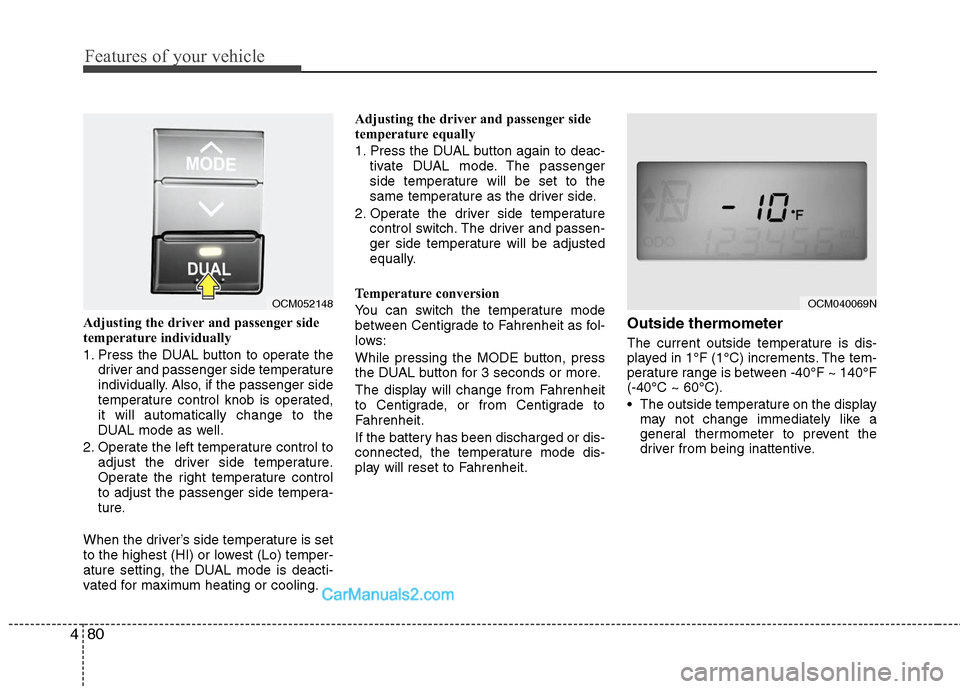
Adjusting the driver and passenger side
temperature individually
1. Press the DUAL button to operate the
driver and passenger side temperature
individually. Also, if the passenger side
temperature control knob is operated,
it will automatically change to the
DUAL mode as well.
2. Operate the left temperature control to adjust the driver side temperature.
Operate the right temperature control
to adjust the passenger side tempera-
ture.
When the driver’s side temperature is set
to the highest (HI) or lowest (Lo) temper-
ature setting, the DUAL mode is deacti-
vated for maximum heating or cooling. Adjusting the driver and passenger side
temperature equally
1. Press the DUAL button again to deac-
tivate DUAL mode. The passenger
side temperature will be set to the
same temperature as the driver side.
2. Operate the driver side temperature control switch. The driver and passen-
ger side temperature will be adjusted
equally.
Temperature conversion
You can switch the temperature mode
between Centigrade to Fahrenheit as fol-
lows:
While pressing the MODE button, press
the DUAL button for 3 seconds or more.
The display will change from Fahrenheit
to Centigrade, or from Centigrade to
Fahrenheit.
If the battery has been discharged or dis-
connected, the temperature mode dis-
play will reset to Fahrenheit.Outside thermometer
The current outside temperature is dis-
played in 1°F (1°C) increments. The tem-
perature range is between -40°F ~ 140°F
(-40°C ~ 60°C).
The outside temperature on the display may not change immediately like a
general thermometer to prevent the
driver from being inattentive.
OCM052148
OCM040069N
Page 164 of 408
485
Features of your vehicle
Defogging logic
To reduce the possibility of fogging up
inside of the windshield, the air intake or
air conditioning are controlled automati-
cally according to certain conditions such
as or position. To cancel or
return to the defogging logic, do the fol-
lowing.
Automatic climate control system
1. Turn the ignition switch to the ON posi-tion.
2. Select the defroster position by press- ing the defroster button ( ).
3. While pressing the air conditioning button (A/C), press the air intake con-
trol button (Recirculated air button) at
least 5 times within 3 seconds.
The A/C display blinks 3 times with 0.5
second of interval. It indicates that the
defogging logic is canceled or returned to
the programmed status.
If the battery has been discharged or dis-
connected, it resets to the defog logic
status.
OCM040165N
Page 171 of 408
Features of your vehicle
92
4
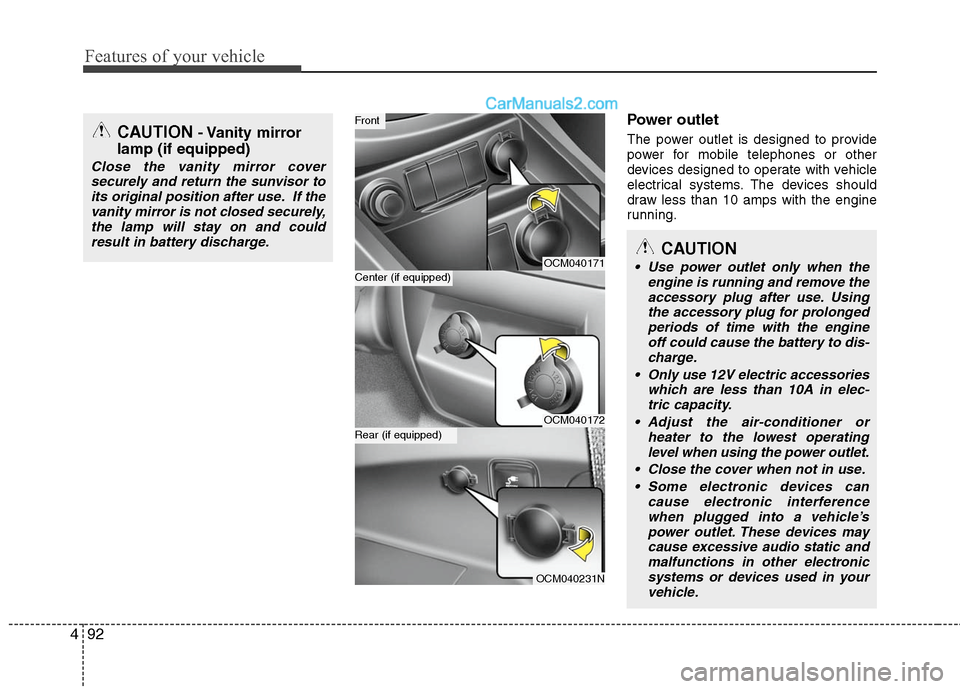
Power outlet
The power outlet is designed to provide
power for mobile telephones or other
devices designed to operate with vehicle
electrical systems. The devices should
draw less than 10 amps with the engine
running.
OCM040171
OCM040172
OCM040231N
Center (if equipped)
Front
Rear (if equipped)
CAUTION
Use power outlet only when the
engine is running and remove theaccessory plug after use. Usingthe accessory plug for prolongedperiods of time with the engineoff could cause the battery to dis-charge.
Only use 12V electric accessories which are less than 10A in elec-tric capacity.
Adjust the air-conditioner or heater to the lowest operatinglevel when using the power outlet.
Close the cover when not in use. Some electronic devices can cause electronic interferencewhen plugged into a vehicle’spower outlet. These devices maycause excessive audio static andmalfunctions in other electronicsystems or devices used in yourvehicle.
CAUTION- Vanity mirror
lamp (if equipped)
Close the vanity mirror cover
securely and return the sunvisor toits original position after use. If thevanity mirror is not closed securely,the lamp will stay on and couldresult in battery discharge.