2010 Hyundai Santa Fe CD player
[x] Cancel search: CD playerPage 179 of 408
Features of your vehicle
100
4
MODE (1)
Press the button to select Radio, or CD
(compact disc).
SEEK ( / ) (2)
If the SEEK button is pressed for 0.8 sec-
ond or more, it will work as follows in
each mode.
RADIO mode
It will function as the AUTO SEEK select
button.
CD PLAYER (CDP) mode
It will function as the FF/REW button.
CD CHANGER (CDC) mode
It will function as the DISC UP/DOWN
button.
If the SEEK button is pressed for less
than 0.8 second, it will work as follows in
each mode. RADIO mode
It will function as the PRESET STATION
select buttons.
CD PLAYER (CDP) mode
It will function as the TRACK UP/DOWN
button.
CD CHANGER (CDC) mode
It will function as the TRACK UP/DOWN
button.
Detailed information for audio control
buttons is described in the following
pages in this section.
VOL (+/ -) (3)
• Press the up button (+) to increase vol-
ume.
Press the down button (-) to decease volume.
VOICE RECOGNITION (VR) mode (4)
Detailed information is described in the
following pages in this section.
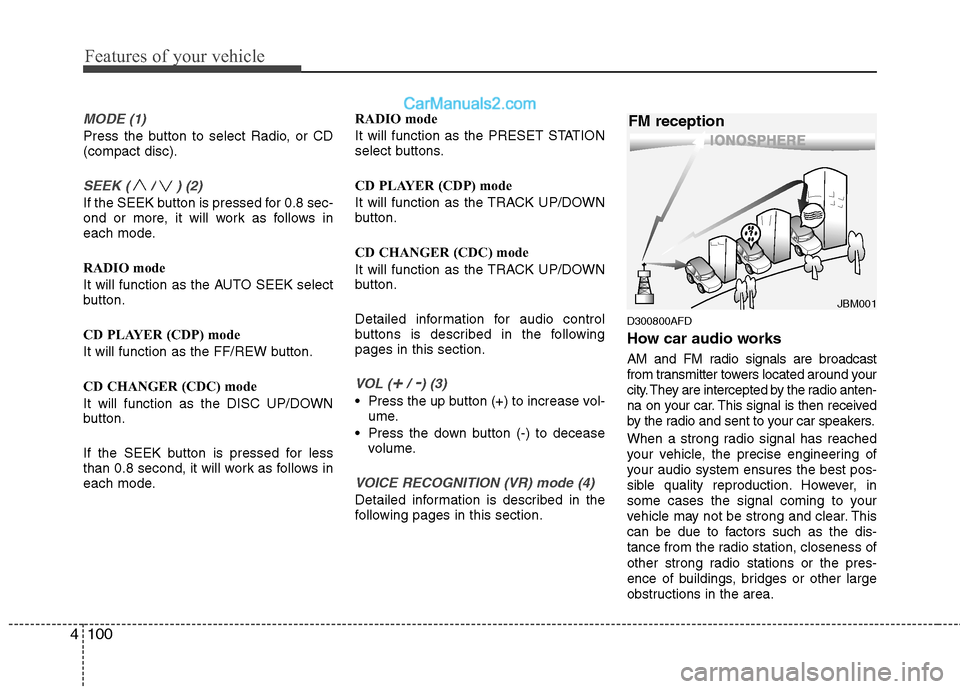
D300800AFD
How car audio works
AM and FM radio signals are broadcast
from transmitter towers located around your
city. They are intercepted by the radio anten-
na on your car. This signal is then received
by the radio and sent to your car speakers.
When a strong radio signal has reached
your vehicle, the precise engineering of
your audio system ensures the best pos-
sible quality reproduction. However, in
some cases the signal coming to your
vehicle may not be strong and clear. This
can be due to factors such as the dis-
tance from the radio station, closeness of
other strong radio stations or the pres-
ence of buildings, bridges or other large
obstructions in the area.
¢¢¢
JBM001
FM reception
Page 182 of 408
4103
Features of your vehicle
Using a cellular phone or a two-
way radio
When a cellular phone is used inside the
vehicle, noise may be produced from the
audio equipment. This does not mean
that something is wrong with the audio
equipment. In such a case, use the cellu-
lar phone at a place as far as possible
from the audio equipment.
Care of disc (if equipped)
If the temperature inside the car is toohigh, open the car windows for ventilation
before using your car audio.
It is illegal to copy and use MP3/WMA/ AAC/WAVE files without permission.
Use CDs that are created only by lawful
means.
Do not apply volatile agents such as benzene and thinner, normal cleaners
and magnetic sprays made for ana-
logue disc onto CDs.
To prevent the disc surface from get- ting damaged. Hold and carry CDs by
the edges or the edges of the center
hole only.
Clean the disc surface with a piece of soft cloth before playback (wipe it from
the center to the outside edge).
Do not damage the disc surface or attach pieces of sticky tape or paper
onto it.
Make sure on undesirable matter other than CDs are inserted into the CD
player (Do not insert more than one
CD at a time).
Keep CDs in their cases after use to protect them from scratches or dirt. Depending on the type of CD-R/CD-
RW CDs, certain CDs may not operate
normally according to manufacturing
companies or making and recording
methods. In such circumstances, if you
still continue to use those CDs, they
may cause the malfunction of your car
audio system.
✽ ✽ NOTICE- Playing an
Incompatible Copy-Protected
Audio CD
Some copy protected CDs, which do not
comply with the international audio CD
standards (Red Book), may not play on
your car audio. Please note that if you
try to play copy protected CDs and the
CD player does not perform correctly
the CDs maybe defective, not the CD
player.
CAUTION
When using a communication sys-
tem such a cellular phone or a radioset inside the vehicle, a separateexternal antenna must be fitted. When a cellular phone or a radio setis used with an internal antenna alone, it may interfere with the vehi-cle's electrical system and adverse-ly affect safe operation of the vehi-cle.
WARNING
Don't use a cellular phone when
you are driving. You must stop at a
safe place to use a cellular phone.
Page 189 of 408
Features of your vehicle
110
4
MP3/WMA : FILE NAME➟TITLE➟
ARTIST➟ALBUME➟FOLDER NAME➟
TOTAL FILE... (not displayed if the
information is not available on the
DISC.)
4. Automatic Track Selection
Button
Push [TRACK ] button for less than
0.8 second to play from the beginning
of current song.
Push [TRACK ] button for less than 0.8 second and press again within 1
second to play the previous song.
Push [TRACK ] button for 0.8 or longer to initiate reverse direction high
speed sound search of current song.
Push [SEEK ] button for less than 0.8 second to play the next song.
Push [SEEK ] button for 0.8 or longer to initiate high speed sound
search of current song.
5. RANDOM Play Button
Press this button for less than 0.8 second
to activate ‘RDM’ mode and more than
0.8 seconds to activate ‘ALL RDM’ mode.
RDM : Only files/tracks in a folder/discare played back in a random sequence.
ALL RDM(MP3/WMA Only) : All files in a disc are played back in the random
sequence.
6. REPEAT Button
Press this button for less than 0.8 second
to activate ‘RPT’ mode and more than 0.8
seconds to activate ‘FLD RPT’ mode.
RPT : Only a track(file) is repeatedlyplayed back.
FLD RPT(MP3/WMA Only) : Only files in a folder are repeatedly played back.
7. CD or CD/AUX or CD/AUX/RSE Selection Button
CD Selection Button
If the CD is loaded, turns to CD mode.
If no CD, it displays "NO Disc" for 3
seconds and returns to the previous
mode. CD/AUX Selection Button
If the auxiliary device is connected, it
switches to the AUX mode from the
other mode to play the sound from the
auxiliary player. If the CD is loaded,
turns to CD mode, and if a device is
connected to AUX then it toggles.
CD
➟AUX➟CD... when the button is
pressed each time. (It will not turn to
AUX if the auxiliary device is not con-
nected) If no CD and auxiliary device is
not connected, it displays "NO Media"
for 3 seconds and returns to the previ-
ous mode.
CD/AUX/RSE Selection Button If the auxiliary device is connected, it
switches to the AUX mode from the
other mode to play the sound from the
auxiliary player. If the CD is loaded,
turns to CD mode, and if a device is
connected to AUX and there is a CD in
the RSE then it toggles.
CD
➟AUX➟RSE➟CD... when the but-
ton is pressed each time.(It will not turn
to AUX and RSE if the auxiliary device
is not connected and there is no CD in
the RSE)
Page 191 of 408
Features of your vehicle
112
4
CAUTION IN USING
USB DEVICE
To use the external USB device,
make sure the device is notmounted when starting up the vehicle and mount the deviceafter starting up.
If you start the vehicle when the USB device is mounted, it maydamage the USB device. (USB isnot ESA)
If the vehicle is started up or turned off while the external USBdevice is connected, the externalUSB device may not work.
It may not play inauthentic MP3 or WMA files.
1) It can only play MP3 files with the compression rate between8Kbps~320Kbps.
2) It can only play WMA music files with the compression ratebetween 8Kbps~320Kbps.
Take cautions for static electricity when mounting or dismountingthe external USB device.
Encoded MP3 PLAYER is not rec- ognizable.
(Continued)
(Continued) Depending on the condition of the external USB device, the con-nected external USB device canbe unrecognizable.
When the formatted byte/sector setting of External USB devices isnot either 512BYTE or 2048BYTE,then the device will not be recog-nized.
Only use an USB device format- ted to FAT 12/16/32.
USB device without USB IF authen- tication may not be recognizable.
Make sure the USB connection terminal does not come in contactwith human body or any object.
If you repeat mounting or dis- mounting USB device in a shortperiod of time, it may break thedevice.
You might hear strange noise when mounting or dismounting aUSB device.
(Continued)(Continued) If you dismount the external USB device during playback in USBmode, the external USB device canbe damaged or malfunction.Therefore, mount the external USB device when the engine is turnedoff or in another mode.
Depending on the type and capac- ity of the external USB device orthe type of the files stored in the device, there is a difference in thetime taken for recognition of the device, but this is not a trouble.Please wait for a moment.
Do not use the USB device for other purposes than playing music files.
Use of USB accessories such as the recharger or heater using USBI/F may lower the performance orcause trouble.
If you use devices such as the USB hub you purchased separate-ly, the vehicle’s audio system maynot recognize the USB device.Connect the USB device directlyto the multimedia terminal of thevehicle.
(Continued)
Page 192 of 408
4113
Features of your vehicle
(Continued) If USB device is divided by logical drives, only the music files on thehighest-priority drive are recog-nized by car audio.
Devices such as MP3 Player/ Cellular phone/Digital cameratare not recognizable by standardUSB I/F can be unrecognizable.
USB devices other than standard- ized goods (METAL COVER TYPEUSB) can be unrecognizable.
USB flash memory reader (such as CF, SD, microSD, etc.) or exter-nal-HDD type devices can beunrecognizable.
Music files protected by DRM (DIGITAL RIGHTS MANAGEMENT)are not recognizalbe.
The data in the USB memory may lost while using this AUDIO, It isrecommeded to back up impor-tant data on a personal.
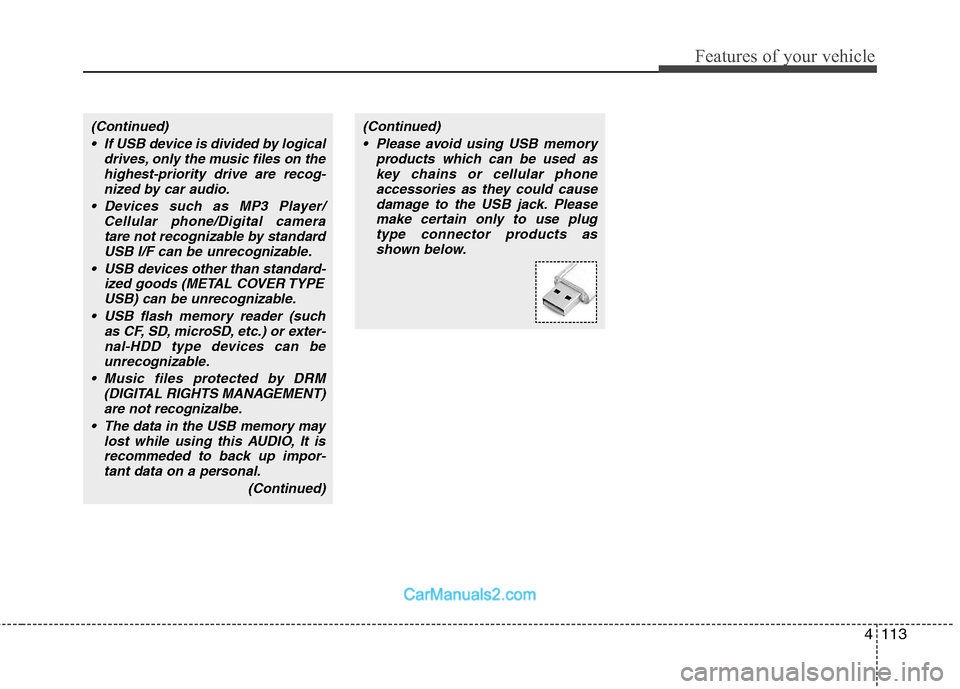
(Continued)(Continued) Please avoid using USB memory products which can be used askey chains or cellular phoneaccessories as they could causedamage to the USB jack. Pleasemake certain only to use plug type connector products asshown below.
Page 211 of 408
Features of your vehicle
132
4
D320000AEN
Important Safety Information
It is always important to operate your
vehicle in a safe manner and to avoid dis-
traction while driving. This manual pro-
vides information that will help you safely
operate your Rear Seat Entertainment
System (RSE). Please read it completely
before using the system.
This device complies with part 15 of
the FCC rules.
Operation is subject to the following two
conditions:
1. This device may not cause harmful
interference, and
2. This device must accept any interfer- ence received, including interference
that may cause undesired operation.
Welcome
The Rear Seat Entertainment System is
a compact, built-in, easy-to-use enter-
tainment system designed to provide
family fun while you are on the road.
Enjoy great quality sound from the vehi-
cle speakers, or have a private, quiet lis-
tening with the wireless headphones.
The overhead display unit is mounted to
the ceiling in the rear passenger area of
the vehicle, allowing rear-seat passen-
gers to play DVD movies, video CDs or
music CDs. Users may also plug in a
game platform or VHS player into an aux-
iliary input to show the programs through
the RSE display. The RSE can also
access to the vehicle's front radio pro-
grams.
System Overview
Connections / Setup
Your Rear Seat Entertainment system
will play DVD movies, video CDs, music
CDs or music MP3 discs, and is
designed to make your time on the road
more enjoyable. Please follow these
instructions carefully to get the most out
of your RSE.
REAR SEAT ENTERTAINMENT SYSTEM (RSE) (IF EQUIPPED)
CAUTION
• Avoid having food or drinks near, in or on the RSE, the wirelessheadphones or the remote con-troller.
Direct sunlight may interfere with the headphone's operation andperformance.
Normal RSE operation cannot be guaranteed with unofficiallyduplicated discs.
(Continued)
WARNING
Changes or modifications not
expressly approved by the party
responsible for compliance could
void the user's authority to operate
the equipment.
Page 213 of 408
Features of your vehicle
134
4
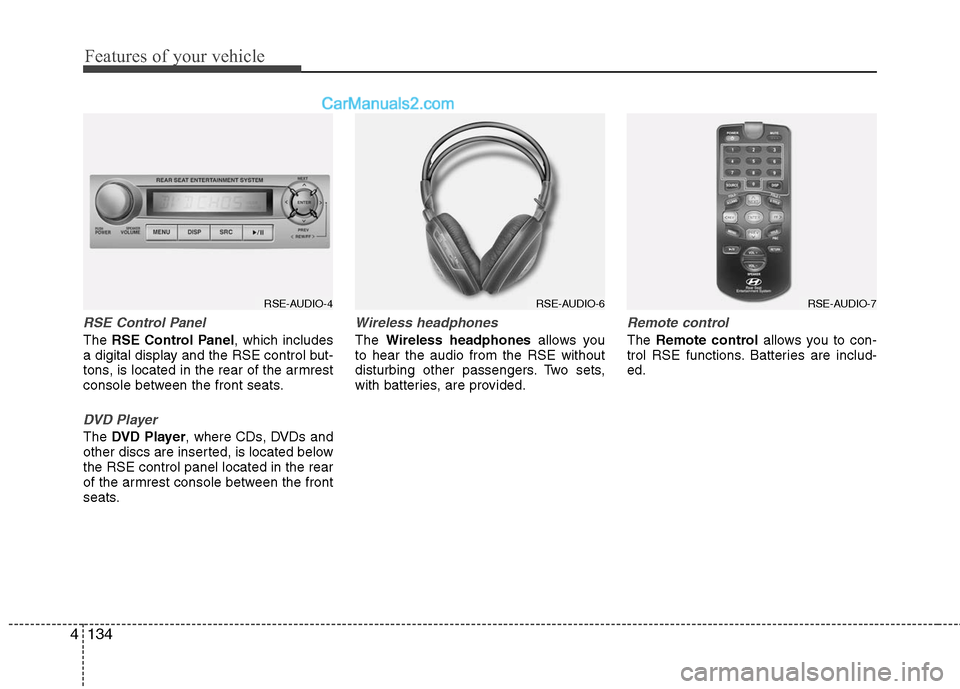
RSE Control Panel
The RSE Control Panel , which includes
a digital display and the RSE control but-
tons, is located in the rear of the armrest
console between the front seats.
DVD Player
The DVD Player , where CDs, DVDs and
other discs are inserted, is located below
the RSE control panel located in the rear
of the armrest console between the front
seats.
Wireless headphones
The Wireless headphones allows you
to hear the audio from the RSE without
disturbing other passengers. Two sets,
with batteries, are provided.
Remote control
The Remote control allows you to con-
trol RSE functions. Batteries are includ-
ed.
RSE-AUDIO-4
RSE-AUDIO-6
RSE-AUDIO-7
Page 214 of 408
4135
Features of your vehicle
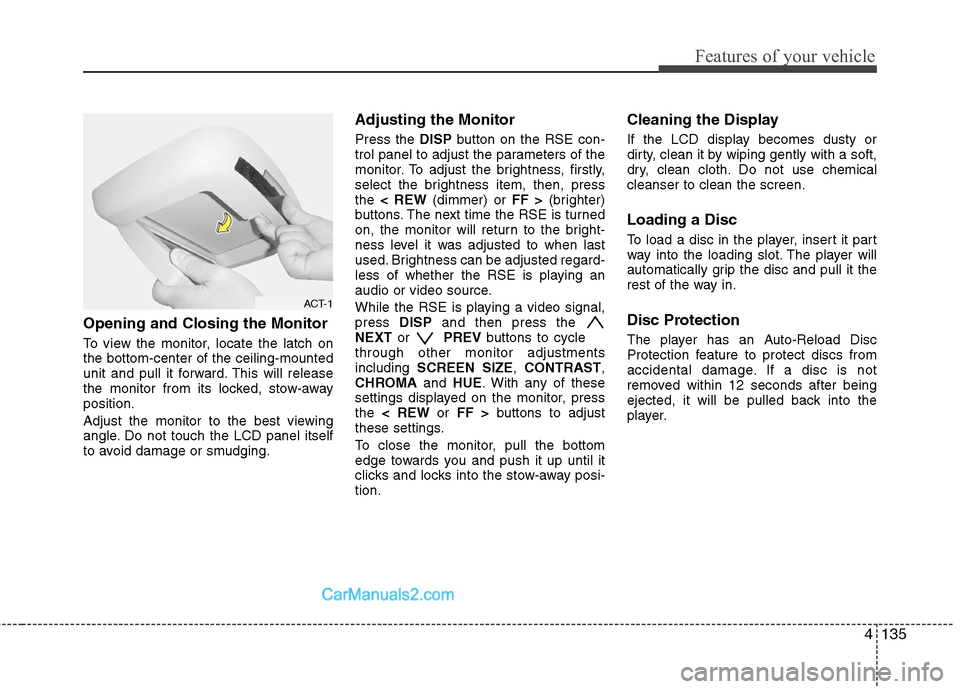
Opening and Closing the Monitor
To view the monitor, locate the latch on
the bottom-center of the ceiling-mounted
unit and pull it forward. This will release
the monitor from its locked, stow-away
position.
Adjust the monitor to the best viewing
angle. Do not touch the LCD panel itself
to avoid damage or smudging.
Adjusting the Monitor
Press the DISPbutton on the RSE con-
trol panel to adjust the parameters of the
monitor. To adjust the brightness, firstly,
select the brightness item, then, press
the < REW (dimmer) or FF >(brighter)
buttons. The next time the RSE is turned
on, the monitor will return to the bright-
ness level it was adjusted to when last
used. Brightness can be adjusted regard-
less of whether the RSE is playing an
audio or video source.
While the RSE is playing a video signal,
press DISPand then press the
NEXT or PREVbuttons to cycle
through other monitor adjustments
including SCREEN SIZE ,CONTRAST ,
CHROMA and HUE. With any of these
settings displayed on the monitor, press
the < REW or FF > buttons to adjust
these settings.
To close the monitor, pull the bottom
edge towards you and push it up until it
clicks and locks into the stow-away posi-
tion.
Cleaning the Display
If the LCD display becomes dusty or
dirty, clean it by wiping gently with a soft,
dry, clean cloth. Do not use chemical
cleanser to clean the screen.
Loading a Disc
To load a disc in the player, insert it part
way into the loading slot. The player will
automatically grip the disc and pull it the
rest of the way in.
Disc Protection
The player has an Auto-Reload Disc
Protection feature to protect discs from
accidental damage. If a disc is not
removed within 12 seconds after being
ejected, it will be pulled back into the
player.
ACT-1