Page 117 of 207

2 DRIVING YOUR HYUNDAI
14
C160K01A-AAT Carry Emergency Equipment Depending on the severity of the weather where you drive your car, you should carry appropriate emergencyequipment. Some of the items you may want to carry include tire chains, tow straps or chains, flashlight, emer-gency flares, sand, a shovel, jumper cables, a window scraper, gloves, ground cloth, coveralls, a blanket, etc.
C160J01A-AAT Don't Let Ice and Snow Accumu- late Underneath Under some conditions, snow and ice can build up under the fenders andinterfere with the steering. When driv- ing in severe winter conditions where this may happen, you should periodi-cally check underneath the car to be sure the movement of the front wheels and the steering components is notobstructed.
C160G01A-AAT To Keep Locks from Freezing To keep the locks from freezing, squirt an approved de-icer fluid or glycerineinto the key opening. If a lock is cov- ered with ice, squirt it with an approved de-icing fluid to remove the ice. If thelock is frozen internally, you may be able to thaw it out by using a heated key. Handle the heated key with careto avoid injury. C160H01A-AAT Use Approved Anti-Freeze in Window Washer System To keep the water in the window washer system from freezing, add an approved anti-freeze solution in accordance with instructions on the container. Windowwasher anti-freeze is available from Hyundai dealers and most auto parts outlets. Do not use engine coolant orother types of anti-freeze as these may damage the finish. C160I01HR-GAT Don't Let Your Parking Brake Freeze Under some conditions your parking brake can freeze in the engaged posi-tion. This is most likely to happen when there is an accumulation of snow or ice around or near the rear brakes orif the brakes are wet. If there is a risk the parking brake may freeze, apply it only temporarily while you put the gearselector lever in first or reverse gear and block the rear wheels so the car cannot roll. Then release the parkingbrake.
Page 121 of 207

2 DRIVING YOUR HYUNDAI
18
8. When parking your car and trailer,especially on a hill, be sure to fol- low all the normal precautions. Turn your front wheel into the curb, set the parking brake firmly, and putthe transmission in 1st or Reverse. In addition, place wheel chocks at each of the trailer's tires.
9. If the trailer has electric brakes, start your vehicle and trailer mov-ing, and then apply the trailer brakecontroller by hand to be sure the brakes are working. This lets you check your electrical connection atthe same time.
10. During your trip, check occasion-
ally to be sure that the load issecure, and that the lights and any trailer brakes are still working.
11. Avoid jerky starts, sudden accel- eration or sudden stops.
12. Avoid sharp turns and rapid lane
changes.
13. Avoid holding the brake pedal down too long or too frequently. This could cause the brakes to over-heat, resulting in reduced braking efficiency.
!WARNING:
Improperly loading your car and trailer can seriously affect its steer- ing and braking performance caus- ing a crash which could cause seri-ous injury or death. C190F01HR-GAT Trailer or Vehicle Towing Tips
1. Before towing, check hitch and
safety chain connections as well as proper operation of the trailer running lights, brake lights, and turn signals.
2. Always drive your vehicle at a mod- erate speed (Less than 100 km/h).
3. Trailer towing requires more fuel than normal conditions.
4. To maintain engine braking effi-
ciency, do not tow a trailer withtransmission in fifth gear.
5. Always secure items in the trailer
to prevent load shift while driving.
6. Check the condition and air pres- sure of all tires on the trailer andyour car. Low tire pressure canseriously affect the handling. Also check the spare tire.
7. The vehicle/trailer combination is more affected by crosswind andbuffeting. When being passed by a largevehicle, keep a constant speed and steer straight ahead. If there is too much wind buffeting, slow downto get out of the other vehicle's air turbulence.
Page 128 of 207
3 WHAT TO DO IN AN EMERGENCY
6
D040B02HR-GAT Handling the Spare Tire 1. Assemble the tools(1)(2)(3) into the
spare tire carrier wrench orderly like the picture.
2. Insert the spare tire carrier wrench into the hole of the spare tire carrier,turn it counterclockwise, then the spare tire comes down. OHR058109
3. Disconnect the steel wire (4) from
the tire support hook (5) after thespare tire comes down completely.
4. To install the spare tire, build the spare tire as following and pull thetire support. OHR058110
(4)
D040B01HR5. Connect the steel wire (4) with the
support hook (5).
Rear wheel tire Front wheel tire
Wheel carrier guide Tire support
Rubber cushion
Steel wire
OHR058111
(4) D040B03HR
Rear wheel tire Tire support
Steel wire
Low Deck HighDeck
(5)
(5)
Page 130 of 207
3 WHAT TO DO IN AN EMERGENCY
8CHANGING A FLAT TIRE
D060A01HR-GAT The procedure described on the follow- ing pages can be used to rotate tires as well as to change a flat tire. When preparing to change a flat tire, check tobe sure the gear selector lever is in reverse gear and that the parking brake is set, then: OHR058104D060K02HR-GAT
Wheel Cover (If Installed) Front To remove the wheel cover insert the rod (1) into the crack between the wheeland wheel cover, and pry up the wheel cover gently with the rod.
OHR058105
OHR058114
To reinstall the wheel cover fit the grooves of the wheel cover in the wheel lug nuts of wheel and hit the center of the wheel cover with your hand.
(1)
Page 131 of 207
3
WHAT TO DO IN AN EMERGENCY
9
D060B01HR-GAT 1. Obtain Spare Tire and Tool Remove the spare tire and take out the jack and tool bag. To remove the spare tire, refer to"Handling the Spare Tire" on page 3-6. To take out the jack, loosen the secur- ing unt. NOTE: The spare tire is located underneath the car.
Rear To remove the wheel cover insert the fingers into the holes in the wheel cover and pull the wheel cover powerfullyfrom the wheel.
OHR058107
D060F01HR
To reinstall the wheel cover fit the point (1) of the wheel cover in the valve (2) of the wheel, and hit the center of the wheel cover with your hand.
OHR058106
CAUTION:
Make sure there's nothing behind you before removing the wheel cover.
!
Page 132 of 207

3 WHAT TO DO IN AN EMERGENCY
10
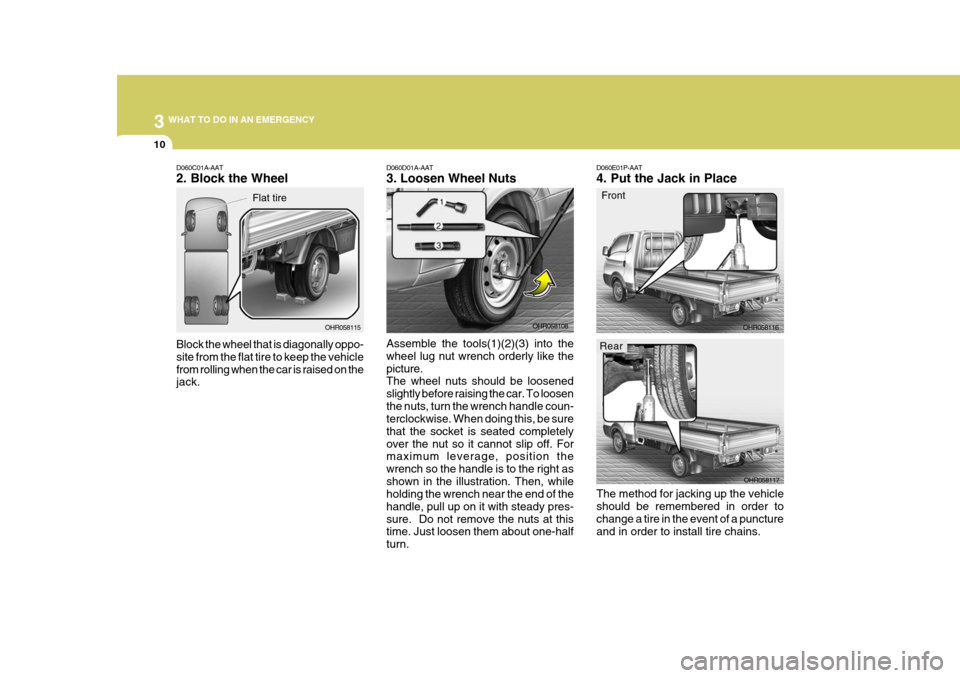
D060E01P-AAT 4. Put the Jack in Place
Front
The method for jacking up the vehicle should be remembered in order to change a tire in the event of a puncture and in order to install tire chains. OHR058116
OHR058117D060D01A-AAT 3. Loosen Wheel Nuts Assemble the tools(1)(2)(3) into the wheel lug nut wrench orderly like thepicture. The wheel nuts should be loosened slightly before raising the car. To loosenthe nuts, turn the wrench handle coun- terclockwise. When doing this, be sure that the socket is seated completelyover the nut so it cannot slip off. For maximum leverage, position the wrench so the handle is to the right asshown in the illustration. Then, while holding the wrench near the end of the handle, pull up on it with steady pres-sure. Do not remove the nuts at this time. Just loosen them about one-half turn. OHR058108D060C01A-AAT 2. Block the Wheel Block the wheel that is diagonally oppo- site from the flat tire to keep the vehiclefrom rolling when the car is raised on the jack.
OHR058115
Flat tire
Rear
Page 133 of 207

3
WHAT TO DO IN AN EMERGENCY
11
After stopping the engine and applying the parking brake on a flat level sur-face, also use chocks to hold the wheels. Position the jack only at the specifiedpoints indicated in the illustration, and the use of the jack at other points could damage the vehicle body.
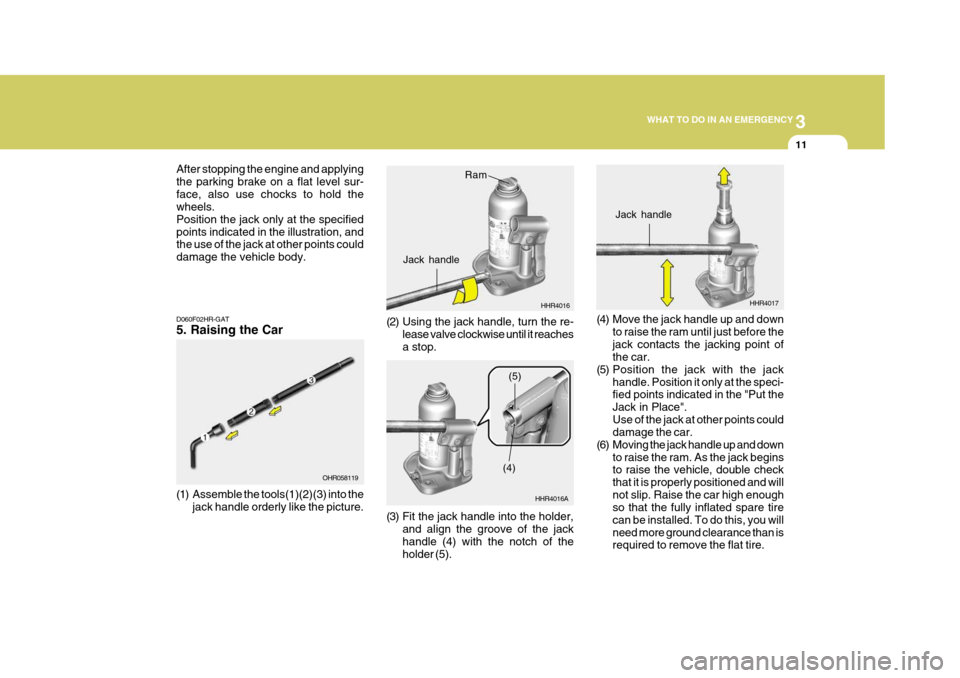
D060F02HR-GAT 5. Raising the Car
(1) Assemble the tools(1)(2)(3) into the jack handle orderly like the picture. OHR058119
HHR4016
Ram
Jack handle
(2) Using the jack handle, turn the re- lease valve clockwise until it reaches a stop.
(3) Fit the jack handle into the holder,and align the groove of the jack handle (4) with the notch of the holder (5). HHR4016A
(4)(5)
HHR4017
Jack handle
(4) Move the jack handle up and down to raise the ram until just before the jack contacts the jacking point of the car.
(5) Position the jack with the jack handle. Position it only at the speci-fied points indicated in the "Put the Jack in Place".Use of the jack at other points could damage the car.
(6) Moving the jack handle up and down to raise the ram. As the jack beginsto raise the vehicle, double check that it is properly positioned and will
not slip. Raise the car high enough so that the fully inflated spare tire can be installed. To do this, you willneed more ground clearance than is required to remove the flat tire.
Page 134 of 207

3 WHAT TO DO IN AN EMERGENCY
12
D060F03HR
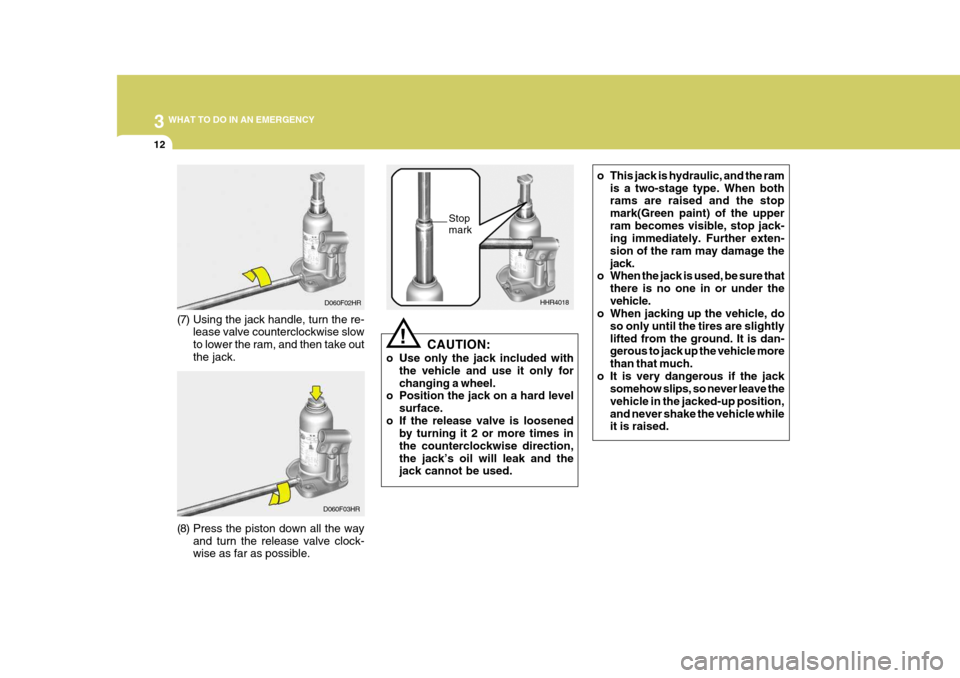
(8) Press the piston down all the way and turn the release valve clock- wise as far as possible. HHR4018
Stop mark
CAUTION:
o Use only the jack included with the vehicle and use it only for changing a wheel.
o Position the jack on a hard level
surface.
o If the release valve is loosened by turning it 2 or more times inthe counterclockwise direction,the jack’s oil will leak and the jack cannot be used.!
D060F02HR
(7) Using the jack handle, turn the re- lease valve counterclockwise slow to lower the ram, and then take outthe jack. o This jack is hydraulic, and the ram
is a two-stage type. When both rams are raised and the stop mark(Green paint) of the upperram becomes visible, stop jack- ing immediately. Further exten- sion of the ram may damage thejack.
o When the jack is used, be sure that
there is no one in or under thevehicle.
o When jacking up the vehicle, do
so only until the tires are slightlylifted from the ground. It is dan- gerous to jack up the vehicle more than that much.
o It is very dangerous if the jack somehow slips, so never leave thevehicle in the jacked-up position,and never shake the vehicle while it is raised.