Page 253 of 526

For inf ormation on how to handle
and protect compact discs, see page.
To remove the disc that is currently
playing, press the eject button. You
will see ‘‘EJECT’’ in the display.
When you remove the disc f rom the
slot, the system automatically begins
the load sequence so you can load
another disc in that position. If you
do not load another disc af ter 15
seconds, the system selects the
previous mode (AM, FM, or XM).
If you do not remove the disc f rom
the slot, the system will reload the
disc af ter 10 seconds, and select the
previous mode (AM, FM, or XM). To
begin playing the disc, press the CD
button.
To remove a different disc from the
changer,firstselectitwiththe
appropriate preset button. When that
disc begins playing, press the eject
button. If you press the eject button while
listening to the radio, or with the
audio system turned of f , the disc
that was last selected is ejected.
Af ter that disc is ejected, pressing
the eject button again will eject the
next disc in numerical order. By
doing this six times, you can remove
all the CDs f rom the changer.
In any mode, if you press the eject
button and hold it until you hear a
beep, the system will eject all of the
discs in the changer.
You can also eject discs when the
ignition switch is of f . The disc that
was last selected is ejected f irst. You
can eject up to six discs, one at a
time.
272
Playing Discs (EX and EX-L models without navigation system)
Protecting Compact DiscsRemoving Discs f rom t he In-dash
Disc Changer
250
�����—�����—�
���y�
�������������y���
�(�����������y���������y
2010 Odyssey
Page 255 of 526
The audio system f or your vehicle
can also be operated by voice control.
See the navigation system manual
f or complete details.
Playing the A M/FM Radio (Models with navigation system)
Voice Control System
252
SCAN BUTTON
AUTO SELECT
BUTTON
PWR/VOL KNOB PRESET BUTTONS
TUNE/SOUND KNOBSEEK BAR
AM/FM BUTTON
XM BUTTON
�����—�����—�
���y�
�������������y���
�(�����������y���������y
2010 Odyssey
Page 256 of 526
 or ON (II) position.
Turn the system on by pushing the
PWR/VOL knob. Adjust the volume
by turning the same knob.
You can also op")
�µ
�µ �´�µ
�µ �µ
The ignition switch must be in the
ACCESSORY (I) or ON (II) position.
Turn the system on by pushing the
PWR/VOL knob. Adjust the volume
by turning the same knob.
You can also operate the audio
system using the control icons on the
audio screen.
The band and f requency that the
radio was last tuned to is displayed.
To change bands, press the AM/FM
button. On the FM band, ST will be
displayed if the station is
broadcasting in stereo. Stereo
reproduction in AM is not available. Use the TUNE knob to
tune the radio to a desired f requency.
Turn the knob right to tune to a
higher f requency, or lef t to tune to a
lower f requency.
The SEEK f unction
searches up and down from the
current f requency to f ind a station
with a strong signal. To activate it
press the or side of the bar,
then release it.
The scan f unction samples
all stations with strong signals on the
selected band. To activate it, press
the SCAN button, then release it.
You will see SCAN in the display.
When the system finds a strong
signal, it will stop and play that
station f or about 10 seconds. If you do nothing, the system will
scan f or the next strong station and
play it f or 10 seconds. When it plays
a station that you want to listen to,
press the SCAN button again.
Each preset button can
store one f requency on AM and two
f requencies on FM.
Usethetune,seek,orscan
function to tune the radio to a
desired station.
Pick a preset button (icon), and
hold it until you hear a beep.
Repeat steps 1 through 3 to store a
total of six stations on AM and
twelve stations on FM.
You can use any of f ive methods to
f ind radio stations on the selected
band: tune, seek, scan, the preset
buttons, and auto select. Select the desired band, AM or
FM. FM1 and FM2 let you store
two f requencies with each preset
button (icon).
1.
2.
3.
4.
CONT INUED
Playing the A M/FM Radio (Models with navigation system)
To Play the AM/FM Radio
To Select a Station TUNE
SEEK
SCAN
Preset
Features
253
�����—�����—�
���y�
���������
�
�y���
�(�����������y���������y
2010 Odyssey
Page 257 of 526

�µ�µ�µ
If you are
traveling and can no longer receive
your preset stations, you can use the
auto select feature to find stations in
the local area.
Press the A. SEL button. ‘‘A. SEL’’
appears in the display, and the
system goes into scan mode f or
several seconds. It stores the
f requencies of six AM and twelve
FM stations in the preset buttons.
You will see a ‘‘0’’ displayed af ter
pressing a preset button if auto
select cannot f ind a strong station f or
that preset button.
If you do not like the stations auto
select has stored, you can store
other f requencies on the preset
buttons (icons) as previously
described. press the
A.SEL button or touch the AUTO
SELECTicon.Thisrestoresthe
presets you originally set.
For inf ormation on AM/FM radio
f requencies and reception, see page . Press the SOUND (TUNE) knob
repeatedly to display the bass, treble,
balance, and f ader settings.
Use the TRE/BAS
modes to adjust the tone to your
liking.
These two
modes adjust the strength of the
sound coming f rom each speaker.
BAL adjusts the side-to-side strength,
while FAD adjusts the f ront-to-back
strength. Eachmodeisshowninthedisplayas
it changes. Turn the SOUND
(TUNE) knob to adjust the setting to
your liking. When the level reaches
the center, you will see ‘‘C’’ in the
display. The system will
automatically return the display to
the selected audio mode about 5
seconds af ter you stop adjusting a
mode.
275To turn of f auto select,
Playing the A M/FM Radio (Models with navigation system)
AUTO SELECT
Adjusting the Sound
Treble/Bass
Balance/Fader
254
�����—�����—�
���y�
�������������y���
�(�����������y���������y
2010 Odyssey
Page 260 of 526
CONT INUED
Playing the XMRadio (Models with navigation system)
Features
257
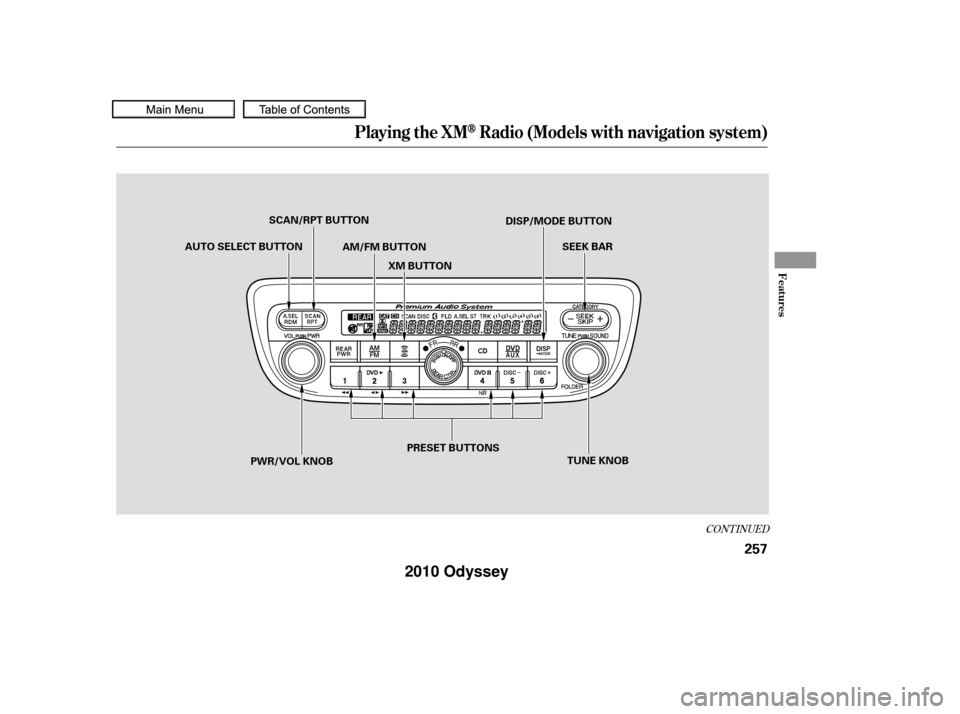
AM/FM BUTTONPRESET BUTTONS
AUTO SELECT BUTTON
TUNE KNOB
PWR/VOL KNOB SCAN/RPT BUTTON
XM BUTTON SEEK BAR
DISP/MODE BUTTON
�����—�����—�
���y�
�������������y���
�(�����������y���������y
2010 Odyssey
Page 262 of 526
 you
want f or that channel. Pr")
�µ
�µ �µ
�µ�´
�µ In category mode, only channels
within that category can be selected.
In channel mode, all channels can be
selected.
Pick the preset button (icon) you
want f or that channel. Press and
hold the button (icon) until you
hear a beep.
Repeat steps 2 and 3 to store the
f irst six channels.
Once a channel is stored, press and
release the proper preset button
(icon) to tune to it. Press the button again or
touch the other XM icon (XM1 or
XM2) on the audio display. Store
the next six channels using steps 2
and 3.
On models with a rear entertainment
system and a navigation system, you
cannot listen to XM Radio and a disc
at the same time. For example, when
XM Radio is playing on the f ront
speakers, you cannot listen to a disc
on the wireless headphones, or vice
versa.
Use the TUNE knob, the
CATEGORY bar, or the SCAN
button to tune to a desired channel.
You can also touch the SCAN icon
on the audio display. Press the button. Either
XM1 or XM2 will show in the
display.
To store a channel: Youcanstoreupto12
preset channels using the six preset
buttons or preset icons on the audio
display. Each button stores one
channel f rom the XM1 band and one
channel f rom the XM2 band.
The scan f unction gives
you a sampling of all channels while
in the channel mode. In the category
mode, only the channels within that
category are scanned. To activate
scan, press the SCAN/RPT button or
touch the SCAN icon on the audio
display. The system plays each channel in numerical order f or a f ew
seconds, then selects the next
channel. When you hear a channel
you want to continue listening to,
press the button or touch the icon
again.
Press either side of
the bar ( or ) to select another
category. Turn the tune knob lef t or
right to select channels. In the
category mode, you can only select
channels within that category.
1.
2.3.
4.
5.
Playing the XMRadio (Models with navigation system)
Preset
SCAN CATEGORY TUNEFeatures
259
�����—�����—�
���y�
�����������
�y���
�(�����������y���������y
2010 Odyssey
Page 273 of 526

For inf ormation on how to handle
and protect compact discs, see page.
To remove the disc that is currently
playing, press the eject button. You
will see ‘‘EJECT’’ in the display.
When you remove the disc f rom the
slot, the system automatically begins
the load sequence so you can load
another disc in that position. If you
do not load another disc af ter 15
seconds, the system selects the
previous mode (AM, FM, or XM).
If you do not remove the disc f rom
the slot, the system will reload the
disc af ter 10 seconds, and select the
previous mode (AM, FM, or XM). To
begin playing the disc, press the CD
button.
To remove a different disc from the
changer,firstselectitwiththe
appropriate preset button. When that
disc begins playing, press the eject
button. If you press the eject button while
listening to the radio, or with the
audio system turned of f , the disc
that was last selected is ejected.
Af ter that disc is ejected, pressing
the eject button again will eject the
next disc in numerical order. By
doing this six times, you can remove
all the CDs f rom the changer.
In any mode, if you press the eject
button and hold it until you hear a
beep, the system will eject all of the
discs in the changer.
You can also eject discs when the
ignition switch is of f . The disc that
was last selected is ejected f irst. You
can eject up to six discs, one at a
time.
272
Playing Discs (Models with navigation system)
Protecting Compact DiscsRemoving Discs f rom t he In-dash
Disc Changer
270
�����—�����—�
���y�
�������������y���
�(�����������y���������y
2010 Odyssey
Page 284 of 526

If your vehicle’s battery is
disconnected or goes dead, you may
need to set the clock.You can quickly set the time to the
nearest hour. If the displayed time is
bef ore the half hour, pressing and
holding the CLOCK button, then
pressing the R (RESET) button sets
the clock back to the previous hour.
If the displayed time is after the half
hour, the clock sets f orward to the
beginning of the next hour. When you are f inished, press the
CLOCK button again.For example: 1:06 will reset to 1:00
1:52 will reset to 2:00
Press and hold the CLOCK button
until the clock f lashes. Change the
hours by pressing the H button until
the numbers advance to the desired
time. Change the minutes by
pressing the M button until the
numbers advance to the desired time. Refer to the navigation system
manual f or how to adjust the time.
On models without navigation system
On models with navigation system
Setting the Clock
Features
281
CLOCK BUTTON
R BUTTON
M BUTTON CLOCK BUTTON
H BUTTON M BUTTON
EX and EX-L models
U.S. EX-L model is shown.
H BUTTON
LX and Canadian DX models
R BUTTON
�����—�����—�
���y�
�����������
�y���
�(�����������y���������y
2010 Odyssey

Voice Control")