Page 453 of 526

Keeping the tires properly inf lated
provides the best combination of
handling, tread lif e, and riding
comf ort.Underinf lated tires wear unevenly,
adversely affect handling and fuel
economy, and are more likely to
fail from being overheated.
Overinf lated tires can make your
vehicleridemoreharshly,are
more prone to damage f rom road
hazards, and wear unevenly.
The tire pressure monitoring system
(TPMS)willwarnyouwhenatire
pressure is low. See page f or
inf ormation on the TPMS.
To saf ely operate your vehicle, your
tires must be the proper type and
size, in good condition with adequate
tread, and correctly inf lated.
The f ollowing pages give more
detailed inf ormation on how to take
care of your tires and what to do
when they need to be replaced.
Clean the wheels as you would the
rest of the exterior. Wash them with
thesamesolution,andrinsethem
thoroughly.
Aluminum alloy wheels have a
protective clear-coat that keeps the
aluminum f rom corroding and
tarnishing. Cleaning the wheels with
harsh chemicals (including some
commercial wheel cleaners) or a stif f
brush can damage the clear-coat. To
clean the wheels, use a mild
detergent and a sof t brush or sponge.
396
If equipped
Inf lation Guidelines
Tires
Wheels
Wheels, Tires
450
Using tires that are excessively
worn or improperly inflated can
cause a crash in which you can
be seriously hurt or killed.
Follow all instructions in this
owner’s manual regarding tire
inflation and maintenance.
�����—�����—�
���y�
�������������y���
�(�����������y���������y
2010 Odyssey
Page 464 of 526

This section covers the more
common problems that motorists
experience with their vehicles. It
gives you inf ormation about how to
safely evaluate the problem and what
to do to correct it. If the problem has
stranded you on the side of the road,
you may be able to get going again.
If not, you will also f ind instructions
on getting your vehicle towed.......................
Compact Spare Tire .462
....................
Changing a Flat Tire .463
.............
If the Engine Won’t Start . 471
................................
Jump Starting .473
..............
If the Engine Overheats . 475
.........
Low Oil Pressure Indicator . 477
..........
Charging System Indicator . 477
.......
Malf unction Indicator Lamp . 478
...........................
Readiness Codes .478
...............
Brake System Indicator . 479
..............................................
Fuses .480
..............................
Fuse Locations .483
......................
Emergency Towing .486
Taking Care of the Unexpected
T aking Care of t he Unexpect ed
461
�����—�����—�
���y�
������
��
���y���
�(�����������y���������y
2010 Odyssey
Page 465 of 526

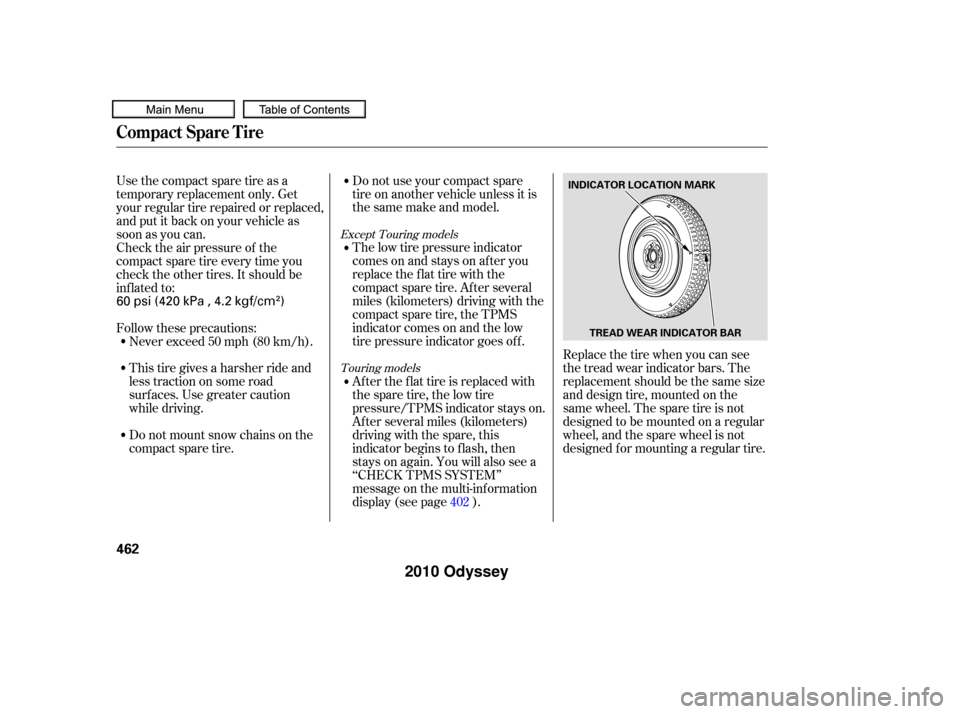
Replace the tire when you can see
the tread wear indicator bars. The
replacement should be the same size
and design tire, mounted on the
same wheel. The spare tire is not
designed to be mounted on a regular
wheel, and the spare wheel is not
designed f or mounting a regular tire.
Do not use your compact spare
tire on another vehicle unless it is
thesamemakeandmodel.
The low tire pressure indicator
comes on and stays on af ter you
replace the flat tire with the
compact spare tire. Af ter several
miles (kilometers) driving with the
compact spare tire, the TPMS
indicator comes on and the low
tire pressure indicator goes of f .
After the flat tire is replaced with
the spare tire, the low tire
pressure/TPMS indicator stays on.
Af ter several miles (kilometers)
driving with the spare, this
indicator begins to f lash, then
stays on again. You will also see a
‘‘CHECK TPMS SYSTEM’’
message on the multi-inf ormation
display (see page ).
Use the compact spare tire as a
temporary replacement only. Get
your regular tire repaired or replaced,
and put it back on your vehicle as
soon as you can.
Check the air pressure of the
compact spare tire every time you
check the other tires. It should be
inf lated to:
Follow these precautions:
Never exceed 50 mph (80 km/h).
This tire gives a harsher ride and
less traction on some road
surf aces. Use greater caution
while driving.
Do not mount snow chains on the
compact spare tire.
402
Except Touring models
Touring models
Compact Spare Tire
462
INDICATOR LOCATION MARK
TREAD WEAR INDICATOR BAR
60 psi (420 kPa , 4.2 kgf/cm)
�����—�����—�
���y�
������
������y���
�(�����������y���������y
2010 Odyssey
Page 466 of 526

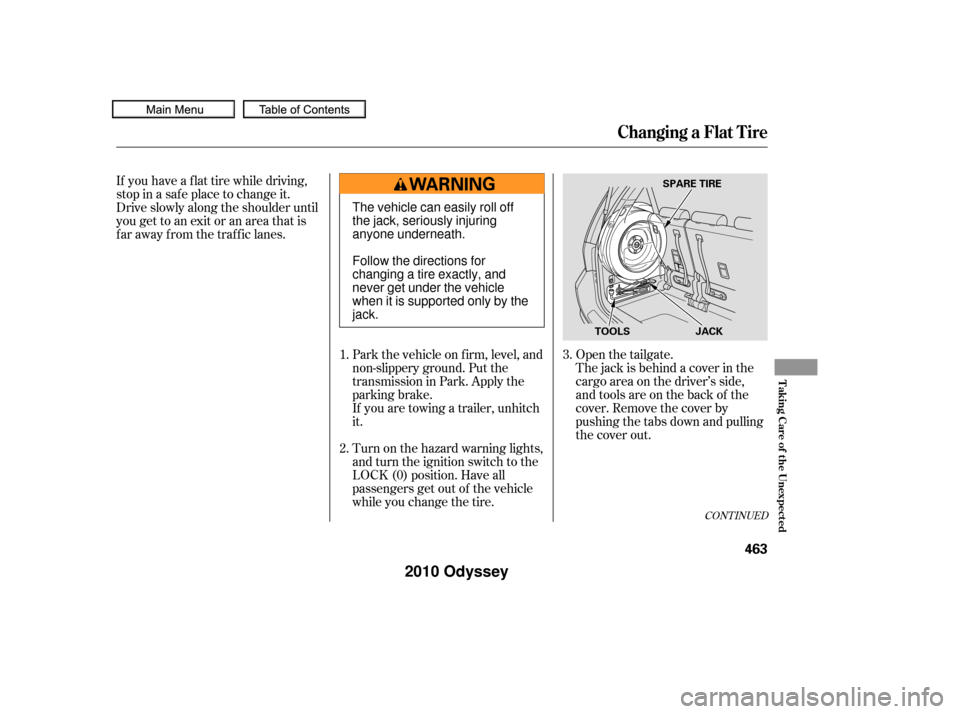
The jack is behind a cover in the
cargo area on the driver’s side,
and tools are on the back of the
cover. Remove the cover by
pushing the tabs down and pulling
the cover out. Open the tailgate.
Park the vehicle on f irm, level, and
non-slippery ground. Put the
transmission in Park. Apply the
parking brake.
If you are towing a trailer, unhitch
it.
Turn on the hazard warning lights,
and turn the ignition switch to the
LOCK (0) position. Have all
passengers get out of the vehicle
while you change the tire.
If you have a f lat tire while driving,
stop in a saf e place to change it.
Drive slowly along the shoulder until
you get to an exit or an area that is
far away from the traffic lanes.
2. 1.3.
CONT INUED
Changing a Flat Tire
T aking Care of t he Unexpect ed
463
JACK
SPARE TIRE
TOOLS
The vehicle can easily roll off
the jack, seriously injuring
anyone underneath.
Follow the directions for
changing a tire exactly, and
never get under the vehicle
when it is supported only by the
jack.
�����—�����—�
���y�
������
������y���
�(�����������y���������y
2010 Odyssey
Page 467 of 526
Loosen the jack from its holder by
turning the end counterclockwise.Remove the bracket from the jack
storageareabyunscrewingthe
bracket mounting wing bolt.
Remove the vinyl storage bag.Move the seat belt out of the way
by hanging the latch plate on the
holder.
Fold down the third row seat (see
page ).
6.
7.
5.
4.
181
Changing a Flat Tire
464
VINYL BAG
JACK
COVER BRACKET MOUNTING
WING BOLT
HOLDER
BRACKET
�����—�����—�
���y�
������
������y���
�(�����������y���������y
2010 Odyssey
Page 468 of 526
The spare tire is stored behind the
sparetirecoveronthesidewallof
the cargo area on the driver’s side.Placethejackunderthejacking
point nearest the tire you need to
change. Turn the end bracket
clockwise until the top of the jack
contacts the jacking point. Make
sure the jacking point tab is
restinginthejacknotch.
Remove the cover by holding the
two handles on the spare tire
cover and pulling the cover out. If you are changing a rear tire,
close the sliding door.
Unscrew the tire mounting wing
bolt, and take the spare tire out of
its holder. Make sure you also turn of f the
sliding door main switch.
Loosen each wheel nut 1/2 turn
with the wheel nut wrench.
8.
9. 10.
12.
11.
CONT INUED
On EX, EX-L, Touring models
Changing a Flat Tire
T aking Care of t he Unexpect ed
465
SEAT BELT
COVER
TIRE MOUNTING
WING BOLT
SPACER CONE
WHEEL NUT WRENCHWHEEL NUTS
�����—�����—�
���y�
������
������y���
�(�����������y���������y
2010 Odyssey
Page 469 of 526
Use the extension and the wheel
nut wrench as shown to raise the
vehicle until the f lat tire is of f the
ground.Bef ore mounting the spare tire,
wipe any dirt of f the mounting
surface of the wheel and hub with
a clean cloth. Wipe the hub
carefully;itmaybehotfrom
driving.
Do not attempt to forcibly pry the
wheel cover of f with a screwdriver or
other tool. The wheel cover cannot
be removed without f irst removing
the wheel nuts. Remove the wheel nuts, then
remove the f lat tire. Handle the
wheel nuts caref ully; they may be
hot from driving. Place the flat tire
on the ground with the outside
surface facing up.
13.
14.15.
On LX and Canadian DX models
Changing a Flat Tire
466
EXTENSION
WHEEL COVER
HUB
WHEEL NUT
WRENCH
�����—�����—�
���y�
������
������y���
�(�����������y�������
�y
2010 Odyssey
Page 470 of 526
Tighten the wheel nuts securely in
a crisscross pattern. Have the
wheel nut torque checked at the
nearest automotive service f acility.
Tighten the wheel nuts to:Put the flat tire in the supplied
vinyl storage bag.
Put on the spare tire. Put the
wheel nuts back on f inger-tight,
then tighten them in a crisscross
pattern with the wheel nut wrench
until the wheel is f irmly against
the hub. Do not try to tighten the
wheel nuts f ully.
Lower the vehicle to the ground,
and remove the jack.
16.
17.
18.
19.
CONT INUED
Changing a Flat Tire
T aking Care of t he Unexpect ed
467
94 lbf·ft (127 N·m , 13 kgf·m)
�����—�����—�
���y�
�������������y���
�(�����������y���������y
2010 Odyssey