Page 187 of 526
 position. You cannot add a
new seat position in memory
unless the ignition switch is in the
ON")
Store a driver’s seat position only
when the vehicle is parked.Turn the ignition switch to the ON
(II) position. You cannot add a
new seat position in memory
unless the ignition switch is in the
ON (II) position. You can recall a
memorized position with the
ignition switch in any position. Press and release the MEMO
button on the driver’s door. You
will hear a beep. Then, both
indicators in the memory buttons
will start to blink. Press and hold
one of the memory buttons (1 or
2) within 5 seconds af ter you press
the MEMO button. When the
system completes storing a new
driving position, you hear two
beeps. The indicator in the stored
memory button will come on.
Adjust the seat to a comfortable
position (see page ).
Adjust the outside mirrors f or best
visibility (see page ).
Your vehicle has a memory feature
f or the driver’s seat and outside
mirror positions.
Two seat and outside mirror
positionscanbestoredinseparate
memories. You select a memorized
position by pushing the appropriate
button or using the appropriate
remote transmitter (Driver 1 or
Driver 2).
This setting can be linked or
unlinked with the remote transmitter.
For more inf ormation, see page .
You can change the ‘‘MEMORY
POSITION LINK’’ setting on the
multi-inf ormation display (see page
). 1.
2.
3.
4.
191
149
116 169
On Touring modelsStoring a Driving Position in
Memory
Driving Position Memory System
184
MEMO BUTTON
MEMORY
BUTTONS
INDICATORS
�����—�����—�
���y�
�������������y���
�(�����������y���
�����y
2010 Odyssey
Page 188 of 526

Doing any of the f ollowing af ter
pressing the MEMO button will
cancel the storing procedure.Fail to press a memory button
within 5 seconds.
To select a memorized position, do
this:
Pressing the MEMO button again
within 5 seconds.
Press the desired memory button
(1 or 2) until you hear a beep.
Readjust the seat position.
Readjusting the outside mirror
position.
All stored driving positions will be
lost if your vehicle’s battery goes
dead or is disconnected. Each memory button stores only one
driving position. Storing a new
position erases the previous setting
stored in that button’s memory. If
you want to add a new position while
retaining the current one, use the
other memory button. The system will move the seat and
outside mirrors to the memorized
positions. The indicator in theselected memory button will f lash
during movement. When the
adjustments are complete, you will
hear two beeps, and the indicator will
remain on.
To stop the system’s automatic
adjustment, do any of these actions:
Press any button on the driver’s
door: MEMO, memory button 1 or
2.
Push any of the adjustment
switches f or the seat.
Shif t out of Park.
Adjust the outside mirrors.
If desired, you can use the
adjustment switches to change the
positions of the seat or outside
mirrors af ter they are in their
memorized positions. If you change
the memorized position, the
indicator in the memory button will
go out. To keep this driving position
f or later use, you must store it in the
driving position memory.
Make sure the shif t lever is in the
Park (P) position.
1.
2. Selecting a Memorized Position
Driving Position Memory System
Inst rument s and Cont rols
185
MEMORY BUTTONS
�����—�����—�
���y�
�������������y���
�(�����������y���
�����y
2010 Odyssey
Page 213 of 526
Vents, Heating, and A/C
210
RECIRCULATION
BUTTONREAR WINDOW
DEFOGGER BUTTON
MODE
CONTROL
DIAL
AUTO
BUTTON
RECIRCULATION
BUTTON TEMPERATURE
CONTROL DIAL
REAR
CONTROLLER
DIAL
WINDSHIELD
DEFROSTER BUTTON REAR WINDOW
DEFOGGER
BUTTON
OFF BUTTON MODE
BUTTON
AIR CONDITIONING
(A/C) BUTTON
SYNC BUTTON AIR CONDITIONING (A/C)
BUTTON
FAN CONTROL
DIAL
FAN CONTROL BUTTONS
REAR
ON/OFF
BUTTON
REAR LOCK
BUTTON
DRIVER’S SIDE
TEMPERATURE
CONTROL
SWITCH PASSENGER’S SIDE
TEMPERATURE CONTROL SWITCH
LX and Canadian DX models
REAR TEMPERATURE
CONTROL SWITCH
EX, EX-L and Touring models
�����—�����—�
���y�
�������������y���
�(�����������y�����
���y
2010 Odyssey
Page 216 of 526
. If it moves near the red mark,
turn of f the A/C until the gauge
reads normally.
The ventila")
Air conditioning places an extra load
on the engine. Watch the engine
coolant temperature gauge (see page). If it moves near the red mark,
turn of f the A/C until the gauge
reads normally.
The ventilation system draws in
outside air, circulates it through the
interior, then exhausts it through
vents near the rear side panels.
The heater uses engine coolant to
warm the air. If the engine is cold, it
will be several minutes bef ore you
f eel warm air coming f rom the
system.
Select and fresh air mode.
Set the f an to the desired speed.
Adjust the warmth of the air with
the temperature control dial or
buttons.
Set the temperature control dial or
button to the lower limit.
Make sure the A/C is of f .
Select and fresh air mode.
Set the f an to the desired speed.
Press the A/C button. The
indicator in the button comes on
(LX and Canadian DX models) or
‘‘A/C ON’’ is shown in the display
(EX, EX-L and Touring models)
when a f an speed is selected.
Make sure the temperature is set
to the lower limit.
Select .
If the outside air is humid, select
recirculation mode. If the outside
air is dry, select f resh air mode.
Set the f an to the desired speed.
1.
2.
3.
4.
5.
1.
2.
3.
1.
2.
3.
4. 77
CONT INUED
Vents, Heating, and A/C
Using the A/C
Ventilation Using the Heater
Features
213
�����—�����—�
���y�
�������������y���
�(�����������y�����
���y
2010 Odyssey
Page 225 of 526
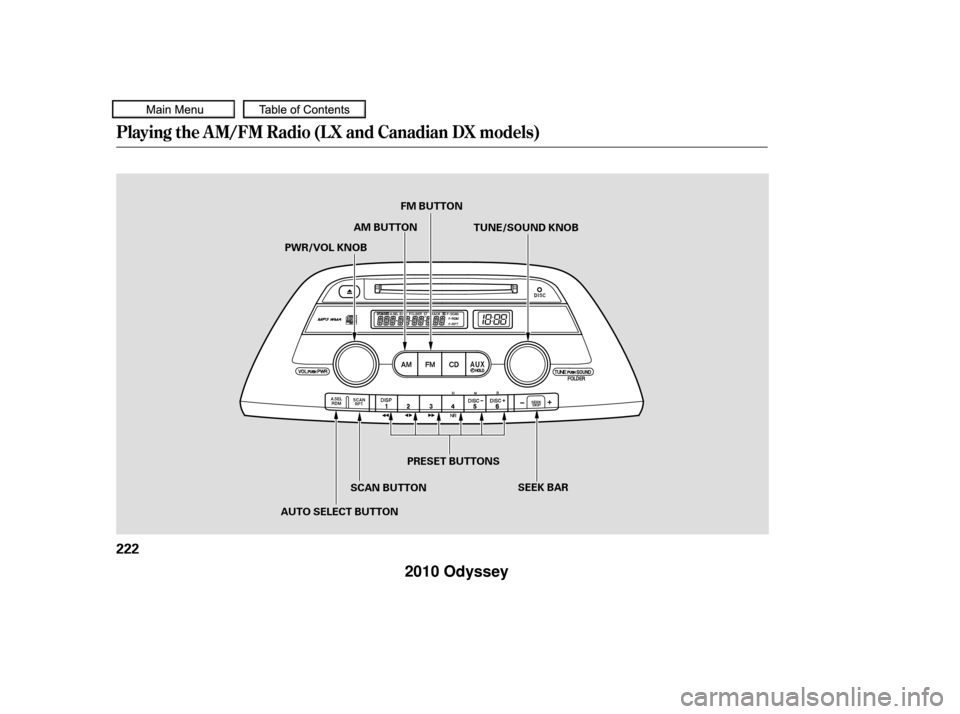
Playing the AM/FM Radio (LX and Canadian DX models)
222
SEEK BAR
AUTO SELECT BUTTON PRESET BUTTONS
PWR/VOL KNOB
SCAN BUTTONFM BUTTON
AM BUTTON TUNE/SOUND KNOB
�����—�����—�
���y�
�������������y���
�(�����������y���������y
2010 Odyssey
Page 226 of 526
 or ON (II) position.
Turn the system on by pushing the
PWR/VOL knob. Adjust the volume
by turning the same knob.
The band and f requ")
�µ
�µ
�µ �´�µ
The ignition switch must be in the
ACCESSORY (I) or ON (II) position.
Turn the system on by pushing the
PWR/VOL knob. Adjust the volume
by turning the same knob.
The band and f requency that the
radio was last tuned to are displayed.
To change bands, press the AM or
FM button. On the FM band, ST will
be displayed if the station is
broadcasting in stereo. Stereo
reproduction in AM is not available.
On the AM band, AM noise
reduction turns on automatically. The scan f unction samples
all stations with strong signals on the
selected band. To activate it, press
the SCAN button, then release it.
You will see SCAN in the display.
When the system finds a strong
signal, it will stop and play that
station f or about 10 seconds.
Use the TUNE knob to
tune the radio to a desired f requency.
Turn the knob right to tune to a
higher f requency, or lef t to tune to a
lower f requency.
The SEEK f unction
searches up and down from the
current f requency to f ind a station
with a strong signal. To activate it
press the or side of the bar,
then release it. You can use any of f ive methods to
f ind radio stations on the selected
band: tune, seek, scan, the preset
buttons, and auto select.
If you do nothing, the system will
scan f or the next strong station and
play it f or 10 seconds. When it plays
a station that you want to listen to,
press the SCAN button again.
CONT INUED
To Play the AM/FM Radio SCAN
To Select a Station
TUNE
SEEK
Playing the AM/FM Radio (LX and Canadian DX models)
Features
223
�����—�����—�
���y�
���������
�
�y���
�(�����������y���������y
2010 Odyssey
Page 227 of 526

�µ
�µ If you are
traveling and can no longer receive
your preset stations, you can use the
auto select feature to find stations in
the local area.
Press the A. SEL button. ‘‘A. SEL’’
appears in the display, and the
system goes into scan mode f or
several seconds. It stores the
f requencies of six AM and twelve
FM stations in the preset buttons.
You will see a ‘‘0’’ displayed af ter
pressing a preset button if auto
select cannot f ind a strong station f or
that preset button.
If you do not like the stations auto
select has stored, you can store
other f requencies on the preset
buttons as previously described.
Each preset button can
store one f requency on AM and two
f requencies on FM.
Select the desired band, AM or
FM. You can store one f requency
on FM1, and one f requency on FM
2witheachpresetbutton.
Usethetune,seek,orscan
function to tune the radio to a
desired station.
Pick a preset button, and hold it
until you hear a beep.
Repeat steps 1 through 3 to store a
total of six stations on AM and
twelve stations on FM. ,pressthe
A. SEL (auto select) button. This
restores the presets you originally
set.
For inf ormation on AM/FM radio
f requencies and reception, see page .
1.
2.
3.
4. 275To turn of f auto select
Playing the AM/FM Radio (LX and Canadian DX models)
AUTO SELECT
Preset
224
�����—�����—�
���y�
���������
���y���
�(�����������y���������y
2010 Odyssey
Page 237 of 526
Playing the AM/FM Radio (EX and EX-L models without navigation system)
234
PRESET BUTTONS
PRESET BUTTONS
PWR/VOL KNOB
AUTO SELECT BUTTON AUTO SELECT BUTTONSCAN BUTTON
FM
BUTTON
SOUND
KNOB
TUNE KNOB
EX-L model is shown.
SEEK BARPWR/VOL KNOB SOUND (TUNE) KNOB
AM/FM BUTTON
SEEK BAR
AM BUTTON
EX and EX-L models
EX and EX-L models with Rear Entertainment System
EX-L model is shown.
SCAN BUTTON
�����—�����—�
���y�
�������������y���
�(�����������y���������y
2010 Odyssey


234
PRESET BUTTONS
PRESET BUTTONS
PWR/VOL KNOB
AUTO SELECT BUTTON AUTO SELECT BUTTONSCAN BUTTON
FM
BUTTON
SOUND
KNOB
TUNE KNOB
EX")