2010 HONDA FIT light
[x] Cancel search: lightPage 312 of 351

If the pressure is lower than 32 psi
(220 kPa) and higher than 19 psi
(130 kPa), use the air pump to
bring air to the desired level as
described in step 11. Then drive to
the nearest service station at no
more than 50 mph (80 km/h).
If the pressure is below 19 psi, do
not continue. Have the vehicle
towed (see page 311).
In any case, be sure to have the
damaged tire permanently repaired
as soon as possible.
Remember to return the tire sealant
bottle to your Honda service center
for proper disposal. If the Engine Won't Start
Diagnosing why the engine won't
start falls into two areas, depending
on what you hear when you turn the
ignition switch to the START (III)position:
● You hear nothing, or almost
nothing. The engine's starter
motor does not operate at all, or
operates very slowly.
● You can hear the starter motor
operating normally, or the starter
motor sounds like it is spinning
faster than normal, but the engine
does not start up and run. Nothing Happens or the Starter
Motor Operates Very Slowly
When you turn the ignition switch to
the START (III) position, you do not
hear the normal noise of the engine
trying to start. You may hear a
clicking sound, a series of clicks, or
nothing at all.
Check these things:
● Check the transmission interlock.
If you have a manual transmission,
the clutch pedal must be pushed
all the way to the floor or the
starter will not operate. With an
automatic transmission, it must be
in Park or neutral.
● Turn the ignition switch to the ON
(II) position. Turn on the
headlights, and check their
brightness. If the headlights are
very dim or do not come on at all,
the battery is discharged. See
Jump Starting on page 299.
CONTINUED
Temporarily Repairing a Flat Tire, If the Engine Won't Start
297
Taking Care of the Unexpected
Table of Contents
Page 313 of 351

●Turn the ignition switch to the
START (III) position. If the
headlights do not dim, check the
condition of the fuses. If the fuses
are OK, there is probably
something wrong with the
electrical circuit for the ignition
switch or starter motor. You will
need a qualified technician to
determine the problem. See
Emergency Towing on page 311.
If the headlights dim noticeably or go
out when you try to start the engine,
either the battery is discharged or
the connections are corroded. Check
the condition of the battery and
terminal connections (see page 279).
You can then try jump starting the
vehicle from a booster battery (see
page 299). The Starter Operates Normally
In this case, the starter motor's speed
sounds normal, or even faster than
normal, when you turn the ignition
switch to the START (III) position,
but the engine does not run.
● Are you using a properly coded
key? An improperly coded key will
cause the immobilizer system
indicator in the instrument panel
to blink rapidly (see page 79).
● Are you using the proper starting
procedure? Refer to Starting the
Engine on page 216. ●
Do you have fuel? Check the fuel
gauge; the low fuel indicator may
not be working.
● There may be an electrical
problem, such as no power to the
fuel pump. Check all the fuses (see
page 306).
If you find nothing wrong, you will
need a qualified technician to find the
problem. See Emergency Towing on
page 311.
If the Engine Won't Start
298
Table of Contents
Page 314 of 351

Although this seems like a simple
procedure, you should take severalprecautions.
A battery can explode if you do
not follow the correct
procedure, seriously injuring
anyone nearby.
Keep all sparks, open flames,
and smoking materials away
from the battery.
You cannot start your vehicle with an
automatic transmission by pushing
or pulling it.
To Jump Start Your Vehicle:
1. Open the hood, and check the physical condition of the battery.
In very cold weather, check the
condition of the electrolyte. If it
seems slushy or frozen, do not try
jump starting until it thaws.
If a battery sits in extreme cold, the
electrolyte inside can freeze. Attempting
to jump start with a frozen battery can
cause it to rupture.
2. Turn off all the electricalaccessories: heater, A/C (if
equipped), audio system, lights,
etc. Put the transmission in neutral
(manual) or Park (automatic), and
set the parking brake.
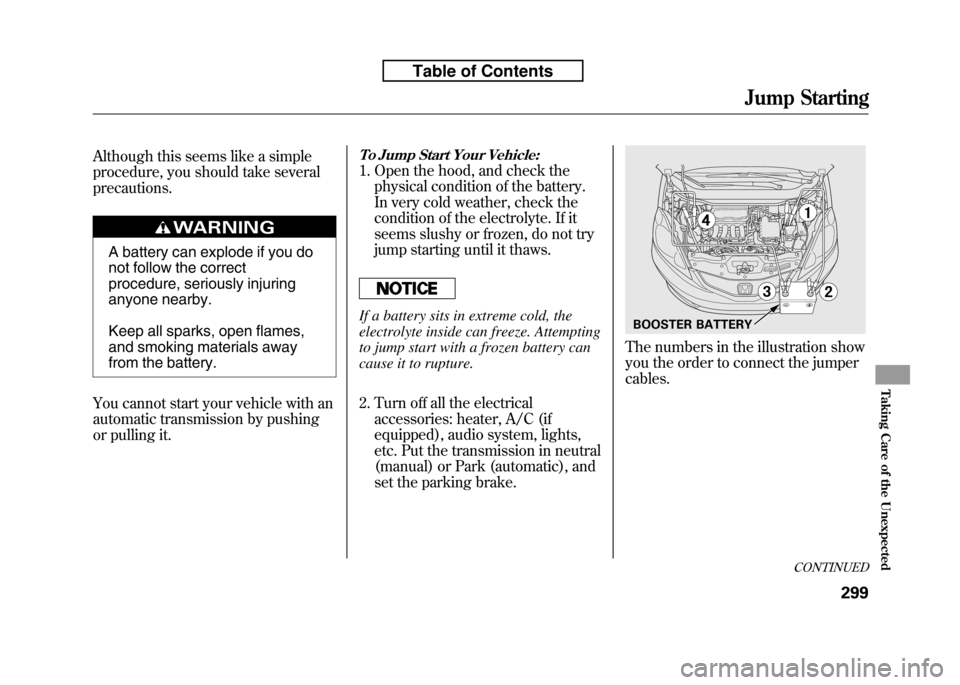
The numbers in the illustration show
you the order to connect the jumpercables.
BOOSTER BATTERY
CONTINUED
Jump Starting
299
Taking Care of the Unexpected
Table of Contents
Page 316 of 351

The high temperature indicator
should be off under most conditions.
If the engine coolant temperature
gets higher than normal, the
indicator will blink. If it stays on, you
should determine the reason (hot
day, driving up a steep hill, etc.).
If the vehicle overheats, you should
take immediate action. The only
indication may be the high
temperature indicator blinking or
remaining on. Or you may see steam
or spray coming from under thehood.
Driving with the high temperature
indicator on can cause serious damage
to your engine.
Steam and spray from an
overheated engine can
seriously scald you.
Do not open the hood if steam
is coming out.
1. Safely pull to the side of the road. Put the transmission in neutral
(manual) or Park (automatic), and
set the parking brake. Turn off all
accessories, and turn on the
hazard warning lights.
2. If you see steam and/or spray coming from under the hood, turn
off the engine. Wait until you see
no more signs of steam or spray,
then open the hood. 3. If you do not see steam or spray,
leave the engine running, and
check the high temperature
indicator. If the high heat is due to
overloading, the engine should
start to cool down almost
immediately. If it does, wait until
the high temperature indicator
goes off, then continue driving.
4. If the high temperature indicator stays on, turn off the engine.
CONTINUED
If the Engine Overheats
301
Taking Care of the Unexpected
Table of Contents
Page 318 of 351

Low Oil Pressure Indicator
This indicator should never
come on when the engine is
running. If it starts flashing or stays
on, the oil pressure has dropped very
low or lost pressure. Serious engine
damage is possible, and you should
take immediate action.
Running the engine with low oil
pressure can cause serious mechanical
damage almost immediately. Turn off
the engine as soon as you can safely get
the vehicle stopped. 1. Safely pull off the road, and shut
off the engine. Turn on the hazard
warning lights.
2. Let the vehicle sit for a minute. Open the hood, and check the oil
level (see page 201). An engine
very low on oil can lose pressure
during cornering and other drivingmaneuvers.
3. If necessary, add oil to bring the level back to the full mark on the
dipstick (see page 253).
4. Start the engine, and watch the oil pressure indicator. If it does not go
out within 10 seconds, turn off the
engine. There is a mechanical
problem that needs to be repaired
before you can continue driving(see Emergency Towing on page
311). Charging System Indicator
If the charging system
indicator comes on brightly
when the engine is running, the
battery is not being charged.
Immediately turn off all electrical
accessories. Try not to use other
electrically operated controls such as
the power windows. Keep the engine
running; starting the engine will
discharge the battery rapidly.
Go to a service station or garage
where you can get technicalassistance.
Low Oil Pressure Indicator, Charging System Indicator
303
Taking Care of the Unexpected
Table of Contents
Page 320 of 351

U.S. Canada
Brake System
Indicator (Red)
The brake system indicator (red)
normally comes on when you turn
the ignition switch to the ON (II)
position, and as a reminder to check
the parking brake. It will stay on if
you do not fully release the parkingbrake.
If the brake system indicator (red)
comes on while driving, the brake
fluid level is probably low. Press
lightly on the brake pedal to see if it
feels normal. If it does, check the
brake fluid level the next time you
stop at a service station (see page261).
If the fluid level is low, take your
vehicle to a dealer, and have the
brake system inspected for leaks or
worn brake pads/shoes. However, if the brake pedal does not
feel normal, you should take
immediate action. A problem in one
part of the system's dual circuit
design will still give you braking at
two wheels. You will feel the brake
pedal go down much farther before
the vehicle begins to slow down, and
you will have to press harder on thepedal.
Slow down by shifting to a lower
gear, and pull to the side of the road
when it is safe. Because of the long
distance needed to stop, it is
hazardous to drive the vehicle. You
should have it towed and repaired as
soon as possible (see
Emergency
Towing on page 311).
If you must drive the vehicle a short
distance in this condition, drive
slowly and carefully. If the ABS indicator and the VSA
system indicator (if equipped) come
on with the brake system indicator,
have your vehicle inspected by your
dealer immediately.
Brake System Indicator
305
Taking Care of the Unexpected
Table of Contents
Page 322 of 351

Checking and Replacing Fuses
If something electrical in your
vehicle stops working, check for a
blown fuse first. Determine from the
chart on pages 309 and 310, or the
diagram on the fuse label, which fuse
or fuses control that device. Check
those fuses first, but check all the
fuses before deciding that a blown
fuse is the cause. Replace any blown
fuses, and check if the device works.
1. Turn the ignition switch to theLOCK (0) position. Make sure the
headlights and all other
accessories are off.
2. On the under-hood fuse box, remove the cover from the fuse
box. On the interior fuse box, pull
the fuse lid toward you.
3. Check each of the large fuses inthe under-hood fuse box and the
interior fuse box by looking
through the top at the wire inside.4. Check all smaller fuses in theinterior fuse box by pulling out
each one with the fuse puller
provided in the interior fuse box.
FUSE
BLOWN
FUSE PULLER
CONTINUED
Fuses
307
Taking Care of the Unexpected
Table of Contents
Page 324 of 351

INTERIOR FUSE BOXNo. Amps. Circuits Protected1 10 A Back Up
2 (7.5 A) TPMS
ꭧ
3 20 A Driver's Power Window 4 - Not Used
5 10 A Back Up Light
6 10 A SRS
7 (10 A) Transmission SOL
ꭧ
8 7.5 A SRS
9 (20 A) Fog Lightꭧ
10 7.5 A A/Cꭧ
11 7.5 A ABS/VSAꭧ
12 10 A ACG
13 20 A ACC Socket
14 7.5 A Key Lock/Radio
15 7.5 A Daytime Running Light
16 10 A Rear Wiper
17 20 A Front Passenger's Power Window
18 20 A Rear Passenger's Side Power Window
19 20 A Rear Driver's Side Power Window
20 15 A Fuel Pump
21 15 A Washer
22 7.5 A Meter
23 10 A Hazard
24 10 A Stop/Horn25 - Not Used No. Amps. Circuits Protected
26 10 A LAF
27 (30 A) Door Lock Main
ꭧ
28 20 A Headlight Main
29 10 A Small Light
30 30 A Main Fan Motor31 - Not Used
32 10 A Right Headlight Low Beam
33 15 A IG Coil
34 10 A Left Headlight Low Beam
35 (15 A) Door Lock
ꭧ
36 (15 A) Door Lockꭧ
37 30 A ABS/VSAꭧFSR
38 (15 A) Door Lockꭧ
39 15 A IGP40 - Not Used
41 - Not Used
42 - Not Used
43 (7.5 A) MG Clutch
44 7.5 A STS45 - Not Used
46 - Not Used
47 (30 A) Sub Fan Motor
48 10 A Left Headlight High Beam
49 (15 A) Door Lock
ꭧ
50 (15 A) Door Lockꭧ
ꭧ : If equipped
CONTINUED
Fuse Locations
309
Taking Care of the Unexpected
Table of Contents