Page 375 of 441
�à
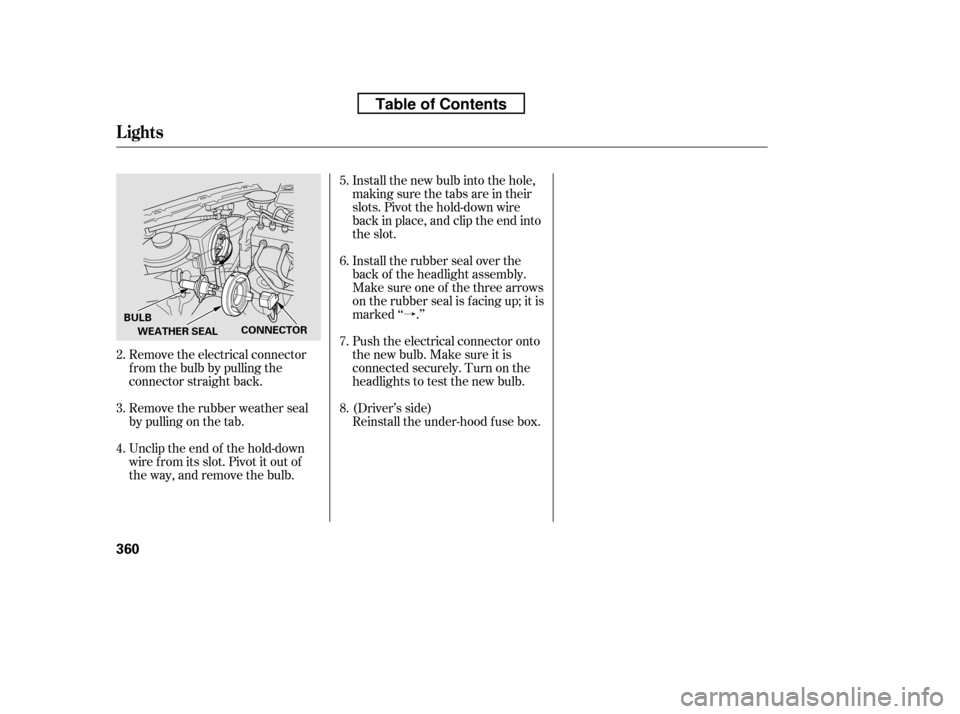
Remove the electrical connector
f rom the bulb by pulling the
connector straight back.
Remove the rubber weather seal
by pulling on the tab.
Unclip the end of the hold-down
wire f rom its slot. Pivot it out of
the way, and remove the bulb. Install the new bulb into the hole,
making sure the tabs are in their
slots. Pivot the hold-down wire
back in place, and clip the end into
the slot.
Install the rubber seal over the
back of the headlight assembly.
Make sure one of the three arrows
on the rubber seal is f acing up; it is
marked ‘‘ .’’
Push the electrical connector onto
the new bulb. Make sure it is
connected securely. Turn on the
headlights to test the new bulb.
(Driver’s side)
Reinstall the under-hood f use box.
4.
2. 3. 5. 6.7. 8.
Lights
360
BULB
WEATHER SEAL CONNECTOR
Table of Contents
Page 376 of 441
Insert the socket back into the
headlight assembly. Turn it
clockwise to lock it in place.
Turn on the lights to make sure
the new bulb is working.
(Driver’s side)
Reinstall the coolant reserve tank.
Open the hood.
To change the turn signal bulb on
the driver’s side, remove the
engine coolant reserve tank by
pulling it out of its holder. Remove the socket from the
headlight assembly by turning it
one-quarter turn counterclockwise.
Pull the bulb straight out of its
socket. Push the new bulb straight
into the socket until it bottoms.
1.
2. 3.4.5. 6.
Lights
Replacing a Front T urn Signal
Light Bulb
Maint enance
361
HOLDER
BULB
SOCKET
Table of Contents
Page 377 of 441
Insert the socket back into the
headlight assembly. Turn it
clockwise to lock it in place.
Turn on the lights to make sure
the new bulb is working.
Reinstall the f use box in place
securely.
(Driver’s side)
Open the hood.
To change the parking light/f ront
side marker on the driver’s side,
removethefuseboxfromitsstay
by pulling out. Remove the socket from the
headlight assembly by turning it
one-quarter turn counterclockwise.
Pull the bulb straight out of its
socket. Push the new bulb straight
into the socket until it bottoms.
1.
2. 3.4.5. 6.
Lights
Replacing a Parking L ight/Front
Side Marker L ight Bulb
362
FUSE BOX
On the passenger’s sideBULB
SOCKET
Table of Contents
Page 378 of 441
Determine which of the f our bulbs
is burned out: stop/taillight, back-
up light, turn signal, or side
marker.
Remove the socket by turning it
one-quarter turn counterclockwise.
Use a Phillips-head screwdriver to
remove the taillight assembly
mounting screw under each cover.
Pull the taillight assembly out of
the rear pillar.
Open the tailgate. Place a cloth on
the edge of the cover to prevent
scratches. Remove the covers by
caref ully prying on the edge with a
small f lat-tip screwdriver.
2. 3. 4. 5.
1.
CONT INUED
Replacing Rear Bulbs
Lights
Maint enance
363
BULBS
COVER
SCREWS
BULBS
Table of Contents
Page 379 of 441
Reinstall the socket into the light
assembly by turning it clockwise
until it locks.
Align the clips on the taillight
assembly with the holes in the
body, then push the taillight
assembly into place. Tighten the
two mounting screws securely and
reinstall the covers.
Pull the bulb straight out of its
socket. Push the new bulb straight
into the socket until it bottoms.
Turn on the lights to make sure
the new bulb is working.
Open the tailgate. Place a cloth on the side edge ofthe cover to prevent scratches.
Remove the cover by caref ully
prying on the edge with a small
f lat-tip screwdriver and pulling the
cover off.
Unlatch the top of the cover by
pulling back on it with your hands.
Remove the socket f rom the light
assembly by turning it one-quarter
turn counterclockwise.
1.
2.
6. 7.8. 9.
3.
Replacing a High-mount Brake
Light Bulb
Lights
364
Table of Contents
Page 380 of 441

CONT INUED
Dirt build-up in the loops of the seat
belt anchors can cause the belts to
retract slowly. Wipe the insides of
the loops with a clean cloth
dampened in mild soap and warm
water or isopropyl alcohol.
If your seat belts get dirty, use a sof t
brush with a mixture of mild soap
and warm water to clean them. Do
not use bleach, dye, or cleaning
solvents. Let the belts air-dry bef ore
you use the vehicle.
Pull the bulb straight out of its
socket. Push the new bulb straight
into the socket until it bottoms.
Press the brake pedal to make
sure the new bulb is working.
Put the socket back into the light
assembly, and turn it clockwise to
lock it in place.
Put the cover back on the light
assembly. Push it in until it locks
in place. The floor mats that came with your
vehicle hook over the f loor mat
anchors. This keeps the f loor mats
f rom sliding f orward, possibly
interf ering with the pedals, or
backwards, making the f ront
passenger’s weight sensors
inef f ective.
4. 5. 6. 7. Floor Mats
Cleaning the Seat Belts
Lights, Cleaning the Seat Belts, Floor Mats
Maint enance
365
BULB SOCKET
LOOP
ANCHOR
Table of Contents
Page 393 of 441

Leave the parking brake off. Put
the transmission in Park.
Block the rear wheels.
If the vehicle is to be stored f or a
longer period, it should be
supported on jackstands so the
tires are of f the ground.
Leave one window open slightly (if
the vehicle is being stored
indoors).
Disconnect the battery.
If your vehicle’s battery is
disconnected, or goes dead, the time
setting may be lost. To reset the time,
see page .
If your vehicle’s battery is
disconnected, or goes dead, the
audio system will disable itself . The
nexttimeyouturnontheradio,you
may see ‘‘ENTER CODE’’ in the
f requency display. Use the preset
buttons to enter the code (see page
).
The navigation system will also
disableitself.Thenexttimeyouturn
on the ignition switch, the system
will require you to enter a PIN
bef ore it can be used. Ref er to the
navigation system manual. Cleantheinterior.Makesurethe
carpeting, floor mats, etc., are
completely dry.
Wash and dry the exterior
completely.
Fill the f uel tank.
If you need to park your vehicle f or
an extended period (more than 1
month), there are several things you
should do to prepare it f or storage.
Proper preparation helps prevent
deterioration and makes it easier to
get your vehicle back on the road. If
possible, store your vehicle indoors.
259
258On vehicles without navigation system
On vehicles with navigation system
Checking the Battery, Vehicle Storage
Vehicle Storage
378
Table of Contents
Page 398 of 441

If you have a f lat tire while driving,
stop in a saf e place to change it.
Drive slowly along the shoulder until
you get to an exit or an area to stop
that is far away from the traffic lanes.Park the vehicle on f irm, level, and
non-slippery ground. Put the
transmission in Park. Apply the
parking brake.
If you are towing a trailer, unhitch
the trailer. Turn on the hazard warning lights,
and turn the ignition switch to the
LOCK (0) position. Have all
passengers get out of the vehicle
while you change the tire.
Open the tailgate. Raise the cargo
area f loor lid by lif ting up with the
strap, and remove it f rom cargo
area by disengaging the tabs.
When you store the f lat tire in the
spare tire well, do not reinstall the
cargo area f loor lid f orcibly. This
will damage the tabs on the lid.
Take the tool kit out of the spare
tire.
1. 2.
3. 4.
CONT INUED
Changing a Flat T ire
T aking Care of t he Unexpect ed
383
JACK
SPARE TIRE
TOOLSSTRAP
FLOOR LID
The vehicle can easily roll off
the jack, seriously injuring
anyone underneath.
Follow the directions for
changing a tire exactly, and
never get under the vehicle
when it is supported only by thejack.
Table of Contents

Reinstall the coolant reserve")


