2010 GMC SIERRA instrument panel
[x] Cancel search: instrument panelPage 453 of 630
The 8th digit of the Vehicle Identification Number (VIN)
shows the code letter or number that identifies the
vehicle's engine. The VIN is at the top left of the
instrument panel. SeeVehicle Identification Number
(VIN) on page 6‑117.
If the vehicle has the 5.3L V8 engine (VIN Code 0),
the 5.3L V8 engine (VIN Code 3), the 6.0L V8 engine
(VIN Code J), or the 6.2L V8 engine (VIN Code 2),
you can use either unleaded gasoline or ethanol fuel
containing up to 85% ethanol (E85). See Fuel E85
(85% Ethanol)
on page 6‑9. In all other gasoline
engines, use only unleaded gasoline. See Gasoline
Octane on page 6‑7.
Gasoline Octane
For all vehicles except those with the 6.2L V8 engine
(VIN Code 2), use regular unleaded gasoline with a
posted octane rating of 87 or higher. If the octane rating
is less than 87, an audible knocking noise, commonly
referred to as spark knock, might be heard when
driving. If this occurs, use a gasoline rated at 87 octane
or higher as soon as possible. If heavy knocking is
heard when using gasoline rated at 87 octane or higher,
the engine needs service. If the vehicle has the 6.2L V8 engine (VIN Code 2), use
premium unleaded gasoline with a posted octane rating
of 91 or higher. You can also use regular unleaded
gasoline rated at 87 octane or higher, but the vehicle's
acceleration could be slightly reduced, and a slight
audible knocking noise, commonly referred to as spark
knock, might be heard. If the octane is less than 87, you
might notice a heavy knocking noise when you drive.
If this occurs, use a gasoline rated at 87 octane or
higher as soon as possible. Otherwise, you could
damage the engine. If heavy knocking is heard when
using gasoline rated at 87 octane or higher, the engine
needs service.
Gasoline Specifications
At a minimum, gasoline should meet ASTM
specification D 4814 in the United States or
CAN/CGSB‐3.5 or 3.511 in Canada. Some
gasolines contain an octane-enhancing additive
called methylcyclopentadienyl manganese tricarbonyl
(MMT). We recommend against the use of gasolines
containing MMT. See
Additives
on page 6‑8for
additional information.
6-7
Page 455 of 630
Also, your dealer/retailer has additives that will help
correct and prevent most deposit‐related problems.
Gasolines containing oxygenates, such as ethers and
ethanol, and reformulated gasolines might be available
in your area. We recommend that you use these
gasolines, if they comply with the specifications
described earlier. However, E85 (85% ethanol) and
other fuels containing more than 10% ethanol must
not be used in vehicles that were not designed for
those fuels.
Notice:This vehicle was not designed for fuel that
contains methanol. Do not use fuel containing
methanol. It can corrode metal parts in the fuel
system and also damage plastic and rubber parts.
That damage would not be covered under the
vehicle warranty.
Some gasolines that are not reformulated for
low emissions can contain an octane-enhancing
additive called methylcyclopentadienyl manganese
tricarbonyl (MMT); ask the attendant where you
buy gasoline whether the fuel contains MMT. We
recommend against the use of such gasolines. Fuels
containing MMT can reduce the life of spark plugs and
the performance of the emission control system could
be affected. The malfunction indicator lamp might
turn on. If this occurs, return to your dealer/retailer
for service.Fuel E85 (85% Ethanol)
The 8th digit of the Vehicle Identification Number (VIN)
shows the code letter or number that identifies the
vehicle's engine. The VIN is at the top left of the
instrument panel. See Vehicle Identification Number
(VIN) on page 6‑117.
If the vehicle has the 5.3L V8 engine (Code 0), the
5.3L V8 engine (VIN Code 3), the 6.0L V8 engine
(VIN Code J), or the 6.2L V8 engine (Code 2), you can
use either unleaded gasoline or ethanol fuel containing
up to 85% ethanol (E85). See Fuel
on page 6‑6.
In all other engines, use only the unleaded gasoline
described under Gasoline Octane on page 6‑7.
Only vehicles that have the 5.3L V8 engine (Code 0),
the 5.3L V8 engine (VIN Code 3), the 6.0L V8 engine
(VIN Code J), or the 6.2L V8 engine (Code 2) can use
85% ethanol fuel (E85). We encourage the use of
E85 in vehicles that are designed to use it. The ethanol
in E85 is a “renewable” fuel, meaning it is made from
renewable sources such as corn and other crops.
6-9
Page 480 of 630

Turn the pressure cap slowly counterclockwise
about one full turn. If you hear a hiss, wait for that
to stop. A hiss means there is still some
pressure left.
2. Keep turning the pressure cap slowly, and remove it.
3. Fill the coolant surge tank with the proper mixtureto the FULL COLD mark.
4. With the coolant surge tank pressure cap off, start the engine and let it run until the engine coolant
temperature gage indicates approximately
195°F (90°C). By this time, the coolant level inside the coolant
surge tank may be lower. If the level is lower, add
more of the proper mixture to the coolant surge
tank until the level reaches the FULL COLD mark.
5. Replace the pressure cap. Be sure the pressure cap is hand-tight and fully seated.
6. Verify coolant level after engine is shut off and the coolant is cold. If necessary, repeat coolant fill
procedure Steps 1 through 6.
Notice: If the pressure cap is not tightly installed,
coolant loss and possible engine damage may
occur. Be sure the cap is properly and tightly
secured.
Engine Overheating
If the vehicle has the DURAMAX®Diesel engine, see
the DURAMAX®Diesel manual for more information.
The vehicle has several indicators to warn of engine
overheating.
You will find a coolant temperature gage on the
vehicle's instrument panel. See Engine Coolant
Temperature Gage on page 4‑41.
In addition, you will find ENGINE OVERHEATED STOP
ENGINE, ENGINE OVERHEATED IDLE ENGINE, and
ENGINE POWER IS REDUCED messages in the Driver
Information Center (DIC) on the instrument panel.
See DIC Warnings and Messages on page 4‑65.
6-34
Page 522 of 630
When the malfunction indicator is illuminated, the
system may not be able to detect or signal low tire
pressure as intended. TPMS malfunctions may occur
for a variety of reasons, including the installation of
replacement or alternate tires or wheels on the vehicle
that prevent the TPMS from functioning properly.
Always check the TPMS malfunction telltale after
replacing one or more tires or wheels on your vehicle to
ensure that the replacement or alternate tires and
wheels allow the TPMS to continue to function properly.
SeeTire Pressure Monitor Operation
on page 6‑76for
additional information.
Federal Communications Commission
(FCC) and Industry and Science Canada
See Radio Frequency Statementon page 8‑19for
information regarding Part 15 of the Federal
Communications Commission (FCC) Rules and
RSS-210/211 of Industry and Science Canada.
Tire Pressure Monitor Operation
This vehicle may have a Tire Pressure Monitor System
(TPMS). The TPMS is designed to warn the driver when
a low tire pressure condition exists. TPMS sensors are
mounted onto each tire and wheel assembly, excluding
the spare tire and wheel assembly. The TPMS sensors monitor the air pressure in the vehicle's tires and
transmits the tire pressure readings to a receiver
located in the vehicle.
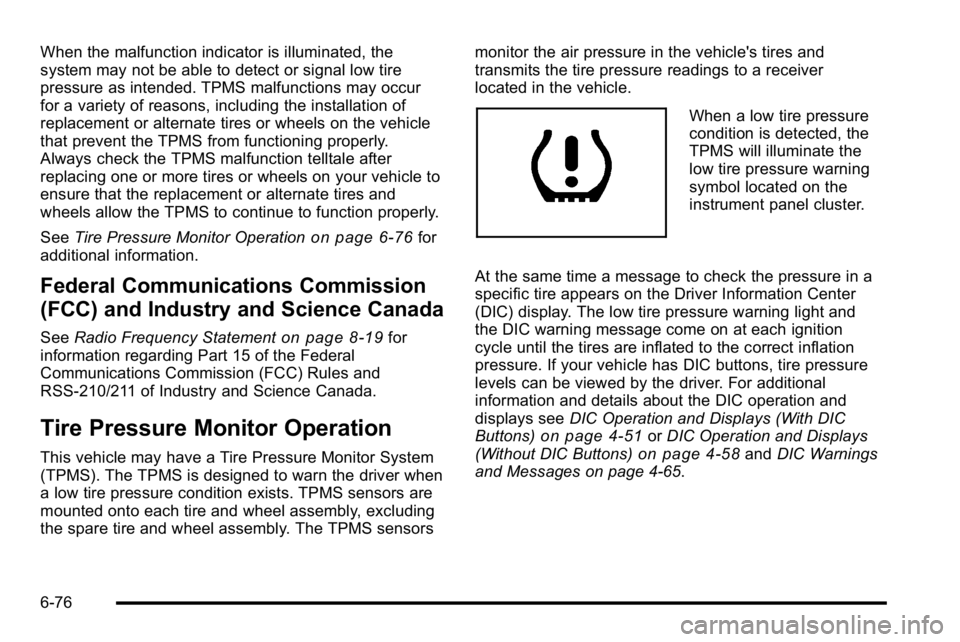
When a low tire pressure
condition is detected, the
TPMS will illuminate the
low tire pressure warning
symbol located on the
instrument panel cluster.
At the same time a message to check the pressure in a
specific tire appears on the Driver Information Center
(DIC) display. The low tire pressure warning light and
the DIC warning message come on at each ignition
cycle until the tires are inflated to the correct inflation
pressure. If your vehicle has DIC buttons, tire pressure
levels can be viewed by the driver. For additional
information and details about the DIC operation and
displays see DIC Operation and Displays (With DIC
Buttons)
on page 4‑51or DIC Operation and Displays
(Without DIC Buttons)on page 4‑58and DIC Warnings
and Messages on page 4‑65.
6-76
Page 525 of 630

The TPMS sensor matching process is outlined below:1. Set the parking brake.
2. Turn the ignition switch to ON/RUN with the engine off.
3. Press the Remote Keyless Entry (RKE) transmitter's LOCK and UNLOCK buttons at the
same time for approximately five seconds. The
horn sounds twice to signal the receiver is in
relearn mode and TIRE LEARNING ACTIVE
message displays on the DIC screen.
If your vehicle does not have RKE, press the
Driver Information Center (DIC) vehicle information
button until the PRESS
VTO RELEARN TIRE
POSITIONS message displays. The horn sounds
twice to signal the receiver is in relearn mode and
TIRE LEARNING ACTIVE message displays on
the DIC screen.
If your vehicle does not have RKE or DIC buttons,
press the trip odometer reset stem located on the
instrument panel cluster until the PRESS
VTO
RELEARN TIRE POSITIONS message displays.
The horn sounds twice to signal the receiver is in
relearn mode and TIRE LEARNING ACTIVE
message displays on the DIC screen.
4. Start with the driver side front tire. 5. Remove the valve cap from the valve cap stem.
Activate the TPMS sensor by increasing or
decreasing the tire's air pressure for five seconds,
or until a horn chirp sounds. The horn chirp, which
may take up to 30 seconds to sound, confirms that
the sensor identification code has been matched to
this tire and wheel position.
6. Proceed to the passenger side front tire, and repeat the procedure in Step 5.
7. Proceed to the passenger side rear tire, and repeat the procedure in Step 5.
8. Proceed to the driver side rear tire, and repeat the procedure in Step 5. The horn sounds two times to
indicate the sensor identification code has been
matched to the driver side rear tire, and that the
TPMS sensor matching process is no longer
active. The TIRE LEARNING ACTIVE message on
the DIC display screen goes off.
9. Turn the ignition switch to LOCK/OFF.
10. Set all four tires to the recommended air pressure level as indicated on the Tire and Loading
Information label.
11. Put the valve caps back on the valve stems.
6-79
Page 558 of 630
Leather
A soft cloth dampened with water can be used to
remove dust. If a more thorough cleaning is necessary,
a soft cloth dampened with a mild soap solution can be
used. Allow the leather to dry naturally. Do not use heat
to dry. Never use steam to clean leather. Never use
spot lifters or spot removers on leather. Many
commercial leather cleaners and coatings that are sold
to preserve and protect leather may permanently
change the appearance and feel of the leather and are
not recommended. Do not use silicone or wax-based
products, or those containing organic solvents to clean
the vehicle's interior because they can alter the
appearance by increasing the gloss in a non-uniform
manner. Never use shoe polish on leather.
Instrument Panel, Vinyl, and Other
Plastic Surfaces
A soft cloth dampened with water may be used
to remove dust. If a more thorough cleaning is
necessary, a clean soft cloth dampened with a mild
soap solution can be used to gently remove dust and
dirt. Never use spot lifters or removers on plastic
surfaces. Many commercial cleaners and coatings thatare sold to preserve and protect soft plastic surfaces
may permanently change the appearance and feel of
the interior and are not recommended. Do not use
silicone or wax-based products, or those containing
organic solvents to clean the vehicle's interior because
they can alter the appearance by increasing the gloss in
a non-uniform manner.
Some commercial products may increase gloss on the
instrument panel. The increase in gloss may cause
annoying reflections in the windshield and even make it
difficult to see through the windshield under certain
conditions.
Care of Safety Belts
Keep belts clean and dry.
{WARNING:
Do not bleach or dye safety belts. It may severely
weaken them. In a crash, they might not be able
to provide adequate protection. Clean safety belts
only with mild soap and lukewarm water.
6-112
Page 563 of 630

Vehicle Identification
Vehicle Identification Number (VIN)
This legal identifier is in the front corner of the
instrument panel, on the driver side. It can be seen
through the windshield from outside. The VIN also
appears on the Certification/Tire and Service Parts
labels and certificates of title and registration.
Engine Identification
The eighth character in the VIN is the engine code. This
code identifies the vehicle's engine, specifications, and
replacement parts. See“Engine Specifications”under
Capacities and Specifications
on page 6‑126for the
vehicle's engine code.
Service Parts Identification Label
This label, on the inside of the glove box, has the
following information:
.Vehicle Identification Number (VIN)
.Model designation
.Paint information
.Production options and special equipment
Do not remove this label from the vehicle.
Electrical System
Add-On Electrical Equipment
Notice: Do not add anything electrical to the vehicle
unless you check with your dealer/retailer first.
Some electrical equipment can damage the vehicle
and the damage would not be covered by the
vehicle's warranty. Some add-on electrical
equipment can keep other components from
working as they should.
Add-on equipment can drain the vehicle battery, even if
the vehicle is not operating.
6-117
Page 565 of 630
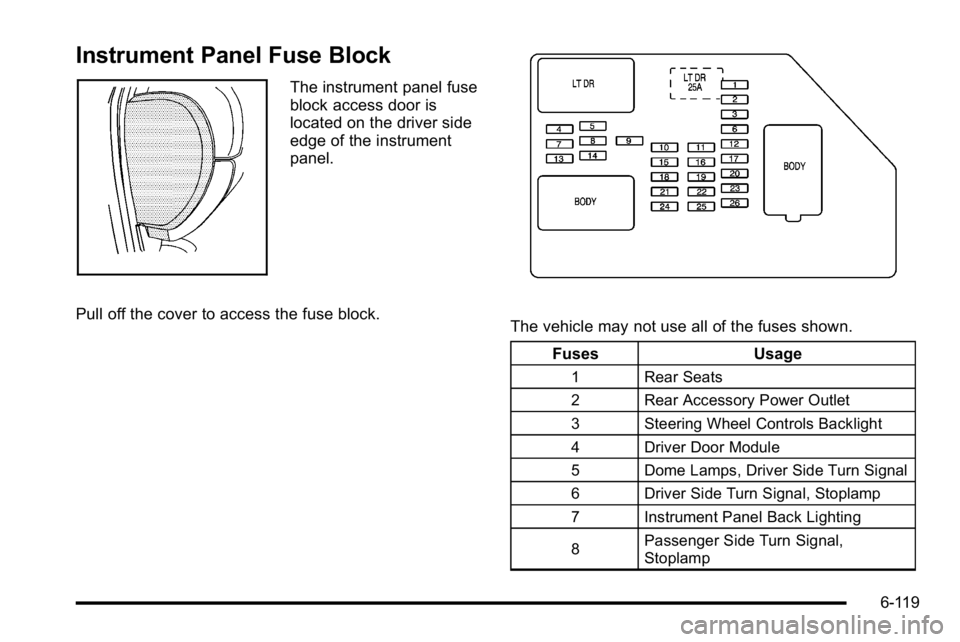
Instrument Panel Fuse Block
The instrument panel fuse
block access door is
located on the driver side
edge of the instrument
panel.
Pull off the cover to access the fuse block.
The vehicle may not use all of the fuses shown. Fuses Usage
1 Rear Seats
2 Rear Accessory Power Outlet
3 Steering Wheel Controls Backlight
4 Driver Door Module
5 Dome Lamps, Driver Side Turn Signal
6 Driver Side Turn Signal, Stoplamp
7 Instrument Panel Back Lighting
8 Passenger Side Turn Signal,
Stoplamp
6-119