2010 GMC SIERRA DENALI power steering
[x] Cancel search: power steeringPage 5 of 550

Vehicle Symbol Chart
Here are some additional symbols that may be found on
the vehicle and what they mean. For more information
on the symbol, refer to the index.
0:Adjustable Pedals
9:Airbag Readiness Light
#:Air Conditioning
!:Antilock Brake System (ABS)
g:Audio Steering Wheel Controls or OnStar®
$: Brake System Warning Light
":Charging System
I:Cruise Control
B: Engine Coolant Temperature
O:Exterior Lamps
#:Fog Lamps
.: Fuel Gage
+:Fuses
i: Headlamp High/Low-Beam Changer
j:LATCH System Child Restraints
*: Malfunction Indicator Lamp
::Oil Pressure
g:Outside Power Foldaway Mirrors
}:Power
/:Remote Vehicle Start
>:Safety Belt Reminders
7:Tire Pressure Monitor
_: Tow/Haul Mode
F:Traction Control
M:Windshield Washer Fluid
v
Page 7 of 550

Section 1 In Brief
Instrument Panel. . . . . . . . . . . . . . . . . . . . . . . . . . . . . . . . . . . 1-2
Initial Drive Information . . . . . . . . . . . . . . . . . . . . . . . . . . . 1-4
Remote Keyless Entry (RKE) System . . . . . . . . . . . 1-4
Remote Vehicle Start . . . . . . . . . . . . . . . . . . . . . . . . . . . 1-5
Door Locks . . . . . . . . . . . . . . . . . . . . . . . . . . . . . . . . . . . . . 1-5
Windows . . . . . . . . . . . . . . . . . . . . . . . . . . . . . . . . . . . . . . . . 1-6
Seat Adjustment . . . . . . . . . . . . . . . . . . . . . . . . . . . . . . . . 1-7
Heated Seats . . . . . . . . . . . . . . . . . . . . . . . . . . . . . . . . . . . 1-9
Heated and Ventilated Seats . . . . . . . . . . . . . . . . . . . . 1-9
Head Restraint Adjustment . . . . . . . . . . . . . . . . . . . . 1-10
Safety Belt . . . . . . . . . . . . . . . . . . . . . . . . . . . . . . . . . . . . . 1-10
Sensing System for Passenger Airbag . . . . . . . . . 1-11
Mirror Adjustment . . . . . . . . . . . . . . . . . . . . . . . . . . . . . . 1-11
Steering Wheel Adjustment . . . . . . . . . . . . . . . . . . . . 1-12
Throttle and Brake Pedal Adjustment . . . . . . . . . . 1-13
Interior Lighting . . . . . . . . . . . . . . . . . . . . . . . . . . . . . . . . 1-13
Exterior Lighting . . . . . . . . . . . . . . . . . . . . . . . . . . . . . . . 1-14
Windshield Wiper/Washer . . . . . . . . . . . . . . . . . . . . . . 1-15
Climate Controls . . . . . . . . . . . . . . . . . . . . . . . . . . . . . . . 1-15
Transmission . . . . . . . . . . . . . . . . . . . . . . . . . . . . . . . . . . 1-17 Vehicle Features
. . . . . . . . . . . . . . . . . . . . . . . . . . . . . . . . . . 1-18
Radio(s) . . . . . . . . . . . . . . . . . . . . . . . . . . . . . . . . . . . . . . . 1-18
Satellite Radio . . . . . . . . . . . . . . . . . . . . . . . . . . . . . . . . . 1-19
Portable Audio Devices . . . . . . . . . . . . . . . . . . . . . . . . 1-19
Steering Wheel Controls . . . . . . . . . . . . . . . . . . . . . . . 1-20
Bluetooth
®. . . . . . . . . . . . . . . . . . . . . . . . . . . . . . . . . . . . . 1-20
Navigation System . . . . . . . . . . . . . . . . . . . . . . . . . . . . . 1-20
Driver Information Center (DIC) . . . . . . . . . . . . . . . . 1-21
Cruise Control . . . . . . . . . . . . . . . . . . . . . . . . . . . . . . . . . 1-22
Rear Vision Camera (RVC) . . . . . . . . . . . . . . . . . . . . 1-23
Ultrasonic Parking Assist . . . . . . . . . . . . . . . . . . . . . . 1-23
Power Outlets . . . . . . . . . . . . . . . . . . . . . . . . . . . . . . . . . 1-23
Universal Remote System . . . . . . . . . . . . . . . . . . . . . 1-23
Sunroof . . . . . . . . . . . . . . . . . . . . . . . . . . . . . . . . . . . . . . . . 1-24
Performance and Maintenance . . . . . . . . . . . . . . . . . .1-24
StabiliTrak
®. . . . . . . . . . . . . . . . . . . . . . . . . . . . . . . . . . . . 1-24
Tire Pressure Monitor . . . . . . . . . . . . . . . . . . . . . . . . . . 1-25
Engine Oil Life System . . . . . . . . . . . . . . . . . . . . . . . . 1-25
Fuel E85 (85% Ethanol) . . . . . . . . . . . . . . . . . . . . . . . 1-26
Driving for Better Fuel Economy . . . . . . . . . . . . . . . 1-26
Roadside Assistance Program . . . . . . . . . . . . . . . . . 1-27
OnStar
®. . . . . . . . . . . . . . . . . . . . . . . . . . . . . . . . . . . . . . . 1-27
1-1
Page 9 of 550

A.Outlet Adjustment on page 4‑27.
B. Turn Signal/Multifunction Lever on page 4‑4.
C. Instrument Panel Cluster on page 4‑28.
D. Hazard Warning Flashers
on page 4‑3.
E. Shift Lever. See Automatic Transmission Operation
on page 3‑28.
F. Tow/Haul Mode
on page 3‑32(If Equipped).
G. Driver Information Center (DIC) Buttons. See Driver Information Center (DIC) on page 4‑44.
H. Audio System(s) on page 4‑76.
I. Exterior Lamps on page 4‑10.
J. Integrated Trailer Brake Controller (If Equipped). See Towing a Trailer on page 5‑42.
K. Dome Lamp Override
on page 4‑14.Dome Lampson page 4‑13.
L. Cruise Control on page 4‑7.
M. Hood Release on page 6‑14.
N. Parking Brake on page 3‑34. O.
Tilt Wheel on page 4‑3.
P. Horn on page 4‑3.
Q. Audio Steering Wheel Controls on page 4‑137.
R. Climate Control System (With Air Conditioning)
on
page 4‑17or Climate Control System (With Heater
Only)on page 4‑20or Dual Automatic Climate
Control Systemon page 4‑21(If Equipped).
S. Accessory Power Outlet(s)
on page 4‑16.
Cigarette Lighter (If Equipped). See Ashtray(s) and
Cigarette Lighter
on page 4‑17.
T. StabiliTrak®Systemon page 5‑6(If Equipped).
Pedal Adjust Button (If Equipped). See Adjustable
Throttle and Brake Pedal
on page 3‑26. Ultrasonic
Rear Parking Assist (URPA)on page 3‑43(If Equipped). Heated Windshield Washer Fluid
Button (If Equipped). See Windshield Washeron
page 4‑6.
U. Passenger Airbag Off Control (If Equipped). See Passenger Sensing System on page 2‑66.
V. Glove Box on page 3‑57.
1-3
Page 14 of 550
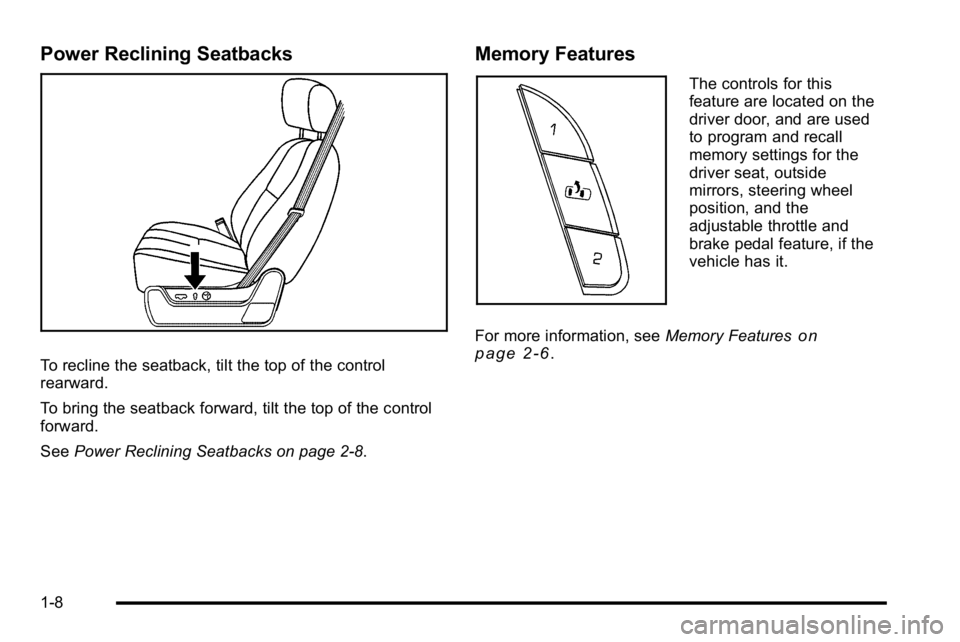
Power Reclining Seatbacks
To recline the seatback, tilt the top of the control
rearward.
To bring the seatback forward, tilt the top of the control
forward.
SeePower Reclining Seatbacks on page 2‑8.
Memory Features
The controls for this
feature are located on the
driver door, and are used
to program and recall
memory settings for the
driver seat, outside
mirrors, steering wheel
position, and the
adjustable throttle and
brake pedal feature, if the
vehicle has it.
For more information, see Memory Features
on
page 2‑6.
1-8
Page 18 of 550
Power Foldaway Mirrors
To fold the mirrors:1. Press (C) to fold the mirrors out to the driving position.
2. Press (D) to fold the mirrors in to the folded position.
Manual Foldaway Mirrors
Manually fold the mirrors inward to prevent damage
when going through an automatic car wash. To fold,
push the mirror toward the vehicle. Push the mirror
outward, to return to its original position.
Interior Mirror
Vehicles with a manual rearview mirror can be adjusted
to see clearly behind the vehicle. Hold the mirror in the
center to move it up or down and side to side. To
reduce headlamp glare during nighttime use, push the
tab forward for daytime use and pull it for nighttime use.
Vehicles with the automatic dimming feature will
automatically reduce the glare of lights from behind the
vehicle. The dimming feature comes on and the
indicator light illuminates each time the vehicle is
started.
See Automatic Dimming Rearview Mirror
on page 3‑39for more information.
Steering Wheel Adjustment
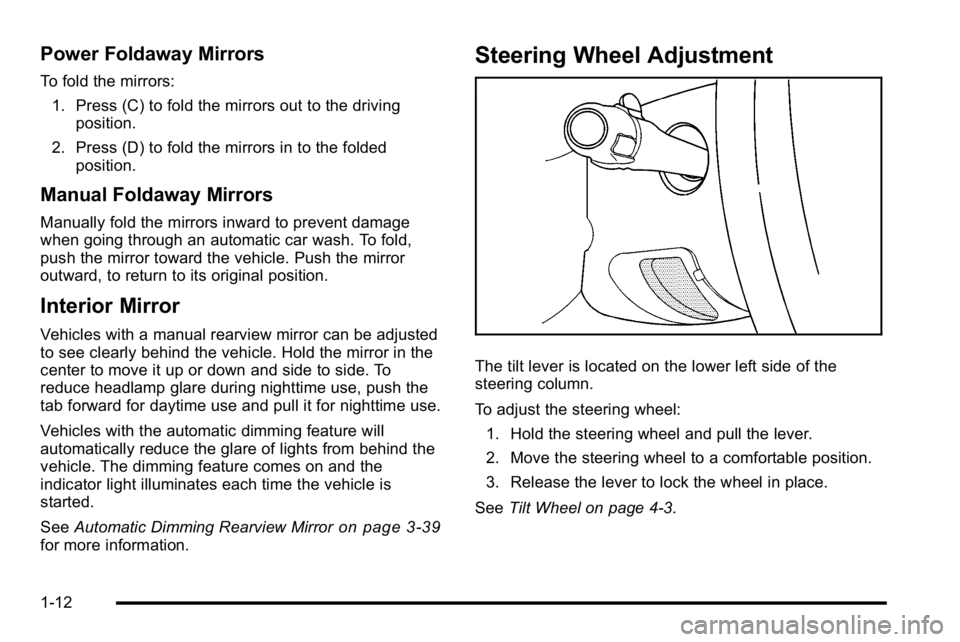
The tilt lever is located on the lower left side of the
steering column.
To adjust the steering wheel:
1. Hold the steering wheel and pull the lever.
2. Move the steering wheel to a comfortable position.
3. Release the lever to lock the wheel in place.
See Tilt Wheel on page 4‑3.
1-12
Page 35 of 550
The vehicle must have a working electrical system,
including adequate battery power, for the OnStar
equipment to operate. There are other problems OnStar
cannot control that may prevent OnStar from providing
OnStar service at any particular time or place. Some
examples are damage to important parts of the vehicle
in a crash, hills, tall buildings, tunnels, weather or
wireless phone network congestion.
OnStar Steering Wheel Controls
This vehicle may have a Talk/Mute button that can be
used to interact with OnStar hands-free calling. See
Audio Steering Wheel Controls
on page 4‑137for more
information.
On some vehicles, the mute button can be used to dial
numbers into voice mail systems, or to dial phone
extensions. See the OnStar Owner's Guide for more
information.
Your Responsibility
Increase the volume of the radio if the OnStar advisor
cannot be heard.
If the light next to the OnStar buttons is red, the system
may not be functioning properly. Press
Qand request a
vehicle diagnostic. If the light appears clear (no light is
appearing), your OnStar subscription has expired and
all services have been deactivated. Press
Qto confirm
that the OnStar equipment is active.
1-29
Page 43 of 550
To save your positions in memory, do the following:1. Adjust the driver's seat, including the seatback recliner, both outside mirrors, steering wheel, and
the throttle and brake pedals to a comfortable
position.
See Outside Power Foldaway Mirrors
on
page 3‑40and Adjustable Throttle and Brake
Pedalon page 3‑26for more information.
Not all mirrors will have the ability to save and
recall the mirror positions.
2. Press and hold button 1 until two beeps sound.
A second seating, mirror, steering wheel position, and
throttle and brake pedal position can be programmed by
repeating the above steps and pressing button 2.
To recall the memory positions, the vehicle must be in
P (Park). Press and release either button 1 or button 2
corresponding to the desired driving position. The seat,
outside mirrors, steering wheel position, and adjustable
throttle and brake pedals will move to the position
previously stored. You will hear a single beep. If you use the remote keyless entry transmitter to enter
your vehicle and the remote recall memory feature is
on, automatic seat, mirror, steering wheel position, and
adjustable pedal movement will occur. See
“MEMORY
SEAT RECALL” underDIC Vehicle Customization (With
DIC Buttons)
on page 4‑67for more information.
To stop recall movement of the memory feature at any
time, press one of the power seat controls, memory
buttons, power mirror buttons, power tilt wheel control,
or adjustable pedal switch.
If something has blocked the driver ’s seat and/or the
adjustable pedals while recalling a memory position, the
driver ’s seat and/or the adjustable pedals recall may
stop working. If this happens, remove the obstruction
and press the appropriate function control for
two seconds. Then try recalling the memory position
again by pressing the appropriate memory button. If the
memory position is still not recalling, see your
dealer/retailer for service.
2-7
Page 317 of 550
Let us say the road is wet and you are driving safely.
Suddenly, an animal jumps out in front of you. You slam
on the brakes and continue braking. Here is what
happens with ABS:
A computer senses that the wheels are slowing down.
If one of the wheels is about to stop rolling, the
computer will separately work the brakes at each front
wheel and at both rear wheels.
ABS can change the brake pressure to each wheel, as
required, faster than any driver could. This can help the
driver steer around the obstacle while braking hard.
As the brakes are applied, the computer keeps
receiving updates on wheel speed and controls braking
pressure accordingly.
Remember: ABS does not change the time needed to
get a foot up to the brake pedal or always decrease
stopping distance. If you get too close to the vehicle in
front of you, there will not be enough time to apply the
brakes if that vehicle suddenly slows or stops. Always
leave enough room up ahead to stop, even with ABS.
Using ABS
Do not pump the brakes. Just hold the brake pedal
down firmly and let antilock work. The brakes might
vibrate or some noise might be heard, but this is
normal.
Braking in Emergencies
ABS allows the driver to steer and brake at the same
time. In many emergencies, steering can help more
than even the very best braking.
Brake Assist
This vehicle has a Brake Assist feature designed to
assist the driver in stopping or decreasing vehicle
speed in emergency driving conditions. This feature
uses the stability system hydraulic brake control module
to supplement the power brake system under conditions
where the driver has quickly and forcefully applied the
brake pedal in an attempt to quickly stop or slow down
the vehicle. The stability system hydraulic brake control
module increases brake pressure at each corner of the
vehicle until the ABS activates. Minor brake pedal
pulsations or pedal movement during this time is normal
and the driver should continue to apply the brake pedal
as the driving situation dictates The Brake Assist
feature will automatically disengage when the brake
pedal is released or brake pedal pressure is quickly
decreased.
5-5