2010 GMC SIERRA DENALI ECO mode
[x] Cancel search: ECO modePage 99 of 550
What Makes an Airbag Inflate?
In a deployment event, the sensing system sends an
electrical signal triggering a release of gas from the
inflator. Gas from the inflator fills the airbag causing the
bag to break out of the cover and deploy. The inflator,
the airbag, and related hardware are all part of the
airbag module.
Frontal airbag modules are located inside the
steering wheel and instrument panel. For vehicles with
seat‐mounted side impact airbags, there are airbags
modules in the side of the front seatbacks closest to the
door. For vehicles with roof-rail airbags, there are airbag
modules in the ceiling of the vehicle, near the side
windows that have occupant seating positions.
How Does an Airbag Restrain?
In moderate to severe frontal or near frontal collisions,
even belted occupants can contact the steering wheel
or the instrument panel. In moderate to severe side
collisions, even belted occupants can contact the inside
of the vehicle.
Airbags supplement the protection provided by safety
belts. Frontal airbags distribute the force of the impact
more evenly over the occupant's upper body, stopping
the occupant more gradually. Seat‐mounted side impact
and roof-rail airbags distribute the force of the impact
more evenly over the occupant's upper body.
Rollover capable roof-rail airbags are designed to help
contain the head and chest of occupants in the
outboard seating positions in the first and second rows.
The rollover capable roof-rail airbags are designed to
help reduce the risk of full or partial ejection in rollover
events, although no system can prevent all such
ejections.
But airbags would not help in many types of collisions,
primarily because the occupant's motion is not toward
those airbags. SeeWhen Should an Airbag Inflate?
on
page 2‑61for more information.
Airbags should never be regarded as anything more
than a supplement to safety belts.
2-63
Page 101 of 550

{WARNING:
A crash severe enough to inflate the airbags may
have also damaged important functions in the
vehicle, such as the fuel system, brake and
steering systems, etc. Even if the vehicle appears
to be drivable after a moderate crash, there may
be concealed damage that could make it difficult
to safely operate the vehicle.
Use caution if you should attempt to restart the
engine after a crash has occurred.In many crashes severe enough to inflate the airbag,
windshields are broken by vehicle deformation.
Additional windshield breakage may also occur from the
right front passenger airbag..Airbags are designed to inflate only once. After an
airbag inflates, you will need some new parts for
the airbag system. If you do not get them, the
airbag system will not be there to help protect you
in another crash. A new system will include airbag
modules and possibly other parts. The service
manual for your vehicle covers the need to replace
other parts.
.The vehicle has a crash sensing and diagnostic
module which records information after a crash.
See
Vehicle Data Recording and Privacy
on
page 8‑18and Event Data Recorderson
page 8‑19.
.Let only qualified technicians work on the airbag
systems. Improper service can mean that an
airbag system will not work properly. See your
dealer/retailer for service.
2-65
Page 137 of 550
{WARNING:
Plugging the cord into an ungrounded outlet could
cause an electrical shock. Also, the wrong kind of
extension cord could overheat and cause a fire.
You could be seriously injured. Plug the cord into
a properly grounded three-prong 110-volt AC
outlet. If the cord will not reach, use a heavy-duty
three-prong extension cord rated for at least
15 amps.
4. Before starting the engine, be sure to unplug and store the cord as it was before to keep it away from
moving engine parts. If you do not, it could be
damaged.
The length of time the heater should remain plugged in
depends on several factors. Ask a dealer/retailer in the
area where you will be parking the vehicle for the best
advice on this.
Active Fuel Management™
Vehicles with V8 engines may have Active Fuel
Management™. This system allows the engine to
operate on either all or half of its cylinders, depending
on the driving conditions.
When less power is required, such as cruising at a
constant vehicle speed, the system will operate in the
half cylinder mode, allowing the vehicle to achieve
better fuel economy. When greater power demands are
required, such as accelerating from a stop, passing,
or merging onto a freeway, the system will maintain
full-cylinder operation.
If the vehicle has an Active Fuel Management™
indicator, see DIC Operation and Displays (Using Trip
Odometer Reset Stem)
on page 4‑44or DIC Operation
and Displays (Using DIC Buttons)on page 4‑48for
more information on using this display .
3-27
Page 165 of 550

Example of Eight Dip Switches with Three PositionsThe panel of switches might not appear exactly as
they do in the examples above, but they should be
similar.
The switch positions on the hand-held transmitter
could be labeled, as follows:
.A switch in the up position could be labeled as
“Up,” “+,” or“On.”
.A switch in the down position could be labeled
as “Down,” “−,” or“Off.”
.A switch in the middle position could be labeled
as “Middle,” “0,” or“Neutral.” 2. Write down the eight to 12 switch settings from left
to right as follows:
.When a switch is in the up position, write “Left.”
.When a switch is in the down position, write
“Right.”
.If a switch is set between the up and down
position, write“Middle.”
The switch settings written down in Step 2 now
become the button strokes to be entered into
the Universal Home Remote in Step 4. Be sure
to enter the switch settings written down in
Step 2, in order from left to right, into the
Universal Home Remote, when completing
Step 4.
3. From inside your vehicle, first firmly press all three buttons at the same time for about three seconds.
Release the buttons to put the Universal Home
Remote into programming mode.
3-55
Page 192 of 550
Climate Control System
(With Heater Only)
With this system the heating and ventilation can be
controlled.
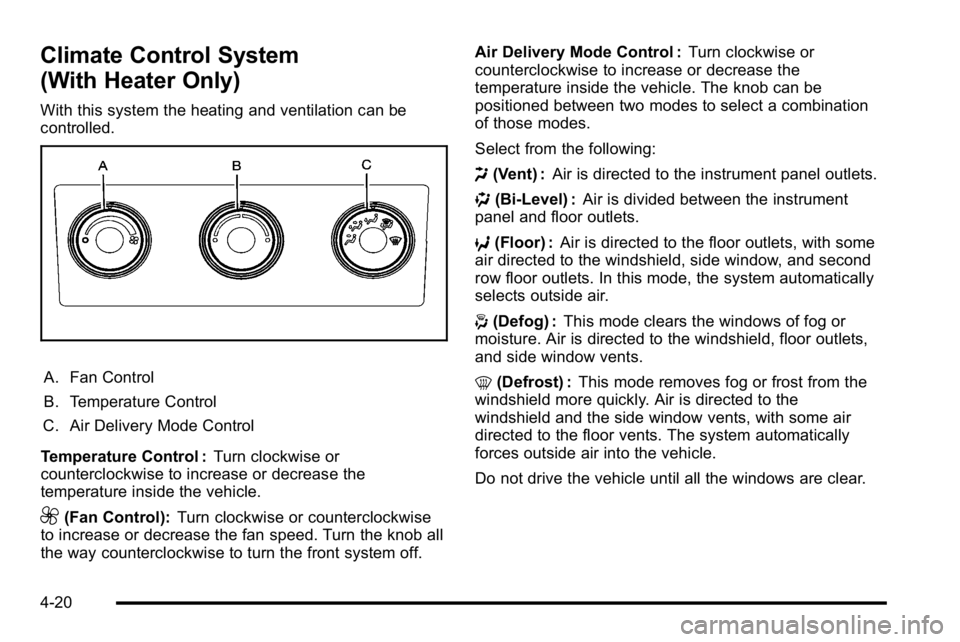
A. Fan Control
B. Temperature Control
C. Air Delivery Mode Control
Temperature Control : Turn clockwise or
counterclockwise to increase or decrease the
temperature inside the vehicle.
9(Fan Control): Turn clockwise or counterclockwise
to increase or decrease the fan speed. Turn the knob all
the way counterclockwise to turn the front system off. Air Delivery Mode Control :
Turn clockwise or
counterclockwise to increase or decrease the
temperature inside the vehicle. The knob can be
positioned between two modes to select a combination
of those modes.
Select from the following:
H (Vent) : Air is directed to the instrument panel outlets.
) (Bi-Level) : Air is divided between the instrument
panel and floor outlets.
6 (Floor) : Air is directed to the floor outlets, with some
air directed to the windshield, side window, and second
row floor outlets. In this mode, the system automatically
selects outside air.
- (Defog) : This mode clears the windows of fog or
moisture. Air is directed to the windshield, floor outlets,
and side window vents.
0 (Defrost) : This mode removes fog or frost from the
windshield more quickly. Air is directed to the
windshield and the side window vents, with some air
directed to the floor vents. The system automatically
forces outside air into the vehicle.
Do not drive the vehicle until all the windows are clear.
4-20
Page 194 of 550
Driver and Passenger Side Temperature
Controls
The driver and passenger side temperature buttons are
used to adjust the temperature of the air coming
through the system on the driver or passenger's side of
the vehicle. The temperature can be adjusted even if
the system is turned off. This is possible since outside
air always flows through the system as the vehicle is
moving forward unless it is set to recirculation mode.
See“Recirculation” later in this section.
Press the + or −buttons to increase or decrease the
cabin temperature. The driver side or passenger side
temperature display shows the temperature setting
decreasing or increasing.
The passenger's temperature setting can be set to
match the driver's temperature setting by pressing the
PASS button and turning off the PASS indicator. When
the passenger's temperature setting is set different than
the driver's setting, the indicator on the PASS button
illuminates and both the driver side and passenger side
temperature displays are shown.
When in defrost mode the passenger temperature
setting cannot be changed.
Automatic Operation
AUTO (Automatic) : When automatic operation is
active the system controls the inside temperature, the
air delivery, and the fan speed.
Use the steps below to place the entire system in
automatic mode:
1. Press the AUTO button. When AUTO is selected, the display changes to
show the current temperature(s) and AUTO is lit on
the display. The current air delivery mode and fan
speed are also displayed for about 5 seconds.
When AUTO is selected, the air conditioning
operation and air inlet are automatically controlled.
The air conditioning compressor may run when the
outside temperature is above freezing. The air inlet
will normally be set to outside air. If it is hot
outside, the air inlet may automatically switch to
the recirculate mode to help quickly cool down the
air inside the vehicle. The light on the button
comes on in recirculation.
4-22
Page 196 of 550

6(Floor):Air is directed to the floor outlets, with some
to the windshield, side window outlets, and second row
floor outlets. In this mode, the system automatically
selects outside air.
-(Defog): This mode clears the windows of fog or
moisture. Air is directed to the windshield, floor outlets,
and side window vents. In this mode, the system turns
off recirculation and runs the air conditioning
compressor unless the outside temperature is close to
freezing. The recirculation mode cannot be selected
while in the defrost mode.
0(Defrost): This mode removes fog or frost from the
windshield more quickly. Air is directed to the
windshield and side window vents, with some directed
to the floor vents. In this mode, the system
automatically forces outside air into the vehicle and
runs the air conditioning compressor unless the outside
temperature is close to freezing. The recirculation mode
cannot be selected while in the defrost mode.
The passenger temperature control cannot be activated
while in defrost mode. If the PASS button is pressed,
the button indicator flashes three times and will not
work. If the passenger temperature buttons are
adjusted, the driver temperature indicator changes. The
passenger temperature will not be displayed. If vent, bi-level, or floor mode is selected again, the
climate control system displays the previous
temperature settings.
Do not drive the vehicle until all the windows are clear.
#(Air Conditioning):
Press to turn the air
conditioning (A/C) compressor on and off. An indicator
light comes on to show that the air conditioning is on.
If this button is pressed when the air conditioning
compressor is unavailable due to outside conditions, the
indicator flashes three times and then turns off. If the air
conditioning is on and the outside temperature drops
below a temperature which is too cool for air
conditioning to be effective, the air conditioning light
turns off to show that the air conditioning mode has
been canceled.
On hot days, open the windows long enough to let hot
inside air escape. This helps to reduce the time it takes
for the vehicle to cool down. It also helps the system to
operate more efficiently.
The air conditioning system removes moisture from the
air, so a small amount of water might drip under the
vehicle while idling or after turning off the engine. This
is normal.
4-24
Page 206 of 550
The voltmeter gage may also read lower when in fuel
economy mode. This is normal.
Readings in the low warning zone can occur when a
large number of electrical accessories are operating in
the vehicle and the engine is left at an idle for an
extended period. This condition is normal since the
charging system is not able to provide full power at
engine idle. As engine speeds are increased, this
condition should correct itself as higher engine speeds
allow the charging system to create maximum power.
The vehicle can only be driven for a short time with the
reading in either warning zone. If the vehicle must be
driven, turn off all unnecessary accessories.
Readings in either warning zone indicate a possible
problem in the electrical system. Have the vehicle
serviced as soon as possible.Brake System Warning Light
With the ignition on, the brake system warning light
comes on when the parking brake is set. If the vehicle
is driven with the parking brake engaged, a chime
sounds when the vehicle speed is greater than
8 km/h (5 mph).
The vehicle's hydraulic brake system is divided into two
parts. If one part is not working, the other part can still
work and stop the vehicle. For good braking, both parts
need to be working well.
If the warning light comes on and a chime sounds there
could be a brake problem. Have the brake system
inspected right away.
This light can also come on due to low brake fluid. See
Brakes
on page 6‑40for more information.
4-34