2010 GMC SIERRA DENALI clock
[x] Cancel search: clockPage 19 of 550
Throttle and Brake Pedal Adjustment
On vehicles with this feature, you can change the
position of the throttle and brake pedals.
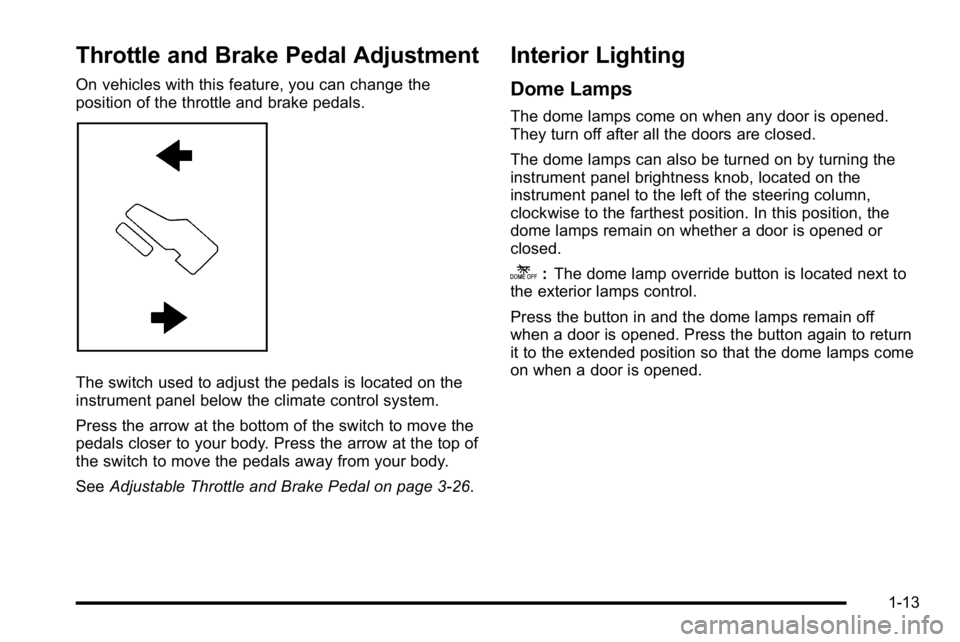
The switch used to adjust the pedals is located on the
instrument panel below the climate control system.
Press the arrow at the bottom of the switch to move the
pedals closer to your body. Press the arrow at the top of
the switch to move the pedals away from your body.
SeeAdjustable Throttle and Brake Pedal on page 3‑26.
Interior Lighting
Dome Lamps
The dome lamps come on when any door is opened.
They turn off after all the doors are closed.
The dome lamps can also be turned on by turning the
instrument panel brightness knob, located on the
instrument panel to the left of the steering column,
clockwise to the farthest position. In this position, the
dome lamps remain on whether a door is opened or
closed.
k:The dome lamp override button is located next to
the exterior lamps control.
Press the button in and the dome lamps remain off
when a door is opened. Press the button again to return
it to the extended position so that the dome lamps come
on when a door is opened.
1-13
Page 25 of 550
Setting the Clock
To set the time and date for the radio with CD, DVD,
and USB Port:1. Turn the ignition key to ACC/ACCESSORY or ON/RUN, then press
O, to turn the radio on.
2. Press
Gto display HR, MIN, MM, DD, YYYY
(hour, minute, month, day, and year).
3. Press the softkey located under any one of the labels to be changed.
4. To increase or decrease the time or date, turn
fclockwise or counter‐clockwise.
For detailed instructions on setting the clock for the
vehicle's specific audio system, see Setting the Clock
on page 4‑77.
Satellite Radio
XM is a satellite radio service that is based in the
48 contiguous United States and 10 Canadian
provinces. XM satellite radio has a wide variety of
programming and commercial-free music,
coast-to-coast, and in digital-quality sound.
A fee is required to receive the XM service.
For more information, refer to:
.www.xmradio.com or call 1-800-929-2100 (U.S.)
.www.xmradio.ca or call 1-877-438-9677 (Canada)
See “XM Satellite Radio Service” underRadio(s)
on
page 4‑79.
Portable Audio Devices
This vehicle may have an auxiliary input located on the
radio faceplate and a USB port located in the center
console or the dashboard. External devices such as
iPod
®, laptop computers, MP3 players, CD changers,
USB storage device, etc. can be connected to the
auxiliary port using a 3.5 mm (1/8 in) input jack or the
USB port depending on the audio system.
See “Using the Auxiliary Input Jack” and“Using the
USB Port” underRadio(s) on page 4‑79.
1-19
Page 174 of 550

Section 4 Instrument Panel
Malfunction Indicator Lamp . . . . . . . . . . . . . . . . . . . . 4-38
Oil Pressure Gage . . . . . . . . . . . . . . . . . . . . . . . . . . . . . 4-40
Oil Pressure Light . . . . . . . . . . . . . . . . . . . . . . . . . . . . . 4-41
Security Light . . . . . . . . . . . . . . . . . . . . . . . . . . . . . . . . . . 4-42
Fog Lamp Light . . . . . . . . . . . . . . . . . . . . . . . . . . . . . . . . 4-42
Cruise Control Light . . . . . . . . . . . . . . . . . . . . . . . . . . . 4-42
Highbeam On Light . . . . . . . . . . . . . . . . . . . . . . . . . . . . 4-42
Tow/Haul Mode Light . . . . . . . . . . . . . . . . . . . . . . . . . . 4-43
Fuel Gage . . . . . . . . . . . . . . . . . . . . . . . . . . . . . . . . . . . . . 4-43
Driver Information Center (DIC) . . . . . . . . . . . . . . . . . .4-44
DIC Operation and Displays (Using Trip Odometer Reset Stem) . . . . . . . . . . . . . . . . . . . . . . 4-44
DIC Operation and Displays (Using DIC Buttons) . . . . . . . . . . . . . . . . . . . . . . . . . . . . . . . . . . . . . 4-48
DIC Compass . . . . . . . . . . . . . . . . . . . . . . . . . . . . . . . . . . 4-55
DIC Warnings and Messages . . . . . . . . . . . . . . . . . . 4-57
DIC Vehicle Customization (With DIC Buttons) . . . . . . . . . . . . . . . . . . . . . . . . . . . . . . . . . . . . . 4-67 Audio System(s)
. . . . . . . . . . . . . . . . . . . . . . . . . . . . . . . . . . 4-76
Setting the Clock . . . . . . . . . . . . . . . . . . . . . . . . . . . . . . 4-77
Radio(s) . . . . . . . . . . . . . . . . . . . . . . . . . . . . . . . . . . . . . . . 4-79
Using an MP3 (Radios with CD) . . . . . . . . . . . . . . . 4-99
Using an MP3 (Radios with CD and DVD) . . . . 4-106
XM Radio Messages . . . . . . . . . . . . . . . . . . . . . . . . . 4-114
Navigation/Radio System . . . . . . . . . . . . . . . . . . . . . 4-115
Bluetooth
®. . . . . . . . . . . . . . . . . . . . . . . . . . . . . . . . . . . . 4-115
Rear Seat Entertainment (RSE) System . . . . . . 4-126
Rear Seat Audio (RSA) . . . . . . . . . . . . . . . . . . . . . . . 4-135
Theft-Deterrent Feature . . . . . . . . . . . . . . . . . . . . . . 4-136
Audio Steering Wheel Controls . . . . . . . . . . . . . . . 4-137
Radio Reception . . . . . . . . . . . . . . . . . . . . . . . . . . . . . . 4-139
Fixed Mast Antenna . . . . . . . . . . . . . . . . . . . . . . . . . . 4-140
XM™ Satellite Radio Antenna System . . . . . . . . 4-140
4-2
Page 185 of 550
Puddle Lamps
If the vehicle has puddle lamps, they come on when the
unlock button on the Remote Keyless Entry (RKE)
Transmitter is pressed. The lamps time out or turn off
once the engine is started.
Fog Lamps
Fog lamps provide better visibility in foggy or misty
conditions.
The fog lamp button is located on the left side of the
instrument panel.
The parking lamps and/or low-beam headlamps must
be on for the fog lamps to work.
#:Press to turn the fog lamps on or off. An indicator
light comes on when the fog lamps are in use.
The fog lamps go off whenever the high-beam
headlamps come on. When the high beams turn off, the
fog lamps come on again.
The fog lamps are cancelled after the ignition is turned
off. If you still want to use the fog lamps after the
vehicle is restarted, press the fog lamp button again.
Some localities have laws that require the headlamps to
be on along with the fog lamps.
Instrument Panel Brightness
D (Instrument Panel Brightness) : This feature
controls the brightness of the instrument panel lights
and is located next to the exterior lamp control.
Push the knob to extend out and then it can be turned.
Turn the knob clockwise or counterclockwise to brighten
or dim the instrument panel lights. Turning the knob to
the farthest clockwise position turns on the dome lamps.
Dome Lamps
The dome lamps come on when any door is opened.
They turn off after all the doors are closed.
The dome lamps can also be turned on by turning the
instrument panel brightness knob, located on the
instrument panel to the left of the steering column,
clockwise to the farthest position. In this position, the
dome lamps remain on whether a door is opened or
closed.
4-13
Page 186 of 550
Dome Lamp Override
The dome lamp override button is located next to the
exterior lamps control.
k(Dome Off):Press the button in and the dome
lamps remain off when a door is opened. Press the
button again to return it to the extended position so that
the dome lamps come on when a door is opened.
Entry Lighting
The vehicle has an illuminated entry feature.
When a door is opened, the dome lamps and puddle
lamps come on if the dome override feature is not in
use. If the dome override feature is used, the lamps do
not come on.
Exit Lighting
The interior lamps come on when the key is removed
from the ignition. They turn off automatically in
20 seconds. The lights do not come on if the dome
override button is pressed in.
Reading Lamps
For vehicles with reading lamps, they are located on the
overhead console.
To turn on the reading lamps, press the button located
next to each lamp. To turn them off, press the button
again.
The vehicle may also have reading lamps in other
locations. To turn the lamps on or off, press the button
located next to the lamp.
If the vehicle has a DVD Rear Seat Entertainment
(RSE) system, press the lamp lenses to turn the lamps
on or off.
The lamps are fixed and cannot be adjusted.
Cargo Lamp
The cargo lamps come on by turning the instrument
panel brightness control knob to the farthest clockwise
position. This knob is located on the instrument panel
and also turns on the dome lamps.
The cargo lamp can be used if more light is needed in
the cargo area of the vehicle or in the top-box storage
units.
4-14
Page 189 of 550
Ashtray(s) and Cigarette Lighter
The vehicle may have a front ashtray located near the
center of the instrument panel. Pull on the door to open
it. The ashtray may have a cigarette lighter.
Notice:If papers, pins, or other flammable items are
put in the ashtray, hot cigarettes or other smoking
materials could ignite them and possibly damage
the vehicle. Never put flammable items in the
ashtray.
To remove the ashtray, open the door and pull the
ashtray bin toward you. To replace the ashtray, insert
the ashtray bin inside the ashtray door and press down
until it engages. To use the cigarette lighter, push it in
all the way, and let go. When it is ready for use, the
lighter pops back out.
Notice: Holding a cigarette lighter in while it is
heating does not let the lighter back away from the
heating element when it is hot. Damage from
overheating can occur to the lighter or heating
element, or a fuse could be blown. Do not hold a
cigarette lighter in while it is heating.
Climate Controls
Climate Control System
(With Air Conditioning)
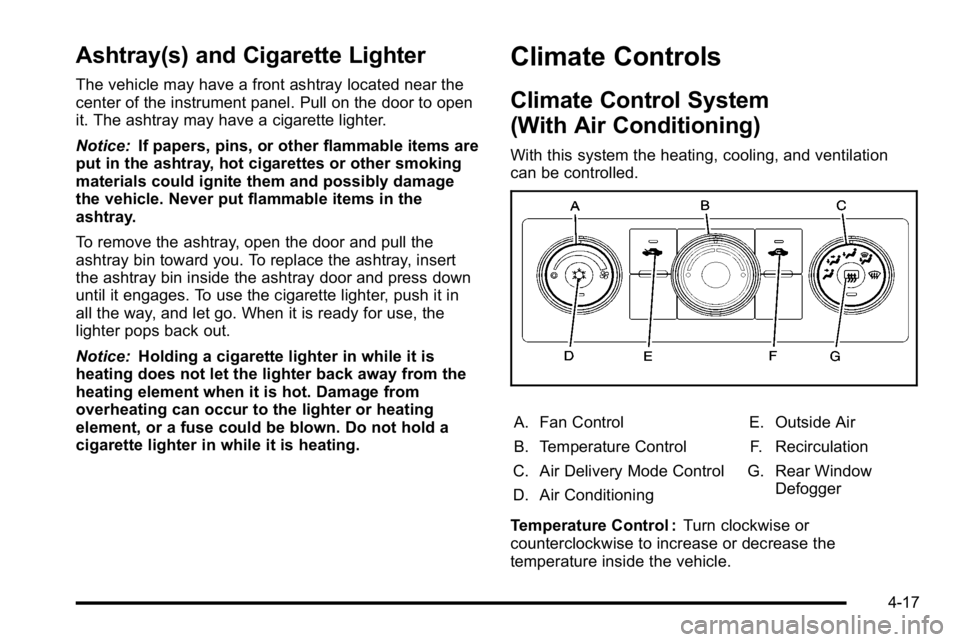
With this system the heating, cooling, and ventilation
can be controlled.
A. Fan Control
B. Temperature Control
C. Air Delivery Mode Control
D. Air Conditioning E. Outside Air
F. Recirculation
G. Rear Window Defogger
Temperature Control : Turn clockwise or
counterclockwise to increase or decrease the
temperature inside the vehicle.
4-17
Page 190 of 550
9(Fan Control):Turn clockwise or counterclockwise
to increase or decrease the fan speed. Turn the knob all
the way counterclockwise to turn the front system off.
Air Delivery Mode Control : Turn clockwise or
counterclockwise to change the direction of the airflow
inside the vehicle. The knob can be positioned between
two modes to select a combination of those modes.
Select from the following:
H (Vent) : Air is directed to the instrument panel outlets.
) (Bi-Level) : Air is divided between the instrument
panel and floor outlets.
6 (Floor) : Air is directed to the floor outlets, with some
air directed to the windshield and side window outlets.
In this mode, the system automatically selects outside
air. Recirculation cannot be selected in floor mode.
- (Defog) : This mode clears the windows of fog or
moisture. Air is directed to the windshield, floor outlets,
and side window vents. 0
(Defrost) : This mode removes fog or frost from the
windshield more quickly. Air is directed to the
windshield and the side window vents, with some air
directed to the floor vents. The system automatically
forces outside air into the vehicle.
The recirculation mode cannot be selected in the defog
or defrost mode. When either mode is selected, the
system runs the air conditioning compressor, unless the
outside temperature is close to freezing.
Do not drive the vehicle until all the windows are clear.
:(Outside Air): Press to turn the outside air mode
on. An indicator light comes on to show that outside air
is on. In this mode outside air circulates throughout the
vehicle. The outside air mode can be used with all
modes, but it cannot be used with the
recirculation mode.
4-18
Page 192 of 550
Climate Control System
(With Heater Only)
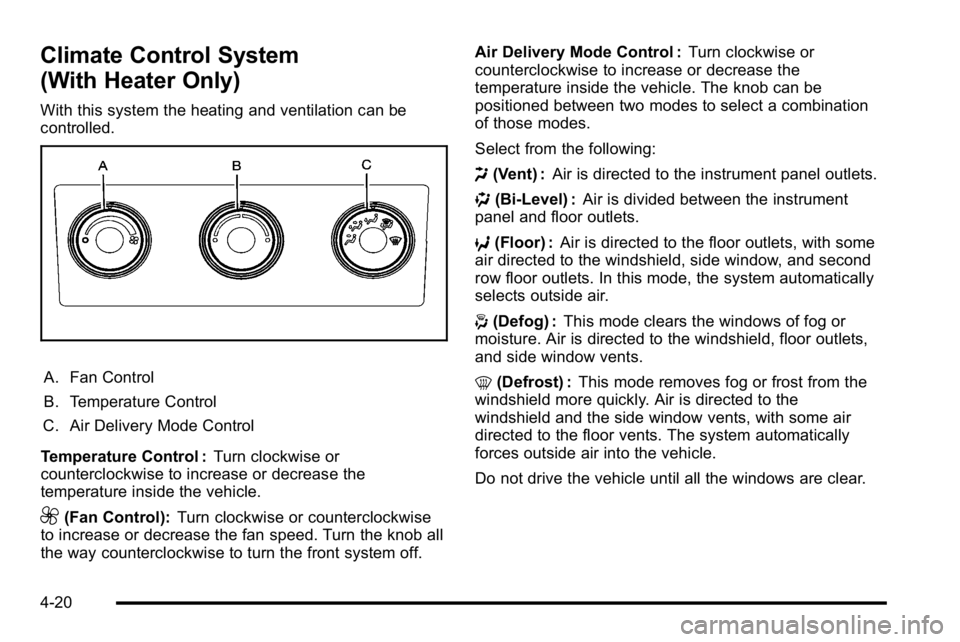
With this system the heating and ventilation can be
controlled.
A. Fan Control
B. Temperature Control
C. Air Delivery Mode Control
Temperature Control : Turn clockwise or
counterclockwise to increase or decrease the
temperature inside the vehicle.
9(Fan Control): Turn clockwise or counterclockwise
to increase or decrease the fan speed. Turn the knob all
the way counterclockwise to turn the front system off. Air Delivery Mode Control :
Turn clockwise or
counterclockwise to increase or decrease the
temperature inside the vehicle. The knob can be
positioned between two modes to select a combination
of those modes.
Select from the following:
H (Vent) : Air is directed to the instrument panel outlets.
) (Bi-Level) : Air is divided between the instrument
panel and floor outlets.
6 (Floor) : Air is directed to the floor outlets, with some
air directed to the windshield, side window, and second
row floor outlets. In this mode, the system automatically
selects outside air.
- (Defog) : This mode clears the windows of fog or
moisture. Air is directed to the windshield, floor outlets,
and side window vents.
0 (Defrost) : This mode removes fog or frost from the
windshield more quickly. Air is directed to the
windshield and the side window vents, with some air
directed to the floor vents. The system automatically
forces outside air into the vehicle.
Do not drive the vehicle until all the windows are clear.
4-20