2010 GMC SIERRA DENALI battery
[x] Cancel search: batteryPage 300 of 550
Battery Replacement
To change the batteries on the headphones, do the
following:1. Turn the screw to loosen the battery door located on the left side of the headphones. Slide the
battery door open.
2. Replace the two batteries in the compartment. Make sure that they are installed correctly, using
the diagram on the inside of the battery
compartment.
3. Replace the battery door and tighten the door screw.
If the headphones are to be stored for a long period of
time, remove the batteries and keep them in a cool, dry
place.
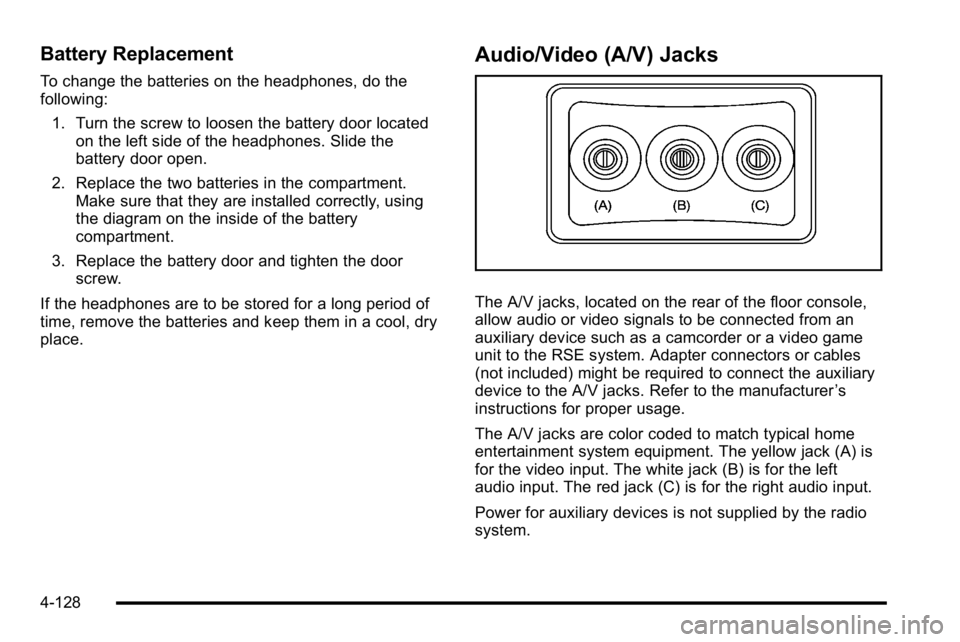
Audio/Video (A/V) Jacks
The A/V jacks, located on the rear of the floor console,
allow audio or video signals to be connected from an
auxiliary device such as a camcorder or a video game
unit to the RSE system. Adapter connectors or cables
(not included) might be required to connect the auxiliary
device to the A/V jacks. Refer to the manufacturer ’s
instructions for proper usage.
The A/V jacks are color coded to match typical home
entertainment system equipment. The yellow jack (A) is
for the video input. The white jack (B) is for the left
audio input. The red jack (C) is for the right audio input.
Power for auxiliary devices is not supplied by the radio
system.
4-128
Page 302 of 550
Video Screen
The video screen is located in the overhead console.
To use the video screen, do the following:1. Push the release button located on the overhead console.
2. Move the screen to the desired position.
When the video screen is not in use, push it up into its
locked position.
If a DVD is playing and the screen is raised to its locked
position, the screen remains on. This is normal, and the
DVD continues to play through the previous audio
source. Use the remote control power button or eject
the disc to turn off the screen.
The overhead console contains the infrared transmitters
for the wireless headphones and the infrared receivers
for the remote control. They are located at the rear of
the console.
Notice: Avoid directly touching the video screen, as
damage may occur. See “Cleaning the Video
Screen” later in this section for more information.
Remote Control
To use the remote control, aim it at the transmitter
window at the rear of the RSE overhead console and
press the desired button. Direct sunlight or very bright
light could affect the ability of the RSE transmitter to
receive signals from the remote control. If the remote
control does not seem to be working, the batteries might
need to be replaced. See “Battery Replacement”later in
this section. Objects blocking the line of sight could also
affect the function of the remote control.
If a CD or DVD is in the Radio DVD slot, the remote
control power button can be used to turn on the video
screen display and start the disc. The radio can also
turn on the video screen display. See Radio(s)
on
page 4‑79for more information.
Notice: Storing the remote control in a hot area or
in direct sunlight can damage it, and the repairs will
not be covered by the warranty. Storage in extreme
cold can weaken the batteries. Keep the remote
control stored in a cool, dry place.
If the remote control becomes lost or damaged, a new
universal remote control can be purchased. If this
happens, make sure the universal remote control uses
a code set of Toshiba
®.
4-130
Page 304 of 550
u(Next Track/Chapter):Press this button to go to the
beginning of the next chapter or track. This button might
not work while the DVD is playing the copyright
information or the previews.
r(Fast Reverse): Press this button to quickly reverse
the DVD or CD. To stop fast reversing a DVD video,
press the play/pause button. To stop fast reversing a
DVD audio or CD, release the fast reverse button. This
button might not work when the DVD is playing the
copyright information or the previews.
[(Fast Forward): Press this button to fast forward the
DVD or CD. To stop fast forwarding a DVD video, press
the play/pause button. To stop fast forwarding a DVD
audio or CD, release the fast forward button. This
button might not work while the DVD is playing the
copyright information or the previews.
e(Audio): Press this button to change audio tracks on
DVDs that have this feature when the DVD is playing.
The format and content of this function vary for
each disc.
{(Subtitles): Press this button to turn ON/OFF
subtitles and to move through subtitle options when a
DVD is playing. The format and content of this function
vary for each disc.
AUX (Auxiliary) : Press this button to switch the
system between the DVD player and an auxiliary
source.
d(Camera): Press this button to change camera
angles on DVDs that have this feature while a DVD is
playing. The format and content of this function vary for
each disc.
1 through 0 (Numeric Keypad) : The numeric keypad
provides the capability of direct chapter or track number
selection.
\(Clear): Press this button within three seconds after
entering a numeric selection, to clear all numerical
inputs.
}10 (Double Digit Entries): Press this button to select
chapter or track numbers greater than nine. Press this
button before entering the number.
Battery Replacement
To change the remote control batteries, do the following:
1. Slide the rear cover back on the remote control.
2. Replace the two batteries in the compartment. Make sure that they are installed correctly, using
the diagram on the inside of the battery
compartment.
3. Replace the battery cover.
If the remote control is to be stored for a long period of
time, remove the battery and keep it in a cool, dry
place.
4-132
Page 312 of 550
XM™Satellite Radio Service
XM Satellite Radio Service gives digital radio reception
from coast-to-coast in the 48 contiguous United States,
and in Canada. Just as with FM, tall buildings or hills
can interfere with satellite radio signals, causing the
sound to fade in and out. In addition, traveling or
standing under heavy foliage, bridges, garages,
or tunnels may cause loss of the XM signal for a period
of time.
Cellular Phone Usage
Cellular phone usage may cause interference with the
vehicle's radio. This interference may occur when
making or receiving phone calls, charging the phone's
battery, or simply having the phone on. This
interference causes an increased level of static while
listening to the radio. If static is received while listening
to the radio, unplug the cellular phone and turn it off.
Fixed Mast Antenna
The fixed mast antenna can withstand most car washes
without being damaged as long as it is securely
attached to the base. If the mast becomes slightly bent,
straighten it out by hand. If the mast is badly bent,
replace it.
Occasionally check to make sure the antenna is
tightened to its base. If tightening is required, tighten by
hand until fully seated plus one quarter turn.
XM™Satellite Radio Antenna
System
The XM Satellite Radio antenna is located on the roof of
the vehicle. Keep the antenna clear of obstructions for
clear radio reception.
If the vehicle has a sunroof, the performance of the XM
system may be affected if the sunroof is open.
4-140
Page 341 of 550
To save fuel, run the engine for only short periods as
needed to warm the vehicle and then shut the engine
off and close the window most of the way to save heat.
Repeat this until help arrives but only when you feel
really uncomfortable from the cold. Moving about to
keep warm also helps.
If it takes some time for help to arrive, now and then
when you run the engine, push the accelerator pedal
slightly so the engine runs faster than the idle speed.
This keeps the battery charged to restart the vehicle
and to signal for help with the headlamps. Do this as
little as possible to save fuel.If Your Vehicle is Stuck in Sand,
Mud, Ice, or Snow
Slowly and cautiously spin the wheels to free the
vehicle when stuck in sand, mud, ice, or snow. See
Rocking Your Vehicle to Get It Out on page 5‑30.
If the vehicle has a traction system, it can often help to
free a stuck vehicle. Refer to the vehicle's traction
system in the Index. If stuck too severely for the traction
system to free the vehicle, turn the traction system off
and use the rocking method.
{WARNING:
If you let your vehicle's tires spin at high speed,
they can explode, and you or others could be
injured. The vehicle can overheat, causing an
engine compartment fire or other damage. Spin
the wheels as little as possible and avoid going
above 55 km/h (35 mph) as shown on the
speedometer.
For information about using tire chains on the vehicle,
see Tire Chains on page 6‑85.
5-29
Page 372 of 550
Trailer Wiring Harness
Heavy-Duty Trailer Wiring Harness Package
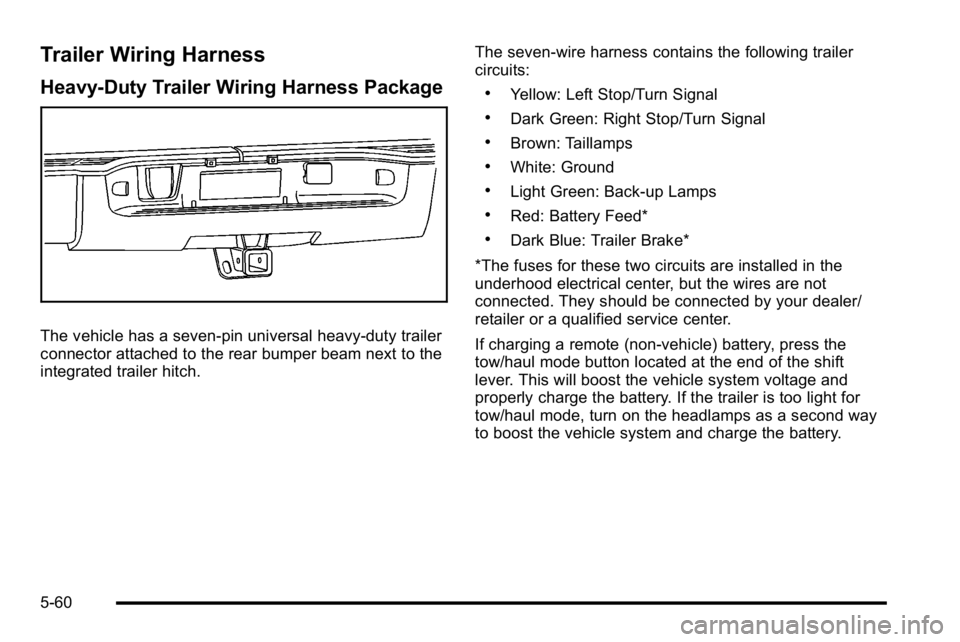
The vehicle has a seven-pin universal heavy-duty trailer
connector attached to the rear bumper beam next to the
integrated trailer hitch.The seven-wire harness contains the following trailer
circuits:
.Yellow: Left Stop/Turn Signal
.Dark Green: Right Stop/Turn Signal
.Brown: Taillamps
.White: Ground
.Light Green: Back-up Lamps
.Red: Battery Feed*
.Dark Blue: Trailer Brake*
*The fuses for these two circuits are installed in the
underhood electrical center, but the wires are not
connected. They should be connected by your dealer/
retailer or a qualified service center.
If charging a remote (non-vehicle) battery, press the
tow/haul mode button located at the end of the shift
lever. This will boost the vehicle system voltage and
properly charge the battery. If the trailer is too light for
tow/haul mode, turn on the headlamps as a second way
to boost the vehicle system and charge the battery.
5-60
Page 373 of 550
Electric Brake Control Wiring
Provisions
These wiring provisions are included with the vehicle as
part of the trailer wiring package. These provisions are
for an electric brake controller. The instrument panel
contains blunt cut wires near the data link connector for
the trailer brake controller. The harness contains the
following wires:
.Dark Blue: Brake Signal to Trailer Connector
.Red/Black: Battery
.Light Blue/White: Brake Switch
.White: Ground
It should be installed by your dealer/retailer or a
qualified service center.
If the vehicle is equipped with an ITBC, the blunt cuts
exist, but are not connected further in the harness. If an
aftermarket trailer brake controller is installed, the ITBC
must be disconnected. Do not power both ITBC and
aftermarket controllers to control the trailer brakes at the
same time.
Trailer Recommendations
Subtract the hitch loads from the Cargo Weight Rating
(CWR). CWR is the maximum weight of the load the
vehicle can carry. It does not include the weight of the
people inside, but you can figure about 150 lbs. (68 kg)
for each passenger. The total cargo load must not be
more than the vehicles CWR.
Weigh the vehicle with the trailer attached, so the
GVWR or GAWR are not exceeded. If using a
weight-distributing hitch, weigh the vehicle without the
spring bars in place.
The best performance is obtained by correctly
spreading out the weight of the load and choosing the
correct hitch and trailer brakes.
For more information see Towing a Trailer
on
page 5‑42.
5-61
Page 375 of 550
Section 6 Service and Appearance Care
Service. . . . . . . . . . . . . . . . . . . . . . . . . . . . . . . . . . . . . . . . . . . . . 6-4
Accessories and Modifications . . . . . . . . . . . . . . . . . . 6-4
California Proposition 65 Warning . . . . . . . . . . . . . . . 6-5
California Perchlorate Materials Requirements . . . . . . . . . . . . . . . . . . . . . . . . . . . . . . . . . 6-5
Doing Your Own Service Work . . . . . . . . . . . . . . . . . . 6-5
Adding Equipment to the Outside of the Vehicle . . . . . . . . . . . . . . . . . . . . . . . . . . . . . . . . . . . . . . . . 6-6
Fuel . . . . . . . . . . . . . . . . . . . . . . . . . . . . . . . . . . . . . . . . . . . . . . . . . 6-6
Gasoline Octane . . . . . . . . . . . . . . . . . . . . . . . . . . . . . . . . 6-7
Gasoline Specifications . . . . . . . . . . . . . . . . . . . . . . . . . 6-7
California Fuel . . . . . . . . . . . . . . . . . . . . . . . . . . . . . . . . . . 6-7
Additives . . . . . . . . . . . . . . . . . . . . . . . . . . . . . . . . . . . . . . . . 6-8
Fuel E85 (85% Ethanol) . . . . . . . . . . . . . . . . . . . . . . . . . 6-9
Fuels in Foreign Countries . . . . . . . . . . . . . . . . . . . . . 6-10
Filling the Tank . . . . . . . . . . . . . . . . . . . . . . . . . . . . . . . . 6-10
Filling a Portable Fuel Container . . . . . . . . . . . . . . . 6-13
Checking Things Under the Hood . . . . . . . . . . . . . . .6-14
Hood Release . . . . . . . . . . . . . . . . . . . . . . . . . . . . . . . . . 6-14
Engine Compartment Overview . . . . . . . . . . . . . . . . 6-16
Engine Oil . . . . . . . . . . . . . . . . . . . . . . . . . . . . . . . . . . . . . 6-18
Engine Oil Life System . . . . . . . . . . . . . . . . . . . . . . . . 6-20
Engine Air Cleaner/Filter . . . . . . . . . . . . . . . . . . . . . . . 6-22
Automatic Transmission Fluid . . . . . . . . . . . . . . . . . . 6-24
Cooling System . . . . . . . . . . . . . . . . . . . . . . . . . . . . . . . . 6-28 Engine Coolant . . . . . . . . . . . . . . . . . . . . . . . . . . . . . . . . 6-29
Engine Overheating . . . . . . . . . . . . . . . . . . . . . . . . . . . 6-34
Overheated Engine Protection
Operating Mode . . . . . . . . . . . . . . . . . . . . . . . . . . . . . 6-37
Engine Fan Noise . . . . . . . . . . . . . . . . . . . . . . . . . . . . . 6-37
Power Steering Fluid . . . . . . . . . . . . . . . . . . . . . . . . . . 6-38
Windshield Washer Fluid . . . . . . . . . . . . . . . . . . . . . . 6-39
Brakes . . . . . . . . . . . . . . . . . . . . . . . . . . . . . . . . . . . . . . . . . 6-40
Battery . . . . . . . . . . . . . . . . . . . . . . . . . . . . . . . . . . . . . . . . . 6-43
Jump Starting . . . . . . . . . . . . . . . . . . . . . . . . . . . . . . . . . . 6-44
All-Wheel Drive . . . . . . . . . . . . . . . . . . . . . . . . . . . . . . . . . . . 6-49
Rear Axle . . . . . . . . . . . . . . . . . . . . . . . . . . . . . . . . . . . . . . . . . 6-50
Front Axle . . . . . . . . . . . . . . . . . . . . . . . . . . . . . . . . . . . . . . . . . 6-51
Headlamp Aiming . . . . . . . . . . . . . . . . . . . . . . . . . . . . . . . . 6-52
Bulb Replacement . . . . . . . . . . . . . . . . . . . . . . . . . . . . . . . . 6-55
Halogen Bulbs . . . . . . . . . . . . . . . . . . . . . . . . . . . . . . . . . 6-55
Headlamps . . . . . . . . . . . . . . . . . . . . . . . . . . . . . . . . . . . . 6-55
Center High-Mounted Stoplamp (CHMSL) and Cargo Lamp . . . . . . . . . . . . . . . . . . . . . . . . . . . . . 6-57
Taillamps, Turn Signal, Stoplamps and Back-up Lamps . . . . . . . . . . . . . . . . . . . . . . . . . . . . . . 6-58
License Plate Lamp . . . . . . . . . . . . . . . . . . . . . . . . . . . . 6-60
Replacement Bulbs . . . . . . . . . . . . . . . . . . . . . . . . . . . . 6-60
Windshield Wiper Blade Replacement . . . . . . . . . . .6-61
6-1