2010 GMC SIERRA DENALI change wheel
[x] Cancel search: change wheelPage 5 of 550

Vehicle Symbol Chart
Here are some additional symbols that may be found on
the vehicle and what they mean. For more information
on the symbol, refer to the index.
0:Adjustable Pedals
9:Airbag Readiness Light
#:Air Conditioning
!:Antilock Brake System (ABS)
g:Audio Steering Wheel Controls or OnStar®
$: Brake System Warning Light
":Charging System
I:Cruise Control
B: Engine Coolant Temperature
O:Exterior Lamps
#:Fog Lamps
.: Fuel Gage
+:Fuses
i: Headlamp High/Low-Beam Changer
j:LATCH System Child Restraints
*: Malfunction Indicator Lamp
::Oil Pressure
g:Outside Power Foldaway Mirrors
}:Power
/:Remote Vehicle Start
>:Safety Belt Reminders
7:Tire Pressure Monitor
_: Tow/Haul Mode
F:Traction Control
M:Windshield Washer Fluid
v
Page 26 of 550

Steering Wheel Controls
For vehicles with audio
steering wheel controls,
some audio controls can
be adjusted at the
steering wheel.
w/x:Press to change favorite radio stations, select
tracks on a CD/DVD, or to navigate tracks or folders on
an iPod
®or USB device.
b g:Press to silence the vehicle speakers only. Press
again to turn the sound on. Press and hold longer than
two seconds to interact with OnStar
®or Bluetooth
systems, if equipped.
+
e−e: Increases or decreases volume.
c:Press to reject an incoming call, or to end a call.
SRCE : Press to switch between the radio, CD, and for
vehicles with, DVD, front auxiliary, and rear auxiliary.
¨: Press to seek the next radio station, the next track
or chapter while sourced to the CD or DVD slot, or to
select tracks and folders on an iPod
®or USB device.
For more information, see Audio Steering Wheel
Controls on page 4‑137.
Bluetooth®
For vehicles with an in-vehicle Bluetooth system, it
allows users with a Bluetooth enabled cell phone to
make and receive hands-free calls using the vehicle’s
audio system and controls.
The Bluetooth enabled cell phone must be paired with
the in-vehicle Bluetooth system before it can be used in
the vehicle. Not all phones will support all functions. For
more information visit www.gm.com/bluetooth.
For more information, see Bluetooth
®on page 4‑115.
Navigation System
The vehicle's navigation system provides detailed maps
of most major freeways and roads throughout the
United States and Canada. After a destination has been
set, the system provides turn-by-turn instructions for
reaching the destination. In addition, the system can
help locate a variety of points of interest (POI), such as
banks, airports, restaurants, and more.
See the vehicle's Navigation System manual for more
information.
1-20
Page 108 of 550

Adding Equipment to Your
Airbag-Equipped Vehicle
Q: Is there anything I might add to or change aboutthe vehicle that could keep the airbags from
working properly?
A: Yes. If you add things that change the vehicle's
frame, bumper system, height, front end or side
sheet metal, they may keep the airbag system from
working properly. Changing or moving any parts of
the front seats, safety belts, the airbag sensing and
diagnostic module, steering wheel, instrument panel,
roof-rail airbag modules, ceiling headliner or pillar
garnish trim, overhead console, front sensors, side
impact sensors, rollover sensor module, or airbag
wiring can affect the operation of the airbag system.
In addition, the vehicle may have a passenger
sensing system for the right front passenger
position, which includes sensors that are part of the
passenger seat. The passenger sensing system
may not operate properly if the original seat trim is
replaced with non-GM covers, upholstery or trim,
or with GM covers, upholstery or trim designed for a
different vehicle. Any object, such as an aftermarket
seat heater or a comfort enhancing pad or device,
installed under or on top of the seat fabric, could
also interfere with the operation of the passenger
sensing system. This could either prevent proper deployment of the passenger airbag(s) or prevent
the passenger sensing system from properly turning
off the passenger airbag(s). See
Passenger Sensing
System on page 2‑66.
If you have any questions, call Customer
Assistance. The phone numbers and addresses for
Customer Assistance are in Step Two of the
Customer Satisfaction Procedure in this manual.
See Customer Satisfaction Procedure on page 8‑2.
If the vehicle has rollover roof-rail airbags, see
Different Size Tires and Wheels
on page 6‑82for
additional important information.
Q: Because I have a disability, I have to get my vehicle modified. How can I find out whether this
will affect my airbag system?
A: If you have questions, call Customer Assistance.
The phone numbers and addresses for Customer
Assistance are in Step Two of the Customer
Satisfaction Procedure in this manual. See
Customer Satisfaction Procedure on page 8‑2.
In addition, your dealer/retailer and the service manual
have information about the location of the airbag
sensors, sensing and diagnostic module and airbag
wiring.
2-72
Page 173 of 550
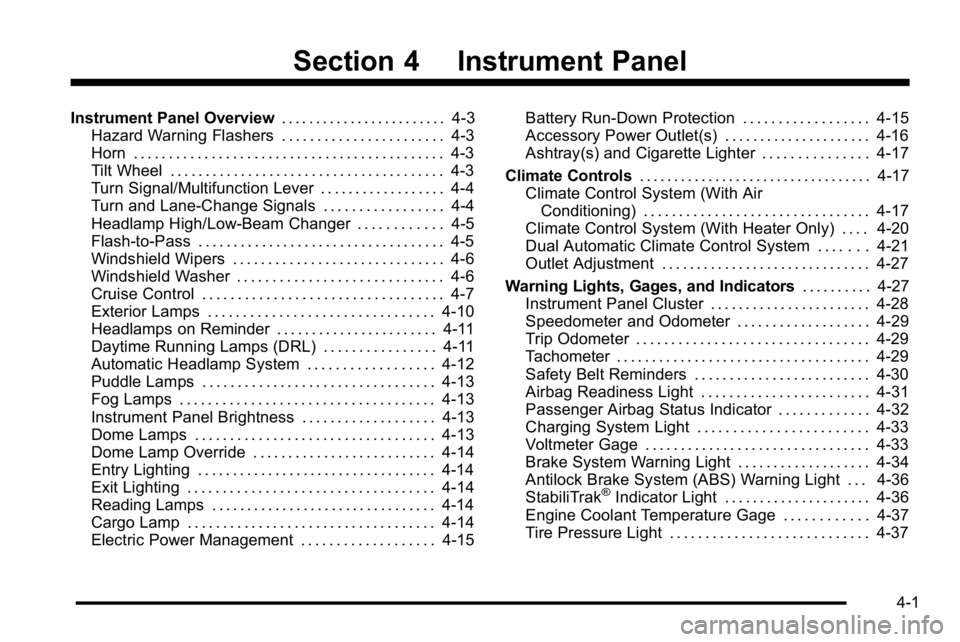
Section 4 Instrument Panel
Instrument Panel Overview. . . . . . . . . . . . . . . . . . . . . . . .4-3
Hazard Warning Flashers . . . . . . . . . . . . . . . . . . . . . . . 4-3
Horn . . . . . . . . . . . . . . . . . . . . . . . . . . . . . . . . . . . . . . . . . . . . 4-3
Tilt Wheel . . . . . . . . . . . . . . . . . . . . . . . . . . . . . . . . . . . . . . . 4-3
Turn Signal/Multifunction Lever . . . . . . . . . . . . . . . . . . 4-4
Turn and Lane-Change Signals . . . . . . . . . . . . . . . . . 4-4
Headlamp High/Low-Beam Changer . . . . . . . . . . . . 4-5
Flash-to-Pass . . . . . . . . . . . . . . . . . . . . . . . . . . . . . . . . . . . 4-5
Windshield Wipers . . . . . . . . . . . . . . . . . . . . . . . . . . . . . . 4-6
Windshield Washer . . . . . . . . . . . . . . . . . . . . . . . . . . . . . 4-6
Cruise Control . . . . . . . . . . . . . . . . . . . . . . . . . . . . . . . . . . 4-7
Exterior Lamps . . . . . . . . . . . . . . . . . . . . . . . . . . . . . . . . 4-10
Headlamps on Reminder . . . . . . . . . . . . . . . . . . . . . . . 4-11
Daytime Running Lamps (DRL) . . . . . . . . . . . . . . . . 4-11
Automatic Headlamp System . . . . . . . . . . . . . . . . . . 4-12
Puddle Lamps . . . . . . . . . . . . . . . . . . . . . . . . . . . . . . . . . 4-13
Fog Lamps . . . . . . . . . . . . . . . . . . . . . . . . . . . . . . . . . . . . 4-13
Instrument Panel Brightness . . . . . . . . . . . . . . . . . . . 4-13
Dome Lamps . . . . . . . . . . . . . . . . . . . . . . . . . . . . . . . . . . 4-13
Dome Lamp Override . . . . . . . . . . . . . . . . . . . . . . . . . . 4-14
Entry Lighting . . . . . . . . . . . . . . . . . . . . . . . . . . . . . . . . . . 4-14
Exit Lighting . . . . . . . . . . . . . . . . . . . . . . . . . . . . . . . . . . . 4-14
Reading Lamps . . . . . . . . . . . . . . . . . . . . . . . . . . . . . . . . 4-14
Cargo Lamp . . . . . . . . . . . . . . . . . . . . . . . . . . . . . . . . . . . 4-14
Electric Power Management . . . . . . . . . . . . . . . . . . . 4-15 Battery Run-Down Protection . . . . . . . . . . . . . . . . . . 4-15
Accessory Power Outlet(s) . . . . . . . . . . . . . . . . . . . . . 4-16
Ashtray(s) and Cigarette Lighter . . . . . . . . . . . . . . . 4-17
Climate Controls . . . . . . . . . . . . . . . . . . . . . . . . . . . . . . . . . . 4-17
Climate Control System (With Air
Conditioning) . . . . . . . . . . . . . . . . . . . . . . . . . . . . . . . . 4-17
Climate Control System (With Heater Only) . . . . 4-20
Dual Automatic Climate Control System . . . . . . . 4-21
Outlet Adjustment . . . . . . . . . . . . . . . . . . . . . . . . . . . . . . 4-27
Warning Lights, Gages, and Indicators . . . . . . . . . .4-27
Instrument Panel Cluster . . . . . . . . . . . . . . . . . . . . . . . 4-28
Speedometer and Odometer . . . . . . . . . . . . . . . . . . . 4-29
Trip Odometer . . . . . . . . . . . . . . . . . . . . . . . . . . . . . . . . . 4-29
Tachometer . . . . . . . . . . . . . . . . . . . . . . . . . . . . . . . . . . . . 4-29
Safety Belt Reminders . . . . . . . . . . . . . . . . . . . . . . . . . 4-30
Airbag Readiness Light . . . . . . . . . . . . . . . . . . . . . . . . 4-31
Passenger Airbag Status Indicator . . . . . . . . . . . . . 4-32
Charging System Light . . . . . . . . . . . . . . . . . . . . . . . . 4-33
Voltmeter Gage . . . . . . . . . . . . . . . . . . . . . . . . . . . . . . . . 4-33
Brake System Warning Light . . . . . . . . . . . . . . . . . . . 4-34
Antilock Brake System (ABS) Warning Light . . . 4-36
StabiliTrak
®Indicator Light . . . . . . . . . . . . . . . . . . . . . 4-36
Engine Coolant Temperature Gage . . . . . . . . . . . . 4-37
Tire Pressure Light . . . . . . . . . . . . . . . . . . . . . . . . . . . . 4-37
4-1
Page 179 of 550
Cruise Control
{WARNING:
Cruise control can be dangerous where you
cannot drive safely at a steady speed. So, do not
use the cruise control on winding roads or in
heavy traffic.
Cruise control can be dangerous on slippery
roads. On such roads, fast changes in tire traction
can cause excessive wheel slip, and you could
lose control. Do not use cruise control on slippery
roads.
With cruise control, a speed of about 40 km/h (25 mph)
or more can be maintained without keeping your foot on
the accelerator. Cruise control does not work at speeds
below about 40 km/h (25 mph).
When the brakes are applied, the cruise control
turns off.
If your vehicle has the Stabilitrak
®system and begins to
limit wheel spin while you are using cruise control, the
cruise control will automatically disengage. See
StabiliTrak
®Systemon page 5‑6. When road
conditions allow the cruise control to be safely used
again, it can be turned back on.
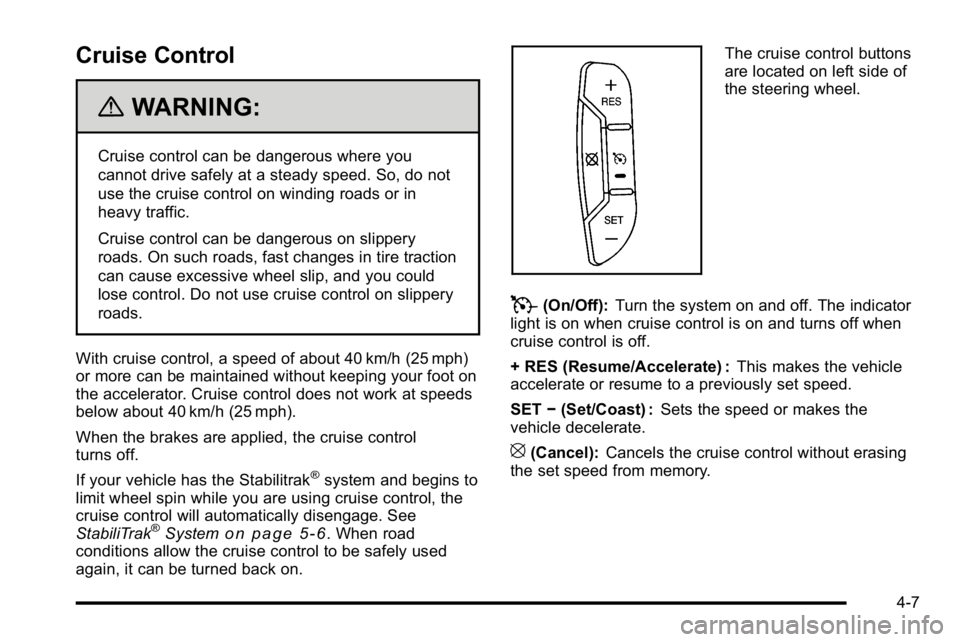
The cruise control buttons
are located on left side of
the steering wheel.
T(On/Off): Turn the system on and off. The indicator
light is on when cruise control is on and turns off when
cruise control is off.
+ RES (Resume/Accelerate) : This makes the vehicle
accelerate or resume to a previously set speed.
SET −(Set/Coast) : Sets the speed or makes the
vehicle decelerate.
[(Cancel): Cancels the cruise control without erasing
the set speed from memory.
4-7
Page 182 of 550
Exterior Lamps
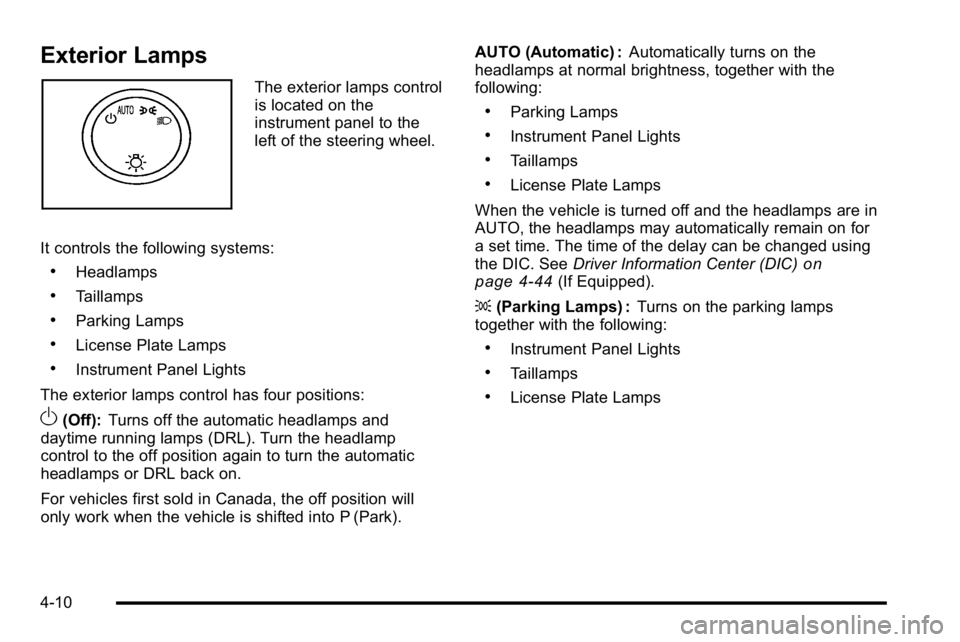
The exterior lamps control
is located on the
instrument panel to the
left of the steering wheel.
It controls the following systems:
.Headlamps
.Taillamps
.Parking Lamps
.License Plate Lamps
.Instrument Panel Lights
The exterior lamps control has four positions:
O(Off): Turns off the automatic headlamps and
daytime running lamps (DRL). Turn the headlamp
control to the off position again to turn the automatic
headlamps or DRL back on.
For vehicles first sold in Canada, the off position will
only work when the vehicle is shifted into P (Park). AUTO (Automatic) :
Automatically turns on the
headlamps at normal brightness, together with the
following:
.Parking Lamps
.Instrument Panel Lights
.Taillamps
.License Plate Lamps
When the vehicle is turned off and the headlamps are in
AUTO, the headlamps may automatically remain on for
a set time. The time of the delay can be changed using
the DIC. See Driver Information Center (DIC)
on
page 4‑44(If Equipped).
; (Parking Lamps) : Turns on the parking lamps
together with the following:
.Instrument Panel Lights
.Taillamps
.License Plate Lamps
4-10
Page 288 of 550
Bluetooth Controls
Use the buttons located on the steering wheel to
operate the in‐vehicle Bluetooth system. SeeAudio
Steering Wheel Controls
on page 4‑137for more
information.
b g(Push To Talk) : Press to answer incoming calls,
to confirm system information, and to start speech
recognition.
c x(Phone On Hook): Press to end a call, reject a
call, or to cancel an operation.
Pairing
A Bluetooth enabled cell phone must be paired to the
in‐vehicle Bluetooth system first and then connected to
the vehicle before it can be used. See the cell phone
manufacturers user guide for Bluetooth functions before
pairing the cell phone. If a Bluetooth phone is not
connected, calls will be made using OnStar
®
Hands‐Free Calling, if available. Refer to the OnStar
owner's guide for more information. Pairing Information:
.Up to five cell phones can be paired to the
in‐vehicle Bluetooth system.
.The pairing process is disabled when the vehicle is
moving.
.The in‐vehicle Bluetooth system automatically links
with the first available paired cell phone in the
order the phone was paired.
.Only one paired cell phone can be connected to
the in‐vehicle Bluetooth system at a time.
.Pairing should only need to be completed once,
unless changes to the pairing information have
been made or the phone is deleted.
To link to a different paired phone, see Linking to a
Different Phone later in this section.
4-116
Page 317 of 550
Let us say the road is wet and you are driving safely.
Suddenly, an animal jumps out in front of you. You slam
on the brakes and continue braking. Here is what
happens with ABS:
A computer senses that the wheels are slowing down.
If one of the wheels is about to stop rolling, the
computer will separately work the brakes at each front
wheel and at both rear wheels.
ABS can change the brake pressure to each wheel, as
required, faster than any driver could. This can help the
driver steer around the obstacle while braking hard.
As the brakes are applied, the computer keeps
receiving updates on wheel speed and controls braking
pressure accordingly.
Remember: ABS does not change the time needed to
get a foot up to the brake pedal or always decrease
stopping distance. If you get too close to the vehicle in
front of you, there will not be enough time to apply the
brakes if that vehicle suddenly slows or stops. Always
leave enough room up ahead to stop, even with ABS.
Using ABS
Do not pump the brakes. Just hold the brake pedal
down firmly and let antilock work. The brakes might
vibrate or some noise might be heard, but this is
normal.
Braking in Emergencies
ABS allows the driver to steer and brake at the same
time. In many emergencies, steering can help more
than even the very best braking.
Brake Assist
This vehicle has a Brake Assist feature designed to
assist the driver in stopping or decreasing vehicle
speed in emergency driving conditions. This feature
uses the stability system hydraulic brake control module
to supplement the power brake system under conditions
where the driver has quickly and forcefully applied the
brake pedal in an attempt to quickly stop or slow down
the vehicle. The stability system hydraulic brake control
module increases brake pressure at each corner of the
vehicle until the ABS activates. Minor brake pedal
pulsations or pedal movement during this time is normal
and the driver should continue to apply the brake pedal
as the driving situation dictates The Brake Assist
feature will automatically disengage when the brake
pedal is released or brake pedal pressure is quickly
decreased.
5-5