Page 277 of 424

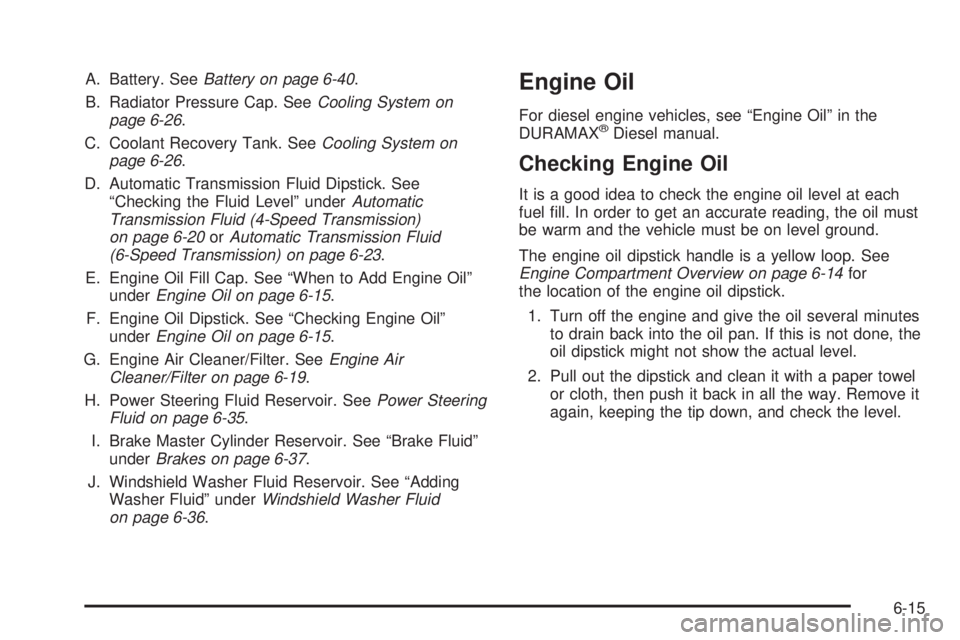
A. Battery. SeeBattery on page 6-40.
B. Radiator Pressure Cap. SeeCooling System on
page 6-26.
C. Coolant Recovery Tank. SeeCooling System on
page 6-26.
D. Automatic Transmission Fluid Dipstick. See
“Checking the Fluid Level” underAutomatic
Transmission Fluid (4-Speed Transmission)
on page 6-20orAutomatic Transmission Fluid
(6-Speed Transmission) on page 6-23.
E. Engine Oil Fill Cap. See “When to Add Engine Oil”
underEngine Oil on page 6-15.
F. Engine Oil Dipstick. See “Checking Engine Oil”
underEngine Oil on page 6-15.
G. Engine Air Cleaner/Filter. SeeEngine Air
Cleaner/Filter on page 6-19.
H. Power Steering Fluid Reservoir. SeePower Steering
Fluid on page 6-35.
I. Brake Master Cylinder Reservoir. See “Brake Fluid”
underBrakes on page 6-37.
J. Windshield Washer Fluid Reservoir. See “Adding
Washer Fluid” underWindshield Washer Fluid
on page 6-36.Engine Oil
For diesel engine vehicles, see “Engine Oil” in the
DURAMAX®Diesel manual.
Checking Engine Oil
It is a good idea to check the engine oil level at each
fuel fill. In order to get an accurate reading, the oil must
be warm and the vehicle must be on level ground.
The engine oil dipstick handle is a yellow loop. See
Engine Compartment Overview on page 6-14for
the location of the engine oil dipstick.
1. Turn off the engine and give the oil several minutes
to drain back into the oil pan. If this is not done, the
oil dipstick might not show the actual level.
2. Pull out the dipstick and clean it with a paper towel
or cloth, then push it back in all the way. Remove it
again, keeping the tip down, and check the level.
6-15
Page 289 of 424

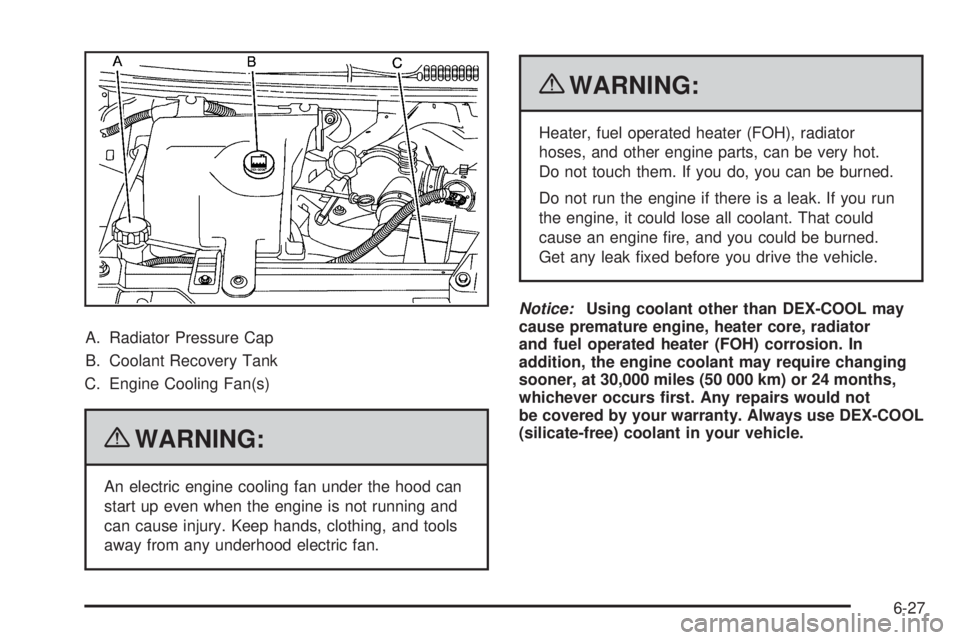
A. Radiator Pressure Cap
B. Coolant Recovery Tank
C. Engine Cooling Fan(s)
{WARNING:
An electric engine cooling fan under the hood can
start up even when the engine is not running and
can cause injury. Keep hands, clothing, and tools
away from any underhood electric fan.
{WARNING:
Heater, fuel operated heater (FOH), radiator
hoses, and other engine parts, can be very hot.
Do not touch them. If you do, you can be burned.
Do not run the engine if there is a leak. If you run
the engine, it could lose all coolant. That could
cause an engine fire, and you could be burned.
Get any leak fixed before you drive the vehicle.
Notice:Using coolant other than DEX-COOL may
cause premature engine, heater core, radiator
and fuel operated heater (FOH) corrosion. In
addition, the engine coolant may require changing
sooner, at 30,000 miles (50 000 km) or 24 months,
whichever occurs �rst. Any repairs would not
be covered by your warranty. Always use DEX-COOL
(silicate-free) coolant in your vehicle.
6-27
Page 292 of 424
How to Add Coolant to the Radiator
If your vehicle has a diesel engine, see “How to
Add Coolant to the Radiator” under “Van Models” in the
Cooling System section of the DURAMAX
®Diesel
Supplement for the proper radiator fill procedure.
{WARNING:
An electric engine cooling fan under the hood can
start up even when the engine is not running and
can cause injury. Keep hands, clothing, and tools
away from any underhood electric fan.
{WARNING:
Steam and scalding liquids from a hot cooling
system can blow out and burn you badly. They are
under pressure, and if you turn the surge tank
pressure cap — even a little — they can come out
at high speed. Never turn the cap when the
cooling system, including the surge tank pressure
cap, is hot. Wait for the cooling system and surge
tank pressure cap to cool if you ever have to turn
the pressure cap.
If coolant is needed, add the proper mixture directly to
the radiator, but be sure the cooling system is cool
before this is done.
6-30
Page 293 of 424
1. You can remove the radiator pressure cap when
the cooling system, including the radiator pressure
cap and upper radiator hose, is no longer hot.
Turn the pressure cap slowly counterclockwise until
it first stops. Do not press down while turning the
pressure cap.
If you hear a hiss, wait for that to stop. A hiss
means there is still some pressure left.
2. Then keep turning the pressure cap, but now push
down as you turn it. Remove the pressure cap.3. Fill the radiator with the proper DEX-COOL®
coolant mixture, up to the base of the filler
neck. SeeEngine Coolant on page 6-28for more
information about the proper coolant mixture.
6-31
Page 294 of 424
4. Then fill the coolant recovery tank to the COLD
FILL mark.
5. Put the cap back on the coolant recovery tank, but
leave the radiator pressure cap off.6. Start the engine and let it run until you can feel the
upper radiator hose getting hot. Watch out for the
engine cooling fan.
7. By this time, the coolant level inside the radiator
filler neck may be lower. If the level is lower, add
more of the proper DEX-COOL
®coolant mixture
through the filler neck until the level reaches
the base of the filler neck.
8. Then replace the pressure cap. At any time during
this procedure if coolant begins to flow out of the
filler neck, reinstall the pressure cap.
Notice:If the pressure cap is not tightly installed,
coolant loss and possible engine damage may occur.
Be sure the cap is properly and tightly secured.
6-32
Page 379 of 424

•Vehicles with diesel engine or GVWR above
4 536 kg (10,000 lbs) only: Shields inspection
for damage or looseness. Adjust or replace as
required. This is a Noise Emission Control Service.
Applicable to vehicles sold in the United States
and recommended for vehicles sold in Canada.
Additional Required Services
At the First 160 km/100 Miles, 1 600 km/
1,000 Miles, and 10 000 km/6,000 Miles
•
For vehicles with dual wheels: Check dual wheel nut
torque. For proper torque, seeCapacities and
Speci�cations on page 6-110.
At Each Fuel Stop
•
Engine oil level check. SeeEngine Oil on
page 6-15.
•Engine coolant level check. SeeEngine Coolant on
page 6-28.
•Windshield washer fluid level check. SeeWindshield
Washer Fluid on page 6-36.
Once a Month
•
Tire inflation check. SeeIn�ation - Tire Pressure on
page 6-63.
•Tire wear inspection. SeeTire Inspection and
Rotation on page 6-69.
Once a Year
•
Starter switch check. SeeOwner Checks and
Services on page 7-9.
•Parking brake and automatic transmission P (Park)
mechanism check. SeeOwner Checks and
Services on page 7-9.
•Automatic transmission shiftlock control system
check. SeeOwner Checks and Services on
page 7-9.
•Ignition transmission lock check. SeeOwner
Checks and Services on page 7-9.
•Engine cooling system and pressure cap pressure
check. Radiator and air conditioning condenser
outside cleaning. SeeCooling System on
page 6-26.
•Exhaust system and nearby heat shields inspection
for loose or damaged components.
•Throttle system inspection for interference, binding
or for damaged or missing parts. Replace parts as
needed. Replace any components that have
high effort or excessive wear. Do not lubricate
accelerator or cruise control cables.
First Engine Oil Change After Every
40 000 km/25,000 Miles
•
Fuel system inspection for damage or leaks.
7-5
Page 381 of 424

First Engine Oil Change After Every
160 000 km/100,000 Miles
•
Automatic transmission fluid change (normal
service). SeeAutomatic Transmission Fluid
(4-Speed Transmission) on page 6-20orAutomatic
Transmission Fluid (6-Speed Transmission) on
page 6-23.
•All-wheel drive only: Transfer case fluid change
(normal service). Check vent hose at transfer
case for kinks and proper installation. Check to be
sure vent hose is unobstructed, clear, and free
of debris. During any maintenance, if a power
washer is used to clean mud and dirt from the
underbody, care should be taken to not directly
spray the transfer case output seals. High pressure
water can overcome the seals and contaminate
the transfer case fluid. Contaminated fluid will
decrease the life of the transfer case and should be
replaced.
•Spark plug replacement and spark plug wires
inspection.An Emission Control Service.
First Engine Oil Change After Every
240 000 km/150,000 Miles
•
Engine cooling system drain, flush, and refill,
cooling system and cap pressure check, and
cleaning of outside of radiator and air conditioning
condenser (or every 5 years, whichever occurs
first). SeeEngine Coolant on page 6-28.An
Emission Control Service.
•Engine accessory drive belt inspection for fraying,
excessive cracks, or obvious damage and
replacement, if needed.An Emission Control
Service.
7-7