2010 GMC CANYON clock
[x] Cancel search: clockPage 21 of 448

Vehicle Features
Radio(s)
PWR:Press to turn the system on and off.
qVOLr:Turn to increase or decrease the volume.
BAND:Press to switch between FM1, FM2, AM,
or XM1 or XM2 (if equipped). The selection displays.
qTUNEr:Turn to select radio stations.
qSEEKr:Press to go to the previous or to the next
station and stay there.
For more information about these and other radio
features, seeAudio System(s) on page 4-42.
Setting Preset Stations
Radio stations are stored as presets.
For vehicles with an XM radio, a maximum of
30 stations can be stored as presets using the
six numbered pushbuttons.
If the radio does not have XM, up to 18 stations
(six FM1, six FM2, and six AM), can be programmed on
the six numbered buttons.
See Setting Preset Stations underRadio(s) on page 4-43.
Setting the Clock
To set the time and date for the radio with
CD (MP3/WMA):
Press and hold the HR button until the correct hour
displays. Press and hold the MIN button until the correct
minute displays. The time can be set with the ignition
on or off. Radio with CD (MP3/WMA)
1-15
Page 22 of 448

To synchronize the time with an FM station broadcasting
Radio Data System (RDS) information, press and
hold the HR and MIN buttons at the same time until
RDS TIME displays. To accept this time, press and hold
the HR and MIN buttons, at the same time, for another
two seconds. If the time is not available from the station,
NO UPDAT (update) displays.
RDS time is broadcast once a minute. After tuning to an
RDS broadcast station, it could take a few minutes
for the time to update.
For detailed instructions on setting the clock for your
specific audio system, seeSetting the Clock on
page 4-43.
Satellite Radio
XM is a satellite radio service that is based in the 48
contiguous United States and 10 Canadian provinces.
XM satellite radio has a wide variety of programming
and commercial-free music, coast-to-coast, and in
digital-quality sound.
A fee is required to receive the XM service.
For more information, refer to:
•www.xmradio.com or call 1-800-929-2100 (U.S.)
•www.xmradio.ca or call 1-877-438-9677 (Canada)See “XM Satellite Radio Service” underRadio(s) on
page 4-43andXM Radio Messages on page 4-60.
Driver Information Center (DIC)
The DIC is located on the instrument panel cluster. It
displays the status of many vehicle systems and enables
some features to be personalized.
Use the trip reset stem located on the instrument panel
cluster to scroll through the available functions. For
more information, seeDIC Operation and Displays on
page 4-33.
Vehicle Personalization
Some vehicle features can be personalized through the
DIC. These features include:
•Language: English, Spanish, or French
•Automatic Door Locks
•RKE Feedback
For more information, seeDIC Operation and Displays
on page 4-33.
1-16
Page 118 of 448

Tailgate
{WARNING:
It is extremely dangerous to ride on the tailgate,
even when the vehicle is operated at low speeds.
People riding on the tailgate can easily lose their
balance and fall in response to vehicle maneuvers.
Falling from a moving vehicle may result in serious
injuries or death. Do not allow people to ride on
the tailgate. Be sure everyone in your vehicle is in
a seat and using a safety belt properly.
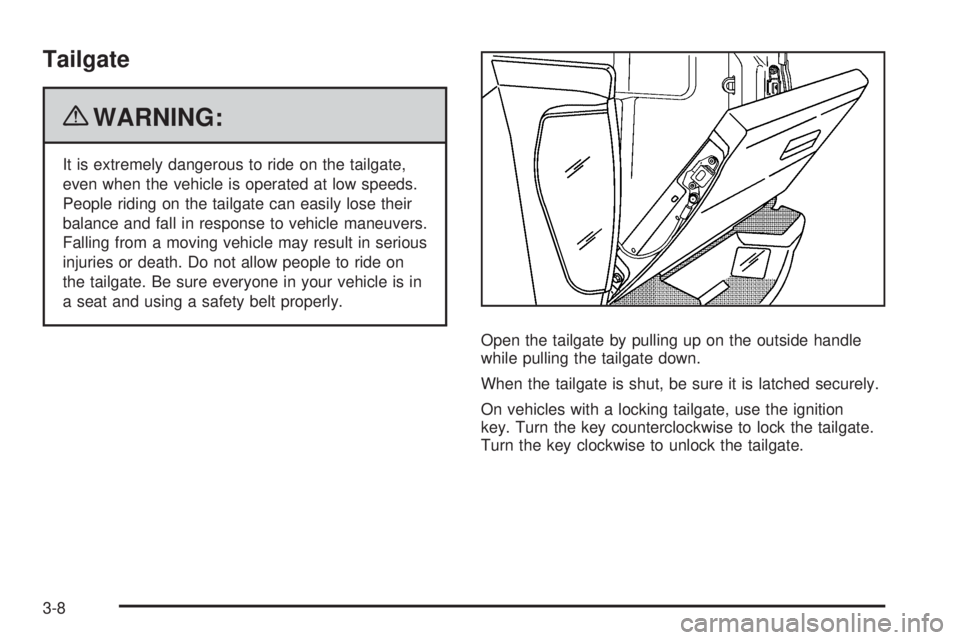
Open the tailgate by pulling up on the outside handle
while pulling the tailgate down.
When the tailgate is shut, be sure it is latched securely.
On vehicles with a locking tailgate, use the ignition
key. Turn the key counterclockwise to lock the tailgate.
Turn the key clockwise to unlock the tailgate.
3-8
Page 146 of 448

Mirrors
Manual Rearview Mirror
Hold the inside rearview mirror in the center to move it
for a clearer view of behind your vehicle. Adjust the
mirror to avoid glare from the headlamps behind you.
Push the tab forward for daytime use and pull it for
nighttime use.
Vehicles with OnStar
®have three additional control
buttons located at the bottom of the mirror. See
your dealer/retailer for more information on the system
and how to subscribe to OnStar. See the OnStar
®
owners guide for more information about the services
OnStar provides.
Adjust this type of mirror to avoid glare from the
headlamps behind you by turning the knob
counterclockwise for nighttime driving and clockwise for
daytime driving.
Cleaning the Mirror
Do not spray glass cleaner directly on the mirror. Use a
soft towel dampened with water.
Automatic Dimming Rearview Mirror
The vehicle may have an automatic dimming inside
rearview mirror. Automatic dimming reduces the glare of
lights from behind the vehicle.
The mirror may also have OnStar
®and/or a compass
and outside temperature display.
Control buttons for the OnStar
®system are at the
bottom of the mirror. See the OnStar®owners guide for
more information about the services OnStar®provides.
SeeCompass on page 3-37for more information
about the compass display. See “Temperature Display”
after, for more information about the outside
temperature display.
AUTO/
(/O(On/Off):Press and hold AUTO /(for
about three seconds or depending on the mirror,
press
Oto turn automatic dimming on or off.
The automatic dimming feature comes on and the
indicator light illuminates each time the vehicle is
started.
3-36
Page 154 of 448

Driver Information Center (DIC).......................4-33
DIC Operation and Displays...........................4-33
DIC Warnings and Messages.........................4-37
Audio System(s).............................................4-42
Setting the Clock..........................................4-43
Radio(s)......................................................4-43
Using an MP3..............................................4-56XM Radio Messages.....................................4-60
Theft-Deterrent Feature..................................4-61
Radio Reception...........................................4-61
Fixed Mast Antenna......................................4-63
XM™ Satellite Radio Antenna System.............4-63
Chime Level Adjustment................................4-63
Section 4 Instrument Panel
4-2
Page 168 of 448

Ashtray(s) and Cigarette Lighter
The vehicle may have a removable ashtray and cigarette
lighter.
The ashtray is located in the center console area.
The ashtray can be removed for cleaning. When the
ashtray is removed, this area can also be used as
a cupholder.
Notice:If papers, pins, or other �ammable items
are put in the ashtray, hot cigarettes or other
smoking materials could ignite them and possibly
damage the vehicle. Never put �ammable items
in the ashtray.
To use the lighter, press it in all the way, and let go.
When it is ready, it will pop back out by itself.
Notice:Holding a cigarette lighter in while it is
heating does not let the lighter back away from
the heating element when it is hot. Damage from
overheating can occur to the lighter or heating
element, or a fuse could be blown. Do not hold
a cigarette lighter in while it is heating.
Climate Controls
Climate Control System
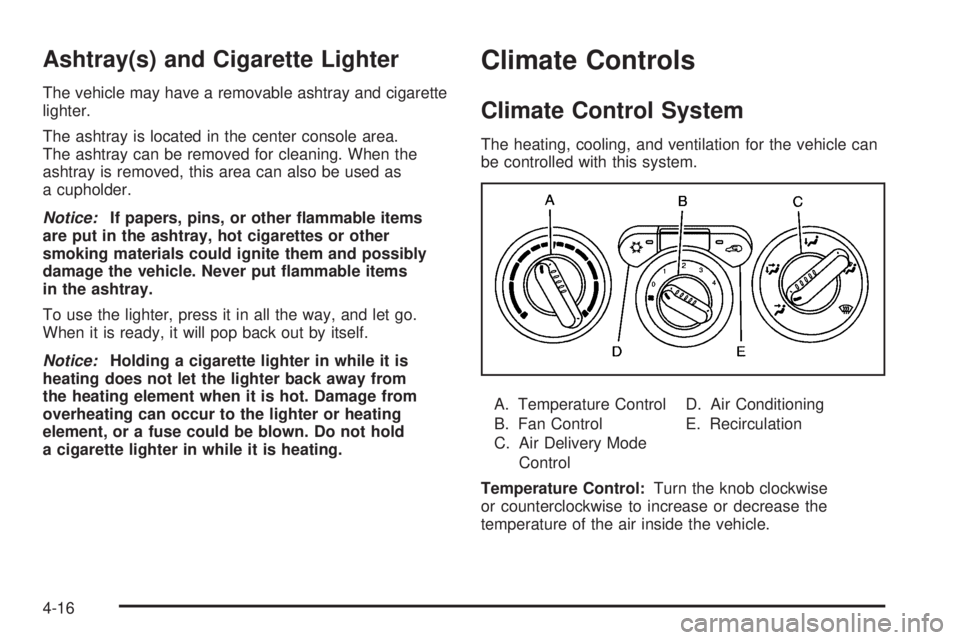
The heating, cooling, and ventilation for the vehicle can
be controlled with this system.
A. Temperature Control
B. Fan Control
C. Air Delivery Mode
ControlD. Air Conditioning
E. Recirculation
Temperature Control:Turn the knob clockwise
or counterclockwise to increase or decrease the
temperature of the air inside the vehicle.
4-16
Page 169 of 448

9(Fan Control):Turn the knob clockwise or
counterclockwise to increase or decrease the fan speed.
If the knob is set on “0” (zero), some outside air will
still enter the vehicle and will be directed according to
the position of the mode knob.
Air Delivery Mode Control:Turn the knob clockwise
or counterclockwise to change the current airflow mode.
Select from the following modes:
H(Vent):Air is directed to the instrument panel
outlets.
\(Bi-Level):Air is divided between the instrument
panel outlets and floor and side window outlets. Cooler
air is directed to the upper outlets and warmer air to
the floor outlets.
[(Floor):Air is directed to the floor outlets.
Recirculation cannot be selected while in floor mode
because this could cause the interior window to fog.
/(Floor/Defog):This mode clears the windows of
fog or moisture. Air is directed to the floor, windshield,
and side window outlets. When this mode is selected,
the system runs the air conditioning compressor unless
the outside temperature is near freezing or below.
Recirculation is not available in this mode.
0(Defrost):This mode clears the windshield of fog or
frost more quickly. Air is directed to the windshield and
side window outlets. When this mode is selected, the
system runs the air conditioning compressor unless
the outside temperature is near, or below freezing.
Recirculation is not available in this mode.
Do not drive the vehicle until all the windows are clear.
#(Air Conditioning):Press to turn the air conditioning
system on or off. An indicator light on the button comes
on to show that the air conditioning is on.
The fan control must be on to use the air conditioning.
There might be a slight change in engine performance
when the air conditioning compressor shuts off and turns
on again. This is normal. The system is designed to
make adjustments to help with fuel economy while still
maintaining the selected temperature.
The air conditioning system removes moisture from
the air, so a small amount of water might drip under
the vehicle while idling or after turning off the engine.
This is normal.
@(Recirculation):Press to turn the recirculation
mode on or off. An indicator light on the button comes
on to show that the recirculation mode is on. This mode
recirculates and helps to quickly cool the air inside the
vehicle. It can be used to prevent outside air and odors
from entering the vehicle.
4-17
Page 195 of 448

Setting the Clock
AM-FM Radio
Press and hold HR until the correct hour displays.
Press and hold MIN until the correct minute displays.
There is an initial two-second delay before the clock
goes into time-set mode. To display the time with the
ignition off, press RCL, HR, or MIN.
Radio with CD (MP3/WMA)
Press and hold the HR button until the correct hour
displays. Press and hold the MIN button until the correct
minute displays. The time can be set with the ignition
on or off.
To synchronize the time with an FM station broadcasting
Radio Data System (RDS) information, press and hold
the HR and MIN buttons at the same time until RDS TIME
displays. To accept this time, press and hold the HR and
MIN buttons, at the same time, for another two seconds.
If the time is not available from the station, NO UPDAT
(update) displays.
RDS time is broadcast once a minute. After tuning to
an RDS broadcast station, it could take a few minutes
for the time to update.
Radio(s)
AM-FM Radio
4-43