Page 19 of 258

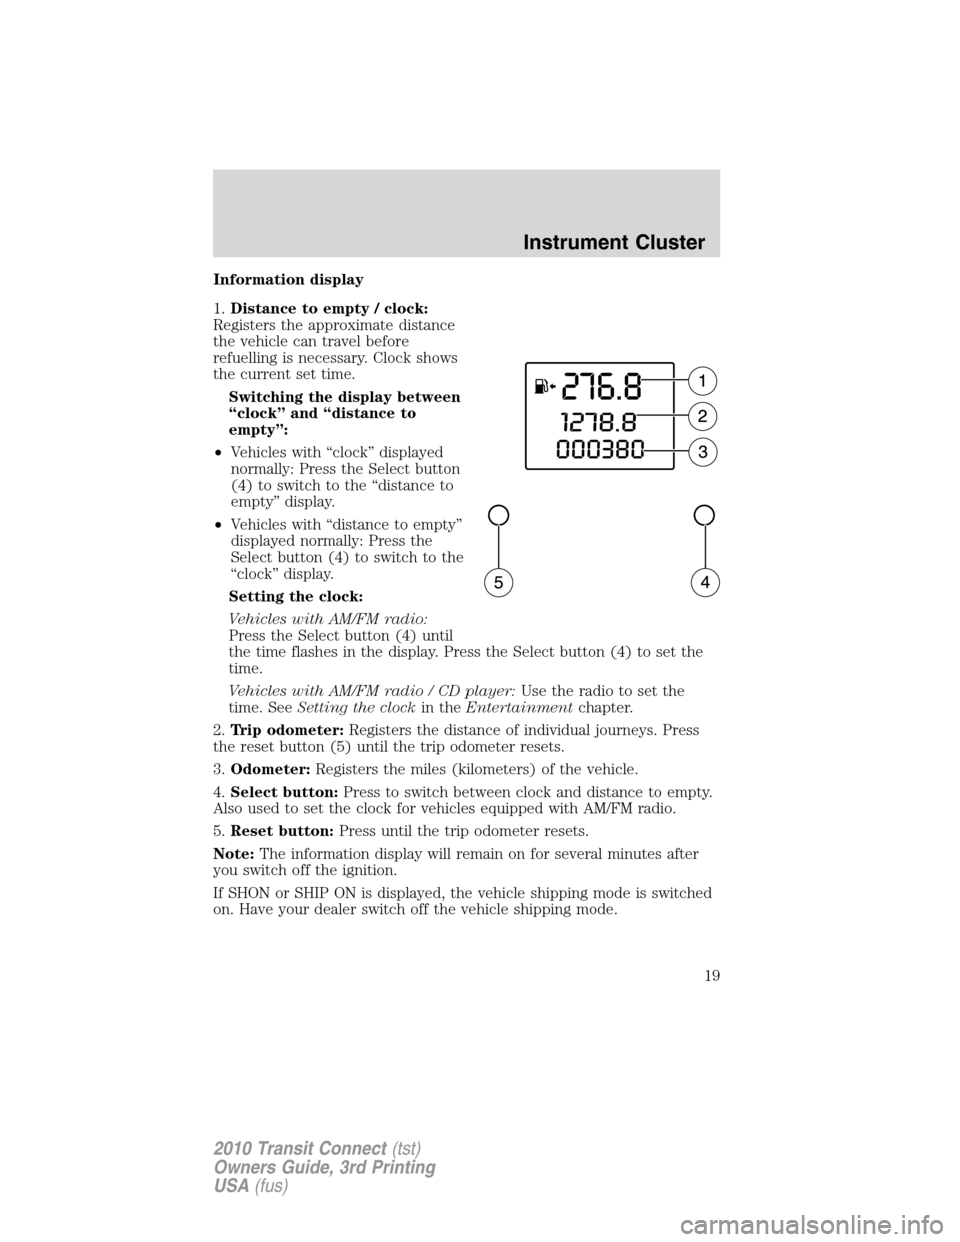
Information display
1.Distance to empty / clock:
Registers the approximate distance
the vehicle can travel before
refuelling is necessary. Clock shows
the current set time.
Switching the display between
“clock” and “distance to
empty”:
•Vehicles with “clock” displayed
normally: Press the Select button
(4) to switch to the “distance to
empty” display.
•Vehicles with “distance to empty”
displayed normally: Press the
Select button (4) to switch to the
“clock” display.
Setting the clock:
Vehicles with AM/FM radio:
Press the Select button (4) until
the time flashes in the display. Press the Select button (4) to set the
time.
Vehicles with AM/FM radio / CD player:Use the radio to set the
time. SeeSetting the clockin theEntertainmentchapter.
2.Trip odometer:Registers the distance of individual journeys. Press
the reset button (5) until the trip odometer resets.
3.Odometer:Registers the miles (kilometers) of the vehicle.
4.Select button:Press to switch between clock and distance to empty.
Also used to set the clock for vehicles equipped with AM/FM radio.
5.Reset button:Press until the trip odometer resets.
Note:The information display will remain on for several minutes after
you switch off the ignition.
If SHON or SHIP ON is displayed, the vehicle shipping mode is switched
on. Have your dealer switch off the vehicle shipping mode.
Instrument Cluster
19
2010 Transit Connect(tst)
Owners Guide, 3rd Printing
USA(fus)
Page 22 of 258

Setting the clock
To set the time or date, turn the radio on and press CLOCK until the
time begins to flash. Press
orto access the desired selection
(date or time). Once the desired selection is flashing, turn the VOL
(Volume) control to adjust the time or date forward/backward. Press
CLOCK again.
AM/FM radio
AM/FM:Press repeatedly to select AM/FM1/FM2 frequency bands.
(Seek): Press to access the next strong station on the frequency
band.
SCAN:Press for a brief sampling of all strong radio stations.
(1–6):(Memory Presets): When tuned to any station, press and hold a
preset button until sound returns.
Note:If TP appears in the display, it is an indicator that RDS is active.
Autostore feature:The autostore feature allows you to store the six
strongest stations available from the FM frequency band. To use, press
and hold the AM/FM button. The sound will mute and AST will appear in
the display indicating the feature is active. When the search is complete,
the sound will return and the six strongest stations will be stored in the
memory presets (and overwrite any stations previously stored in the AST
band).
Note:You can also manually store stations in the AST band. When the
AST band is active, simply tune to the desired station and press and hold
a memory preset. The new station will be saved and will override the
previously saved station.
CD player
To load a CD, simply insert the disc, label side up, into the CD slot.
(Eject): Press to eject the CD.
(Seek): Pressto access the previous/next track.
SCAN:Press for a brief sampling of all tracks on the current disc.
Sound Adjustments
BASS/TRE:Press to toggle between bass and treble adjustments. Once
the desired selection appears in the display, press
to adjust the
levels.
Entertainment Systems
22
2010 Transit Connect(tst)
Owners Guide, 3rd Printing
USA(fus)
Page 23 of 258

FADE/BAL:Press to toggle between fade and balance adjustments.
Once the desired selection appears in the display, press
to adjust
the audio between front (F) and back (B) and left (L) and right (R)
speakers.
Extra Features
AUX:Press to access auxiliary input jack mode and play music from a
portable player over the vehicle speakers.
(Phone): If your vehicle is equipped with theBluetooth�system,
refer toBluetooth hands free systemlater in this chapter for more
information. If your vehicle is not equipped withBluetooth, this control
will not be operational.
MENU:Press repeatedly to access the following features:
MAN:Press
oror to manually advance down or up the chosen
frequency band.
SCAN:Press
orfor a brief sampling of radio stations or CD
tracks.
SHUFFLE CD:Select to shuffle the tracks on the current CD.
REPEAT CD:Select to repeat the current CD.
COMP(Compression): Select to bring soft and loud CD passages
together for a more consistent listening level.
CLOCK 24H:Press
to toggle between a 12 and 24 hour clock
display.
AVC:Press
orto decrease/increase the level of automatic volume
control.
ADV MENU:When ADV MENU (Advanced menu) appears in the
display, press and hold MENU to access the following features:
•NEWS ON/OFF:News features are not available in the U.S. and
Canada markets.
•CLIP ON/OFF:Press to turn nominal volume levels on/off.
•VEHICLE ID:Press to view the vehicle’s VIN number.
•BT ON/OFF:Press to turn Bluetooth ON/OFF (if equipped). Refer to
Bluetooth hands free systemlater in this chapter for more
information
Entertainment Systems
23
2010 Transit Connect(tst)
Owners Guide, 3rd Printing
USA(fus)
Page 46 of 258
3. Disconnect electrical connector
from the bulb.
4. Twist off the bulb retainer ring by
turning it counterclockwise.
Install in reverse order.
WARNING:Handle a halogen headlamp bulb carefully and keep
out of children’s reach. Grasp the bulb by only its plastic base
and do not touch the glass. The oil from your hand could cause the
bulb to break the next time the headlamps are operated.
Note:If the bulb is accidentally touched, it should be cleaned with
rubbing alcohol before being used.
Replacing front parking lamp bulbs
1. Make sure the headlamp control
is in the off position.
2. Turn the cover counterclockwise
and remove it.
Lights
46
2010 Transit Connect(tst)
Owners Guide, 3rd Printing
USA(fus)
Page 47 of 258
3. Remove the bulb and the bulb
socket.
4. Pull the bulb straight out.
Install in reverse order.
Replacing front turn signal bulbs
1. Make sure the headlamp control
is in the off position and open the
hood.
2. Remove the bulb socket from the
lamp assembly by turning it
counterclockwise.
3. Pull the bulb straight out of the
socket.
Install in reverse order.
Lights
47
2010 Transit Connect(tst)
Owners Guide, 3rd Printing
USA(fus)
Page 48 of 258
Replacing tail/brake/backup lamps and turn signal bulbs
1. Make sure the headlamp control
is in the off position and then open
the cargo door.
2. Remove the two wing nuts and
gently pull the lamp assembly away
from the vehicle.
3. Remove the bulb socket from the
lamp assembly by turning it
counterclockwise.
Lights
48
2010 Transit Connect(tst)
Owners Guide, 3rd Printing
USA(fus)
Page 49 of 258
4. Pull the bulb straight out of the
socket.
Install in reverse order.
Replacing front and rear side marker bulbs
1. Make sure the headlamp control
is in the off position and then open
the cargo door.
2. Remove the side marker by gently
prying the lamp assembly away from
the vehicle.
3. Remove the bulb socket from the
lamp assembly by turning it
counterclockwise.
4. Pull the bulb straight out of the
socket.
Install in reverse order.
Lights
49
2010 Transit Connect(tst)
Owners Guide, 3rd Printing
USA(fus)
Page 50 of 258
Replacing side repeater bulbs
1. Make sure the headlamp control
is in the off position.
2. Remove the side repeater by
prying it out from the bottom.
3. Hold the bulb holder and turn it
counterclockwise to remove it.
4. Pull the bulb straight out.
Install in reverse order.
Replacing high-mount brake lamp bulbs
See your authorized dealer for replacement.
Replacing license plate lamp bulbs
1. Make sure the headlamp control
is in the off position.
2. Remove the lens assembly.
3. Pull the bulb straight out.
Install in reverse order.
Lights
50
2010 Transit Connect(tst)
Owners Guide, 3rd Printing
USA(fus)