2010 FORD F750 service schedule
[x] Cancel search: service schedulePage 195 of 274

Engine and Driveline System
•Transmission Enclosure:inspect for cracks, holes, and tears. Clean
any deposits such as oil, dirt, and stones.
•Engine valve covers and block covers are made to damp out engine
mechanical noise and, if needed, should be replaced with
recommended parts. Check for mechanical isolations.
Exhaust System
•Inspect the exhaust system for leaks at various joint connections and
tighten the clamps.
•Do a visual inspection for cracks or holes in the muffler and tail pipe.
•Always use the recommended parts when items need to be replaced.
•The tail pipe elbow or offset tail pipe orientation must not be changed
from the standard position as originally received.
•To avoid abnormal changes in vehicle sound levels, it is necessary for
the owner to perform inspections and necessary maintenance at the
intervals shown in theScheduled Maintenance Guidechapter.
POWER STEERING FLUID
Check the power steering fluid level using the following procedure. If
adding fluid is necessary, refer toLubricant Specificationsin this
chapter for the proper fluid type. Refer to theScheduled Maintenance
Guidechapter for the recommended service intervals.
1. Set the parking brake, shift into N (Neutral) (automatic transmission)
or 1 (First) (manual transmission) and turn the engine off.
2. Open the hood.
3. Clean the top of the power steering fluid reservoir.
4. Remove the dipstick from the reservoir and wipe the dipstick clean.
Maintenance and Specifications
195
2010 F-650/750(f67)
Supplement(supplement), 1st Printing
USA(fus)
Page 196 of 274

5. Reinstall the dipstick. Remove it again and check the fluid level.
•If the fluid temperature is at
approximately 68°-120°F
(20°-49°C) (fluid cool or warm
to the touch), check the COLD
side of the dipstick. The fluid
level should be within the FULL
range
•If the fluid level is below the ADD
line, add fluid in small amounts, continuously checking the level until
it reaches the proper level.
•If the fluid temperature is at
approximately 176°–230°F
(80°-110°C) (fluid too hot to
touch), check the HOT side of
the dipstick. The fluid level
should be within the FULL range.
•If the fluid level is below the ADD
line, add fluid in small amounts,
continuously checking the level until it reaches the proper level.
Note:The fluid level may also be checked by looking at the see-through
plastic reservoir. Make sure that the fluid is within the minimum and
maximum fluid range as marked on the reservoir.
A low fluid level may indicate a leak in the power steering system.
Inspect the power steering system and repair the leak. If necessary, see
your dealer or a qualified service technician.
To avoid damage to the power steering system,do notoperate the
vehicle with a low power steering fluid level.
Whenever the dipstick is installed, make sure it is properly seated and
tightened securely.
BRAKE FLUID
Check and refill the Full Power brake fluid reservoir using the following
procedure. Refer to theScheduled Maintenance Guidechapter for the
service interval.
1. Clean the reservoir caps before removal to prevent dirt or water from
entering the reservoir.
ADD MAX. COLDFULL
ADD MAX. HOTFULL
Maintenance and Specifications
196
2010 F-650/750(f67)
Supplement(supplement), 1st Printing
USA(fus)
Page 197 of 274

2. Visually inspect the fluid level; the level should be at the bottom of
the fill ports.
3. If necessary, add brake fluid from a clean unopened container until the
level reaches the bottom of the fill ports. Do not fill above this line.
4. Use only a DOT 3 brake fluid certified to meet manufacturer
specifications. Refer toLubricant specificationsin this chapter.
WARNING:Brake fluid is toxic. If brake fluid contacts the eyes,
flush eyes with running water for 15 minutes. Seek medical
attention if irritation persists. If taken internally, drink water and
induce vomiting. Seek medical attention immediately.
WARNING:If you use a brake fluid that is not DOT 3, you will
cause permanent damage to your brakes.
WARNING:Do not let the reservoir for the master cylinder run
dry. This may cause the brakes to fail.
CLUTCH FLUID/LINKAGE ADJUSTMENTS
Clutch fluid (if equipped)
Check the clutch fluid level. Refer to theScheduled Maintenance
Guidechapter for the service interval schedules.
During normal operation, the fluid level in the clutch reservoir should
remain constant. If the fluid level drops, maintain the fluid level at the
step in the reservoir.
Use only a DOT 3 brake fluid designed to meet manufacturer
specifications. Refer toLubricant specificationsin this chapter.
WARNING:Carefully read cautionary information on product
label. For MEDICAL EMERGENCY INFORMATION, contact a
physician or Poison Control Center immediately; on Ford-Motorcraft
products call: 1-800-959-3673 (FORD). Failure to follow these
instructions may result in personal injury.
Maintenance and Specifications
197
2010 F-650/750(f67)
Supplement(supplement), 1st Printing
USA(fus)
Page 198 of 274

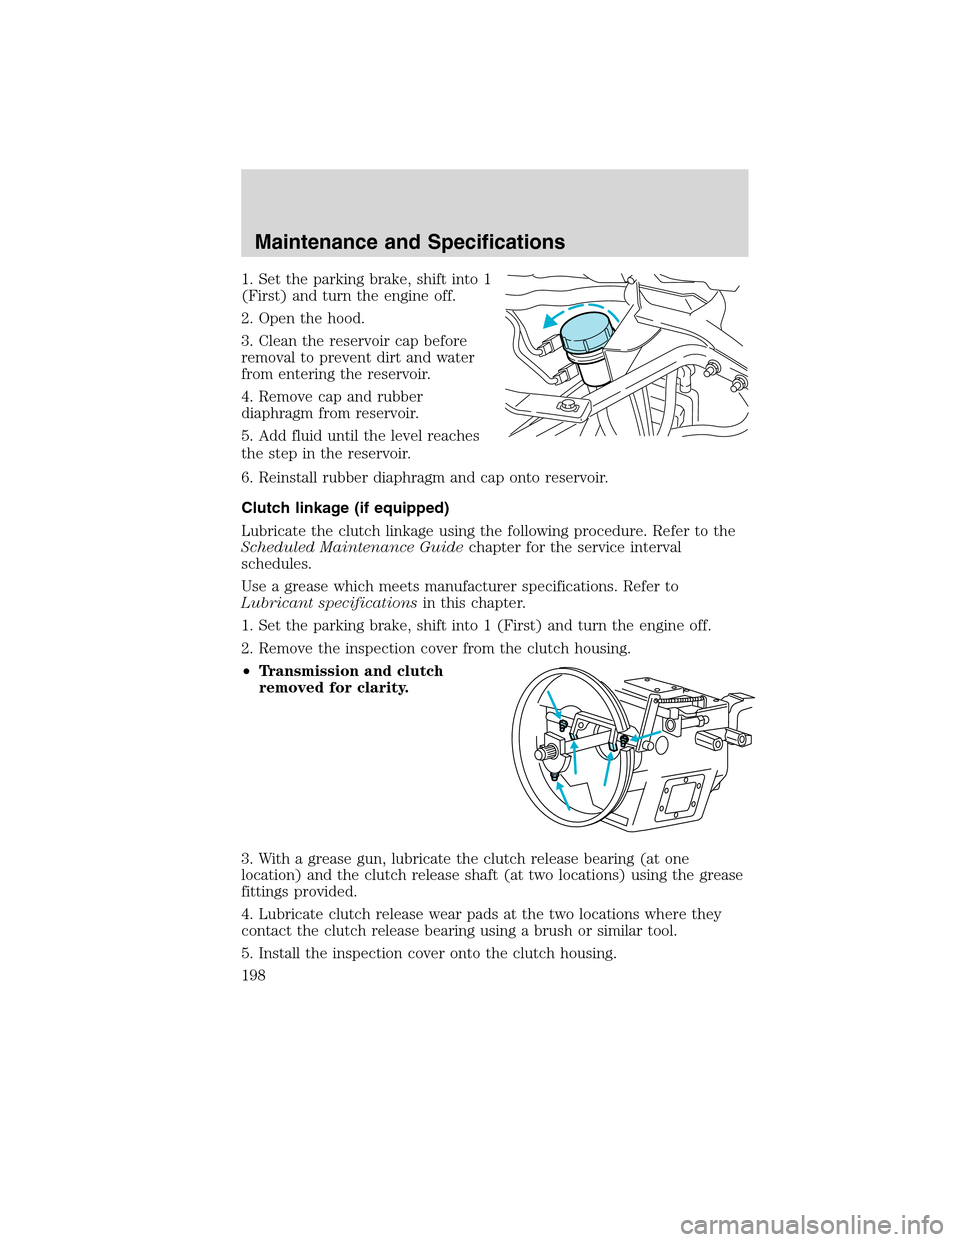
1. Set the parking brake, shift into 1
(First) and turn the engine off.
2. Open the hood.
3. Clean the reservoir cap before
removal to prevent dirt and water
from entering the reservoir.
4. Remove cap and rubber
diaphragm from reservoir.
5. Add fluid until the level reaches
the step in the reservoir.
6. Reinstall rubber diaphragm and cap onto reservoir.
Clutch linkage (if equipped)
Lubricate the clutch linkage using the following procedure. Refer to the
Scheduled Maintenance Guidechapter for the service interval
schedules.
Use a grease which meets manufacturer specifications. Refer to
Lubricant specificationsin this chapter.
1. Set the parking brake, shift into 1 (First) and turn the engine off.
2. Remove the inspection cover from the clutch housing.
•Transmission and clutch
removed for clarity.
3. With a grease gun, lubricate the clutch release bearing (at one
location) and the clutch release shaft (at two locations) using the grease
fittings provided.
4. Lubricate clutch release wear pads at the two locations where they
contact the clutch release bearing using a brush or similar tool.
5. Install the inspection cover onto the clutch housing.
Maintenance and Specifications
198
2010 F-650/750(f67)
Supplement(supplement), 1st Printing
USA(fus)
Page 200 of 274

Eaton UltraShift (if equipped)
The Eaton UltraShift transmission is filled with synthetic fluid from the
factory with no scheduled lube change intervals. This fluid is intended to
last the life of the transmission. However, the system should be checked
regularly to ensure that proper transmission fluid levels remain constant.
Refer to theEaton Driver Instructions Manualfor details.
Manual transmission fluid
Refer to theScheduled Maintenance Guidechapter for transmission
fluid level checks and fluid change intervals.
Your manual transmission may be filled with an optional synthetic fluid
which allows the use of extended service intervals. A tag on the filler
plug will identify the use of the synthetic fluid.
Use only fluid that meets manufacturer specifications (refer to
Lubricant specificationsin this chapter.
Use of a non-approved transmission fluid may cause internal
transmission component damage.
Check your transmission fluid level using the following procedure:
1. Park the vehicle on level ground.
2. Set the parking brake and shift into 1 (First) and turn the engine off.
3. Clean any dirt from around the filler plug.
4. Remove the filler plug and inspect the fluid level.
5. The fluid level should be up to the bottom of the filler plug opening.
6. If necessary, add enough fluid through the filler plug opening so that
the fluid level is at the bottom of the opening.
7. Clean and install the filler plug securely.
Drain and refill your transmission fluid using the following procedure:
1. Drain the transmission while the fluid is warm.
2. Park the vehicle on level ground.
3. Set the parking brake and shift into 1 (First) and turn the engine off.
4. Clean any dirt from around the filler and drain plugs.
5. Remove the filler and drain plugs and drain the fluid into a suitable
container. Dispose all used automotive fluids in a responsible manner
following your local authorized standards.
6. Clean and install the drain plug securely.
Maintenance and Specifications
200
2010 F-650/750(f67)
Supplement(supplement), 1st Printing
USA(fus)
Page 204 of 274

3. Re-torque the nuts to 100 ft. lb. (136 N•m), using a diagonal pattern.
4. Re-torque the nuts to 200 ft. lb. (271 N•m), using a diagonal pattern.
5. Re-torque the nuts to 400 ft. lb. (542 N•m), using a diagonal pattern.
(For vehicles equipped with 14ACC, 14 ADN and 14ADP axles, do not
use Step 6.)
6. Re-torque the nuts to 425 ft. lb (576 N•m), using a diagonal pattern.
(For vehicles equipped with 14ACC, 14 ADN and 14ADP axles.)
7. Use the same diagonal pattern with each U-bolt nut re-torque.
Spring U-bolt checks
Check U-bolt nuts and re-torque every 36,000 miles (58,000 km) after
initial 1,000 miles (1,600 km) re-torque. The U-bolt and nut threads and
seats should be cleaned and lubricated to ensure peak condition when
re-torqued.
DRIVESHAFT
At the regular lubrication interval, check the universal joints for any
evidence of wear or looseness. Should driveshaft vibrations occur, stop
the vehicle immediately to avoid possible hazardous consequences or
damage to other components.
REAR AXLE LUBRICANT
Refer to theScheduled Maintenance Guidechapter for rear axle
lubricant level checks and lubricant change intervals.
Your rear axle may be filled with an optional synthetic lubricant which
allows the use of extended service intervals. A tag on the filler plug will
identify the use of the synthetic lubricant.
Use only a lubricant that meets manufacturer specifications (refer to
Lubricant specificationsin this chapter).
Use of a non-approved rear axle lubricant may cause internal axle
component damage.
Checking the rear axle lubricant level
1. Park the vehicle on level ground.
2. Set the parking brake and shift into N (Neutral) (automatic
transmission) or 1 (First) (manual transmission) and turn the engine off.
3. Clean any dirt from around the rear axle filler plug.
4. Remove the filler plug and inspect the lubricant level.
Maintenance and Specifications
204
2010 F-650/750(f67)
Supplement(supplement), 1st Printing
USA(fus)
Page 235 of 274

GENERAL MAINTENANCE INFORMATION
The general maintenance services listed in this section are required
because they are considered essential to the life and performance of
your vehicle. Refer to the “Daily Owner Checks” chart for important
maintenance items.
Ford Motor Company recommends you perform the owner maintenance
services listed in this section. These services are matters of day-to-day
care that are important to the proper operation of your vehicle. In
addition to the conditions described in owner maintenance, be alert for
any unusual noise, vibration or other indication that your vehicle may
need service and attend to it promptly.
Your vehicle is very sophisticated and built with multiple complex
performance systems. Every manufacturer develops these systems using
different specifications and performance features. That’s why it’s
important to rely upon your Ford dealership to properly diagnose and
repair your vehicle.
Use only recommended fuels, lubricants, fluids and service parts
conforming to Ford specifications. Motorcraft parts are designed and
built for best performance in your vehicle. Using these parts for
replacement is your assurance that Ford-Built quality stays in your
vehicle.
Non-Ford approved chemicals or additives are not required for factory
recommended maintenance. In fact, Ford Motor Company recommends
against the use of such additive products unless specifically
recommended by Ford for a particular application.
SCHEDULED MAINTENANCE
Ford Motor Company has recommended maintenance intervals for
various parts and component systems based upon engineering testing.
Ford Motor Company relies upon this testing to determine the most
appropriate mileage for replacement of oils and fluids to protect your
vehicle at the lowest overall cost to you and recommends against
maintenance schedules that deviate from the scheduled maintenance
information.
The maintenance or replacement of the emission control devices (or
systems) in your new Ford Motor Company vehicle (or engine) may be
performed at your expense. These services may be performed by any
automotive repair establishment or individual using automotive parts
equivalent to those with which your vehicle or engine was originally
equipped. If any parts other than Ford, Motorcraft, or Ford authorized,
Scheduled Maintenance Guide
235
2010 F-650/750(f67)
Supplement(supplement), 1st Printing
USA(fus)
Page 236 of 274

remanufactured parts are used for maintenance replacements (or for the
service) of components effecting the emission control, the owner should
be ensured that such parts are warranted by their manufacturer to be
equivalent to genuine Ford Motor Company Parts in performance and
durability. Please consult your warranty information booklet for complete
warranty information.
Authorized dealer maintenance
Your authorized dealer specializes in knowing all about Ford Motor
Company vehicles rather than knowing a little about all makes.
There are Ford or Ford of Canada dealer service shops ready to serve
you wherever you drive in the U.S. or Canada. They stock Ford and
Motorcraft parts, and Ford Chemicals and lubricants. You can be
confident that these meet the same exacting design and quality
standards as those used to build the vehicle originally. Dealer Service
Technicians have available training in the latest product developments
and service techniques.
Oils, Fluids and Flushing
In many cases, fluid discoloration is a normal operating characteristic of
the chemical compound and in itself does not demonstrate that a fluid
needs to be changed. Oils and fluids identified in theScheduled
Maintenance Guidechapter should be changed at the specified interval
or in conjunction with a repair. Flushing is a viable way to change fluid
for many vehicle sub-systems during scheduled maintenance and should
only be done using the same fluid required to finish the maintenance
procedure, or a Ford approved flushing chemical.
OWNER MAINTENANCE
You can do much of the maintenance your vehicle requires yourself, if
you have the time and a reasonable amount of mechanical ability. If you
prefer to have this work done professionally, your authorized dealer
stands ready to help you.
All mechanical components and attachments are important in that they
could affect the performance of vital components and systems. If
replacement becomes necessary, they must be replaced with parts having
the same part number or with equivalent parts. Torque values of the
attaching parts must be used as specified during any reassembly
procedure to ensure proper retention.
Scheduled Maintenance Guide
236
2010 F-650/750(f67)
Supplement(supplement), 1st Printing
USA(fus)