Page 190 of 286

189
KNOWING
YOUR CAR
SAFETY
STARTING
AND
DRIVING
WARNING
LIGHTS AND
MESSAGES
IN AN
EMERGENCY
MAINTENANCE
AND CARE
TECHNICAL
SPECIFICATIONS
INDEX
F0N0082mfig. 187F0N0083mfig. 188
MAIN BEAM HEADLIGHTS
To change the bulb, proceed as follows:
❒remove protective cover A-fig. 186 by turning it
anticlockwise;
❒disconnect the electrical connector A-fig. 188;
❒release the bulb holding clip B;
❒remove the bulb C and replace it;
❒fit the new bulb, ensuring that the outline of the
metal part coincides with the grooves on the curve
of the headlight. Then reconnect the bulb holder clip
A and reattach electrical connector B;
❒refit protective cover A-fig. 186 by turning it
clockwise, making sure to lock it correctly. SIDE LIGHTS
To change the bulb, proceed as follows:
❒remove protective cover B-fig. 186 by turning
anticlockwise;
❒remove snap-fitted bulb holder A-fig. 187, remove
the bulb B and replace it;
❒refit the snap-fitted bulb holder A-fig. 187;
❒refit protective cover B-fig. 186 by turning it
clockwise, making sure to lock it correctly.
173-206 DUCATO LUM EN 8ed 27-10-2010 15:45 Pagina 189
Page 191 of 286

190
KNOWING
YOUR CAR
SAFETY
STARTING
AND
DRIVING
WARNING
LIGHTS AND
MESSAGES
IN AN
EMERGENCY
MAINTENANCE
AND CARE
TECHNICAL
SPECIFICATIONS
INDEX
F0N0081mfig. 189
DIRECTION INDICATORS
To change the bulb, proceed as follows:
❒turn the bulb holder A-fig. 189 anticlockwise and pull
it out;
❒remove the bulb by pushing it slightly and turning it
anticlockwise (bayonet mount);
❒replace the bulb;
❒refit the bulb holder by turning it clockwise making
sure to lock it correctly.
DIPPED BEAM HEADLIGHTS
With incandescent bulbs
To change the bulb, proceed as follows:
❒remove protective cover B-fig. 186 by turning it
anticlockwise;
❒disconnect the electrical connector A-fig. 190;
❒release the bulb holding clip B;
❒remove the bulb C and replace it;
❒fit the new bulb, ensuring that the outline of the
metal part coincides with the grooves on the curve
of the headlight. Then reconnect the bulb holder clip
B and reattach electrical connector A;
❒refit the protective cover by turning it clockwise
making sure to lock it correctly;
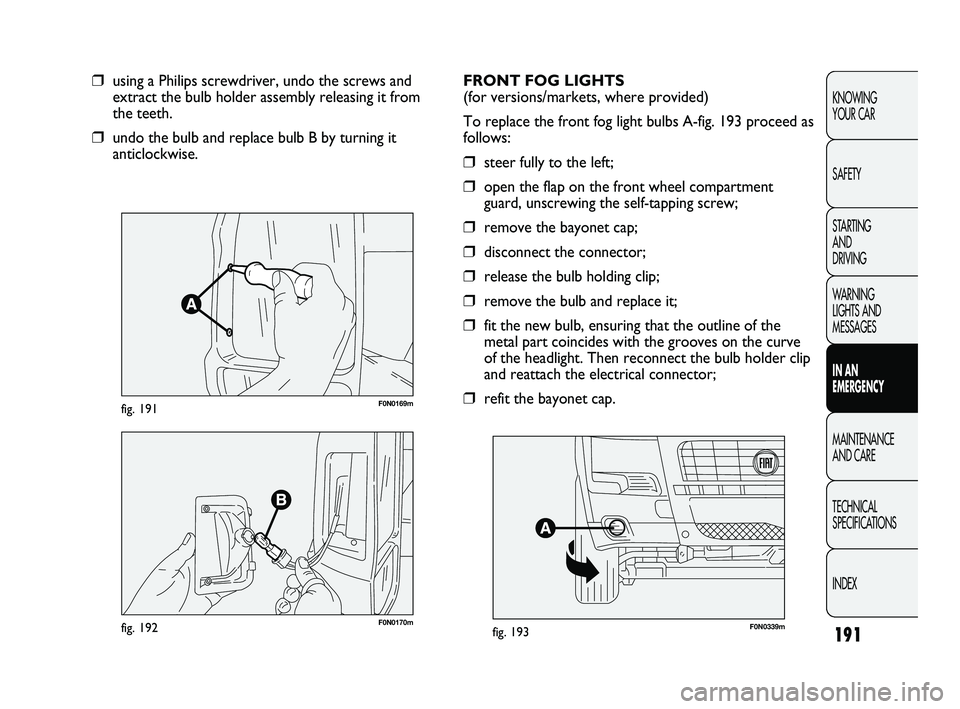
Side lights fig. 191-192
To change the bulb, proceed as follows:
❒move the mirror manually to access the two fixing
screws A;
F0N0084mfig. 190
173-206 DUCATO LUM EN 8ed 27-10-2010 15:45 Pagina 190
Page 192 of 286

191
KNOWING
YOUR CAR
SAFETY
STARTING
AND
DRIVING
WARNING
LIGHTS AND
MESSAGES
IN AN
EMERGENCY
MAINTENANCE
AND CARE
TECHNICAL
SPECIFICATIONS
INDEX
F0N0169mfig. 191
❒using a Philips screwdriver, undo the screws and
extract the bulb holder assembly releasing it from
the teeth.
❒undo the bulb and replace bulb B by turning it
anticlockwise.
F0N0170mfig. 192
FRONT FOG LIGHTS
(for versions/markets, where provided)
To replace the front fog light bulbs A-fig. 193 proceed as
follows:
❒steer fully to the left;
❒open the flap on the front wheel compartment
guard, unscrewing the self-tapping screw;
❒remove the bayonet cap;
❒disconnect the connector;
❒release the bulb holding clip;
❒remove the bulb and replace it;
❒fit the new bulb, ensuring that the outline of the
metal part coincides with the grooves on the curve
of the headlight. Then reconnect the bulb holder clip
and reattach the electrical connector;
❒refit the bayonet cap.
F0N0339mfig. 193
173-206 DUCATO LUM EN 8ed 27-10-2010 15:45 Pagina 191
Page 194 of 286
193
KNOWING
YOUR CAR
SAFETY
STARTING
AND
DRIVING
WARNING
LIGHTS AND
MESSAGES
IN AN
EMERGENCY
MAINTENANCE
AND CARE
TECHNICAL
SPECIFICATIONS
INDEX
F0N0088mfig. 196
❒remove the bulb D, E, F, G pushing it gently and
turning it anticlockwise (“bayonet” locking), then
replace it;
❒refit the bulb holder and tighten the screws C;
❒reconnect the electric connector B, suitably refit the
unit to the car body and then tighten the fastening
screws A.
F0N0239mfig. 197
For truck and chassis cab versions:
undo the four screws H-fig. 197 and replace the bulbs:
I bulb for rear fog light (left side); bulb for reversing
light (right side).
L bulb for side light
M bulb for brake light
N bulb for direction indicator.
173-206 DUCATO LUM EN 8ed 27-10-2010 15:45 Pagina 193
Page 195 of 286

F0N0241mfig. 198
REAR FOG LIGHTS (Heavy Van)
To change the bulb proceed as follows:
❒take up position at the rear of the side bumper;
❒unscrew the lower fastening A between the central
and side bumpers fig. 198;
❒after removing the tail-light, unscrew upper
fastening B;
❒unscrew both fastenings C-fig. 199 on the side of the
accessible rear swing door and open the door
slightly;
❒unscrew the three side fastenings D on the panel
side, accessible after removing the side mounting
fig. 199. To remove the moulding, undo the three
lower self-tapping screws and undo the pins with
care to avoid breaking them. If you break one or
more pins, they will have to be replaced;
194
KNOWING
YOUR CAR
SAFETY
STARTING
AND
DRIVING
WARNING
LIGHTS AND
MESSAGES
IN AN
EMERGENCY
MAINTENANCE
AND CARE
TECHNICAL
SPECIFICATIONS
INDEX
F0N0242mfig. 199
F0N0243mfig. 200
❒remove the bulb holder;
❒turn bulb holder E anticlockwise (1/8 of a turn),
remove the bayonet bulb by pushing gently and
turning anticlockwise, then replace fig. 200.
173-206 DUCATO LUM EN 8ed 27-10-2010 15:45 Pagina 194
Page 207 of 286
206
KNOWING
YOUR CAR
SAFETY
STARTING
AND
DRIVING
WARNING
LIGHTS AND
MESSAGES
IN AN
EMERGENCY
MAINTENANCE
AND CARE
TECHNICAL
SPECIFICATIONS
INDEX
F0N0117mfig. 220F0N0135mfig. 218
F0N0136mfig. 219
❒take the screwdriver provided from the box and
prise up at the point shown to raise the cap
C-fig. 219;
❒take the tow ring D from the box and screw onto
the threaded pin fig. 219.
The rear ring B-fig. 220 is located at the point shown in
the diagram. For activation / deactivation, proceed as follows:
❒Open the flap A and remove it as illustrated
in fig. 217;
❒turn the locking knob B anticlockwise and remove it
fig. 217 to allow the removal of the compartment
fig. 218;
F0N0134mfig. 217
173-206 DUCATO LUM EN 8ed 27-10-2010 15:45 Pagina 206