Page 103 of 530

Airbag Warning Light
The light should come on and remain on for four to eight
seconds as a bulb check when the ignition switch is first
turned ON. If the light is not lit during starting, see your
authorized dealer. If the light stays on, flickers, or comes
on while driving, have the system checked by an autho-
rized dealer.
Defroster
Check operation by selecting the defrost mode and place
the blower control on high speed. You should be able to
feel the air directed against the windshield. See your
authorized dealer for service if your defroster is
inoperable.
Floor Mat Safety Information
Always use floor mats designed to fit the foot well of
your vehicle. Use only floor mats that leave the pedal
area unobstructed and that are firmly secured so that
they cannot slip out of position and interfere with the
pedals or impair safe operation of your vehicle in other
ways.
WARNING!
Pedals that cannot move freely can cause loss of
vehicle control and increase the risk of serious per-
sonal injury.
•Always make sure that floor mats are properly
attached to the floor mat fasteners.(Continued)
102 THINGS TO KNOW BEFORE STARTING YOUR VEHICLE
Page 105 of 530
Periodic Safety Checks You Should Make Outside
the Vehicle
Tires
Examine tires for excessive tread wear and uneven wear
patterns. Check for stones, nails, glass, or other objects
lodged in the tread. Inspect the tread and sidewall for
cuts and cracks. Check the wheel nuts for tightness.
Check the tires (including spare) for proper pressure.
Lights
Have someone observe the operation of exterior lights
while you work the controls. Check turn signal and high
beam indicator lights on the instrument panel.
Door Latches
Check for positive closing, latching, and locking.
Fluid Leaks
Check area under vehicle after overnight parking for fuel,
engine coolant, oil, or other fluid leaks. Also, if gasoline
fumes are detected or if fuel, power steering fluid, or
brake fluid leaks are suspected, the cause should be
located and corrected immediately.
104 THINGS TO KNOW BEFORE STARTING YOUR VEHICLE
Page 107 of 530

▫Manual Front And Second Row
Seat Adjuster ....................... 124
▫ Manual Reclining Seats — If Equipped ..... 124
▫ Manual Lumbar Adjust Lever —
If Equipped ........................ 126
▫ Eight–Way Power Seats — If Equipped ..... 126
▫ Heated Seats — If Equipped ............ 128
▫ Adjusting Head Restraints .............. 129
▫ Stow ’n Go� Seating — If Equipped ....... 132
▫ Easy Access Seating .................. 135
▫ Swivel ’n Go™ Premium Seating —
If Equipped ........................ 136
▫ Second Row Bench Seat — If Equipped .... 144
▫ Third Row Power Recline — If Equipped . . . 145 �
Driver Memory Seat — If Equipped ........ 149
▫ Setting Memory Positions And Linking RKE
Transmitter To Memory ................ 150
▫ Easy Entry/Exit Seat
(Available With Memory Seat Only) ....... 152
� To Open And Close The Hood ............ 153
� Lights ............................. 155
▫ Interior Lighting ..................... 155
▫ Parking Lights ...................... 157
▫ Headlights ......................... 157
▫ Automatic Headlights — If Equipped ...... 157
▫ Headlights On With Wipers — If Equipped . . 158
▫ Headlight Delay — If Equipped .......... 158
▫ Daytime Running Lights — If Equipped .... 159
106 UNDERSTANDING THE FEATURES OF YOUR VEHICLE
Page 108 of 530

▫Front Fog Lights — If Equipped .......... 160
▫ Battery Protection .................... 160
▫ Multifunction Lever .................. 160
▫ Turn Signals ........................ 160
▫ Lane Change Assist ................... 161
▫ High/Low Beam Switch ............... 161
▫ Flash-To-Pass ....................... 162
� Windshield Wiper And Washers ........... 162
▫ Rain Sensing Wipers — If Equipped ....... 164
� Tilt Steering Column ................... 165
� Adjustable Pedals — If Equipped .......... 166
� Electronic Speed Control — If Equipped ..... 168
▫ To Activate ......................... 169 ▫
To Set At A Desired Speed .............. 169
▫ Deactivating Electronic Speed Control ...... 169
▫ Resuming Speed ..................... 169
▫ Varying The Speed Setting .............. 170
▫ Accelerating To Pass .................. 170
� Parksense� Rear Park Assist — If Equipped . . . 171
▫ Parksense� Sensors................... 172
▫ Parksense� Warning Display ............ 172
▫ Parksense� Display................... 173
▫ Enabling/Disabling Parksense� .......... 177
▫ Service Parksense� ................... 177
▫ Cleaning Parksense� .................. 177
▫ Parksense� System Usage Precautions ...... 178
3
UNDERSTANDING THE FEATURES OF YOUR VEHICLE 107
Page 111 of 530
MIRRORS
Inside Day/Night Mirror — If Equipped
A two-point pivot system allows for horizontal and
vertical adjustment of the mirror. Adjust the mirror to
center on the view through the rear window.
Headlight glare can be reduced by moving the small
control under the mirror to the night position (toward the
rear of the vehicle). The mirror should be adjusted while
set in the day position (toward the windshield).
Automatic Dimming Mirror — If Equipped
This mirror automatically adjusts for headlight glare
from vehicles behind you. You can turn the feature on or
off by pressing the button at the base of the mirror. A light
next to the button will illuminate to indicate when the
dimming feature is activated.
Manual Rearview Mirror
110 UNDERSTANDING THE FEATURES OF YOUR VEHICLE
Page 112 of 530
CAUTION!
To avoid damage to the mirror during cleaning, never
spray any cleaning solution directly onto the mirror.
Apply the solution onto a clean cloth and wipe the
mirror clean.
Outside Mirrors
To receive maximum benefit, adjust the outside mirror(s)
to center on the adjacent lane of traffic with a slight
overlap of the view obtained on the inside mirror.
WARNING!
Vehicles and other objects seen in an outside convex
mirror will look smaller and farther away than they
really are. Relying too much on side convex mirrors
could cause you to collide with another vehicle or
other object. Use your inside mirror when judging
the size or distance of a vehicle seen in a side convex
mirror.
Automatic Dimming Mirror
3
UNDERSTANDING THE FEATURES OF YOUR VEHICLE 111
Page 113 of 530

Driver’s Automatic Dimming Mirror — If Equipped
The driver’s outside mirror will automatically adjust for
glare from vehicles behind you. This feature is controlled
by the inside automatic dimming mirror and can be
turned on or off by pressing the button at the base of the
inside mirror. The mirror will automatically adjust for
headlight glare when the inside mirror adjusts.
Outside Mirror Folding Feature
All outside mirrors are hinged and may be moved either
forward or rearward to resist damage. The hinges have
three detent positions: full forward, full rearward and
normal.
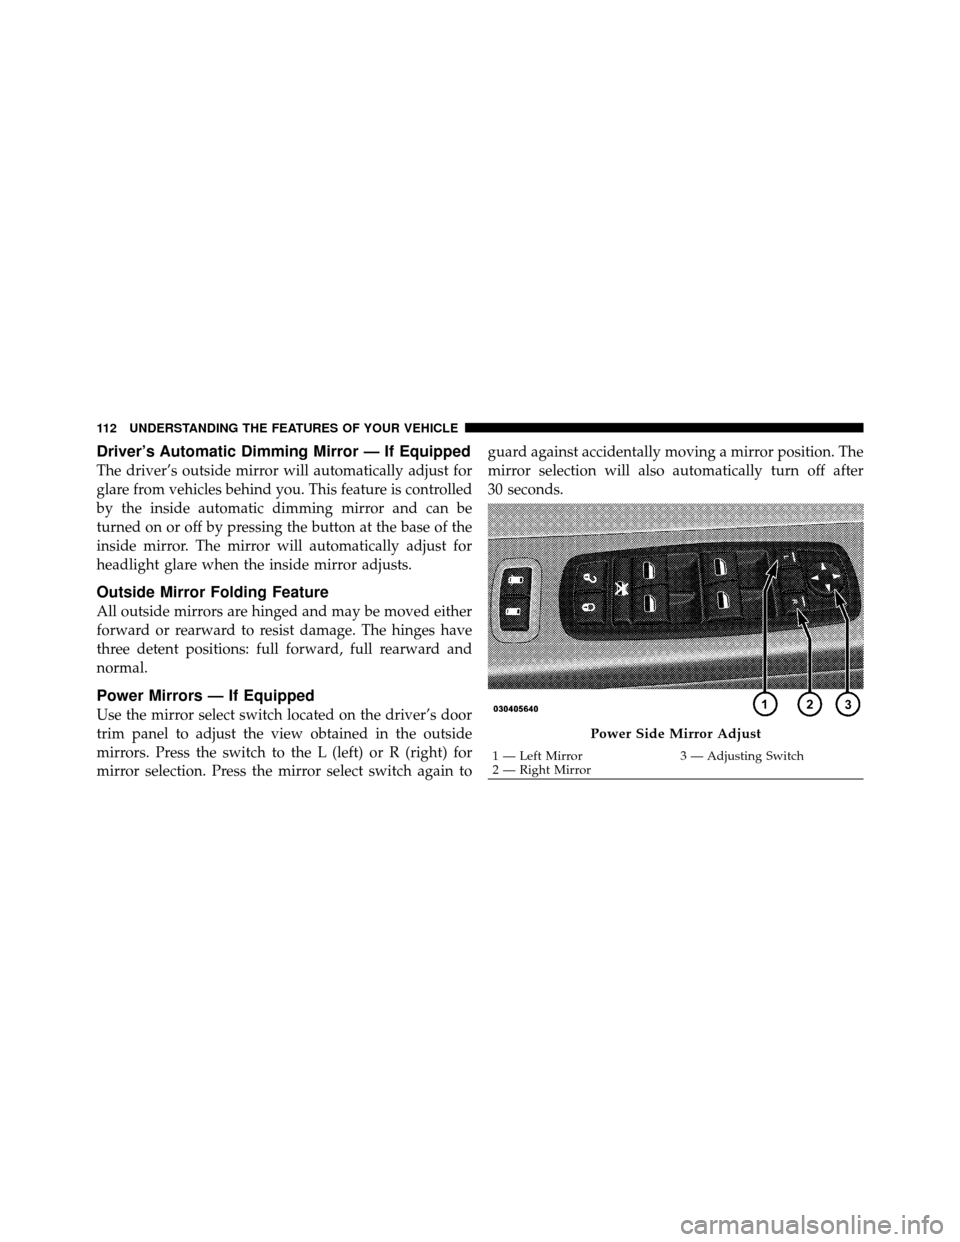
Power Mirrors — If Equipped
Use the mirror select switch located on the driver’s door
trim panel to adjust the view obtained in the outside
mirrors. Press the switch to the L (left) or R (right) for
mirror selection. Press the mirror select switch again toguard against accidentally moving a mirror position. The
mirror selection will also automatically turn off after
30 seconds.
Power Side Mirror Adjust
1 — Left Mirror
3 — Adjusting Switch
2 — Right Mirror
112 UNDERSTANDING THE FEATURES OF YOUR VEHICLE
Page 114 of 530

Select a mirror and press one of the four arrows for the
direction you want the mirror to move.
Driver’s side power mirror preselected positions can be
controlled by the optional Driver Memory Seat Feature.
Refer to “Driver Memory Seat” in “Understanding the
Features of Your Vehicle” for further information.
Heated Mirrors — If Equipped
These mirrors are heated to melt frost or ice. This
feature is activated whenever you turn on the rear
window defroster. Refer to “Rear Window Features” in
“Understanding the Features of Your Vehicle” for further
information.
Tilt Mirrors in Reverse (Available with Memory
Seat Only) — If Equipped
Tilt Mirrors in Reverse provides automatic outside mirror
positioning which will aid the drivers view of the ground
rearward of the front doors. The driver’s outside mirror
will move slightly downward from the present position
when the vehicle is shifted into REVERSE. The driver’s
outside mirror will then return to the original position
when the vehicle is shifted out of REVERSE position.
Each stored memory setting will have an associated Tilt
Mirrors in Reverse position.
NOTE: The Tilt Mirrors in Reverse feature is not en-
abled when delivered from the factory. The Tilt Mirrors in
Reverse feature can be enabled or disabled in the Elec-
tronic Vehicle Information Center (EVIC). Refer to “Elec-
tronic Vehicle Information Center (EVIC)/Customer-
Programmable Features” in “Understanding Your
Instrument Panel” for further information.
3
UNDERSTANDING THE FEATURES OF YOUR VEHICLE 113