Page 168 of 530
Press the button forward to move the pedals forward
(toward the front of the vehicle).
Press the button rearward to move the pedals rearward
(toward the driver).
•The pedals can be adjusted with the ignition OFF.
•The pedalscannotbe adjusted when the vehicle is in
REVERSE or when the Electronic Speed Control Sys-
tem is on. The following messages will be displayed
on vehicles equipped with the Electronic Vehicle In-
formation System (EVIC) if the pedals are attempted to
be adjusted when the system is locked out (“Adjust-
able Pedal Disabled — Cruise Control Engaged” or
“Adjustable Pedal Disabled — Vehicle In Reverse”.
CAUTION!
Do not place any article under the adjustable pedals
or impede its ability to move, as it may cause damage
to the pedal controls. Pedal travel may become lim-
ited if movement is stopped by an obstruction in the
adjustable pedal’s path.
Adjustable Pedal Switch
3
UNDERSTANDING THE FEATURES OF YOUR VEHICLE 167
Page 185 of 530

Courtesy/Interior Lighting
At the forward end of the console are two courtesy lights
(standard dome light has two buttons). The lights turn on
when a front door, a sliding door or the liftgate is opened.
If your vehicle is equipped with Remote Keyless Entry
(RKE) the lights will also turn on when the UNLOCK
button on the RKE transmitter is pressed.
The courtesy lights also function as reading lights. Press
in on each lens to turn these lights on while inside the
vehicle. Press a second time to turn each light off. You
may adjust the direction of these lights by pressing the
outside ring, which is identified with four directional
arrows (LED lamps only).
The area around the instrument panel cupholders is also
illuminated from a light in the overhead console (pre-
mium console only). This light is turned on when the
headlight switch is on, and will adjust in brightness when
the dimmer control is rotated up or down.
Sunglass Storage (non-sunroof only)
At the rear of the front overhead console, a compartment
is provided for the storage of two pairs of sunglasses.
From the closed position, press the door over-travel latch
to open the compartment. The door will slowly rotate to
the full open position. From this position, the door can be
fully closed or, by rotating upward about 3/4 of the way
and releasing, positioned for conversation mirror use.
From the�conversation mirror� position, the door can
only be closed. To return to the full open position, the
door must first be closed and then opened by pressing
the over-travel latch again to release.
NOTE: The front overhead console supplied with fac-
tory sunroof, incorporates a sunroof switch.
Rear Overhead Consoles — If Equipped
The rear overhead storage system is available in two
versions: with or without sunroof.
184 UNDERSTANDING THE FEATURES OF YOUR VEHICLE
Page 186 of 530

An additional LED at the front of the rear console shines
down on the front foot-well area while in courtesy mode,
for added convenience.Rear Courtesy/Reading Lights — If Equipped
The overhead console has two sets of courtesy lights. The
lights turn on when a front door, a sliding door or the
liftgate is opened. If your vehicle is equipped with
Remote Keyless Entry (RKE) the lights will also turn on
when the UNLOCK button on the RKE transmitter is
pressed.
The courtesy lights also function as reading lights. Press
in on each lens to turn these lights on while inside the
vehicle. Press the lens a second time to turn each light off.
You may adjust the direction of these lights by pressing
the outside ring, which is identified with four directional
arrows.
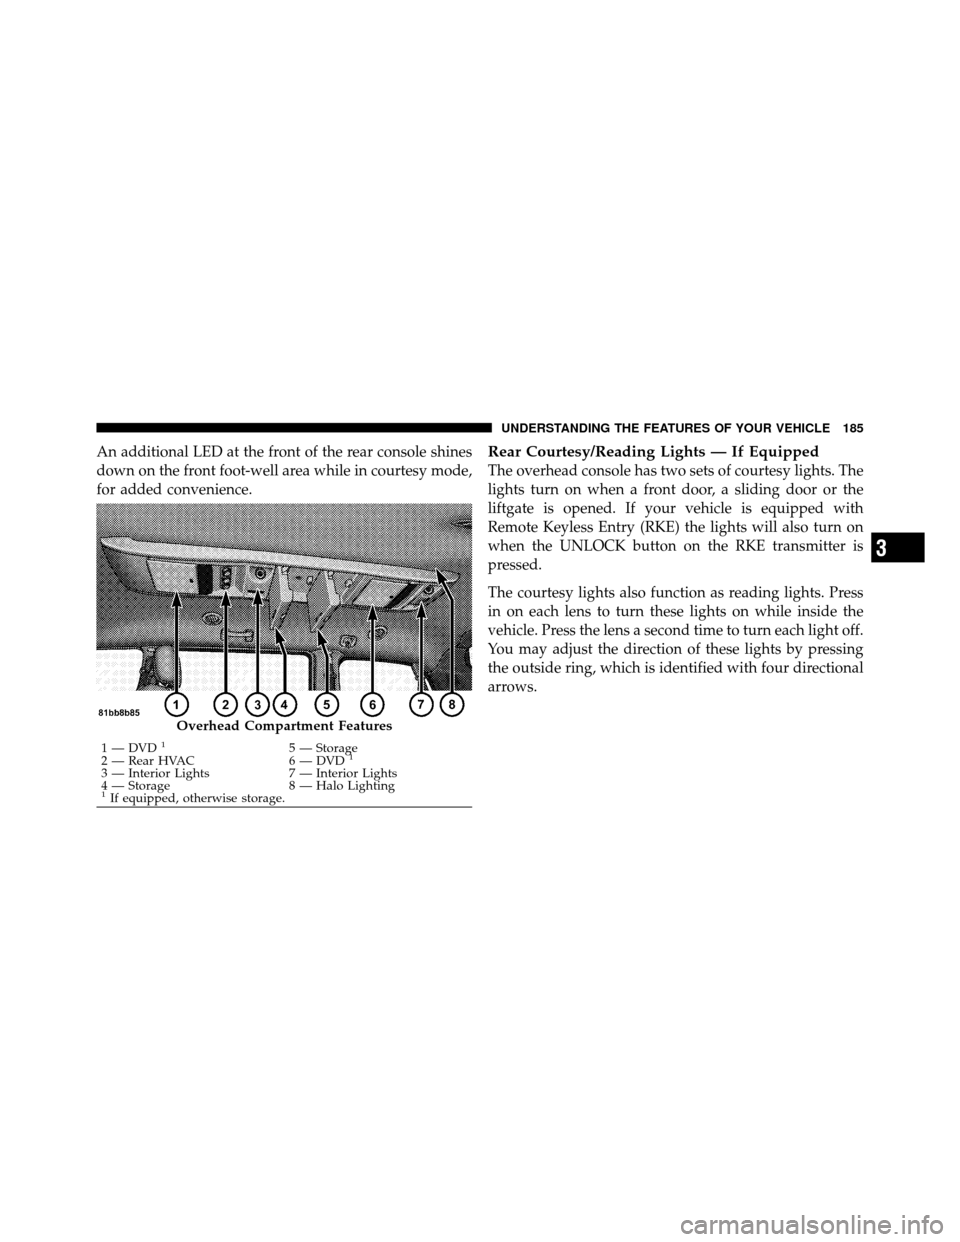
Overhead Compartment Features
1 — DVD15 — Storage
2 — Rear HVAC 6 — DVD1
3 — Interior Lights 7 — Interior Lights
4 — Storage 8 — Halo Lighting
1If equipped, otherwise storage.
3
UNDERSTANDING THE FEATURES OF YOUR VEHICLE 185
Page 191 of 530

Using HomeLink�
To operate, press and release the programmed
HomeLink�button. Activation will now occur for the
trained device (i.e., garage door opener, gate operator,
security system, entry door lock, home/office lighting,
etc.,). The handheld transmitter of the device may also be
used at any time.
Reprogramming a Single HomeLink� Button
To reprogram a channel that has been previously trained,
follow these steps:
1. Turn the ignition switch to the ON/RUN position.
2. Press and hold the desired HomeLink� button until
the indicator light begins to flash after 20 seconds. Do not
release the button.
3. Without releasing the button, proceed with Program-
ming HomeLink� Step 2 and follow all remaining steps.
Gate Operator/Canadian Programming
Canadian radio frequency laws require transmitter sig-
nals to time-out (or quit) after several seconds of trans-
mission – which may not be long enough for HomeLink�
to pick up the signal during programming. Similar to this
Canadian law, some U.S. gate operators are designed to
time-out in the same manner.
It may be helpful to unplug the device during the cycling
process to prevent possible overheating of the garage
door or gate motor.
If you are having difficulties programming a garage door
opener or a gate operator, replace “Programming
HomeLink�” Step 3, with the following:
3. Continue to press and hold the HomeLink� button,
while you press and release (“cycle”), your handheld
transmitter every two seconds until HomeLink� has
190 UNDERSTANDING THE FEATURES OF YOUR VEHICLE
Page 202 of 530
of the two cupholders in the center front instrument
panel. To install the ash receiver, align the receiver so the
thumb grip on the lid is facing rearward. Press the ash
receiver into either of the cup wells to secure. Pull
upward on the ash receiver to remove for cleaning
and/or storage.
The left rear trim panel cupholder is designed to accom-
modate a second ash receiver, if desired.
STORAGE
Glove Compartments
There are both upper and lower glove compartments.
Upper Glove Compartment
To open the upper compartment, press in on the upper
latch. The door will spring open about 1 in (2.54 cm).
Manually lift the front edge of the door upward until
fully opened and the detent is engaged.To close the compartment door, firmly push downward
on the door’s surface to release the detent and latch the
door closed.Glove Compartment Features
1 — Lower Compartment 3 — Upper Latch
2 — Lower Latch/Lock 4 — Upper Compartment
3
UNDERSTANDING THE FEATURES OF YOUR VEHICLE 201
Page 203 of 530
Lower Glove Compartment
To open the lower compartment pull out on the release
handle.
NOTE:The lower compartment is equipped with a lock
that is part of the compartment handle (2).
Door Trim Panel Storage
Front Door Storage
Both interior front door panels have multiple pockets for
storage.
Sliding Side Door Bottle Holder
Both sliding doors have a bottle holder molded right into
the trim.
Front Door Storage
1 — Rear Map Pocket 3 — Bottle Holder
2 — Storage Pocket 4 — Front Map Pocket
202 UNDERSTANDING THE FEATURES OF YOUR VEHICLE
Page 205 of 530
Umbrella Holder
An umbrella holder has been conveniently molded into
the left front door entry scuff molding.
Second Row Seat Storage Bins — If Equipped
The seat storage bins are located on the floor in front of
the second row seats. The area below the covers can be
used for storage when the second row seat is in the
upright position.
Pull up on the storage bin latch to open the cover. Slide
the storage bin locking mechanism to the�Lock�position
to allow greater access to the storage bin.
Umbrella Holder
204 UNDERSTANDING THE FEATURES OF YOUR VEHICLE
Page 206 of 530
CAUTION!
NOTE: The storage bin cover must be locked and flat
to avoid damage from contact with the front seat
tracks, which have minimal clearance to the cover.
WARNING!
In an accident, serious injury could result if the seat
storage bin covers are not properly latched.
•DO NOT drive the vehicle with the storage bin
covers open.
•Keep the storage bin covers closed and latched
while the vehicle is in motion.
•DO NOT use a storage bin latch as a tie down.
Storage Bin
3
UNDERSTANDING THE FEATURES OF YOUR VEHICLE 205