Page 117 of 450
NOTE:If you do not say a command within a few
seconds, the system will present you with a list of
options.
If you ever wish to interrupt the system while it lists
options, press the Voice Command
button, listen
for the beep, and say your command.
Pressing the Voice Command
button while the
system is speaking is known as “barging in.” The system
will be interrupted, and after the beep, you can add or
change commands. This will become helpful once you
start to learn the options.
NOTE: At any time, you can say the words “Cancel”,
“Help” or “Main Menu”.
These commands are universal and can be used from any
menu. All other commands can be used depending upon
the active application. For example, if you are in the disc menu and you are
listening to FM radio, you can speak commands from the
disc menu or from the FM radio menu.
When using this system, you should speak clearly and at
a normal speaking volume.
The system will best recognize your speech if the win-
dows are closed, and the heater/air conditioning fan is
set to low.
At any point, if the system does not recognize one of your
commands, you will be prompted to repeat it.
To hear the first available Menu, press the Voice
Command
button and say “Help” or “Main
Menu”.
116 UNDERSTANDING THE FEATURES OF YOUR VEHICLE
Page 127 of 450
Extended Cab/Crew Cab Rear Seat
More cargo space is available by lifting up on the rear
seat cushion.
The Crew Cab Rear Seat is a 60/40 split cushion and full
back. Either cushion can be raised, independently.
Heated Seats — If Equipped
The heated seat switches are located on the center of the
instrument panel.
After turning the ignition ON, you can choose from High,
Low or Off heat settings. Amber indicator lights in each
switch indicate the level of heat in use. Two indicator
lights will illuminate for High, one for Low and none for
Off.Press the switch once to select High-level heat-
ing. Press the switch a second time to select
Low-level heating. Press the switch a third time
to shut the heating elements Off. If the High-level heating is selected, the system will
automatically switch to Low-level heating after approxi-
mately 30 minutes of continuous operation. At that time,
the number of indicators illuminated changes from two
to one, indicating the change. Operation on the Low-level
setting also turns Off automatically after approximately
30 minutes.
WARNING!
•Persons who are unable to feel pain to the skin
because of advanced age, chronic illness, diabetes,
spinal cord injury, medication, alcohol use, ex-
haustion or other physical condition must exercise
care when using the seat heater. It may cause burns
even at low temperatures, especially if used for
long periods of time.
(Continued)
126 UNDERSTANDING THE FEATURES OF YOUR VEHICLE
Page 128 of 450
WARNING! (Continued)
•Do not place anything on the seat that insulates
against heat, such as a blanket or cushion. This
may cause the seat heater to overheat. Sitting in a
seat that has been overheated could cause serious
burns due to the increased surface temperature of
the seat.
CAUTION!
Repeated overheating of the seat could damage the
heating element and/or degrade the material of the
seat.
TO OPEN AND CLOSE THE HOOD
To open the hood, two latches must be released.
1. First pull the hood release lever located under the left
side of the instrument panel.
Hood Release Lever Location
3
UNDERSTANDING THE FEATURES OF YOUR VEHICLE 127
Page 163 of 450
To remove the cleats from the utility rail, remove the end
cap by pushing up on the locking tab, located on the
bottom of the end cap. Slide the cleat off the end of the
rail.REAR WINDOW FEATURES
Rear Window Defroster — If Equipped
The rear window defroster button is located on the
right-side of the Air Conditioning and Heater
Control, below the A/C (snowflake) button. Press this
button to turn on the rear window defroster and the
heated outside mirrors (if equipped). An indicator in the
button will illuminate when the rear window defroster is
on. The rear window defroster automatically turns off
after approximately 10 minutes. For an additional five
minutes of operation, press the button a second time.
NOTE: To prevent excessive battery drain, use the rear
window defroster only when the engine is operating.
Utility Rail End Cap
162 UNDERSTANDING THE FEATURES OF YOUR VEHICLE
Page 165 of 450
SLIDE-IN CAMPERS
Camper Applications
Certain truck models are not recommended for slide-in
campers. To determine if your vehicle is excluded, please
refer to the Consumer Information Truck-Camper Load-
ing document, located in your Owner’s Manual packet or
available from your authorized dealer. For safety reasons,
follow all instructions on this important document.
General Information
The Manufacturer’s Warranty does not apply to body
modifications and special equipment, such as a camper
unit, heaters, stoves, refrigerators, etc., supplied by
manufacturers other than Chrysler LLC. For warranty
coverage and service on these items, contact the appli-
cable manufacturer.To mount a camper unit with an overhang, the tailgate
can be removed. Unlatch the tailgate and remove the
support cables from the retainer pins. Raise the right side
of the tailgate until the lower right side pivot clears the
hanger bracket. Then slide the tailgate to the right to
remove.
Carbon Monoxide Warning-Vehicles Equipped
With A Cap or Slide-In Campers
To avoid inhaling carbon monoxide, which is deadly, the
exhaust system on vehicles equipped with “Cap or
Slide-In Campers” should extend beyond the overhang-
ing camper compartment and be free of leaks.
164 UNDERSTANDING THE FEATURES OF YOUR VEHICLE
Page 172 of 450
▫Electronic Serial Number/Sirius
Identification Number (ESN/SID) ......... 230
▫ Selecting Uconnect™ Multimedia
(Satellite) Mode ..................... 231
▫ Satellite Antenna ..................... 231
▫ Reception Quality .................... 231
▫ Operating Instructions — Uconnect™
Multimedia (Satellite) Mode ............. 232
▫ Operating Instructions — Uconnect™ phone
(If Equipped) ....................... 234
▫ Operating Instructions —
Video Entertainment System (VES)™
(If Equipped) ....................... 234 �
Remote Sound System Controls —
If Equipped .......................... 235
▫ Radio Operation ..................... 235
▫ CD Player ......................... 236
� CD/DVD Disc Maintenance .............. 236
� Radio Operation And Cellular Phones ....... 237
� Climate Controls ...................... 237
▫ Air Conditioning And Heater ............ 237
▫ Operating Tips ...................... 240
▫ Operation Tips Chart ................. 243
4
UNDERSTANDING YOUR INSTRUMENT PANEL 171
Page 238 of 450
RADIO OPERATION AND CELLULAR PHONES
Under certain conditions, the cellular phone being on in
your vehicle can cause erratic or noisy performance from
your radio. This condition may be lessened or eliminated
by relocating the cellular phone antenna. This condition
is not harmful to the radio. If your radio performance
does not satisfactorily “clear” by the repositioning of the
antenna, it is recommended that the radio volume be
turned down or off during cellular phone operation.
CLIMATE CONTROLS
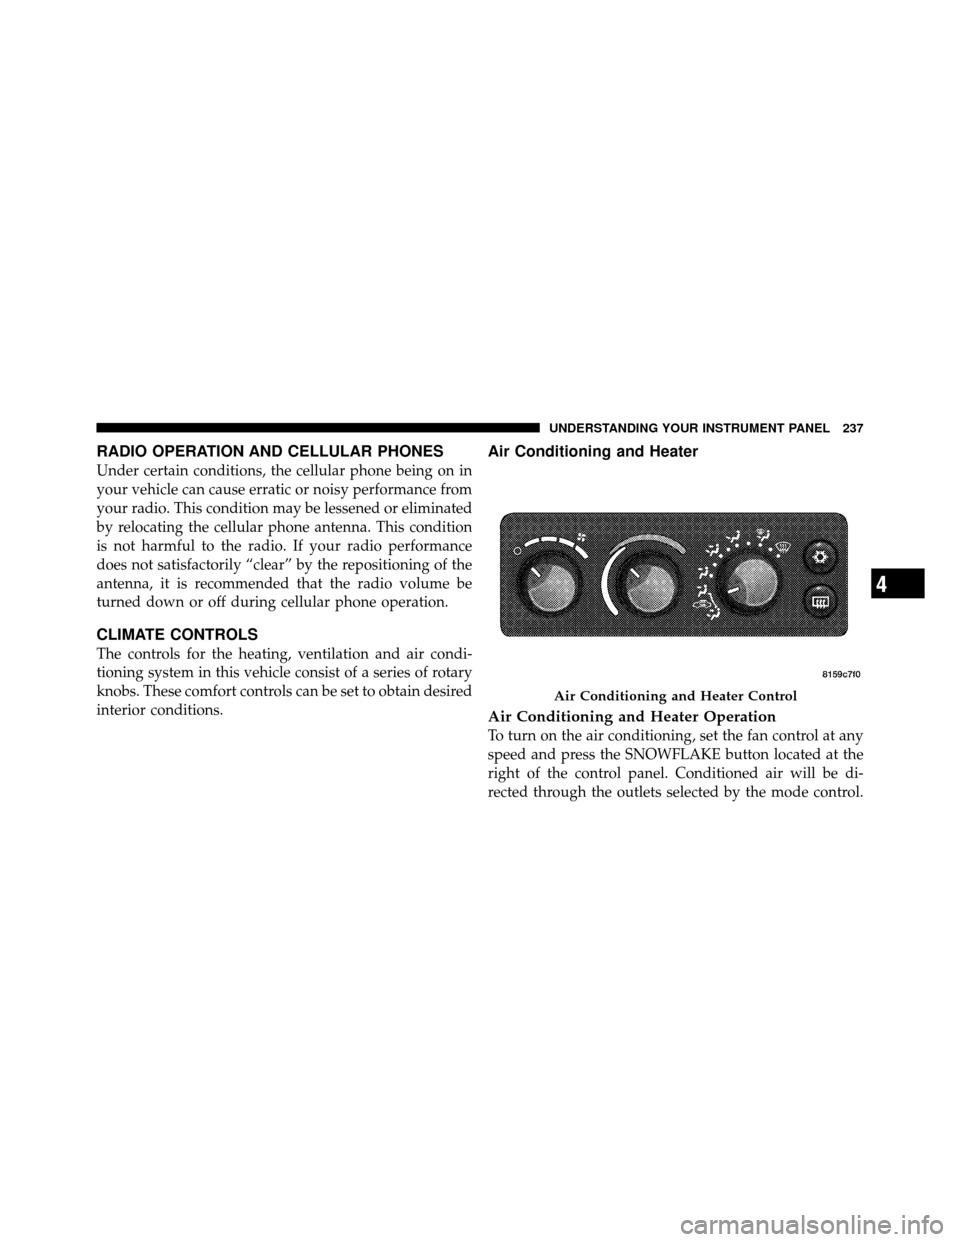
The controls for the heating, ventilation and air condi-
tioning system in this vehicle consist of a series of rotary
knobs. These comfort controls can be set to obtain desired
interior conditions.
Air Conditioning and Heater
Air Conditioning and Heater Operation
To turn on the air conditioning, set the fan control at any
speed and press the SNOWFLAKE button located at the
right of the control panel. Conditioned air will be di-
rected through the outlets selected by the mode control.
Air Conditioning and Heater Control
4
UNDERSTANDING YOUR INSTRUMENT PANEL 237
Page 246 of 450
STARTING AND OPERATING
CONTENTS
�Starting Procedures .................... 249
▫ Automatic Transmission ............... 249
▫ Normal Starting ..................... 249
▫ Extreme Cold Weather
(Below –20°F Or –29°C) ................ 250
▫ If Engine Fails To Start ................ 250
▫ After Starting ....................... 251
� Engine Block Heater — If Equipped ........ 251
� Automatic Transmission ................. 252 ▫
Key Ignition Park Interlock ............. 252
▫ Brake/Transmission Interlock System ...... 253
▫ Automatic Transmission ............... 253
▫ Gear Ranges ........................ 253
� Four-Wheel Drive Operation — If Equipped . . 258
▫ NV233/243 GII Transfer Case Operating
Information/Precautions ............... 258
▫ Shifting Procedure – NV233/243 Transfer
Case ............................. 262
5