Page 205 of 450

Operating Instructions — Voice Command
System — If Equipped
For the radio, refer to “Voice Command” in “Understand-
ing The Features Of Your Vehicle”.
Operating Instructions — Uconnect™ Phone — If
Equipped
Refer to “Uconnect™ Phone” in “Understanding The
Features Of Your Vehicle”.
Clock Setting Procedure — RBZ Radio
To Manually Set the Clock
1. Turn on the radio.
2. Touch the screen where the time is displayed, the clock
setting menu will appear on the screen.3. To move the hour forward, touch the screen where the
word “Hour” with the arrow pointing upward is dis-
played. To move the hour backward, touch the screen
where the word “Hour” with the arrow pointing down-
ward is displayed.
4. To move the minute forward, touch the screen where
the word “Min” with the arrow pointing upward is
displayed. To move the minute backward, touch the
screen where the word “Min” with the arrow pointing
downward is displayed.
5. To save the new time setting, touch the screen where
the word “Save” is displayed.
Changing Daylight Savings Time
When selected, this feature will display the time of day in
daylight savings time. Proceed as follows to change the
current setting:
1. Turn on the radio.
204 UNDERSTANDING YOUR INSTRUMENT PANEL
Page 206 of 450
2. Touch the screen where the time is displayed. The
clock setting menu will appear on the screen.
3. When this feature is on, a check mark will appear in
the box next to the words “Daylight Savings.” Touch the
screen where the words “Daylight Savings” are dis-
played to change the current setting.
Show Time if Radio is Off
When selected, this feature will display the time of day
on the touch screen when the radio is turned off. Proceed
as follows to change the current setting:
1. Turn on the radio.
2. Touch the screen where the time is displayed. The
clock setting menu will appear on the screen.
3. When this feature is on, a check mark will appear in
the box next to the words “Show Time if Radio is Off.”
Touch the screen where the words “Show Time if Radio is
Off” are displayed to change the current setting.
Changing the Time Zone
1. Turn on the radio.
2. Touch the screen where the time is displayed. The
clock setting menu will appear on the screen.
3. Touch the screen where the words “Set Time Zone” are
displayed. The time zone selection menu will appear on
the screen.
4. Select a time zone by touching the screen where your
selection appears. If you do not see a time zone that you
want to select, touch the screen where the word “Page” is
displayed to view additional time zones in the menu.
5. Touch the screen where the word “Save” is displayed.
4
UNDERSTANDING YOUR INSTRUMENT PANEL 205
Page 207 of 450
Clock Setting Procedure — RER/REN Radio
Uconnect�gps — RER Only
The GPS receiver used in this system is synchronized to
the time data being transmitted by the GPS satellite. The
satellite clock is Greenwich Mean Time (GMT). This is the
worldwide standard for time. This makes the system’s
clock very accurate once the appropriate time zone and
daylight savings information is set.
To Manually Set the Clock — RER/REN
1. Turn on the radio.
2. Touch the screen where the time is displayed.
3. Touch the screen where “User Clock” is displayed, the
clock setting menu will appear on the screen. 4. To move the hour forward, touch the screen where the
word “Hour” with the arrow pointing upward is dis-
played. To move the hour backward, touch the screen
where the word “Hour” with the arrow pointing down-
ward is displayed.
5. To move the minute forward, touch the screen where
the word “Min” with the arrow pointing upward is
displayed. To move the minute backward, touch the
screen where the word “Min” with the arrow pointing
downward is displayed.
6. To save the new time setting, touch the screen where
the word “Save” is displayed.
Changing Daylight Savings Time
When selected, this feature will display the time of day in
daylight savings time. Proceed as follows to change the
current setting:
1. Turn on the radio.
206 UNDERSTANDING YOUR INSTRUMENT PANEL
Page 208 of 450
2. Touch the screen where “User Clock” is displayed, the
clock setting menu will appear on the screen.
3. When this feature is on, a check mark will appear in
the box next to the words “Daylight Savings.” Touch the
screen where the words “Daylight Savings” are dis-
played to change the current setting.
Show Time if Radio is Off
When selected, this feature will display the time of day
on the touch screen when the radio is turned off. Proceed
as follows to change the current setting:
1. Turn on the radio.
2. Touch the screen where the time is displayed.
3. Touch the screen where “User Clock” is displayed, the
clock setting menu will appear on the screen.
4. When this feature is on, a check mark will appear in
the box next to the words “Show Time if Radio is Off.”Touch the screen where the words “Show Time if Radio is
Off” are displayed to change the current setting.
Changing the Time Zone
1. Turn on the radio.
2. Touch the screen where the time is displayed.
3. Touch the screen where “User Clock” is displayed, the
clock setting menu will appear on the screen.
4. Touch the screen where the words “Set Time Zone” are
displayed. The time zone selection menu will appear on
the screen.
5. Select a time zone by touching the screen where your
selection appears. If you do not see a time zone that you
want to select, touch the screen where the word “Page” is
displayed to view additional time zones in the menu.
6. Touch the screen where the word “Save” is displayed.
4
UNDERSTANDING YOUR INSTRUMENT PANEL 207
Page 230 of 450
SOUND BOX OPERATION
The Sound Box includes one subwoofer, two tweeters
and lights that pulsate with the music.
The lights can be: turned off, on constantly, or pulse with
the beat of the music. To control the lights, select one of
the following three positions:Switch PositionLight Operation
1 Pulse (right/passenger
side) position – In this
position the sound is ac-
tive and the lights will
pulse with the music.
2 Pulse off/light off (center)
position – In this position
the sound is active but
the lights will be turned
off.
3 Constant (left/driver side)
position – In this position
the sound is active and
the lights will remain on
constantly.
Sound Box
4
UNDERSTANDING YOUR INSTRUMENT PANEL 229
Page 237 of 450
CD Player
Pressing the top of the switch once will go to the next
track on the CD. Pressing the bottom of the switch once
will go to the beginning of the current track or to the
beginning of the previous track if it is within one second
after the current track begins to play.
If you press the switch up or down twice it plays the
second track, three times, it will play the third, etc.
The button in the center of the left hand switch changes
CD’s on the 6–Disc in-dash CD changer radio. This
button does not function for all other radios.
CD/DVD DISC MAINTENANCE
To keep a CD/DVD in good condition, take the following
precautions:
1. Handle the disc by its edge; avoid touching the
surface.2. If the disc is stained, clean the surface with a soft cloth,
wiping from center to edge.
3. Do not apply paper or tape to the disc; avoid scratch-
ing the disc.
4. Do not use solvents such as benzene, thinner, cleaners,
or anti-static sprays.
5. Store the disc in its case after playing.
6. Do not expose the disc to direct sunlight.
7. Do not store the disc where temperatures may become
too high.
NOTE:
If you experience difficulty in playing a particu-
lar disc, it may be damaged (i.e., scratched, reflective
coating removed, a hair, moisture or dew on the disc)
oversized, or have protection encoding. Try a known
good disc before considering disc player service.
236 UNDERSTANDING YOUR INSTRUMENT PANEL
Page 239 of 450
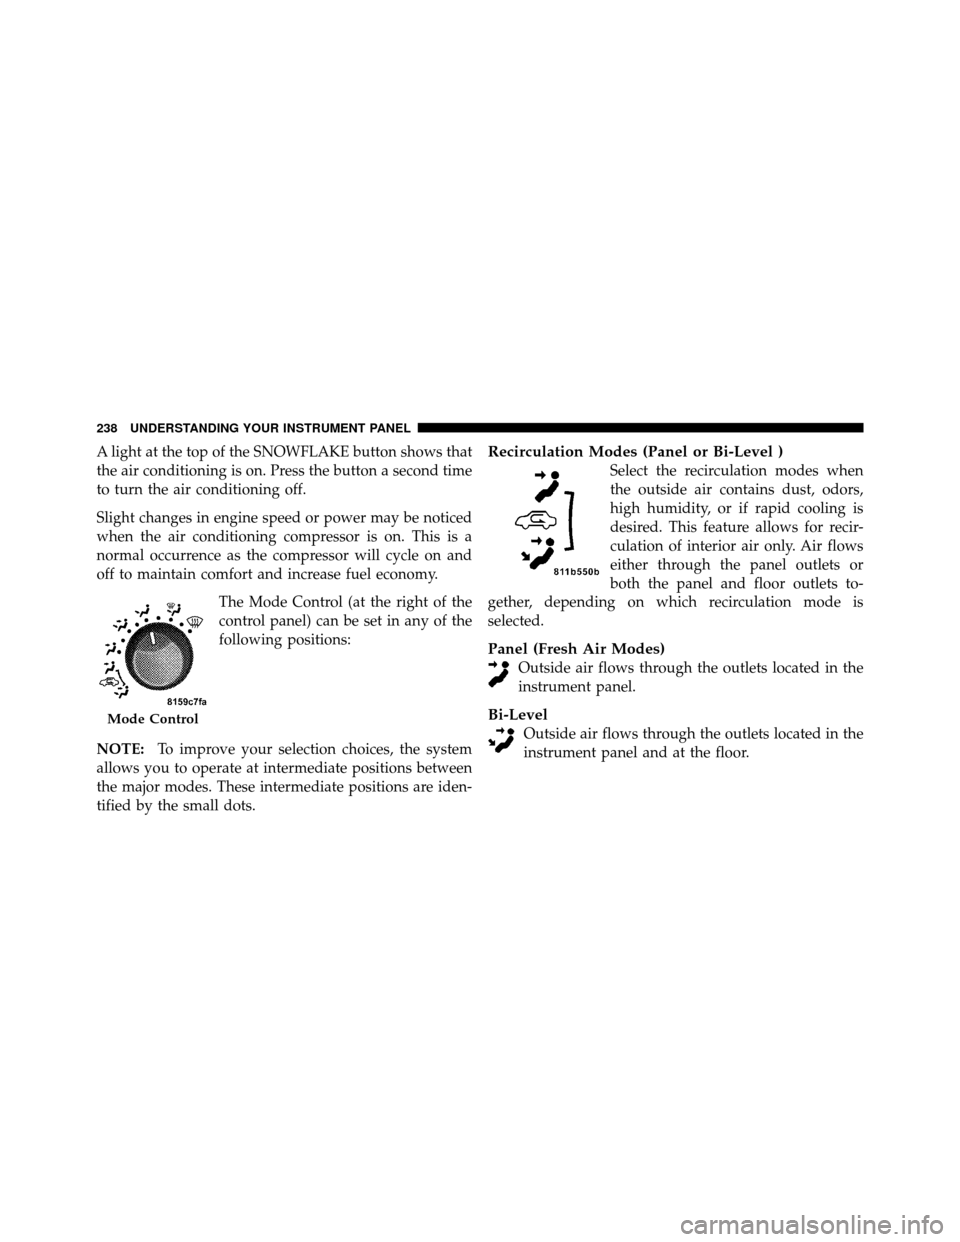
A light at the top of the SNOWFLAKE button shows that
the air conditioning is on. Press the button a second time
to turn the air conditioning off.
Slight changes in engine speed or power may be noticed
when the air conditioning compressor is on. This is a
normal occurrence as the compressor will cycle on and
off to maintain comfort and increase fuel economy.The Mode Control (at the right of the
control panel) can be set in any of the
following positions:
NOTE: To improve your selection choices, the system
allows you to operate at intermediate positions between
the major modes. These intermediate positions are iden-
tified by the small dots.Recirculation Modes (Panel or Bi-Level )
Select the recirculation modes when
the outside air contains dust, odors,
high humidity, or if rapid cooling is
desired. This feature allows for recir-
culation of interior air only. Air flows
either through the panel outlets or
both the panel and floor outlets to-
gether, depending on which recirculation mode is
selected.
Panel (Fresh Air Modes)
Outside air flows through the outlets located in the
instrument panel.
Bi-Level
Outside air flows through the outlets located in the
instrument panel and at the floor.Mode Control
238 UNDERSTANDING YOUR INSTRUMENT PANEL
Page 243 of 450
When using the air conditioner in extremely heavy
traffic, in hot weather, especially when towing a trailer,
additional engine cooling may be required. If this situa-
tion is encountered, operate the transmission in a lower
gear and set the air conditioner to recirculation mode.
Operating the air conditioner in recirculation mode pro-
vides the maximum performance from your air condi-
tioning. When stopped in heavy traffic, it may be neces-
sary to shift into NEUTRAL and press the accelerator
slightly for fast idle operation.Winter Operation
When operating the system during the winter months,
make sure the air intake, located directly in front of the
windshield, is free of ice, slush, snow, or other obstruc-
tions. This will help prevent snow going into the ducts.
242 UNDERSTANDING YOUR INSTRUMENT PANEL