Page 39 of 484
Window Lockout Switch
The window lockout switch on the driver’s door trim
panel allows you to disable the window controls on the
passenger doors. To disable the window controls, press
and release the window lockout button (setting it in the
DOWN position). To enable the window controls, press
and release the window lockout button again (setting it in
the UP position).
Reset
Anytime the vehicle battery is disconnected or goes dead,
the AUTO-up function will be disabled. To reactivate the
AUTO-up feature, perform the following procedure after
vehicle power is restored:
Window Lockout Switch
38 THINGS TO KNOW BEFORE STARTING YOUR VEHICLE
Page 146 of 484

NOTE:In order to ensure proper operation, the Elec-
tronic Speed Control System has been designed to shut
down if multiple Speed Control functions are operated at
the same time. If this occurs, the Electronic Speed Control System can be reactivated by pushing the Electronic
Speed Control ON/OFF button and resetting the desired
vehicle set speed.
To Activate
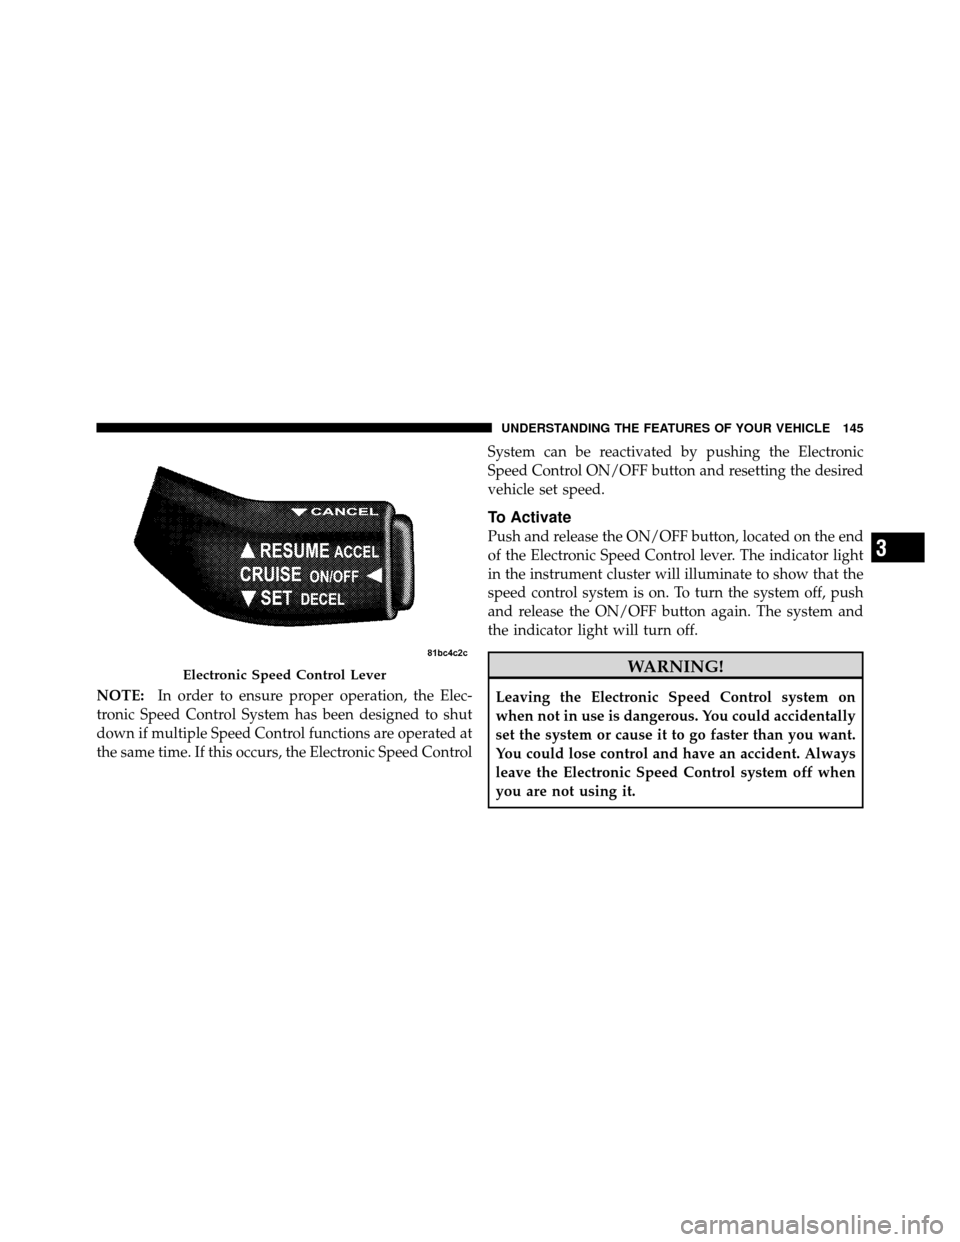
Push and release the ON/OFF button, located on the end
of the Electronic Speed Control lever. The indicator light
in the instrument cluster will illuminate to show that the
speed control system is on. To turn the system off, push
and release the ON/OFF button again. The system and
the indicator light will turn off.
WARNING!
Leaving the Electronic Speed Control system on
when not in use is dangerous. You could accidentally
set the system or cause it to go faster than you want.
You could lose control and have an accident. Always
leave the Electronic Speed Control system off when
you are not using it.
Electronic Speed Control Lever
3
UNDERSTANDING THE FEATURES OF YOUR VEHICLE 145
Page 167 of 484
LOAD LEVELING SYSTEM — IF EQUIPPED
The automatic load leveling system will provide a level-
riding vehicle under most passenger and cargo loading
conditions.
A hydraulic pump contained within the shock absorbers
raises the rear of the vehicle to the correct height. It takes
approximately 1 mile (1.6 km) of driving for the leveling
to complete depending on road surface conditions.
If the leveled vehicle is not moved for approximately
15 hours, the leveling system will bleed itself down. The
vehicle must be driven to reset the system.
166 UNDERSTANDING THE FEATURES OF YOUR VEHICLE
Page 174 of 484

INSTRUMENT CLUSTER DESCRIPTIONS
1. Fuel Gauge
The pointer shows the level of fuel in the fuel tank when
the ignition switch is in the ON position.
2. Trip Odometer Button
Premium Cluster
Press this button to change the display from odometer to
either of two trip odometer settings. The letter “A” or “B”
will appear when in the trip odometer mode. Push in and
hold the button for two seconds to reset the trip odometer
to 0 miles (km). The odometer must be in TRIP mode to
reset it.
Base Cluster
The word�Trip�will appear when this button is pressed.
Push in and hold the button for two seconds when the trip odometer is displayed to reset it to 0 miles (km). A
second press of the button will display the outside
temperature in the odometer.
3. Speedometer
Indicates vehicle speed.
4. Electronic Speed Control Indicator Light
This light will turn on when the electronic
speed control is on.
5. Tachometer
The red segments indicate the maximum permissible
engine revolutions per minute (RPM x 1000) for each gear
range. Ease up on the accelerator before reaching the red
area.
4
UNDERSTANDING YOUR INSTRUMENT PANEL 173
Page 179 of 484

17.Shift Lever Indicator — Automatic Transmission Only
The Shift Lever Indicator is self-contained within the
instrument cluster. It displays the gear position of the
automatic transmission.
18. Front Fog Light Indicator — If EquippedThis indicator will illuminate when the front fog
lights are on.
19. Odometer / Electronic Vehicle Information Center
(EVIC) Display Area
The odometer shows the total distance the vehicle has
been driven. The trip odometer shows individual trip
mileage. Refer to “Trip Odometer Button” for additional
information.
NOTE: U.S. Federal regulations require that upon trans-
fer of vehicle ownership, the seller certify to the pur-
chaser the correct mileage that the vehicle has been
driven. If your odometer needs to be repaired or serviced,
the repair technician should leave the odometer reading the same as it was before the repair or service. If s/he
cannot do so, then the odometer must be set at zero, and
a sticker must be placed in the door jamb stating what the
mileage was before the repair or service. It is a good idea
for you to make a record of the odometer reading before
the repair/service, so that you can be sure that it is
properly reset, or that the door jamb sticker is accurate if
the odometer must be reset at zero.
Vehicle Odometer Messages
When the appropriate conditions exist, the following
messages will display in the odometer:
ECO
...................... Fuel Saver Indicator
2drivE ........ V ehicle is in Rear Wheel Drive (RWD)
4drivE .......... V ehicle is in All Wheel Drive (AWD
tCASE ..................... AWD System Fault
gASCAP ............ Loose Fuel Filler Cap Message
Lo tirE ...................... LowTirePr essure
noFUSE .......................... Fuse Fault
CHAngE OIL ............... Oil Change Required
178 UNDERSTANDING YOUR INSTRUMENT PANEL
Page 181 of 484

A loose, improperly installed, or damaged fuel filler cap
may also turn on the Malfunction Indicator Light (MIL).
Lo tirE
When the appropriate condition exists, the odometer
display will toggle between Lo and tirE for three cycles.
noFUSE
If the vehicle diagnostic system determines that the
Ignition Off Draw (IOD) fuse is improperly installed, or
damaged, a “noFUSE” message will display in the odom-
eter display area. For further information on fuses and
fuse locations refer to “Fuses” in “Maintaining Your
Vehicle”.
CHAngE OIL (Base Cluster)
Your vehicle is equipped with an engine oil change
indicator system. The “Change Oil” message will flash in
the instrument cluster odometer for approximately
12 seconds after a single chime has sounded to indicate
the next scheduled oil change interval. The engine oilchange indicator system is duty cycle based, which
means the engine oil change interval may fluctuate
dependent upon your personal driving style.
Unless reset, this message will continue to display each
time you turn the ignition switch to the ON position. To
turn off the message temporarily, press and release the
TRIP ODOMETER button on the instrument cluster. To
reset the oil change indicator system (after performing
the scheduled maintenance) perform the following pro-
cedure:
1. Turn the ignition switch to the ON position (do not
start the engine).
2. Fully depress the accelerator pedal, slowly, three times
within 10 seconds.
3. Turn the ignition switch to the OFF/LOCK position.
180 UNDERSTANDING YOUR INSTRUMENT PANEL
Page 182 of 484

NOTE:If the indicator message illuminates when you
start the engine, the oil change indicator system did not
reset. If necessary, repeat these steps.
20. Brake Warning Light This light monitors various brake functions,
including brake fluid level and parking brake
application. If the brake light turns on, it may
indicate that the parking brake is applied, that
the brake fluid level is low, or that there is a problem with
the anti-lock brake system reservoir.
If the light remains on when the parking brake has been
disengaged, and the fluid level is at the full mark on the
master cylinder reservoir, it indicates a possible brake
hydraulic system malfunction. In this case, the light will
remain on until the condition has been corrected.
The dual brake system provides a reserve braking capac-
ity in the event of a failure to a portion of the hydraulic
system. A leak in either half of the dual brake system is indicated by the Brake Warning Light which will turn on
when the brake fluid level in the master cylinder has
dropped below a specified level.
The light will remain on until the cause is corrected.
NOTE:
The light may flash momentarily during sharp
cornering maneuvers which change fluid level condi-
tions. The vehicle should have service performed, and
the brake fluid level checked.
If brake failure is indicated, immediate repair is neces-
sary.
WARNING!
Driving a vehicle with the brake light on is danger-
ous. Part of the brake system may have failed. It will
take longer to stop the vehicle. You could have an
accident. Have the vehicle checked immediately.
4
UNDERSTANDING YOUR INSTRUMENT PANEL 181
Page 190 of 484

•ECO (Fuel Saver Indicator) — if equipped
•SERVICE AWD SYSTEM — All Wheel Drive (AWD)
system is not functioning properly and service is
required.
•Channel # Transmit
•Channel # Training
•Channel # Trained
•Clearing Channels
•Channels Cleared
•Did Not Train
•Insert Key/Turn To Run (refer to “Remote Starting
System” in “Things To Know Before Starting Your
Vehicle”)
•Check Gascap (refer to “Adding Fuel” in “Starting
And Operating”)
•Oil Change Required (with a single chime)
Oil Change Required
Your vehicle is equipped with an engine oil change
indicator system. The “Oil Change Required” message
will flash in the EVIC display for approximately 10 sec-
onds after a single chime has sounded to indicate the next
scheduled oil change interval. The engine oil change
indicator system is duty cycle based, which means the
engine oil change interval may fluctuate dependent upon
your personal driving style.
Unless reset, this message will continue to display each
time you turn the ignition switch to the ON position. To
turn off the message temporarily, press and release the
MENU button. To reset the oil change indicator system
(after performing the scheduled maintenance) perform
the following procedure:
1. Turn the ignition switch to the ON position. (Do not
start the engine).
4
UNDERSTANDING YOUR INSTRUMENT PANEL 189