Page 92 of 538

Here are some tips on getting the most out of your child
restraint:
•Before buying any restraint system, make sure that it
has a label certifying that it meets all applicable Safety
Standards. Chrysler Group LLC also recommends that
you make sure that you can install the child restraint in
the vehicle where you will use it, before you buy it.
•The restraint must be appropriate for your child’s
weight and height. Check the label on the restraint for
weight and height limits.
•Carefully follow the instructions that come with the
restraint. If you install the restraint improperly, it may
not work when you need it.
•The passenger seat belts are equipped with cinching
latch plates, which are designed to keep the lap
portion tight around the child restraint so that it is not
necessary to use a locking clip. Pulling up on theshoulder portion of the lap/shoulder belt will tighten
the belt. The cinching latch plate will keep the belt
tight; however, any seat belt system will loosen with
time, so check the belt occasionally and pull it tight if
necessary.
•In the rear seat, you may have trouble tightening the
lap/shoulder belt on the child restraint because the
buckle or latch plate is too close to the belt path
opening on the restraint. Disconnect the latch plate
from the buckle and twist the short buckle end of the
belt several times to shorten it. Insert the latch plate
into the buckle with the release button facing out.
•If the belt still can’t be tightened, or if pulling and
pushing on the restraint loosens the belt, disconnect
the latch plate from the buckle, turn the buckle
around, and insert the latch plate into the buckle
again. If you still can’t make the child restraint secure,
try a different seating position.
2
THINGS TO KNOW BEFORE STARTING YOUR VEHICLE 91
Page 97 of 538

WARNING!
An incorrectly anchored tether strap could lead to
increased head motion and possible injury to the
child. Use only the anchor positions directly behind
the child seat to secure a child restraint top tether
strap.
Installing the Child Restraint Using the Vehicle
Seat Belts
The seat belts in the passenger seating positions are
equipped with either an Automatic Locking Retractor
(ALR) or a cinching latch plate or both. Both types of seat
belts are designed to keep the lap portion of the seat belt
tight around the child restraint so that it is not necessary
to use a locking clip. The ALR will make a ratcheting
noise if you extract the entire belt from the retractor andthen allow the belt to retract into the retractor. For
additional information on ALR, refer to “Automatic
Locking Mode”.
To install a child restraint, first, pull enough of the seat
belt webbing from the retractor to route it through the
belt path of the child restraint and slide the latch plate
into the buckle. Next, extract all the seat belt webbing out
of the retractor and then allow the belt to retract into the
retractor. Finally, pull on any excess webbing to tighten
the lap portion around the child restraint. Any seat belt
system will loosen with time, so check the belt occasion-
ally, and pull it tight if necessary.
Once you have completed securing the child restraint
with the seat belt secure the top tether strap. Refer to
�Installing the Top Tether Strap�
for instructions.
96 THINGS TO KNOW BEFORE STARTING YOUR VEHICLE
Page 106 of 538
Door Latches
Check for positive closing, latching, and locking.
Fluid Leaks
Check area under vehicle after overnight parking for fuel,
engine coolant, oil, or other fluid leaks. Also, if gasoline
fumes are detected or if fuel, power steering fluid, or
brake fluid leaks are suspected, the cause should be
located and corrected immediately.2
THINGS TO KNOW BEFORE STARTING YOUR VEHICLE 105
Page 119 of 538
•The BSM system detection zone DOES NOT change if
your vehicle is towing a trailer. Therefore, visually
verify the adjacent lane is clear for both your vehicle
and trailer before making a lane change. If the trailer
or other object (i.e., bicycle, sports equipment) extends
beyond the side of your vehicle, this may result in the
BSM warning light remaining illuminated the entire
time the vehicle is in a forward gear.
The area on the rear fascia where the radar sensors are
located must remain free of snow, ice, and dirt/road
contamination so that the BSM system can function
properly. Do not block the area of the rear fascia where
the radar sensors are located with foreign objects
(bumper stickers, bicycle racks, etc.).
Sensor Locations
118 UNDERSTANDING THE FEATURES OF YOUR VEHICLE
Page 124 of 538

WARNING!
The Blind Spot Monitoring system is only an aid to
help detect objects in the blind spot zones. The BSM
system is not designed to detect pedestrians, bicy-
clists, or animals. Even if your vehicle is equipped
with the BSM system, always check your vehicles
mirrors, glance over your shoulder, and use your turn
signal before changing lanes. Failure to do so can
result in serious injury or death.
Rear Cross Path
The Rear Cross Path (RCP) feature is intended to aid the
driver when backing out of parking spaces where their
vision of oncoming vehicles may be blocked. Proceed
slowly and cautiously out of the parking space until the
rear end of the vehicle is exposed. The RCP system will
then have a clear view of the cross traffic and if an
oncoming vehicle is detected, alert the driver.RCP monitors the rear detection zones on both sides of
the vehicle, for objects that are moving toward the side of
the vehicle with a minimum speed of approximately 1 to
2 mph (1 km/h to 3 km/h), to objects moving a maxi-
mum of approximately 10 mph (16 km/h), such as in
parking lot situations.RCP Detection Zones
3
UNDERSTANDING THE FEATURES OF YOUR VEHICLE 123
Page 125 of 538

NOTE:In a parking lot situation, oncoming vehicles can
be obscured by vehicles parked on either side. If the
sensors are blocked by other structures or vehicles, the
system will not be able to alert the driver.
When RCP is on and the vehicle is in REVERSE, the
driver is alerted using both the visual and audible
alarms, including radio muting.
WARNING!
RCP is not a Back Up Aid system. It is intended to be
used to help a driver detect an oncoming vehicle in a
parking lot situation. Drivers must be careful when
backing up, even when using RCP. Always check
carefully behind your vehicle, look behind you, and
be sure to check for pedestrians, animals, other
vehicles, obstructions, and blind spots before back-
ing up. Failure to do so can result in serious injury or
death.
Modes Of Operation
Three selectable modes of operation are available in the
Electronic Vehicle Information Center (EVIC). Refer to
�Electronic Vehicle Information Center (EVIC)/Personal
Settings (Customer-Programmable Features)” in “Under-
standing Your Instrument Panel” for further information.
Blind Spot Alert
When operating in Blind Spot Alert mode, the BSM
system will provide a visual alert in the appropriate side
view mirror based on a detected object. However, when
the system is operating in RCP, the system will respond
with both visual and audible alerts when a detected
object is present. Whenever an audible alert is requested,
the radio is muted.
Blind Spot Alert Lights/Chime
When operating in Blind Spot Alert Lights/Chime, the
BSM system will provide a visual alert in the appropriate
side view mirror based on a detected object. If the turn
124 UNDERSTANDING THE FEATURES OF YOUR VEHICLE
Page 128 of 538
Manual Front And Second Row Seat Adjuster
The adjusting bar is located under the front of the seat.
Pull the bar upward and move the seat to the desired
position. Release the bar to lock the seat into position.
Using body pressure, move forward and rearward on the
seat to be sure the seat adjusters have latched.WARNING!
Adjusting a seat while the vehicle is moving is
dangerous. The sudden movement of the seat could
cause you to lose control. The seat belt might not be
properly adjusted and you could be injured. Adjust
any seat only while the vehicle is parked.
Manual Seat Adjuster
3
UNDERSTANDING THE FEATURES OF YOUR VEHICLE 127
Page 137 of 538
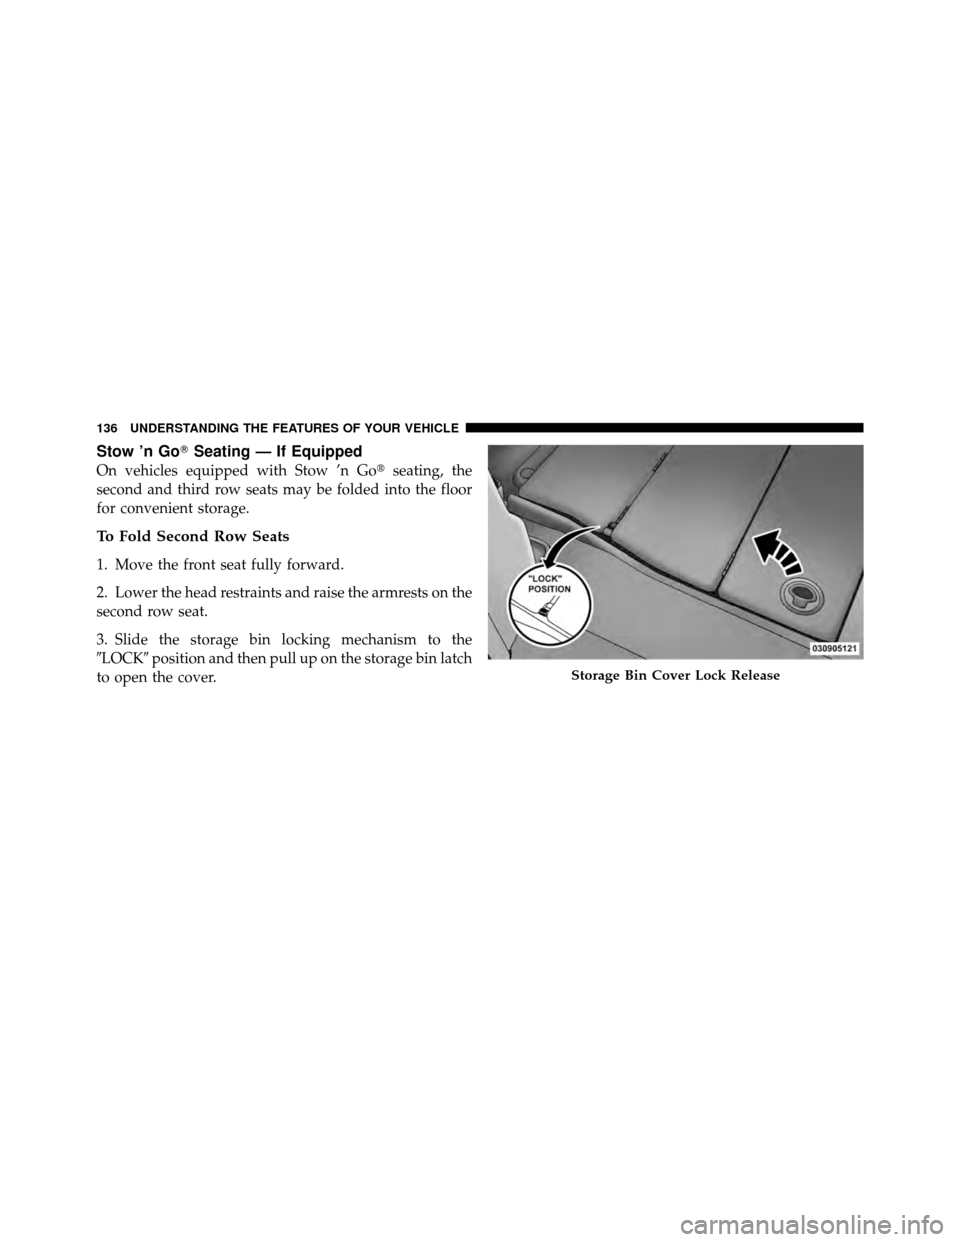
Stow ’n Go�Seating — If Equipped
On vehicles equipped with Stow ’n Go� seating, the
second and third row seats may be folded into the floor
for convenient storage.
To Fold Second Row Seats
1. Move the front seat fully forward.
2. Lower the head restraints and raise the armrests on the
second row seat.
3. Slide the storage bin locking mechanism to the
�LOCK� position and then pull up on the storage bin latch
to open the cover.
Storage Bin Cover Lock Release
136 UNDERSTANDING THE FEATURES OF YOUR VEHICLE