Page 11 of 538
▫Power Sliding Side Door — If Equipped ..... 42
▫ Sliding Side Door Child Protection Lock ..... 46
� Liftgate ............................. 48
▫ Power Liftgate — If Equipped ............ 49
� Occupant Restraints ..................... 52
▫ Lap/Shoulder Belts .................... 53
▫ Automatic Locking Retractors (ALR) Mode
— If Equipped ....................... 60
▫ Seat Belt Pretensioners — If Equipped ...... 61
▫ Supplemental Active Head Restraints (AHR)
— If Equipped ....................... 61
▫ Enhanced Seat Belt Use Reminder System
(BeltAlert�) ......................... 65
▫ Seat Belts And Pregnant Women .......... 67▫
Seat Belt Extender ..................... 67
▫ Supplemental Restraint System (SRS) -
Airbags ............................ 68
▫ Airbag System Components .............. 69
▫ Advanced Front Airbag Features .......... 70
▫ Airbag Deployment Sensors And Controls . . . 75
▫ Event Data Recorder (EDR) .............. 82
▫ Integrated Child Booster Seat — If Equipped . . 84
▫ Integrated Child Seat — If Equipped ....... 86
▫ Child Restraints ...................... 87
� Rear Seat Delete Feature (Commercial Vehicles
Only) — If Equipped ..................... 97
10 THINGS TO KNOW BEFORE STARTING YOUR VEHICLE
Page 12 of 538
▫Restraining Infants And Small Children With
Seat Delete Feature (Commercial Vehicles
Only) .............................. 98
� Engine Break-In Recommendations ......... 100
� Safety Tips .......................... 101
▫ Transporting Passengers ............... 101 ▫
Exhaust Gas ........................ 101
▫ Safety Checks You Should Make Inside The
Vehicle ............................ 102
▫ Periodic Safety Checks You Should Make
Outside The Vehicle .................. 104
2
THINGS TO KNOW BEFORE STARTING YOUR VEHICLE 11
Page 46 of 538
The Sliding Side Door Open Flash can be enabled or
disabled by performing the following procedure:
1. Place the Key Fob in the ignition switch.
2. Cycle the ignition switch ON/LOCK five times ending
in the ON position(do not start the engine).
3. Within 10 seconds of the final cycle, press the HAZ-
ARD switch.
4. A single chime will sound to signify that you have
successfully completed the programming.
You can turn the feature back on by repeating the
previous procedure.
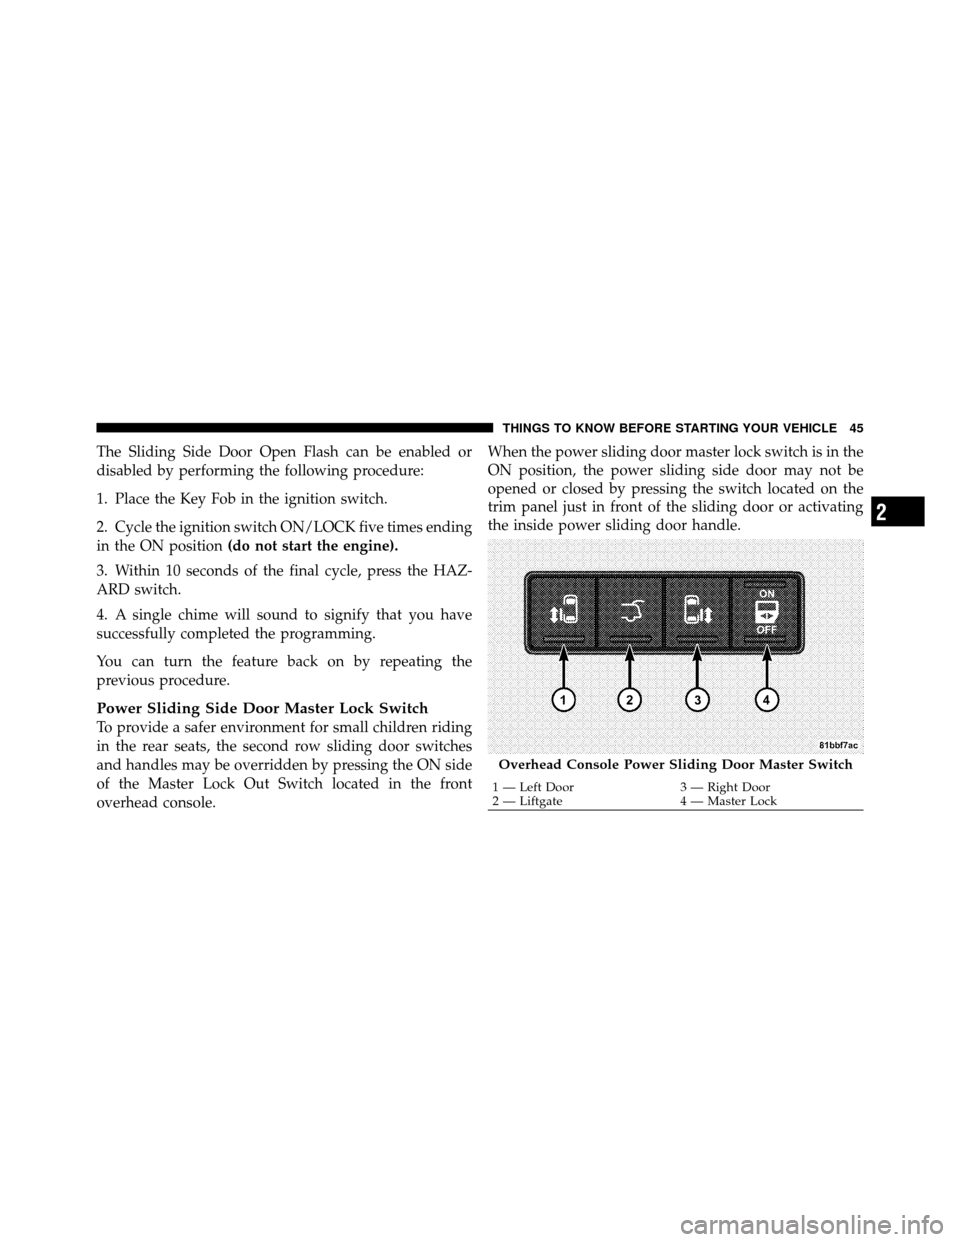
Power Sliding Side Door Master Lock Switch
To provide a safer environment for small children riding
in the rear seats, the second row sliding door switches
and handles may be overridden by pressing the ON side
of the Master Lock Out Switch located in the front
overhead console. When the power sliding door master lock switch is in the
ON position, the power sliding side door may not be
opened or closed by pressing the switch located on the
trim panel just in front of the sliding door or activating
the inside power sliding door handle.
Overhead Console Power Sliding Door Master Switch
1 — Left Door
3 — Right Door
2 — Liftgate 4 — Master Lock
2
THINGS TO KNOW BEFORE STARTING YOUR VEHICLE 45
Page 47 of 538
Sliding Side Door Child Protection Lock
To provide a safer environment for small children riding
in the rear seats, the sliding doors are equipped with a
Child Protection Door Lock system.
NOTE:When the Child Protection Door Lock system is
engaged, the door can be opened only by using the
outside door handle even though the inside door lock is
in the unlocked position.
To Engage the Child Protection Door Lock
1. Open the sliding side door.
2. Slide the Child Protection Door Lock control inward
(toward the vehicle) to engage the Child Protection Door
Lock. 3. Repeat Steps 1 and 2 on the opposite sliding door.
NOTE:
•After engaging the Child Protection Door Lock, al-
ways test the door from the inside to make certain it is
in the desired position.
Child Protection Door Lock
46 THINGS TO KNOW BEFORE STARTING YOUR VEHICLE
Page 48 of 538
•When the Child Protection Door Lock system is en-
gaged, (even if the inside door lock is in the unlocked
position) the door can be opened only by using the
outside door handle, the RKE transmitter, the switches
on the overhead console or the switches located on the
trim panel just in front of the power sliding door.
•The power sliding side door will operate from the
switches located on the trim panel just in front of the
power sliding door, regardless of the Child Protection
Door Lock lever position.To avoid unintentional
operation of the power sliding door from the rear
seats, press the ”ON” Master Lock Out Switch lo-
cated in the front overhead console, next to the
driver.
WARNING!
Avoid trapping anyone in the vehicle in a collision.
Remember that the sliding doors can only be opened
from the outside door handle or the switches located
on the trim panel just in front of the power sliding
door when the Child Protection Door Locks are
engaged.
To Disengage the Child Protection Door Lock
1. Open the sliding side door.
2. Slide the Child Protection Door Lock control outward
(away from the vehicle) to disengage the Child Protection
Door Lock.
3. Repeat Steps 1 and 2 on the opposite sliding door (if
equipped).
2
THINGS TO KNOW BEFORE STARTING YOUR VEHICLE 47
Page 53 of 538
Gas props support the liftgate in the open position.
However, because the gas pressure drops with tempera-
ture, it may be necessary to assist the props when
opening the liftgate in cold weather.
OCCUPANT RESTRAINTS
Some of the most important safety features in your
vehicle are the restraint systems:
•Three-point lap and shoulder belts for all seating
positions
•Advanced Front Airbags for driver and front passenger
•Supplemental Active Head Restraints (AHR) located
on top of the front seats (integrated into the head
restraint) — if equipped
•Supplemental Side Airbag Inflatable Curtains (SABIC)
that span the front, second, and third row seating for
the driver and passengers seated next to a window —
if equipped
•Supplemental Seat-Mounted Side Airbags (SAB) — if
equipped
•An energy-absorbing steering column and steering
wheel
•Knee bolsters/blockers for front seat occupants
•Front seat belts incorporate pretensioners to enhance
occupant protection by managing occupant energy
during an impact event — if equipped
If you will be carrying children too small for adult-sized
seat belts, the seat belts or the Lower Anchors and Tether
for CHildren (LATCH) feature can be used to hold infant
and child restraint systems. For more information on
LATCH, see Lower Anchors and Tether for CHildren
(LATCH).
52 THINGS TO KNOW BEFORE STARTING YOUR VEHICLE
Page 61 of 538
As a guide, if you are shorter than average you will
prefer a lower position, and if you are taller than average
you will prefer a higher position. When you release the
anchorage, try to move it up or down to make sure that
it is locked in position.
Automatic Locking Retractors (ALR) Mode — If
Equipped
In this mode, the shoulder belt is automatically pre-
locked. The belt will still retract to remove any slack in
the shoulder belt. The Automatic Locking Mode is avail-
able on all passenger-seating positions with a combina-
tion lap/shoulder belt.
When To Use The Automatic Locking Mode
Use the Automatic Locking Mode anytime a child safety
seat is installed in a seating position that has a belt with
this feature. Children 12 years old and under should
always be properly restrained in the rear seat.
How To Engage The Automatic Locking Mode
1. Buckle the combination lap and shoulder belt.
2. Grasp the shoulder portion and pull downward until
the entire belt is extracted.
3. Allow the belt to retract. As the belt retracts, you will
hear a clicking sound. This indicates the safety belt is
now in the Automatic Locking Mode.
How To Disengage The Automatic Locking Mode
Unbuckle the combination lap/shoulder belt and allow it
to retract completely to disengage the Automatic Locking
Mode and activate the vehicle sensitive (emergency)
locking mode.
60 THINGS TO KNOW BEFORE STARTING YOUR VEHICLE
Page 62 of 538
Seat Belt Pretensioners — If Equipped
The seat belts for both front seating positions may be
equipped with pretensioning devices that are designed to
remove slack from the seat belt in the event of a collision.
These devices improve the performance of the seat belt
by assuring that the belt is tight about the occupant early
in a collision. Pretensioners work for all size occupants,
including those in child restraints.
NOTE:These devices are not a substitute for proper seat
belt placement by the occupant. The seat belt still must be
worn snugly and positioned properly.
The pretensioners are triggered by the Occupant Re-
straint Controller (ORC). Like the airbags, the pretension-
ers are single use items. A deployed pretensioner or a
deployed airbag must be replaced immediately.
Supplemental Active Head Restraints (AHR) — If
Equipped
These head restraints are passive, deployable compo-
nents, and vehicles with this equipment cannot be readily
identified by any markings, only through visual inspec-
tion of the head restraint. The head restraint will be split
in two halves, with the front half being soft foam and
trim, the back half being decorative plastic.
How the Active Head Restraints (AHR) Work
The Occupant Restraint Controller (ORC) determines
whether the severity, or type of rear impact will require
the Active Head Restraints (AHR) to deploy. If a rear
impact requires deployment, both the driver and front
passenger seat AHRs will be deployed.
When AHRs deploy during a rear impact, the front half
of the head restraint extends forward to minimize the gap
between the back of the occupant’s head and the AHR.
2
THINGS TO KNOW BEFORE STARTING YOUR VEHICLE 61