Page 84 of 465
Periodic Safety Checks You Should Make Outside
the Vehicle
Tires
Examine tires for excessive tread wear and uneven wear
patterns. Check for stones, nails, glass, or other objects
lodged in the tread. Inspect the tread and sidewall for
cuts and cracks. Check the wheel nuts for tightness.
Check the tires (including spare) for proper pressure.
Lights
Have someone observe the operation of exterior lights
while you work the controls. Check turn signal and high
beam indicator lights on the instrument panel.
Door Latches
Check for positive closing, latching, and locking.
Fluid Leaks
Check area under vehicle after overnight parking for fuel,
engine coolant, oil, or other fluid leaks. Also, if gasoline
fumes are detected or if fuel, power steering fluid, or
brake fluid leaks are suspected, the cause should be
located and corrected immediately.2
THINGS TO KNOW BEFORE STARTING YOUR VEHICLE 83
Page 115 of 465
•Press thebutton and say the�Setup, Voice
Training� command.
Repeat the words and phrases when prompted by the
Uconnect™ Phone. For best results, the Voice Training
session should be completed when the vehicle is parked
with the engine running, all windows closed, and the
blower fan switched off.
This procedure may be repeated with a new user. The
system will adapt to the last trained voice only.
To restore the Voice Command system to factory default
settings, enter the Voice Training session via the above
procedure and follow the prompts.
Voice Command
•
For best performance, adjust the rearview mirror to
provide at least1�2in (1 cm) gap between the overhead
console (if equipped) and the mirror.
•Always wait for the beep before speaking.
•Speak normally, without pausing, just as you would
speak to a person sitting a few feet/meters away from
you.
•Make sure that no one other than you is speaking
during a Voice Command period.
•Performance is maximized under:
•low-to-medium blower setting,
•low-to-medium vehicle speed,
•low road noise,
•smooth road surface,
•fully closed windows,
•dry weather condition.
114 UNDERSTANDING THE FEATURES OF YOUR VEHICLE
Page 128 of 465
NOTE:Keep in mind that you have to press the Voice
Command
button first and wait for the beep
before speaking the “Barge In” commands.
Voice Training
For users experiencing difficulty with the system recog-
nizing their voice commands or numbers the Uconnect™
Voice “Voice Training” feature may be used.
1. Press the Voice Command
button, say “System
Setup” and once you are in that menu then say “Voice
Training.” This will train your own voice to the system
and will improve recognition.
2. Repeat the words and phrases when prompted by
Uconnect™ Voice. For best results, the “Voice Training”
session should be completed when the vehicle is parked,
engine running, all windows closed, and the blower fan
switched off. This procedure may be repeated with a new
user. The system will adapt to the last trained voice only.
SEATS
Seats are a primary part of the Occupant Restraint System
of the vehicle. They need to be used properly for safe
operation of the vehicle.
WARNING!
•DO NOT allow people to ride in any area of your
vehicle that is not equipped with seats and seat
belts. In a collision, people riding in these areas
are more likely to be seriously injured or killed.
•Be sure everyone in your vehicle is in a seat and
using a seat belt properly.
3
UNDERSTANDING THE FEATURES OF YOUR VEHICLE 127
Page 143 of 465
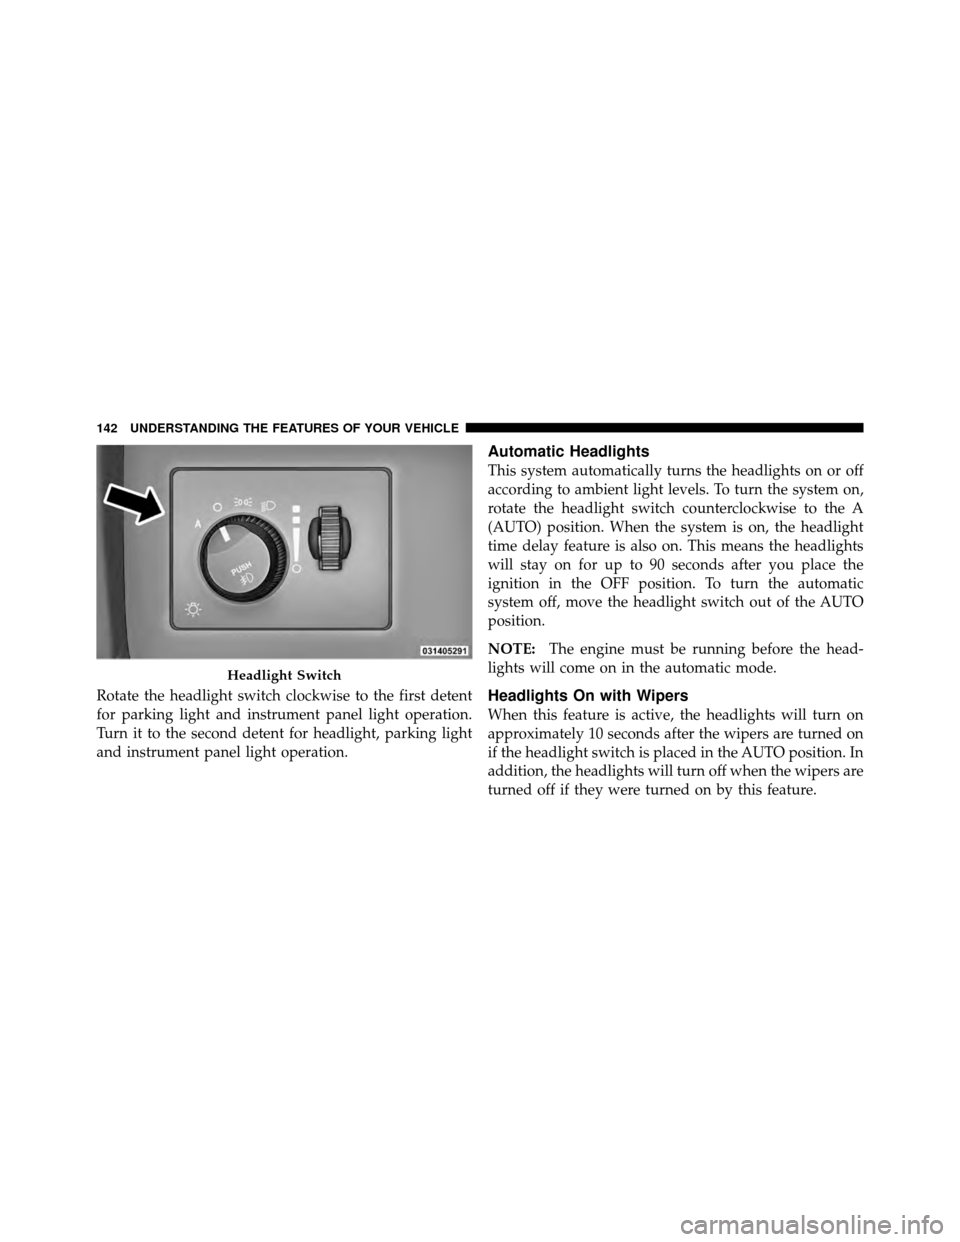
Rotate the headlight switch clockwise to the first detent
for parking light and instrument panel light operation.
Turn it to the second detent for headlight, parking light
and instrument panel light operation.
Automatic Headlights
This system automatically turns the headlights on or off
according to ambient light levels. To turn the system on,
rotate the headlight switch counterclockwise to the A
(AUTO) position. When the system is on, the headlight
time delay feature is also on. This means the headlights
will stay on for up to 90 seconds after you place the
ignition in the OFF position. To turn the automatic
system off, move the headlight switch out of the AUTO
position.
NOTE:The engine must be running before the head-
lights will come on in the automatic mode.
Headlights On with Wipers
When this feature is active, the headlights will turn on
approximately 10 seconds after the wipers are turned on
if the headlight switch is placed in the AUTO position. In
addition, the headlights will turn off when the wipers are
turned off if they were turned on by this feature.
Headlight Switch
142 UNDERSTANDING THE FEATURES OF YOUR VEHICLE
Page 176 of 465
WARNING!
Do not place ashes inside the cubby bin located on
the center console on vehicle’s not equipped with the
ash receiver tray. A fire leading to bodily injury could
result.
The center console outlet is powered directly from the
battery (power available at all times). Items plugged into
this outlet may discharge the battery and/or prevent the
engine from starting.
WARNING!
To avoid serious injury or death:
•Only devices designed for use in this type of
outlet should be inserted into any 12 Volt outlet. (Continued)
Center Console Power Outlet
3
UNDERSTANDING THE FEATURES OF YOUR VEHICLE 175
Page 177 of 465
WARNING! (Continued)
•Do not touch with wet hands.
•Close the lid when not in use and while driving
the vehicle.
•If this outlet is mishandled, it may cause an
electric shock and failure.
CAUTION!
•Many accessories that can be plugged in draw
power from the vehicle’s battery even when not in
use (i.e., cellular phones, etc.). Eventually, if
plugged in long enough, the vehicle’s battery will
discharge sufficiently to degrade battery life
and/or prevent the engine from starting.(Continued)
CAUTION! (Continued)
•Accessories that draw higher power (i.e., coolers,
vacuum cleaners, lights, etc.) will degrade the
battery even more quickly. Only use these inter-
mittently and with greater caution.
•After the use of high power draw accessories or
long periods of the vehicle not being started (with
accessories still plugged in), the vehicle must be
driven a sufficient length of time to allow the
alternator to recharge the vehicle’s battery.
•Power outlets are designed for accessory plugs
only. Do not hang any type of accessory or acces-
sory bracket from the plug. Improper use of the
power outlet can cause damage.
176 UNDERSTANDING THE FEATURES OF YOUR VEHICLE
Page 184 of 465
UNDERSTANDING YOUR INSTRUMENT PANEL
CONTENTS
�Instrument Panel Features ............... 187
� Instrument Cluster .................... 188
� Instrument Cluster Descriptions ........... 189
� Electronic Vehicle Information Center (EVIC) . . 199
▫ Electronic Vehicle Information Center (EVIC)
Displays ........................... 202
▫ Engine Oil Change Indicator System ....... 206
▫ Trip Functions ...................... 206
▫ Performance Pages — If Equipped ........ 208▫
Keyless Go Display — If Equipped ........ 212
▫ Driver-Selectable Surround Sound (DSS)
– If Equipped ....................... 212
▫ Compass Display .................... 213
▫ Uconnect™ GPS — If Equipped .......... 215
▫ System Warnings (Customer Information
Features) .......................... 216
▫ Personal Settings (Customer-Programmable
Features) .......................... 216
� Setting The Analog Clock ................ 221
4
Page 191 of 465
mileage was before the repair or service. It is a good idea
for you to make a record of the odometer reading before
the repair/service, so that you can be sure that it is
properly reset, or that the door jamb sticker is accurate if
the odometer must be reset at zero.
This display shows the Electronic Vehicle Information
Center (EVIC) messages when the appropriate conditions
exist. (Refer to “Electronic Vehicle Information Center
(EVIC)” for further information).
Loose Fuel Filler Cap Message
If the vehicle diagnostic system determines that the fuel
filler cap is loose, improperly installed, or damaged, a
“Check Gascap” message will display in the odometer
display area. Tighten the fuel filler cap properly and
press the TRIP ODOMETER button to turn off the
message. If the problem continues, the message will
appear the next time the vehicle is started.A loose, improperly installed, or damaged fuel filler cap
may also turn on the Malfunction Indicator Light (MIL).
7. Tachometer
The red segments indicate the maximum permissible
engine revolutions per minute (RPM x 1000) for each gear
range. Ease up on the accelerator before reaching the red
area.
8. Engine Temperature Warning Light
This light will turn on and a single chime will
sound to warn of an overheated engine condition.
When this light turns on, the engine temperature
is critically hot. The vehicle should be turned OFF
immediately and serviced as soon as possible.
9. Anti-Lock Brake (ABS) Light This light monitors the Anti-Lock Brake System
(ABS). The light will turn on when the ignition
switch is placed in the RUN position and may stay on for
as long as four seconds.
190 UNDERSTANDING YOUR INSTRUMENT PANEL