2010 CHRYSLER 300 reset
[x] Cancel search: resetPage 43 of 538

•Any impact due to rough road conditions may trigger
the auto-reverse function unexpectedly during auto-
closure. If this happens, pull the switch lightly to the
first detent and hold to close the window manually.
WARNING!
There is no anti-pinch protection when the window
is almost closed. Be sure to clear all objects from the
window before closing.
Window Lockout Switch
The window lockout switch on the driver’s door trim
panel allows you to disable the window controls on the
passenger doors. To disable the window controls, press
and release the window lockout button (setting it in the
DOWN position). To enable the window controls, press
and release the window lockout button again (setting it in
the UP position).
Reset
Anytime the vehicle battery is disconnected or goes dead,
the AUTO-up function will be disabled. To reactivate the
AUTO-up feature, perform the following procedure after
vehicle power is restored:
Window Lockout Switch
42 THINGS TO KNOW BEFORE STARTING YOUR VEHICLE
Page 139 of 538

DRIVER MEMORY SEAT — IF EQUIPPED
This feature allows the driver to store up to two different
memory profiles for easy recall through a memory
switch. Each memory profile contains desired position
settings for the driver seat, side mirrors, adjustable
pedals (if equipped), and power tilt and telescopic steer-
ing column (if equipped) and a set of desired radio
station presets. Your Remote Keyless Entry (RKE) trans-
mitter can also be programmed to recall the same posi-
tions when the UNLOCK button is pressed.
NOTE:
•Only one RKE transmitter can be linked to each of the
memory positions.
•Passive Entry door handles cannot be linked to the
memory function. Use either the memory recall switch
or the RKE transmitter (if linked to the memory
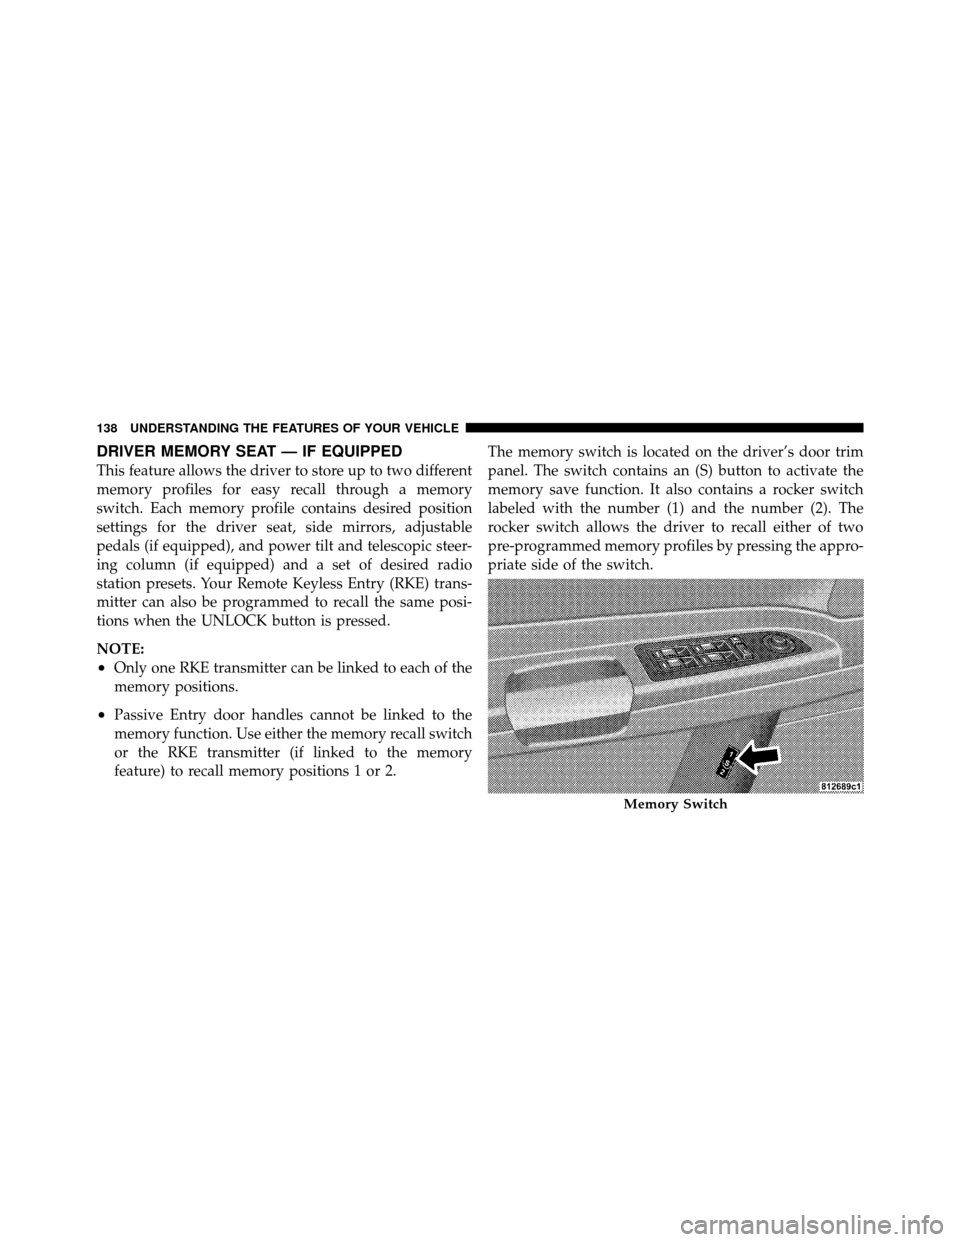
feature) to recall memory positions 1 or 2.The memory switch is located on the driver’s door trim
panel. The switch contains an (S) button to activate the
memory save function. It also contains a rocker switch
labeled with the number (1) and the number (2). The
rocker switch allows the driver to recall either of two
pre-programmed memory profiles by pressing the appro-
priate side of the switch.
Memory Switch
138 UNDERSTANDING THE FEATURES OF YOUR VEHICLE
Page 140 of 538

Programming The Memory Feature
NOTE:Saving a new memory profile will erase an
existing profile from memory.
To create a new memory profile, perform the following:
1. Place the ignition into the RUN position.
2. Adjust all memory profile settings to desired prefer-
ences (i.e., seat, side mirror, adjustable pedals [if
equipped], power tilt and telescopic steering column [if
equipped], and radio station presets).
3. Press and release the SET (S) button on the memory
switch.
4. Within five seconds, press and release the MEMORY
button 1 or 2. The Electronic Vehicle Information Center
(EVIC) (if equipped) will display which memory position
has been set. NOTE:•Memory profiles can be set without the vehicle in
PARK, but the vehicle must be in PARK to recall a
memory profile.
•The Recall Memory with Remote Key Unlock feature
can be enabled through the EVIC (if equipped). Refer
to “Electronic Vehicle Information Center (EVIC)/
Personal Settings (Customer-Programmable Fea-
tures)” in “Understanding Your Instrument Panel” for
further information.
Linking and Unlinking the Remote Keyless Entry
Transmitter to Memory
Your RKE transmitters can be programmed to recall one
of two pre-programmed memory profiles by pressing the
UNLOCK button on the RKE transmitter.
3
UNDERSTANDING THE FEATURES OF YOUR VEHICLE 139
Page 160 of 538

NOTE:In order to ensure proper operation, the Elec-
tronic Speed Control System has been designed to shut
down if multiple Speed Control functions are operated
simultaneously. If this occurs, the Electronic Speed Con-
trol System can be reactivated by pushing the Electronic
Speed Control ON/OFF button and resetting the desired
vehicle set speed.
To Activate
Push and release the ON/OFF button, located on the end
of the Electronic Speed Control lever. The indicator light
in the instrument cluster will illuminate and the cluster
will display a “Cruise ON” message to show that the
speed control system is on. To turn the system off, push
and release the ON/OFF button again. The system,
indicator light and message will turn off.
WARNING!
Leaving the Electronic Speed Control system on
when not in use is dangerous. You could accidentally
set the system or cause it to go faster than you want.
You could lose control and have an accident. Always
leave the Electronic Speed Control system off when
you are not using it.
To Set At A Desired Speed
When the vehicle reaches the speed desired, push the
lever downward to SET DECEL and release, the cluster
will display the “Cruise Set” message. Remove your foot
from the accelerator pedal and the vehicle will operate at
the selected speed.
3
UNDERSTANDING THE FEATURES OF YOUR VEHICLE 159
Page 163 of 538

ADAPTIVE CRUISE CONTROL (ACC) — IF
EQUIPPED
Adaptive Cruise Control (ACC) increases the driving
convenience provided by cruise control while traveling
on highways and major roadways. However, it is not a
safety system and not designed to prevent collisions.
ACC will allow you to keep cruise control engaged in
light to moderate traffic conditions without the constant
need to reset your cruise control. ACC utilizes an infrared
sensor designed to detect a vehicle directly ahead of you.
NOTE:
•If the sensor does not detect a vehicle ahead of you,
ACC will maintain a fixed set speed.
•If the ACC sensor detects a vehicle ahead, ACC will
apply limited braking or acceleration automatically to
maintain a preset following distance, while matching
the speed of the vehicle ahead.
WARNING!
•Adaptive Cruise Control (ACC) is a convenience
system. It is not a substitute for active driving
involvement. It is always the driver ’s responsibil-
ity to be attentive of road, traffic, and weather
conditions, vehicle speed, distance to the vehicle
ahead; and, most importantly, brake operation to
ensure safe operation of the vehicle under all road
conditions. Your complete attention is always re-
quired while driving to maintain safe control of
your vehicle. Failure to follow these warnings can
result in an accident or serious personal injury.The
ACC system:
•Does not react to pedestrians, oncoming vehicles,
and stationary objects (i.e., a stopped vehicle in a
traffic jam or a disabled vehicle).(Continued)
162 UNDERSTANDING THE FEATURES OF YOUR VEHICLE
Page 165 of 538

The Cruise Control system has two control modes:
•Adaptive Cruise Control mode for maintaining an
appropriate distance between vehicles.
•Normal (fixed speed) cruise control mode for cruising
at a constant preset speed. For additional information,
refer to “Normal (Fixed Speed) Cruise Control Mode”
in this section.Note:The system will not react to
preceding vehicles. Always be aware of the mode
selected.
You can change the mode by using the control lever. The
two control modes function differently. Always confirm
which mode is selected.
Adaptive Cruise Control (ACC) Operation
The speed control lever (located on the right side of the
steering wheel) operates the ACC system.
Activating Adaptive Cruise Control (ACC)
You can only activate ACC if the vehicle speed is above
25 mph (40 km/h).
1 — DISTANCE SETTING
2 — CANCEL
3 — RESUME/ACCEL
4 — ON/OFF/MODE
5 — SET/DECEL
164 UNDERSTANDING THE FEATURES OF YOUR VEHICLE
Page 208 of 538

rear window defroster and the heated outside mirrors (if
equipped). An indicator in the button will illuminate
when the rear window defroster is on. The rear window
defroster automatically turns off after approximately
10 minutes. For an additional five minutes of operation,
press the button a second time.
CAUTION!
Failure to follow these cautions can cause damage to
the heating elements:
•Use care when washing the inside of the rear
window. Do not use abrasive window cleaners on
the interior surface of the window. Use a soft cloth
and a mild washing solution, wiping parallel to
the heating elements. Labels can be peeled off
after soaking with warm water.(Continued)
CAUTION! (Continued)
•Do not use scrapers, sharp instruments, or abra-
sive window cleaners on the interior surface of the
window.
•Keep all objects a safe distance from the window.
LOAD LEVELING SYSTEM — IF EQUIPPED
The automatic load leveling system will provide a level-
riding vehicle under most passenger and cargo loading
conditions.
A hydraulic pump contained within the shock absorbers
raises the rear of the vehicle to the correct height. It takes
approximately 1 mile (1.6 km) of driving for the leveling
to complete depending on road surface conditions.
If the leveled vehicle is not moved for approximately
15 hours, the leveling system will bleed itself down. The
vehicle must be driven to reset the system.
3
UNDERSTANDING THE FEATURES OF YOUR VEHICLE 207
Page 218 of 538

NOTE:U.S. Federal regulations require that upon trans-
fer of vehicle ownership, the seller certify to the pur-
chaser the correct mileage that the vehicle has been
driven. If your odometer needs to be repaired or serviced,
the repair technician should leave the odometer reading
the same as it was before the repair or service. If s/he
cannot do so, then the odometer must be set at zero, and
a sticker must be placed in the door jamb stating what the
mileage was before the repair or service. It is a good idea
for you to make a record of the odometer reading before
the repair/service, so that you can be sure that it is
properly reset, or that the door jamb sticker is accurate if
the odometer must be reset at zero.
Vehicle Odometer Messages
When the appropriate conditions exist, the following
warning messages will display in the odometer:
ECO ...................... Fuel Saver Indicator
2drivE ........ V ehicle is in Rear Wheel Drive (RWD) 4drivE
.......... V ehicle is in All Wheel Drive (AWD
tCASE ..................... AWD System Fault
gASCAP ............ Loose Fuel Filler Cap Message
Lo tirE ...................... LowTirePr essure
noFUSE .......................... Fuse Fault
CHAngE OIL ............... Oil Change Required
On vehicles equipped with a Premium Instrument Clus-
ter, this display shows the Electronic Vehicle Information
Center (EVIC) messages when the appropriate conditions
exist. Refer to Electronic Vehicle Information Center
(EVIC) for further information.
ECO (Fuel Saver Indicator) — If Equipped
The ECO indicator will illuminate when you are driving
in a fuel efficient manner and can be used to modify
driving habits in order to increase fuel economy. The
ECO display will toggle on and off depending on driving
habits and vehicle usage.
4
UNDERSTANDING YOUR INSTRUMENT PANEL 217