2010 CHEVROLET SUBURBAN light
[x] Cancel search: lightPage 501 of 608
At the same time a message to check the pressure in a
specific tire appears on the Driver Information Center
(DIC) display. The low tire pressure warning light and
the DIC warning message come on at each ignition
cycle until the tires are inflated to the correct inflation
pressure. Using the DIC, tire pressure levels can be
viewed by the driver. For additional information and
details about the DIC operation and displays see
DIC Operation and Displays (With DIC Buttons)
on
page 4‑47or DIC Operation and Displays (Without DIC
Buttons)on page 4‑55and DIC Warnings and
Messages on page 4‑61.
The low tire pressure warning light may come on in cool
weather when the vehicle is first started, and then turn
off as you start to drive. This could be an early indicator
that the air pressure in the tire(s) are getting low and
need to be inflated to the proper pressure.
A Tire and Loading Information label, attached to your
vehicle, shows the size of your vehicle's original
equipment tires and the correct inflation pressure for
your vehicle's tires when they are cold. See Loading the
Vehicle
on page 5‑29, for an example of the Tire and
Loading Information label and its location on your
vehicle. Also see Inflation - Tire Pressure on page 6‑72.
Your vehicle's TPMS can warn you about a low tire
pressure condition but it does not replace normal tire
maintenance. See Tire Inspection and Rotation
on
page 6‑78and Tires on page 6‑63. Notice:
Liquid tire sealants could damage the Tire
Pressure Monitor System (TPMS) sensors. Sensor
damage caused by using a tire sealant is not
covered by your warranty. Do not use liquid tire
sealants.
TPMS Malfunction Light and Message
The TPMS will not function properly if one or more of
the TPMS sensors are missing or inoperable. When the
system detects a malfunction, the low tire warning light
flashes for about one minute and then stays on for the
remainder of the ignition cycle. A DIC warning message
is also displayed. The low tire warning light and DIC
warning message come on at each ignition cycle until
the problem is corrected. Some of the conditions that
can cause the malfunction light and DIC message to
come on are:
.One of the road tires has been replaced with the
spare tire. The spare tire does not have a TPMS
sensor. The TPMS malfunction light and DIC
message should go off once you re‐install the road
tire containing the TPMS sensor.
.The TPMS sensor matching process was started
but not completed or not completed successfully
after rotating the vehicle's tires. The DIC message
and TPMS malfunction light should go off once the
TPMS sensor matching process is performed
successfully. See “TPMS Sensor Matching
Process” later in this section.
6-75
Page 502 of 608
.One or more TPMS sensors are missing or
damaged. The DIC message and the TPMS
malfunction light should go off when the TPMS
sensors are installed and the sensor matching
process is performed successfully. See your dealer
for service.
.Replacement tires or wheels do not match your
vehicle's original equipment tires or wheels. Tires
and wheels other than those recommended for
your vehicle could prevent the TPMS from
functioning properly. SeeBuying New Tires
on
page 6‑80.
.Operating electronic devices or being near facilities
using radio wave frequencies similar to the TPMS
could cause the TPMS sensors to malfunction.
If the TPMS is not functioning it cannot detect or signal
a low tire condition. See your dealer for service if the
TPMS malfunction light and DIC message comes on
and stays on.
TPMS Sensor Matching Process
Each TPMS sensor has a unique identification code.
Any time you rotate your vehicle's tires or replace one
or more of the TPMS sensors, the identification codes
will need to be matched to the new tire/wheel position.
The sensors are matched to the tire/wheel positions in
the following order: driver side front tire, passenger side
front tire, passenger side rear tire, and driver side rear
tire using a TPMS diagnostic tool. See your dealer for
service.
The TPMS sensors can also be matched to each
tire/wheel position by increasing or decreasing the tire's
air pressure. If increasing the tire's air pressure, do not
exceed the maximum inflation pressure indicated on the
tire's sidewall.
To decrease air-pressure out of a tire you can use the
pointed end of the valve cap, a pencil-style air pressure
gauge, or a key.
You have two minutes to match the first tire/wheel
position, and five minutes overall to match all
four tire/wheel positions. If it takes longer than
two minutes, to match the first tire and wheel, or
more than five minutes to match all four tire and wheel
positions the matching process stops and you need to
start over.
6-76
Page 508 of 608
Different Size Tires and Wheels
If you add wheels or tires that are a different size than
your original equipment wheels and tires, this could
affect the way your vehicle performs, including its
braking, ride and handling characteristics, stability, and
resistance to rollover. Additionally, if your vehicle has
electronic systems such as anti‐lock brakes, rollover
airbags, traction control, and electronic stability control,
the performance of these systems can be affected.
{WARNING:
If you add different sized wheels, your vehicle
may not provide an acceptable level of
performance and safety if tires not recommended
for those wheels are selected. You may increase
the chance that you will crash and suffer serious
injury. Only use GM specific wheel and tire
systems developed for your vehicle, and have
them properly installed by a GM certified
technician.
See Buying New Tires
on page 6‑80andAccessories
and Modificationson page 6‑4for additional
information.
Uniform Tire Quality Grading
Quality grades can be found where applicable
on the tire sidewall between tread shoulder and
maximum section width. For example:
Treadwear 200 Traction AA
Temperature A
The following information relates to the system
developed by the United States National Highway
Traffic Safety Administration (NHTSA), which
grades tires by treadwear, traction, and
temperature performance. This applies only to
vehicles sold in the United States. The grades are
molded on the sidewalls of most passenger car
tires. The Uniform Tire Quality Grading (UTQG)
system does not apply to deep tread, winter-type
snow tires, space-saver, or temporary use
spare tires, tires with nominal rim diameters
of 10 to 12 inches (25 to 30 cm), or to some
limited-production tires.
While the tires available on General Motors
passenger cars and light trucks may vary with
respect to these grades, they must also conform
to federal safety requirements and additional
General Motors Tire Performance Criteria (TPC)
standards.
6-82
Page 534 of 608
After installing the spare tire on your vehicle, you should
stop as soon as possible and make sure the spare tire
is correctly inflated. Have the damaged or flat road tire
repaired or replaced as soon as you can and installed
back onto your vehicle. This way, the spare tire will be
available in case you need it again.
Do not mix tires and wheels of different sizes, because
they will not fit. Keep your spare tire and its wheel
together. If your vehicle has a spare tire that does not
match your vehicle's original road tires and wheels in
size and type, do not include the spare in the tire
rotation.
Appearance Care
Interior Cleaning
The vehicle's interior will continue to look its best if it is
cleaned often. Although not always visible, dust and dirt
can accumulate on the upholstery. Dirt can damage
carpet, fabric, leather, and plastic surfaces. Regular
vacuuming is recommended to remove particles from
the upholstery. It is important to keep the upholstery
from becoming and remaining heavily soiled. Soils
should be removed as quickly as possible. The
vehicle's interior may experience extremes of heat that
could cause stains to set rapidly.Lighter colored interiors may require more frequent
cleaning. Use care because newspapers and garments
that transfer color to home furnishings may also transfer
color to the vehicle's interior.
When cleaning the vehicle's interior, only use cleaners
specifically designed for the surfaces being cleaned.
Permanent damage may result from using cleaners
on surfaces for which they were not intended. Use
glass cleaner only on glass. Remove any accidental
over-spray from other surfaces immediately. To prevent
over-spray, apply cleaner directly to the cleaning cloth.
Notice:
Using abrasive cleaners when cleaning
glass surfaces on the vehicle, could scratch the
glass and/or cause damage to the rear window
defogger. When cleaning the glass on the vehicle,
use only a soft cloth and glass cleaner.
Many cleaners contain solvents that may become
concentrated in the vehicle's breathing space.
Before using cleaners, read and adhere to all safety
instructions on the label. While cleaning the vehicle's
interior, maintain adequate ventilation by opening the
vehicle's doors and windows.
Dust may be removed from small buttons and knobs
using a small brush with soft bristles.
Products that remove odors from the vehicle's
upholstery and clean the vehicle's glass can be
obtained from your dealer.
6-108
Page 537 of 608
Care of Safety Belts
Keep belts clean and dry.
{WARNING:
Do not bleach or dye safety belts. It may severely
weaken them. In a crash, they might not be able
to provide adequate protection. Clean safety belts
only with mild soap and lukewarm water.
Weatherstrips
Silicone grease on weatherstrips will make them last
longer, seal better, and not stick or squeak. Apply
silicone grease with a clean cloth. During very cold,
damp weather frequent application may be required.
SeeRecommended Fluids and Lubricants
on
page 7‑12.
Washing Your Vehicle
The best way to preserve the vehicle's finish is to keep
it clean by washing it often.
Notice: Certain cleaners contain chemicals that can
damage the emblems or nameplates on the vehicle.
Check the cleaning product label. If it states that it
should not be used on plastic parts, do not use it on
the vehicle or damage may occur and it would not
be covered by the warranty.
Do not wash the vehicle in direct sunlight. Use a car
washing soap. Do not use cleaning agents that are
petroleum based or that contain acid or abrasives, as
they can damage the paint, metal or plastic on the
vehicle. Approved cleaning products can be obtained
from your dealer. Follow all manufacturers' directions
regarding correct product usage, necessary safety
precautions and appropriate disposal of any vehicle
care product.
6-111
Page 544 of 608
Fuses and Circuit Breakers
If the vehicle is a Two-mode Hybrid, see the Two-mode
Hybrid manual for more information.
The wiring circuits in the vehicle are protected from
short circuits by a combination of fuses, circuit breakers
and fusible thermal links. This greatly reduces the
chance of fires caused by electrical problems.
Look at the silver-colored band inside the fuse. If the
band is broken or melted, replace the fuse. Be sure you
replace a bad fuse with a new one of the identical size
and rating.
If you ever have a problem on the road and don't
have a spare fuse, you can borrow one that has the
same amperage. Just pick some feature of your
vehicle that you can get along without–like the
radio or cigarette lighter –and use its fuse, if it is the
correct amperage. Replace it as soon as you can.
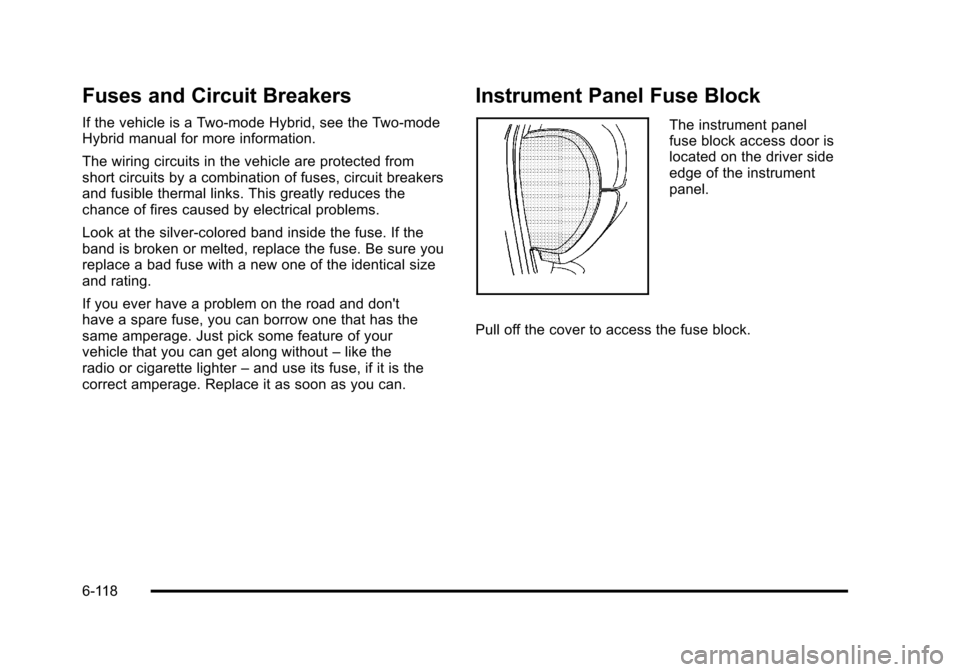
Instrument Panel Fuse Block
The instrument panel
fuse block access door is
located on the driver side
edge of the instrument
panel.
Pull off the cover to access the fuse block.
6-118
Page 545 of 608
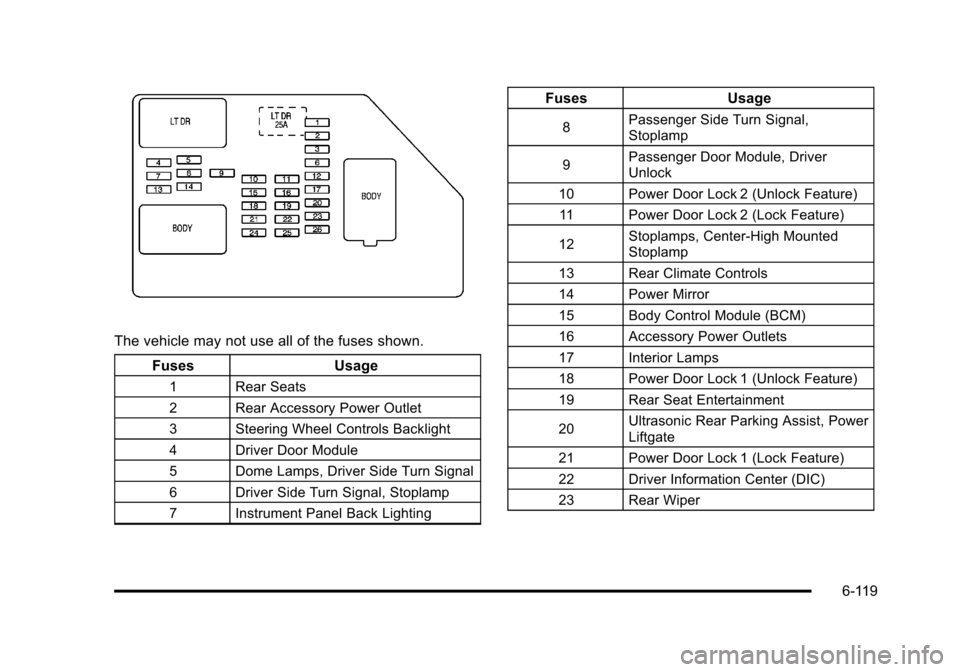
The vehicle may not use all of the fuses shown.Fuses Usage
1 Rear Seats
2 Rear Accessory Power Outlet
3 Steering Wheel Controls Backlight
4 Driver Door Module
5 Dome Lamps, Driver Side Turn Signal
6 Driver Side Turn Signal, Stoplamp
7 Instrument Panel Back Lighting
FusesUsage
8Passenger Side Turn Signal,
Stoplamp
9 Passenger Door Module, Driver
Unlock
10 Power Door Lock 2 (Unlock Feature)
11 Power Door Lock 2 (Lock Feature)
12 Stoplamps, Center-High Mounted
Stoplamp
13 Rear Climate Controls
14 Power Mirror
15 Body Control Module (BCM)
16 Accessory Power Outlets
17 Interior Lamps
18 Power Door Lock 1 (Unlock Feature)
19 Rear Seat Entertainment
20 Ultrasonic Rear Parking Assist, Power
Liftgate
21 Power Door Lock 1 (Lock Feature)
22 Driver Information Center (DIC)
23 Rear Wiper
6-119
Page 549 of 608
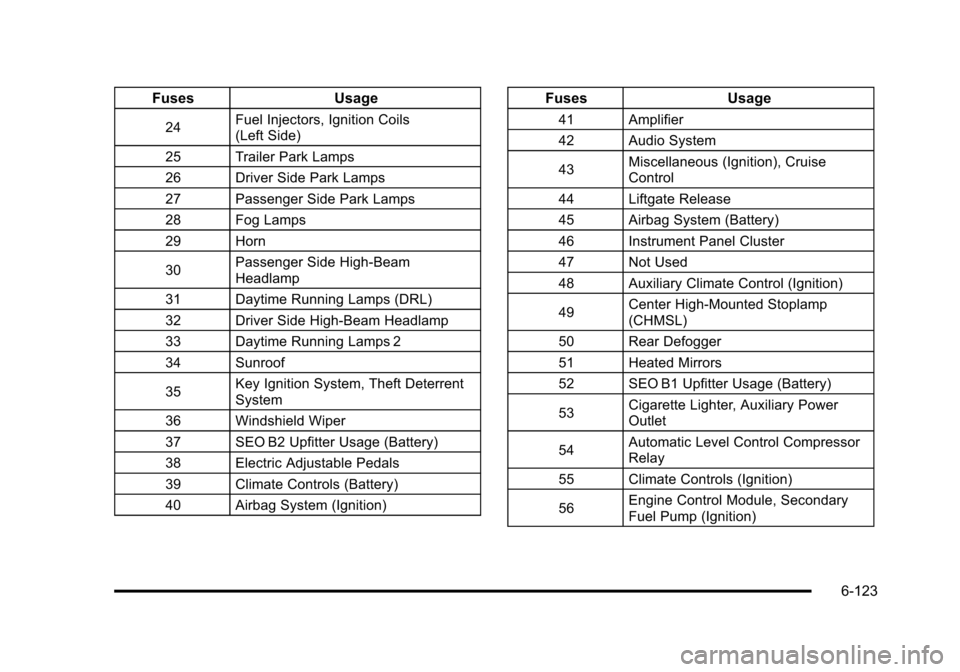
FusesUsage
24Fuel Injectors, Ignition Coils
(Left Side)
25 Trailer Park Lamps
26 Driver Side Park Lamps
27 Passenger Side Park Lamps
28 Fog Lamps
29 Horn
30 Passenger Side High-Beam
Headlamp
31 Daytime Running Lamps (DRL)
32 Driver Side High-Beam Headlamp
33 Daytime Running Lamps 2
34 Sunroof
35 Key Ignition System, Theft Deterrent
System
36 Windshield Wiper
37 SEO B2 Upfitter Usage (Battery)
38 Electric Adjustable Pedals
39 Climate Controls (Battery)
40 Airbag System (Ignition)
Fuses Usage
41 Amplifier
42 Audio System
43Miscellaneous (Ignition), Cruise
Control
44 Liftgate Release
45 Airbag System (Battery)
46 Instrument Panel Cluster
47 Not Used
48 Auxiliary Climate Control (Ignition)
49 Center High-Mounted Stoplamp
(CHMSL)
50 Rear Defogger
51 Heated Mirrors
52 SEO B1 Upfitter Usage (Battery)
53 Cigarette Lighter, Auxiliary Power
Outlet
54 Automatic Level Control Compressor
Relay
55 Climate Controls (Ignition)
56 Engine Control Module, Secondary
Fuel Pump (Ignition)
6-123