Page 174 of 626
Four-Wheel Drive
If the vehicle has Four-Wheel Drive, you can send the
engine's driving power to all four wheels for extra
traction. To get the most satisfaction out of Four-Wheel
Drive, you must be familiar with its operation. Read the
following before using Four-Wheel Drive. See the
appropriate text for the transfer case in the vehicle.
Notice:Driving on clean, dry pavement in
Four-Wheel Drive High or Four-Wheel Drive Low for
an extended period of time may cause premature
wear on your vehicle's powertrain. Do not drive on
clean, dry pavement in Four-Wheel Drive High or
Four-Wheel Drive Low for extended periods of time.
While driving on clean dry pavement and during tight
turns, you may experience vibration in the steering
system.
If the vehicle has StabiliTrak
®, shifting into
Four-Wheel-Drive Low will turn Traction Control and
StabiliTrak
®off. See StabiliTrak®System on page 5‑6.
Front Axle
The front axle engages and disengages automatically
when you shift the transfer case. Some delay for the
axle to engage or disengage is normal.
Manual Transfer Case
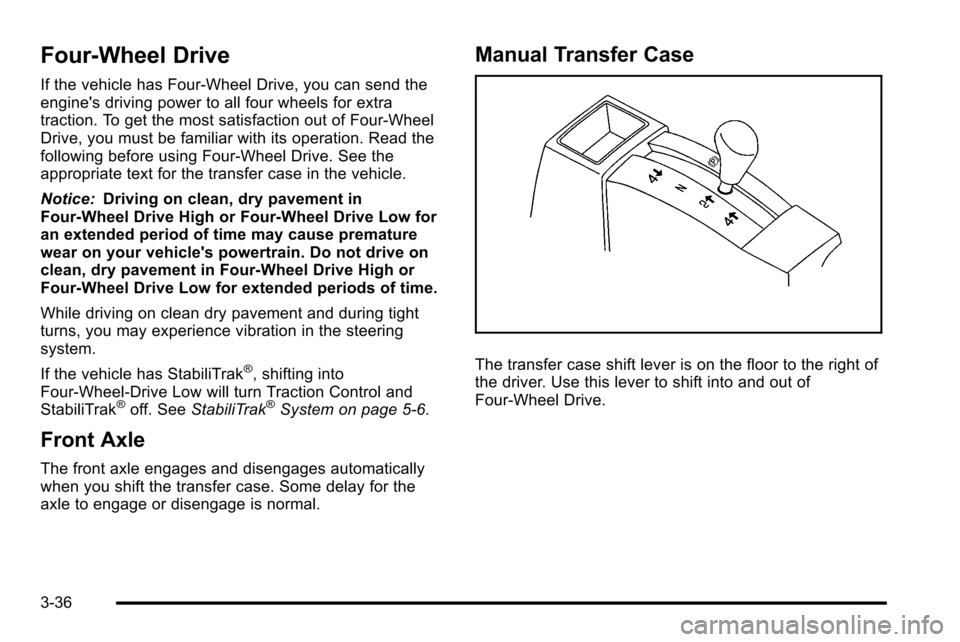
The transfer case shift lever is on the floor to the right of
the driver. Use this lever to shift into and out of
Four-Wheel Drive.
3-36
Page 179 of 626
Electronic Transfer Case
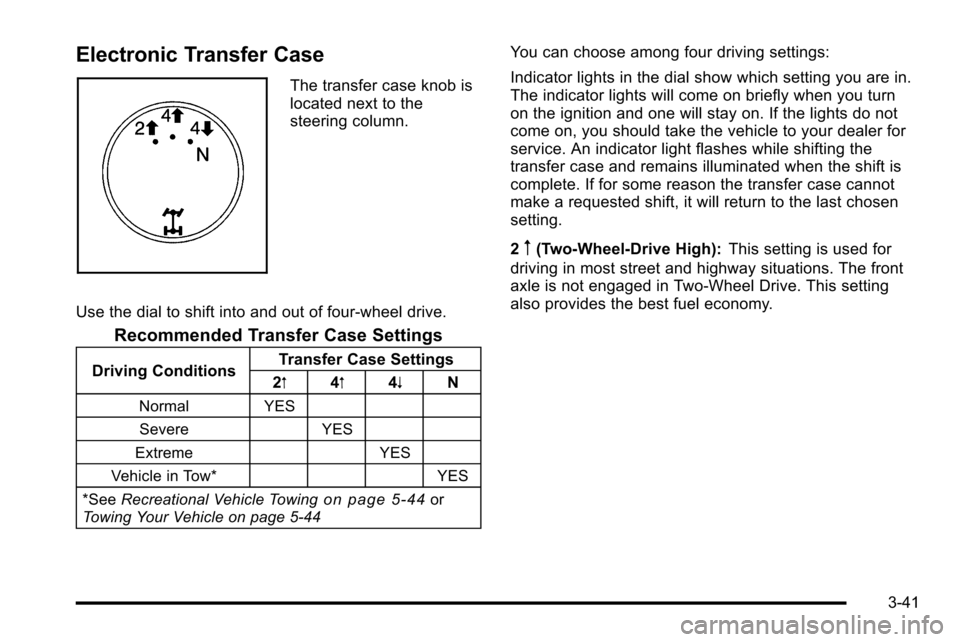
The transfer case knob is
located next to the
steering column.
Use the dial to shift into and out of four-wheel drive.
Recommended Transfer Case Settings
Driving Conditions Transfer Case Settings
2m 4m 4n N
Normal YES
Severe YES
Extreme YES
Vehicle in Tow* YES
*See Recreational Vehicle Towing
on page 5‑44or
Towing Your Vehicle on page 5‑44
You can choose among four driving settings:
Indicator lights in the dial show which setting you are in.
The indicator lights will come on briefly when you turn
on the ignition and one will stay on. If the lights do not
come on, you should take the vehicle to your dealer for
service. An indicator light flashes while shifting the
transfer case and remains illuminated when the shift is
complete. If for some reason the transfer case cannot
make a requested shift, it will return to the last chosen
setting.
2
m(Two-Wheel-Drive High): This setting is used for
driving in most street and highway situations. The front
axle is not engaged in Two-Wheel Drive. This setting
also provides the best fuel economy.
3-41
Page 184 of 626
Automatic Transfer Case
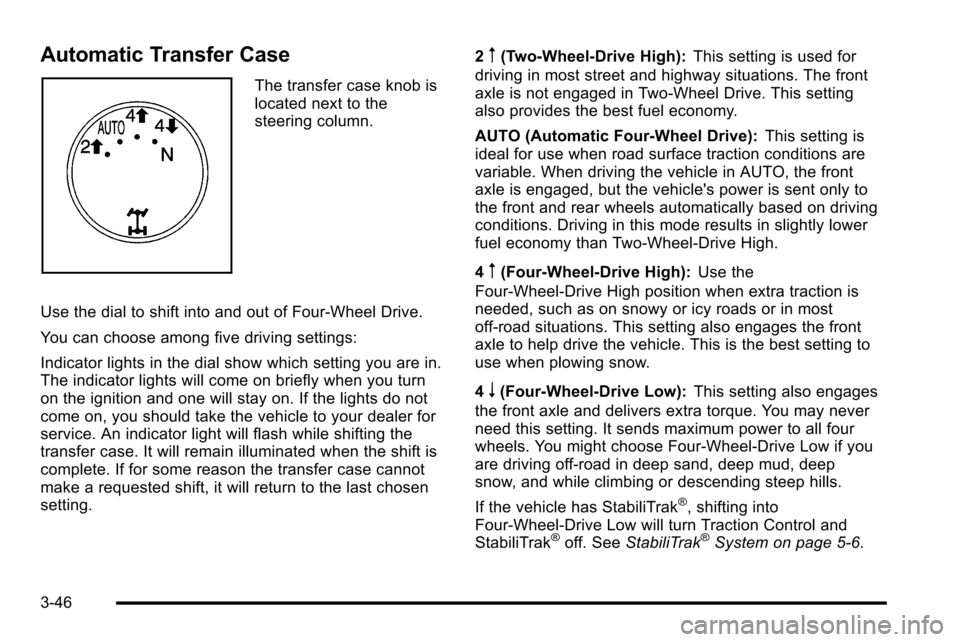
The transfer case knob is
located next to the
steering column.
Use the dial to shift into and out of Four-Wheel Drive.
You can choose among five driving settings:
Indicator lights in the dial show which setting you are in.
The indicator lights will come on briefly when you turn
on the ignition and one will stay on. If the lights do not
come on, you should take the vehicle to your dealer for
service. An indicator light will flash while shifting the
transfer case. It will remain illuminated when the shift is
complete. If for some reason the transfer case cannot
make a requested shift, it will return to the last chosen
setting. 2
m(Two-Wheel-Drive High):
This setting is used for
driving in most street and highway situations. The front
axle is not engaged in Two-Wheel Drive. This setting
also provides the best fuel economy.
AUTO (Automatic Four-Wheel Drive): This setting is
ideal for use when road surface traction conditions are
variable. When driving the vehicle in AUTO, the front
axle is engaged, but the vehicle's power is sent only to
the front and rear wheels automatically based on driving
conditions. Driving in this mode results in slightly lower
fuel economy than Two-Wheel-Drive High.
4
m(Four-Wheel-Drive High): Use the
Four-Wheel-Drive High position when extra traction is
needed, such as on snowy or icy roads or in most
off-road situations. This setting also engages the front
axle to help drive the vehicle. This is the best setting to
use when plowing snow.
4
n(Four-Wheel-Drive Low): This setting also engages
the front axle and delivers extra torque. You may never
need this setting. It sends maximum power to all four
wheels. You might choose Four-Wheel-Drive Low if you
are driving off-road in deep sand, deep mud, deep
snow, and while climbing or descending steep hills.
If the vehicle has StabiliTrak
®, shifting into
Four-Wheel-Drive Low will turn Traction Control and
StabiliTrak
®off. See StabiliTrak®System on page 5‑6.
3-46
Page 220 of 626

Section 4 Instrument Panel
Oil Pressure Gauge . . . . . . . . . . . . . . . . . . . . . . . . . . . . 4-44
Oil Pressure Light . . . . . . . . . . . . . . . . . . . . . . . . . . . . . 4-45
Security Light . . . . . . . . . . . . . . . . . . . . . . . . . . . . . . . . . . 4-46
Fog Lamp Light . . . . . . . . . . . . . . . . . . . . . . . . . . . . . . . . 4-46
Cruise Control Light . . . . . . . . . . . . . . . . . . . . . . . . . . . 4-46
Highbeam On Light . . . . . . . . . . . . . . . . . . . . . . . . . . . . 4-46
Four-Wheel-Drive Light . . . . . . . . . . . . . . . . . . . . . . . . 4-47
Tow/Haul Mode Light . . . . . . . . . . . . . . . . . . . . . . . . . . 4-47
Fuel Gauge . . . . . . . . . . . . . . . . . . . . . . . . . . . . . . . . . . . . 4-47
Low Fuel Warning Light . . . . . . . . . . . . . . . . . . . . . . . . 4-48
Driver Information Center (DIC) . . . . . . . . . . . . . . . . . .4-49
DIC Operation and Displays (With DIC Buttons) . . . . . . . . . . . . . . . . . . . . . . . . . . . . . . . . . . . . . 4-49
DIC Operation and Displays (Without DIC Buttons) . . . . . . . . . . . . . . . . . . . . . . . . . . . . . . . . . . . . . 4-56
DIC Compass . . . . . . . . . . . . . . . . . . . . . . . . . . . . . . . . . . 4-60
DIC Warnings and Messages . . . . . . . . . . . . . . . . . . 4-63
DIC Vehicle Customization (With DIC Buttons) . . . . . . . . . . . . . . . . . . . . . . . . . . . . . . . . . . . . . 4-73 Audio System(s)
. . . . . . . . . . . . . . . . . . . . . . . . . . . . . . . . . . 4-82
Setting the Clock . . . . . . . . . . . . . . . . . . . . . . . . . . . . . . 4-82
Radio(s) . . . . . . . . . . . . . . . . . . . . . . . . . . . . . . . . . . . . . . . 4-85
Using an MP3 (Radios with CD) . . . . . . . . . . . . . . 4-105
Using an MP3 (Radios with CD and DVD) . . . . 4-112
XM Radio Messages . . . . . . . . . . . . . . . . . . . . . . . . . 4-120
Navigation/Radio System . . . . . . . . . . . . . . . . . . . . . 4-121
Bluetooth
®. . . . . . . . . . . . . . . . . . . . . . . . . . . . . . . . . . . . 4-121
Rear Seat Entertainment (RSE) System . . . . . . 4-132
Rear Seat Audio (RSA) . . . . . . . . . . . . . . . . . . . . . . . 4-141
Theft-Deterrent Feature . . . . . . . . . . . . . . . . . . . . . . 4-143
Audio Steering Wheel Controls . . . . . . . . . . . . . . . 4-143
Radio Reception . . . . . . . . . . . . . . . . . . . . . . . . . . . . . . 4-146
Fixed Mast Antenna . . . . . . . . . . . . . . . . . . . . . . . . . . 4-147
XM™ Satellite Radio Antenna System . . . . . . . . 4-147
4-2
Page 221 of 626
Instrument Panel Overview
Hazard Warning Flashers
|(Hazard Warning Flasher):Press this button
located on top of the steering column, to make the front
and rear turn signal lamps flash on and off. This warns
others that you are having trouble. Press again to turn
the flashers off.
When the hazard warning flashers are on, the vehicle's
turn signals will not work.
Horn
To sound the horn, press the horn symbols located on
the steering wheel.
Tilt Wheel
The tilt lever is located on the lower left side of the
steering column.
To adjust the steering wheel:
1. Hold the steering wheel and pull the lever.
2. Move the steering wheel to a comfortable position.
3. Release the lever to lock the wheel in place.
Do not adjust the steering wheel while driving.
4-3
Page 222 of 626
Turn Signal/Multifunction Lever
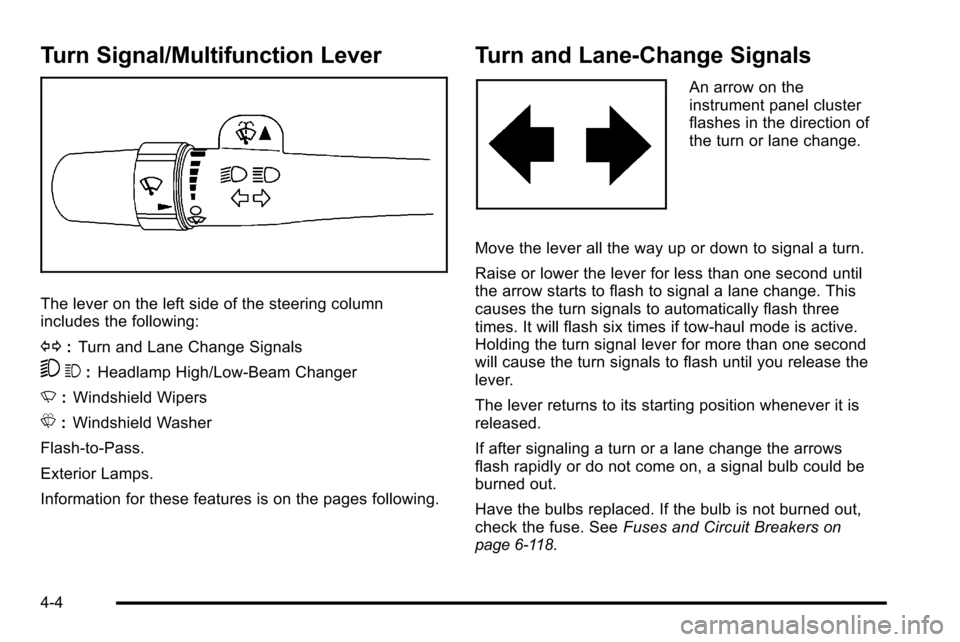
The lever on the left side of the steering column
includes the following:
G:Turn and Lane Change Signals
53 :Headlamp High/Low-Beam Changer
N :Windshield Wipers
L :Windshield Washer
Flash-to-Pass.
Exterior Lamps.
Information for these features is on the pages following.
Turn and Lane-Change Signals
An arrow on the
instrument panel cluster
flashes in the direction of
the turn or lane change.
Move the lever all the way up or down to signal a turn.
Raise or lower the lever for less than one second until
the arrow starts to flash to signal a lane change. This
causes the turn signals to automatically flash three
times. It will flash six times if tow-haul mode is active.
Holding the turn signal lever for more than one second
will cause the turn signals to flash until you release the
lever.
The lever returns to its starting position whenever it is
released.
If after signaling a turn or a lane change the arrows
flash rapidly or do not come on, a signal bulb could be
burned out.
Have the bulbs replaced. If the bulb is not burned out,
check the fuse. See Fuses and Circuit Breakers
on
page 6‑118.
4-4
Page 226 of 626
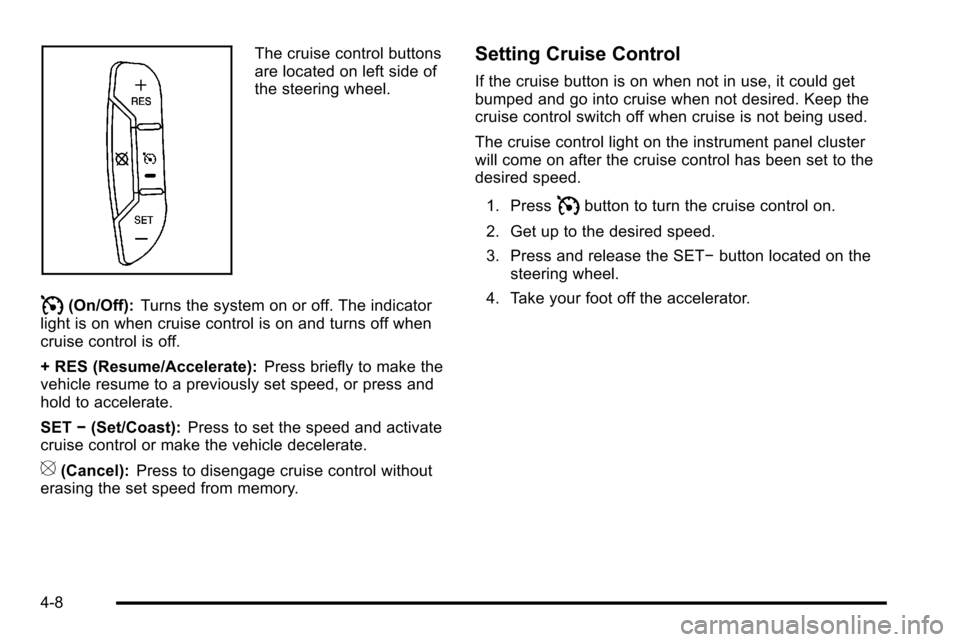
The cruise control buttons
are located on left side of
the steering wheel.
I(On/Off):Turns the system on or off. The indicator
light is on when cruise control is on and turns off when
cruise control is off.
+ RES (Resume/Accelerate): Press briefly to make the
vehicle resume to a previously set speed, or press and
hold to accelerate.
SET −(Set/Coast): Press to set the speed and activate
cruise control or make the vehicle decelerate.
[(Cancel): Press to disengage cruise control without
erasing the set speed from memory.
Setting Cruise Control
If the cruise button is on when not in use, it could get
bumped and go into cruise when not desired. Keep the
cruise control switch off when cruise is not being used.
The cruise control light on the instrument panel cluster
will come on after the cruise control has been set to the
desired speed.
1. Press
Ibutton to turn the cruise control on.
2. Get up to the desired speed.
3. Press and release the SET− button located on the
steering wheel.
4. Take your foot off the accelerator.
4-8
Page 227 of 626
Resuming a Set Speed
If the cruise control is set at a desired speed and then
the brakes are applied, the cruise control is disengaged
without erasing the set speed from memory.
Once the vehicle speed reaches about 40 km/h
(25 mph) or more, press the +RES button on the
steering wheel. The vehicle returns to the previous set
speed and stays there.
Increasing Speed While Using Cruise
Control
If the cruise control system is already activated,
.Press and hold the +RES button on the steering
wheel until the desired speed is reached, then
release it.
.To increase vehicle speed in small amounts, press
the +RES button. Each time this is done, the
vehicle goes about 1.6 km/h (1 mph) faster.
Reducing Speed While Using Cruise
Control
If the cruise control system is already activated,
.Press and hold the SET–button on the steering
wheel until the desired lower speed is reached,
then release it.
.To slow down in small amounts, press the
SET– button on the steering wheel briefly. Each
time this is done, the vehicle goes about 1.6 km/h
(1 mph) slower.
Passing Another Vehicle While Using
Cruise Control
Use the accelerator pedal to increase the vehicle
speed. When you take your foot off the pedal, the
vehicle will slow down to the previous set cruise speed.
4-9