2010 CHEVROLET SILVERADO rear entertainment
[x] Cancel search: rear entertainmentPage 319 of 626
\FWD (Fast Forward):Press to fast forward the CD
or DVD. The radio displays the elapsed time and fast
forwards five times the normal speed. To stop fast
forwarding, press again. This button might not work
when the DVD is playing the copyright information or
the previews.
Z(Eject): Press to eject a CD or DVD. If a CD or
DVD is ejected, but not removed, the player
automatically pulls it back in after 15 seconds.
If loading and reading of a CD cannot be completed,
because of an unknown format, etc., and the disc fails
to eject, press and hold for more than five seconds to
force the disc to eject.
DVD-V (Video) Display Buttons
Once a DVD-V is inserted, the radio display menu
shows several tag options for DVD playing. Press the
softkey located under any desired tag option during
DVD playback. See the tag options listed after, for more
information.
The rear seat passenger can navigate the DVD-V
menus and controls through the remote control. See
“Remote Control”, under Rear Seat Entertainment
(RSE) System
on page 4‑132for more information. The
Video Screen automatically turns on when the DVD-V is
inserted into the DVD slot.
r/j(Play/Pause): Press either the play or pause
icon displayed on the radio system, to toggle between
pausing or restarting playback of a DVD. If the forward
arrow is showing on display, the system is in pause
mode. If the pause icon is showing on display, the
system is in playback mode. If the DVD screen is off,
press the play button to turn the screen on.
Some DVDs begin playing after the previews have
finished, although there could be a delay of up to
30 seconds. If the DVD does not begin playing the
movie automatically, press the softkey located under the
play/pause symbol tag displayed on the radio. If the
DVD still does not play, refer to the on-screen
instructions, if available.
c(Stop): Press to stop playing, rewinding, or fast
forwarding a DVD.
r(Enter): Press to select the choices that are
highlighted in any menu.
y(Menu): Press to access the DVD menu. The DVD
menu is different on every DVD. Use the softkeys
located under the navigation arrows to navigate the
cursor through the DVD menu. After making a selection
press this button. This button only operates when using
a DVD.
4-101
Page 320 of 626
Nav (Navigate):Press to display directional arrows for
navigating through the menus.
q(Return): Press to exit the current active menu and
return to the previous menu. This button operates only
when a DVD is playing and a menu is active.
DVD-A (Audio) Display Buttons
Once a DVD-A is inserted, radio display menu shows
several tag options for DVD playing. Press the softkeys
located under any desired tag option during DVD
playback. See the tag options listed after, for more
information.
The rear seat operator can navigate the DVD-A menus
and controls through the remote control. See “Remote
Control”, under Rear Seat Entertainment (RSE) System
on page 4‑132for more information. The Video Screen
does not automatically power on when the DVD-A is
inserted into the DVD slot. It must be manually turned
on by the rear seat occupant through the remote control
power button.
r/j(Play/Pause): Press either the play or pause
icon displayed on the radio system, to toggle between
pausing or restarting playback of a DVD. If the forward
arrow is showing on the display, the system is in pause
mode. If the pause icon is showing on the display, the
system is in playback mode.
qGroupr: Press to cycle through musical
groupings on the DVD-A disc.
Nav (Navigate): Press to display directional arrows for
navigating through the menus.
e(Audio Stream): Press to cycle through audio
stream formats located on the DVD-A disc. The video
screen shows the audio stream changing.
Inserting a Disc
To play a disc, gently insert the disc, with the label side
up, into the loading slot. The DVD player might not
accept some paper labeled media. The player starts
loading the disc into the system and show “Loading
Disc” on the radio display. At the same time, the radio
displays a softkey menu of option(s). Some discs
automatically play the movie while others default to the
softkey menu display, which requires the Play, Enter,
or Navigation softkeys to be pressed; either by softkey
or by the rear seat passenger using the remote control.
Loading a disc into the system, depending on media
type and format, ranges from 5 to 20 seconds for a CD,
and up to 30 seconds for a DVD.
4-102
Page 322 of 626
Drivers are encouraged to set up any auxiliary device
while the vehicle is in P (Park). SeeDefensive Driving
on page 5‑2for more information on driver distraction.
To use a portable audio player, connect a 3.5 mm
(1/8 in) cable to the radio's front auxiliary input jack.
When a device is connected, press the radio CD/AUX
button to begin playing audio from the device over the
vehicle speakers.
For optimal sound quality, increase the portable audio
device's volume to the loudest level.
It is always best to power the portable audio device
through its own battery while playing.
O(Power/Volume): Turn clockwise or
counterclockwise to increase or decrease the volume of
the portable player. Additional volume adjustments
might have to be made from the portable device if the
volume is not loud or soft enough.
BAND: Press to listen to the radio when a portable
audio device is playing. The portable audio device
continues playing.
CD/AUX (CD/Auxiliary): Press to play a CD when a
portable audio device is playing. Press again and the
system begins playing audio from the connected
portable audio player. If a portable audio player is not
connected, “No Input Device Found” displays.DVD/CD AUX (CD/Auxiliary):
Press to cycle through
DVD, CD, or Auxiliary when listening to the radio. The
DVD/CD text tab and a message showing track or
chapter number displays when a disc is in either slot.
Press again and the system automatically searches for
an auxiliary input device, such as a portable audio
player. If a portable audio player is not connected, “No
Aux Input Device” displays. If a disc is in both the DVD
slot and the CD slot the DVD/CD AUX button cycles
between the two sources and not indicate “No Aux Input
Device”. If a front auxiliary device is connected, the
DVD/CD AUX button cycles through all available
options, such as: DVD slot, CD slot, Front Auxiliary, and
Rear Auxiliary (if available). See “Using the Auxiliary
Input Jack(s)” later in this section, or “Audio/Video (A/V)
Jacks” under,Rear Seat Entertainment (RSE) System
on page 4‑132for more information.
Using the USB Port
Radios with a USB port can control a USB storage
device or an iPod®using the radio buttons and knobs.
See Using an MP3 (Radios with CD)on page 4‑105or
Using an MP3 (Radios with CD and DVD)on
page 4‑112for information about how to connect and
control a USB storage device or an iPod.
4-104
Page 350 of 626
Rear Seat Entertainment (RSE)
System
The vehicle may have a DVD Rear Seat Entertainment
(RSE) system. The RSE system works with the
vehicle's audio system. The DVD player is part of the
front radio. The RSE system includes a radio with a
DVD player, a video display screen, audio/video jacks,
two wireless headphones, and a remote control. See
Radio(s)
on page 4‑85for more information on the
vehicle's audio/DVD system.
Before Driving
The RSE is designed for rear seat passengers only. The
driver cannot safely view the video screen while driving
and should not try to do so.
In severe or extreme weather conditions the RSE
system might not work until the temperature is within
the operating range. The operating range for the RSE
system is above −4°F (−20°C) or below 140°F (60°C).
If the temperature of the vehicle is outside of this range,
heat or cool the vehicle until the temperature is within
the operating range of the RSE system.
Parental Control
The RSE system may have a Parental Control feature,
depending on which radio the vehicle has. To start
Parental Control, press and hold the radio power button
for more than two seconds to stop all system features
such as: radio, video screen, RSA, DVD and/or CD.
While Parental Control is on, a padlock icon displays.
The radio can be turned back on with a single press of
the power button, but the RSE system will remain under
Parental Control.
To turn Parental Control off, press and hold the radio
power button for more than two seconds. The RSE
returns from where it was previously left and the
padlock icon disappears from the radio display.
Parental Control can also be turned off by inserting or
ejecting any disc, pressing the play icon on the radio
DVD display menu, or changing an ignition position.
4-132
Page 352 of 626
Battery Replacement
To change the batteries on the headphones, do the
following:1. Turn the screw to loosen the battery door located on the left side of the headphones. Slide the
battery door open.
2. Replace the two batteries in the compartment. Make sure that they are installed correctly, using
the diagram on the inside of the battery
compartment.
3. Replace the battery door and tighten the door screw.
If the headphones are to be stored for a long period of
time, remove the batteries and keep them in a cool, dry
place.
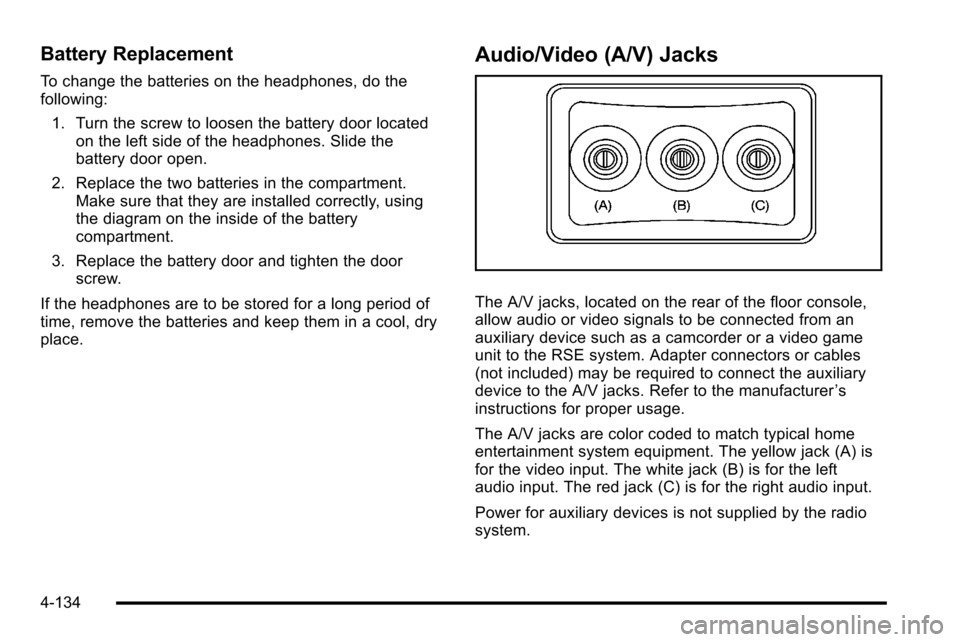
Audio/Video (A/V) Jacks
The A/V jacks, located on the rear of the floor console,
allow audio or video signals to be connected from an
auxiliary device such as a camcorder or a video game
unit to the RSE system. Adapter connectors or cables
(not included) may be required to connect the auxiliary
device to the A/V jacks. Refer to the manufacturer ’s
instructions for proper usage.
The A/V jacks are color coded to match typical home
entertainment system equipment. The yellow jack (A) is
for the video input. The white jack (B) is for the left
audio input. The red jack (C) is for the right audio input.
Power for auxiliary devices is not supplied by the radio
system.
4-134
Page 564 of 626
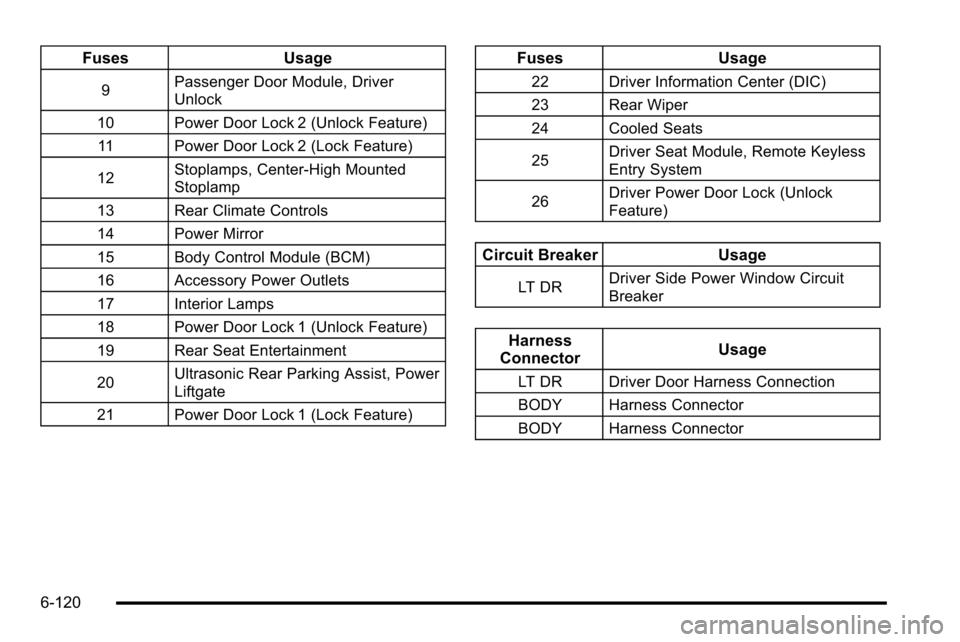
FusesUsage
9Passenger Door Module, Driver
Unlock
10 Power Door Lock 2 (Unlock Feature) 11 Power Door Lock 2 (Lock Feature)
12 Stoplamps, Center-High Mounted
Stoplamp
13 Rear Climate Controls
14 Power Mirror
15 Body Control Module (BCM)
16 Accessory Power Outlets
17 Interior Lamps
18 Power Door Lock 1 (Unlock Feature)
19 Rear Seat Entertainment
20 Ultrasonic Rear Parking Assist, Power
Liftgate
21 Power Door Lock 1 (Lock Feature)
Fuses Usage
22 Driver Information Center (DIC)
23 Rear Wiper
24 Cooled Seats
25Driver Seat Module, Remote Keyless
Entry System
26 Driver Power Door Lock (Unlock
Feature)
Circuit Breaker
Usage
LT DRDriver Side Power Window Circuit
Breaker
Harness
Connector Usage
LT DR Driver Door Harness Connection
BODY Harness Connector
BODY Harness Connector
6-120
Page 615 of 626

Driver Information Center (DIC) . . . . . . . . . . . . . . . . . . . . 4-49DIC Operation and Displays . . . . . . . . . . . . . . . . 4-49, 4-56
DIC Vehicle Customization . . . . . . . . . . . . . . . . . . . . . . . 4-73
DIC Warnings and Messages . . . . . . . . . . . . . . . . . . . . . 4-63
Driving At Night . . . . . . . . . . . . . . . . . . . . . . . . . . . . . . . . . . . . . . . . . . . 5-22
Before a Long Trip . . . . . . . . . . . . . . . . . . . . . . . . . . . . . . . . 5-23
Defensive . . . . . . . . . . . . . . . . . . . . . . . . . . . . . . . . . . . . . . . . . . 5-2
Drunk . . . . . . . . . . . . . . . . . . . . . . . . . . . . . . . . . . . . . . . . . . . . . . 5-2
Highway Hypnosis . . . . . . . . . . . . . . . . . . . . . . . . . . . . . . . . 5-23
Hill and Mountain Roads . . . . . . . . . . . . . . . . . . . . . . . . . . 5-24
In Rain and on Wet Roads . . . . . . . . . . . . . . . . . . . . . . . . 5-22
Loss of Control . . . . . . . . . . . . . . . . . . . . . . . . . . . . . . . . . . . 5-10
Off-Road . . . . . . . . . . . . . . . . . . . . . . . . . . . . . . . . . . . . . . . . . 5-11
Off-Road Recovery . . . . . . . . . . . . . . . . . . . . . . . . . . . . . . . 5-10
Recovery Hooks . . . . . . . . . . . . . . . . . . . . . . . . . . . . . . . . . . 5-28
Rocking Your Vehicle to Get it Out . . . . . . . . . . . . . . . . 5-28
Winter . . . . . . . . . . . . . . . . . . . . . . . . . . . . . . . . . . . . . . . . . . . . 5-25
Driving for Better Fuel Economy . . . . . . . . . . . . . . . . . . . 1-33
Dual Automatic Climate Control System . . . . . . . . . . . 4-22
Dual Tire Operation . . . . . . . . . . . . . . . . . . . . . . . . . . . . . . . . 6-75
DVD Rear Seat Entertainment System . . . . . . . . . . . . . . . .4-132E
E85 Fuel . . . . . . . . . . . . . . . . . . . . . . . . . . . . . . . . . . . . . . . . . . . . .6-9
EDR . . . . . . . . . . . . . . . . . . . . . . . . . . . . . . . . . . . . . . . . . . . . . . . 8-17
Electrical Equipment, Add-On . . . . . . . . . . . . . . . . . . . . 6-117
Electrical SystemCenter Instrument Panel Fuse Block . . . . . . . . . . . . .6-121
Fuses and Circuit Breakers . . . . . . . . . . . . . . . . . . . . . . 6-118
Instrument Panel Fuse Block . . . . . . . . . . . . . . . . . . . . 6-119
Power Windows and Other Power Options . . . . . . 6-118
Underhood Fuse Block . . . . . . . . . . . . . . . . . . . . . . . . . .6-122
Windshield Wiper Fuses . . . . . . . . . . . . . . . . . . . . . . . . . 6-118
Electronic Immobilizer PASS-Key
®III+ . . . . . . . . . . . . . . . . . . . . . . . . . . . . . . . . . . . 3-19
Electronic Immobilizer Operation PASS-Key
®III+ . . . . . . . . . . . . . . . . . . . . . . . . . . . . . . . . . . . 3-19
Engine
Air Cleaner/Filter . . . . . . . . . . . . . . . . . . . . . . . . . . . . . . . . . 6-21
Check and Service Engine Soon Light . . . . . . . . . . . . 4-41
Compartment Overview . . . . . . . . . . . . . . . . . . . . . . . . . . . 6-16
Coolant . . . . . . . . . . . . . . . . . . . . . . . . . . . . . . . . . . . . . . . . . . . 6-31
Coolant Heater . . . . . . . . . . . . . . . . . . . . . . . . . . . . . . . . . . . 3-26
Coolant Temperature Gauge . . . . . . . . . . . . . . . . . . . . . . 4-40
Cooling System . . . . . . . . . . . . . . . . . . . . . . . . . . . . . . . . . . . 6-29
Drive Belt Routing . . . . . . . . . . . . . . . . . . . . . . . . . . . . . . . . 7-16
i - 5
Page 621 of 626

Passing . . . . . . . . . . . . . . . . . . . . . . . . . . . . . . . . . . . . . . . . . . . . 5-10
Perchlorate Materials Requirements, California . . . . . .6-5
PhoneBluetooth
®. . . . . . . . . . . . . . . . . . . . . . . . . . . . . . . . . . . . . . .4-121
Pickup Conversion to Chassis Cab . . . . . . . . . . . . . . . . 5-43
Power Door Locks . . . . . . . . . . . . . . . . . . . . . . . . . . . . . . . . . . . . . . . . 3-9
Electrical System . . . . . . . . . . . . . . . . . . . . . . . . . . . . . . . . 6-118
Lumbar Controls . . . . . . . . . . . . . . . . . . . . . . . . . . . . . . . . . . . 2-7
Retained Accessory (RAP) . . . . . . . . . . . . . . . . . . . . . . . 3-23
Seat . . . . . . . . . . . . . . . . . . . . . . . . . . . . . . . . . . . . . . . . . . . . . . . 2-5
Sliding Rear Window . . . . . . . . . . . . . . . . . . . . . . . . . . . . . 3-16
Steering Fluid . . . . . . . . . . . . . . . . . . . . . . . . . . . . . . . . . . . . . 6-37
Windows . . . . . . . . . . . . . . . . . . . . . . . . . . . . . . . . . . . . . . . . . 3-15
Pregnancy, Using Safety Belts . . . . . . . . . . . . . . . . . . . . . 2-37
Privacy . . . . . . . . . . . . . . . . . . . . . . . . . . . . . . . . . . . . . . . . . . . . 8-17 Navigation System . . . . . . . . . . . . . . . . . . . . . . . . . . . . . . . . 8-18
OnStar . . . . . . . . . . . . . . . . . . . . . . . . . . . . . . . . . . . . . . . . . . . 8-18
Radio Frequency Identification (RFID) . . . . . . . . . . . . 8-18
Program Courtesy Transportation . . . . . . . . . . . . . . . . . . . . . . . . . . 8-10
Programmable Automatic Door Locks . . . . . . . . . . . . . 3-10
Proposition 65 Warning, California . . . . . . . . . . . . . . . . . . .6-5
R
Radio Frequency Identification (RFID) . . . . . . . . . . . . . . . . . . . . . . . . . . . . . . 8-18
Statement . . . . . . . . . . . . . . . . . . . . . . . . . . . . . . . . . . . . . . . . 8-18
Radio(s) . . . . . . . . . . . . . . . . . . . . . . . . . . . . . . . . . . . . . . . . . . . 4-85
Radios Navigation/Radio System, see Navigation
Manual . . . . . . . . . . . . . . . . . . . . . . . . . . . . . . . . . . . . . . . . .4-121
Reception . . . . . . . . . . . . . . . . . . . . . . . . . . . . . . . . . . . . . . .4-146
Setting the Clock . . . . . . . . . . . . . . . . . . . . . . . . . . . . . . . . . 4-82
Theft-Deterrent . . . . . . . . . . . . . . . . . . . . . . . . . . . . . . . . . .4-143
Reading Lamps . . . . . . . . . . . . . . . . . . . . . . . . . . . . . . . . . . . . 4-15
Rear Axle . . . . . . . . . . . . . . . . . . . . . . . . . . . . . . . . . . . . . . . . . . 6-48 Locking . . . . . . . . . . . . . . . . . . . . . . . . . . . . . . . . . . . . . . . . . . . . 5-8
Rear Door Security Locks . . . . . . . . . . . . . . . . . . . . . . . . . 3-10
Rear Doors . . . . . . . . . . . . . . . . . . . . . . . . . . . . . . . . . . . . . . . . 3-11
Rear Seat Armrest . . . . . . . . . . . . . . . . . . . . . . . . . . . . . . . . . 3-78
Rear Seat Audio (RSA) System . . . . . . . . . . . . . . . . . . 4-141
Rear Seat Entertainment System . . . . . . . . . . . . . . . . . 4-132 Rear Seat Audio (RSA) . . . . . . . . . . . . . . . . . . . . . . . . . .4-141
Rear Seat Operation . . . . . . . . . . . . . . . . . . . . . . . . . 2-14, 2-15
Rear Vision Camera (RVC) . . . . . . . . . . . . . . . . . . . . . . . . 3-63
i - 11