2010 CHEVROLET IMPALA remote control
[x] Cancel search: remote controlPage 119 of 432

Trunk ReleaseTo open the trunk from the outside, press the trunk
release button on the RKE transmitter, if equipped.Remote Trunk Release
G
(Remote Trunk Release):Press the button
located next to the exterior lamps control on the left side
of the instrument panel to open the trunk. The shift
lever must be in P (Park).
The trunk can also be opened by lowering the rear seat
and pulling the emergency trunk release handle located
inside the trunk. SeeSplit Folding Rear Seat on
page 2-10and “Emergency Trunk Release Handle”
following.
Emergency Trunk Release HandleNotice:Do not use the emergency trunk release
handle as a tie-down or anchor point when securing
items in the trunk as it could damage the handle.
The emergency trunk release handle is only
intended to aid a person trapped in a latched trunk,
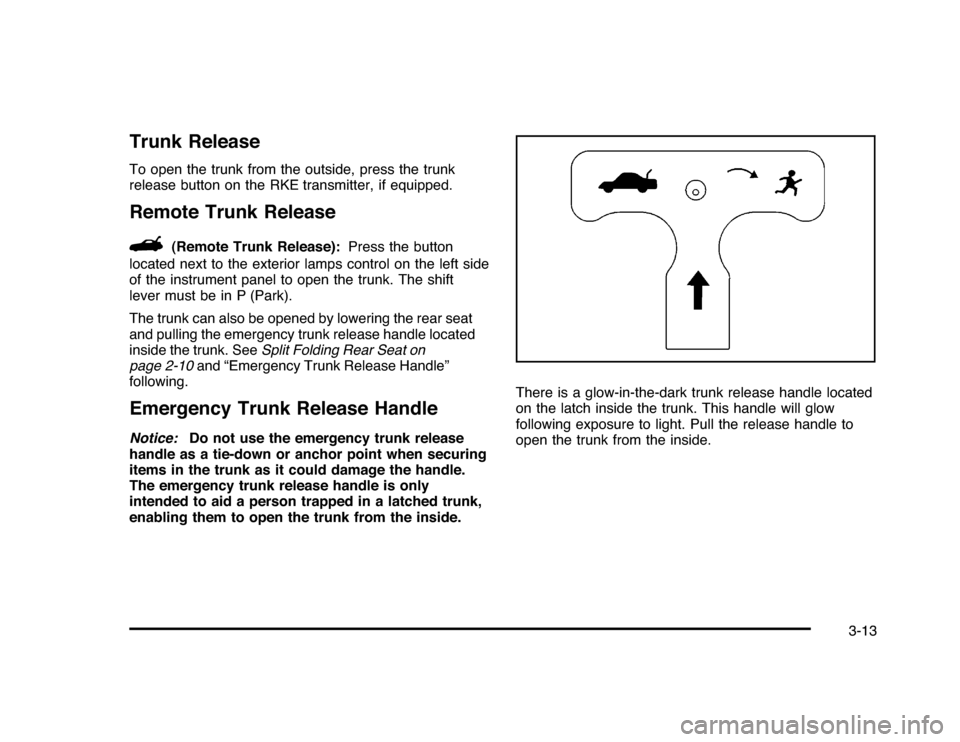
enabling them to open the trunk from the inside.There is a glow-in-the-dark trunk release handle located
on the latch inside the trunk. This handle will glow
following exposure to light. Pull the release handle to
open the trunk from the inside.
3-13
Page 141 of 432

Universal Home Remote
SystemSeeRadio Frequency Statement on page 8-20for
information regarding Part 15 of the Federal
Communications Commission (FCC) Rules and
RSS-210/211 of Industry and Science Canada.Universal Home Remote System
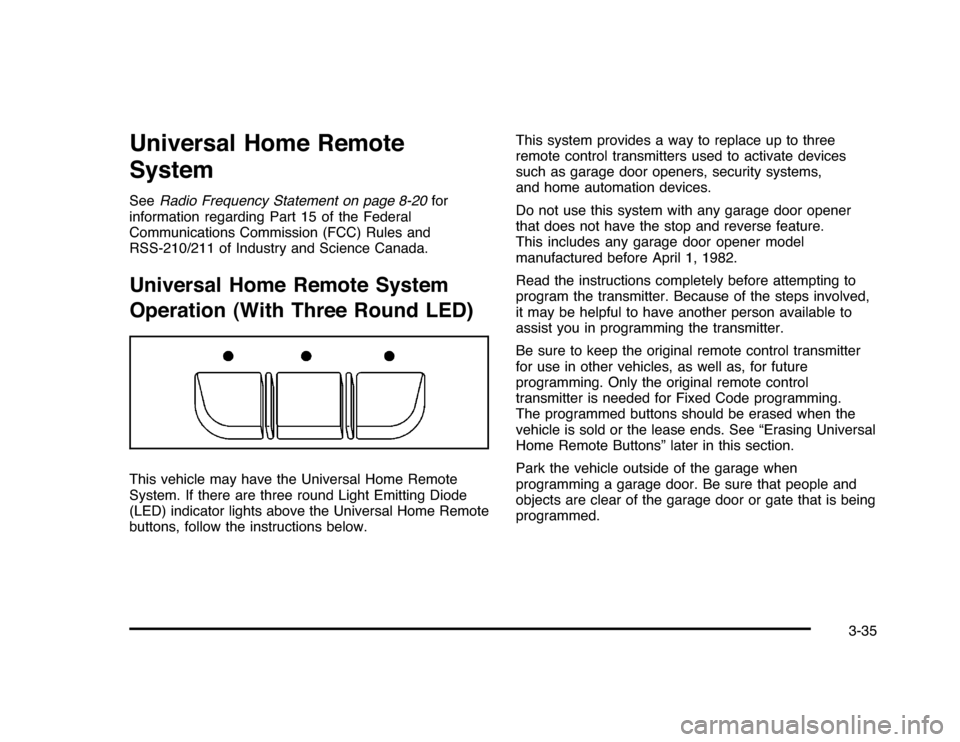
Operation (With Three Round LED)This vehicle may have the Universal Home Remote
System. If there are three round Light Emitting Diode
(LED) indicator lights above the Universal Home Remote
buttons, follow the instructions below.This system provides a way to replace up to three
remote control transmitters used to activate devices
such as garage door openers, security systems,
and home automation devices.
Do not use this system with any garage door opener
that does not have the stop and reverse feature.
This includes any garage door opener model
manufactured before April 1, 1982.
Read the instructions completely before attempting to
program the transmitter. Because of the steps involved,
it may be helpful to have another person available to
assist you in programming the transmitter.
Be sure to keep the original remote control transmitter
for use in other vehicles, as well as, for future
programming. Only the original remote control
transmitter is needed for Fixed Code programming.
The programmed buttons should be erased when the
vehicle is sold or the lease ends. See “Erasing Universal
Home Remote Buttons” later in this section.
Park the vehicle outside of the garage when
programming a garage door. Be sure that people and
objects are clear of the garage door or gate that is being
programmed.
3-35
Page 143 of 432

2. Locate in the garage, the garage door opener
receiver (motor-head unit). Locate the “Learn”
or “Smart” button. It can usually be found where the
hanging antenna wire is attached to the motor-head
unit and may be a colored button. Press this
button. After pressing this button, complete the
following steps in less than 30 seconds.3. Immediately return to the vehicle. Press and hold
the Universal Home Remote button that will be
used to control the garage door until the garage
door moves. The indicator light, above the selected
button, should slowly blink. This button may
need to be held for up to 20 seconds.
4. Immediately, within one second, release the button
when the garage door moves. The indicator light
will blink rapidly until programming is complete.
5. Press and release the same button again.
The garage door should move, confirming
that programming is successful and complete.
To program another Rolling Code device such as an
additional garage door opener, a security device,
or home automation device, repeat Steps 1-5, choosing
a different function button in Step 3 than what was
used for the garage door opener.
If these instructions do not work, the garage door
opener is probably a Fixed Code unit. Follow the
Programming instructions that follow for a Fixed Code
garage door opener.
3-37
Page 147 of 432

5. After entering all of the switch positions, again,
firmly press and release all three buttons at the
same time. The indicator lights will turn on.
6. Press and hold the button that will be used to
control the garage door until the garage door
moves. The indicator light above the selected button
should slowly blink. This button may need to be
held for up to 55 seconds.
7. Immediately release the button when the garage
door moves. The indicator light will blink rapidly
until programming is complete.
8. Press and release the same button again.
The garage door should move, confirming
that programming is successful and complete.
To program another Fixed Code device such as an
additional garage door opener, a security device,
or home automation device, repeat Steps 1-8, choosing
a different button in Step 6 than what was used for
the garage door opener.Using Universal Home RemotePress and hold the appropriate button for at least half of
a second. The indicator light will come on while the
signal is being transmitted.
Reprogramming Universal Home
Remote ButtonsAny of the three buttons can be reprogrammed by
repeating the instructions.Erasing Universal Home Remote
ButtonsThe programmed buttons should be erased when the
vehicle is sold or the lease ends.
To erase either Rolling Code or Fixed Code on the
Universal Home Remote device:
1. Press and hold the two outside buttons at the
same time for approximately 20 seconds, until
the indicator lights, located directly above the
buttons, begin to blink rapidly.
2. Once the indicator lights begin to blink, release both
buttons. The codes from all buttons will be erased.
For help or information on the Universal Home Remote
System, call the customer assistance phone number
underCustomer Assistance Offices on page 8-6.
3-41
Page 197 of 432

REMOTE KEY LEARNING ACTIVEThis message displays while you are matching a
Remote Keyless Entry (RKE) transmitter to your vehicle.
See “Matching Transmitter(s) to Your Vehicle” under
Remote Keyless Entry (RKE) System Operation
on page 3-4andDIC Operation and Displays on
page 4-37for more information.REPLACE BATTERY IN REMOTE KEYThis message displays when the battery in the Remote
Keyless Entry (RKE) transmitter needs to be replaced.
To replace the battery, see “Battery Replacement” under
Remote Keyless Entry (RKE) System Operation on
page 3-4.RIGHT REAR DOOR OPENThis message displays when the passenger side rear
door is not closed properly. Make sure that the door
is closed completely.SERVICE A/C (Air Conditioning)
SYSTEMThis message displays when the electronic sensors that
control the air conditioning and heating systems are
no longer working. Have the climate control system
serviced by your dealer/retailer if you notice a drop
in heating and air conditioning efficiency.
SERVICE AIR BAGThis message displays when there is a problem with
the airbag system. Have your vehicle serviced by your
dealer/retailer immediately. SeeAirbag Readiness
Light on page 4-24for more information.SERVICE BATTERY CHARGING
SYSTEMThis message displays when there is a problem with the
generator and battery charging systems. Driving with this
problem could drain the battery. Turn off all unnecessary
accessories. Stop and turn off the vehicle as soon as it is
safe to do so. Have the electrical system checked by your
dealer/retailer immediately.SERVICE BRAKE SYSTEMThis message displays when service is required on the
brake system. Have the brake system serviced by
your dealer/retailer as soon as possible. The brake
system warning light also appears on the instrument
panel cluster when this message appears on the DIC.
SeeBrake System Warning Light on page 4-27.
4-47
Page 415 of 432

I
Ignition Positions.............................................3-20
Infants and Young Children, Restraints...............2-35
Inflation - Tire Pressure . . .................................6-59
Instrument Panel
Brightness..................................................4-11
Cluster . . .....................................................4-22
Introduction...................................................... 7-2
J
Jump Starting . . ...............................................6-39
K
Keyless Entry
Remote (RKE) System . .................................. 3-4
Keyless Entry System....................................... 3-4
Keys . . . . ........................................................... 3-3
L
Labeling, Tire Sidewall.....................................6-52
Lamps
Courtesy . . . . ................................................4-11
Dome . . . . . ...................................................4-11
License Plate..............................................6-49Lamps (cont.)
Malfunction Indicator....................................4-31
Map ..........................................................4-13
Reading.....................................................4-13
Lap Belt........................................................2-30
Lap-Shoulder Belt...........................................2-25
LATCH System for Child Restraints . . .................2-43
Lighting
Delayed Entry.............................................4-12
Delayed Exit...............................................4-13
Entry.........................................................4-12
Parade Dimming..........................................4-13
Lights
Airbag Readiness........................................4-24
Antilock Brake System (ABS) Warning . . . . . . . . . . . . 4-28
Brake System Warning . . . . .............................4-27
Charging System.........................................4-26
Cruise Control.............................................4-35
Electronic StabiliTrak Control Indicator . . . . . . . . . . . . 4-29
Engine Coolant Temperature Warning.............4-30
Exterior Lamps . . ........................................... 4-9
Flash-to-Pass............................................... 4-5
Fog Lamps.................................................4-35
Highbeam On.............................................4-36
High/Low Beam Changer................................ 4-5
Oil Pressure...............................................4-34
Passenger Airbag Status Indicator . . . ...............4-25
Safety Belt Reminders..................................4-23
7
Page 418 of 432

R
Radio Frequency
Identification (RFID).....................................8-20
Statement . . . . . . . ............................................8-20
Radio(s) . . . . . . . . . . . . . . ..........................................4-59
Radios
Reception . . . . . . . ............................................4-85
Setting the Clock.........................................4-58
Theft-Deterrent............................................4-84
Reading Lamps . . ............................................4-13
Rear Door Security Locks................................3-11
Rear Seat Armrest..........................................3-42
Rear Storage . . . . . . ...........................................3-42
Rearview Mirrors.............................................3-33
Automatic Dimming......................................3-33
Reclining Seatbacks.......................................... 2-6
Recommended Fluids and Lubricants.................7-10
Recreational Vehicle Towing . . ...........................5-26
Reimbursement Program, GM Mobility................. 8-7
Remote Keyless Entry (RKE) System.................. 3-4
Remote Vehicle Start........................................ 3-7
Removing the Flat Tire and Installing the
Spare Tire . . . . . . . ...........................................6-77
Removing the Spare Tire and Tools...................6-76
Replacement Bulbs.........................................6-49Replacement Parts
Maintenance...............................................7-11
Reporting Safety Defects
Canadian Government..................................8-16
General Motors...........................................8-16
U.S. Government.........................................8-16
Restraint System Check
Checking the Restraint Systems....................2-74
Replacing Restraint System Parts After
a Crash..................................................2-75
Retained Accessory Power (RAP) . . ....................3-21
Ride Control Systems....................................... 5-6
Electronic Stability (ESC)................................ 5-6
Roadside Assistance Program............................ 8-7
Rocking Your Vehicle to Get it Out....................5-20
Roof
Sunroof......................................................3-43
Running the Vehicle While Parked
.....................3-32
S
Safety Belts
Care of......................................................6-90
Extender....................................................2-31
How to Wear Safety Belts Properly................2-17
10
Page 420 of 432

Split Folding Rear Seat....................................2-10
StabiliTrak Control Indicator Light, Electronic.......4-29
Start Vehicle, Remote....................................... 3-7
Starting the Engine.........................................3-21
Steering.......................................................... 5-9
Steering Wheel Controls, Audio.........................4-84
Steering Wheel, Tilt Wheel................................. 4-3
Storage Areas
Center Console...........................................3-42
Convenience Net.........................................3-42
Cupholders . . . . . . ...........................................3-42
Glove Box . . . . . . . . . . ........................................3-42
Rear . . . . . . . ...................................................3-42
Rear Seat Armrest.......................................3-42
Sunglasses Storage Compartment..................3-42
Stuck in Sand, Mud, Ice, or Snow.....................5-19
Sun Visors .....................................................3-16
Sunroof . . . . . ....................................................3-43
T
Tachometer ....................................................4-23
Taillamps
Turn Signal, Sidemarker, Stoplamps, and
Back-Up Lamps.......................................6-47
Text Telephone (TTY) Users............................... 8-6Theft-Deterrent Feature....................................4-84
Theft-Deterrent Systems...................................3-16
Content Theft-Deterrent................................3-17
PASS-Key
®
III+ Electronic Immobilizer............3-18
PASS-Key
®
III+ Electronic Immobilizer
Operation................................................3-18
Tilt Wheel........................................................ 4-3
Time, Setting..................................................4-58
Tires . . ...........................................................6-51
Aluminum Wheels, Cleaning..........................6-93
Buying New Tires........................................6-68
Chains.......................................................6-73
Changing a Flat Tire....................................6-75
Cleaning....................................................6-93
Compact Spare...........................................6-86
Different Size . . ............................................6-69
If a Tire Goes Flat.......................................6-74
Inflation - Tire Pressure................................6-59
Inspection and Rotation................................6-65
Installing the Spare Tire................................6-77
Pressure Light.............................................4-31
Pressure Monitor Operation ...........................6-62
Pressure Monitor System..............................6-60
Removing the Flat Tire.................................6-77
Removing the Spare Tire and Tools...............6-76
Sidewall Labeling.........................................6-52
12