2010 CHEVROLET HHR steering
[x] Cancel search: steeringPage 286 of 480
Rocking Your Vehicle to Get It Out
Turn the steering wheel left and right to clear the area
around the front wheels. Turn off any traction system.
Shift back and forth between R (Reverse) and a forward
gear, or with a manual transmission, between 1 (First) or
2 (Second) and R (Reverse), spinning the wheels as
little as possible. To prevent transmission wear, wait
until the wheels stop spinning before shifting gears.
Release the accelerator pedal while shifting, and press
lightly on the accelerator pedal when the transmission is
in gear. Slowly spinning the wheels in the forward and
reverse directions causes a rocking motion that could
free the vehicle. If that does not get the vehicle out after
a few tries, it might need to be towed out. If the vehicle
does need to be towed out, seeTowing Your Vehicle
on
page 5‑29.
Loading the Vehicle
It is very important to know how much weight your
vehicle can carry. Two labels on your vehicle
show how much weight it may properly carry, the
Tire and Loading Information label and the Vehicle
Certification label.
{WARNING:
Do not load the vehicle any heavier than the
Gross Vehicle Weight Rating (GVWR),
or either the maximum front or rear Gross
Axle Weight Rating (GAWR). If you do, parts
on the vehicle can break, and it can change
the way the vehicle handles. These could
cause you to lose control and crash. Also,
overloading can shorten the life of the
vehicle.
5-24
Page 292 of 480
Recreational Vehicle Towing
Recreational vehicle towing means towing the vehicle
behind another vehicle–such as behind a motorhome.
The two most common types of recreational vehicle
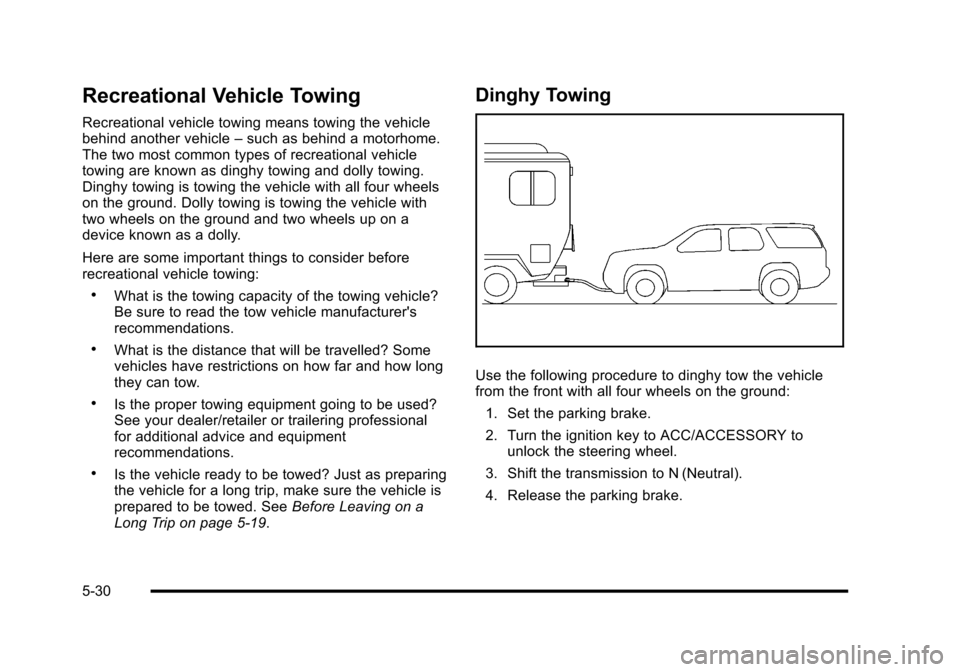
towing are known as dinghy towing and dolly towing.
Dinghy towing is towing the vehicle with all four wheels
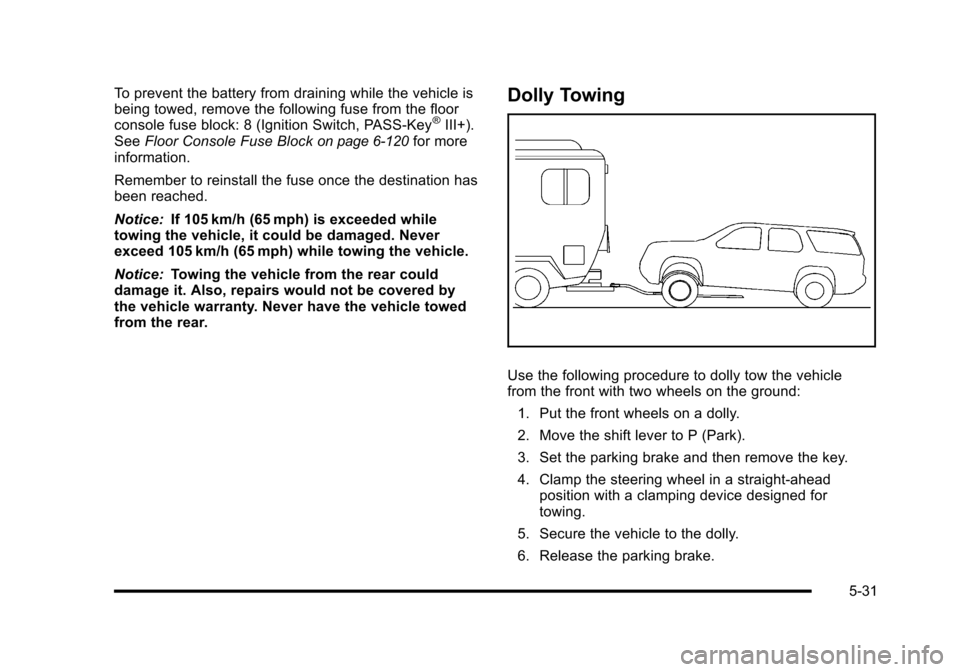
on the ground. Dolly towing is towing the vehicle with
two wheels on the ground and two wheels up on a
device known as a dolly.
Here are some important things to consider before
recreational vehicle towing:
.What is the towing capacity of the towing vehicle?
Be sure to read the tow vehicle manufacturer's
recommendations.
.What is the distance that will be travelled? Some
vehicles have restrictions on how far and how long
they can tow.
.Is the proper towing equipment going to be used?
See your dealer/retailer or trailering professional
for additional advice and equipment
recommendations.
.Is the vehicle ready to be towed? Just as preparing
the vehicle for a long trip, make sure the vehicle is
prepared to be towed. See Before Leaving on a
Long Trip on page 5‑19.
Dinghy Towing
Use the following procedure to dinghy tow the vehicle
from the front with all four wheels on the ground:
1. Set the parking brake.
2. Turn the ignition key to ACC/ACCESSORY to unlock the steering wheel.
3. Shift the transmission to N (Neutral).
4. Release the parking brake.
5-30
Page 293 of 480
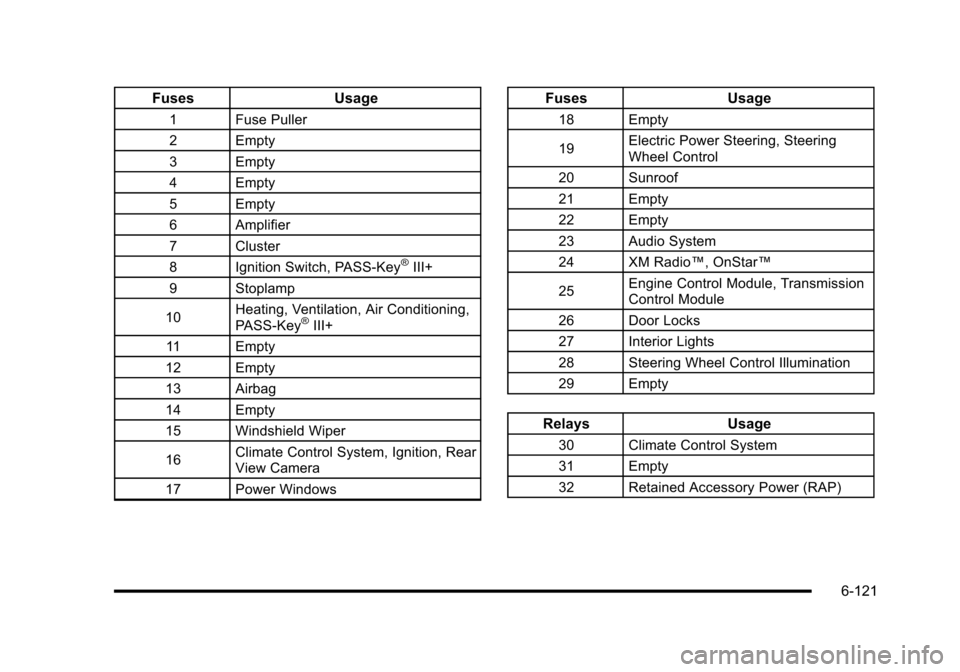
To prevent the battery from draining while the vehicle is
being towed, remove the following fuse from the floor
console fuse block: 8 (Ignition Switch, PASS‐Key
®III+).
See Floor Console Fuse Blockon page 6‑120for more
information.
Remember to reinstall the fuse once the destination has
been reached.
Notice: If 105 km/h (65 mph) is exceeded while
towing the vehicle, it could be damaged. Never
exceed 105 km/h (65 mph) while towing the vehicle.
Notice: Towing the vehicle from the rear could
damage it. Also, repairs would not be covered by
the vehicle warranty. Never have the vehicle towed
from the rear.
Dolly Towing
Use the following procedure to dolly tow the vehicle
from the front with two wheels on the ground:
1. Put the front wheels on a dolly.
2. Move the shift lever to P (Park).
3. Set the parking brake and then remove the key.
4. Clamp the steering wheel in a straight-ahead position with a clamping device designed for
towing.
5. Secure the vehicle to the dolly.
6. Release the parking brake.
5-31
Page 300 of 480
Backing Up
Hold the bottom of the steering wheel with one hand.
Then, to move the trailer to the left, move that hand to
the left. To move the trailer to the right, move your hand
to the right. Always back up slowly and, if possible,
have someone guide you.
Making Turns
When turning with a trailer, make wider turns than
normal. Do this so the trailer will not strike soft
shoulders, curbs, road signs, trees or other objects.
Avoid jerky or sudden maneuvers. Signal well in
advance.
Turn Signals When Towing a Trailer
The arrows on the instrument panel flash whenever
signaling a turn or lane change. Properly hooked up,
the trailer lamps also flash, telling other drivers the
vehicle is turning, changing lanes or stopping.
When towing a trailer, the arrows on the instrument
panel flash for turns even if the bulbs on the trailer are
burned out. For this reason you may think other drivers
are seeing the signal when they are not. It is important
to check occasionally to be sure the trailer bulbs are still
working.
Driving on Grades
Notice:Do not tow on steep continuous grades
exceeding 6 miles (9.6 km). Extended, higher than
normal engine and transmission temperatures may
result and damage the vehicle. Frequent stops are
very important to allow the engine and transmission
to cool.
When towing under severe conditions such as hot
ambient temperatures or steep grades, the vehicle may
experience more transmission shifting. A COOLING
MODE ON message may also appear in the DIC. This
alerts the driver that the shifting mode is in progress
and is aiding engine cooling. See DIC Warnings and
Messages
on page 4‑48DIC Warnings and Messages
for more information.
Reduce speed and shift to a lower gear beforestarting
down a long or steep downgrade. If the transmission is
not shifted down, the brakes might have to be used so
much that they would get hot and no longer work well.
Pay attention to the engine coolant gauge. If the
indicator is in the red area, turn off the air conditioning
to reduce engine load. See Engine Overheating
on
page 6‑34.
5-38
Page 362 of 480

Tire Terminology and Definitions
Air Pressure:The amount of air inside the tire
pressing outward on each square inch of the tire.
Air pressure is expressed in pounds per square
inch (psi) or kilopascal (kPa).
Accessory Weight
:This means the combined
weight of optional accessories. Some examples of
optional accessories are, automatic transmission,
power steering, power brakes, power windows,
power seats, and air conditioning.
Aspect Ratio
:The relationship of a tire's height to
its width.
Belt
:A rubber coated layer of cords that is
located between the plies and the tread. Cords
may be made from steel or other reinforcing
materials.
Bead
:The tire bead contains steel wires wrapped
by steel cords that hold the tire onto the rim.
Bias Ply Tire
:A pneumatic tire in which the plies
are laid at alternate angles less than 90 degrees
to the centerline of the tread. Cold Tire Pressure
:The amount of air pressure
in a tire, measured in pounds per square inch (psi)
or kilopascals (kPa) before a tire has built up heat
from driving. See Inflation - Tire Pressure
on
page 6‑63
.
Curb Weight
:The weight of a motor vehicle with
standard and optional equipment including the
maximum capacity of fuel, oil, and coolant, but
without passengers and cargo.
DOT Markings
:A code molded into the sidewall
of a tire signifying that the tire is in compliance
with the U.S. Department of Transportation (DOT)
motor vehicle safety standards. The DOT code
includes the Tire Identification Number (TIN), an
alphanumeric designator which can also identify
the tire manufacturer, production plant, brand, and
date of production.
GVWR
:Gross Vehicle Weight Rating. See
Loading the Vehicle
on page 5‑24.
GAWR FRT
:Gross Axle Weight Rating for the
front axle. See Loading the Vehicle
on page 5‑24.
6-60
Page 379 of 480
Used Replacement Wheels
{WARNING:
Putting a used wheel on the vehicle is dangerous.
You cannot know how it has been used or how far
it has been driven. It could fail suddenly and
cause a crash. If you have to replace a wheel, use
a new GM original equipment wheel.
Tire Chains
{WARNING:
Do not use tire chains. There is not enough
clearance. Tire chains used on a vehicle without
the proper amount of clearance can cause
damage to the brakes, suspension or other
vehicle parts. The area damaged by the tire
chains could cause you to lose control of the
vehicle and you or others may be injured in a
crash.(Continued)
WARNING: (Continued)
Use another type of traction device only if its
manufacturer recommends it for use on the
vehicle and tire size combination and road
conditions. Follow that manufacturer's
instructions. To help avoid damage to the vehicle,
drive slowly, readjust or remove the device if it is
contacting the vehicle, and do not spin the
vehicle's wheels. If you do find traction devices
that will fit, install them on the front tires.
If a Tire Goes Flat
It is unusual for a tire to blowout while you are driving,
especially if you maintain your vehicle's tires properly.
If air goes out of a tire, it is much more likely to leak out
slowly. But if you should ever have a blowout, here are
a few tips about what to expect and what to do:
If a front tire fails, the flat tire creates a drag that pulls
the vehicle toward that side. Take your foot off the
accelerator pedal and grip the steering wheel firmly.
Steer to maintain lane position, and then gently brake
to a stop well out of the traffic lane.
6-77
Page 380 of 480
A rear blowout, particularly on a curve, acts much like a
skid and may require the same correction you would
use in a skid. In any rear blowout remove your foot from
the accelerator pedal. Get the vehicle under control by
steering the way you want the vehicle to go. It may be
very bumpy and noisy, but you can still steer. Gently
brake to a stop, well off the road if possible.
{WARNING:
Lifting a vehicle and getting under it to do
maintenance or repairs is dangerous without the
appropriate safety equipment and training. If a
jack is provided with the vehicle, it is designed
only for changing a flat tire. If it is used for
anything else, you or others could be badly
injured or killed if the vehicle slips off the jack.
If a jack is provided with the vehicle, only use it
for changing a flat tire.
This vehicle may come with a jack and spare tire or a
tire sealant and compressor kit. To use the jack and
spare tire, follow the instructions below. To use the tire
sealant and compressor kit, see Tire Sealant and
Compressor Kit
on page 6‑78.
Tire Sealant and Compressor Kit
{WARNING:
Idling a vehicle in an enclosed area with poor
ventilation is dangerous. Engine exhaust may
enter the vehicle. Engine exhaust contains
Carbon Monoxide (CO) which cannot be seen or
smelled. It can cause unconsciousness and even
death. Never run the engine in an enclosed area
that has no fresh air ventilation. For more
information, see Engine Exhaust on page 3‑39.
{WARNING:
Over-inflating a tire could cause the tire to rupture
and you or others could be injured. Be sure to
read and follow the tire sealant and compressor
kit instructions and inflate the tire to its
recommended pressure. Do not exceed the
recommended pressure.
6-78
Page 423 of 480
FusesUsage
1 Fuse Puller
2 Empty
3 Empty
4 Empty
5 Empty
6 Amplifier
7 Cluster
8 Ignition Switch, PASS-Key
®III+
9 Stoplamp
10 Heating, Ventilation, Air Conditioning,
PASS-Key
®III+
11 Empty
12 Empty
13 Airbag
14 Empty
15 Windshield Wiper
16 Climate Control System, Ignition, Rear
View Camera
17 Power Windows
Fuses Usage
18 Empty
19Electric Power Steering, Steering
Wheel Control
20 Sunroof
21 Empty
22 Empty
23 Audio System
24 XM Radio™, OnStar™
25 Engine Control Module, Transmission
Control Module
26 Door Locks
27 Interior Lights
28 Steering Wheel Control Illumination
29 Empty
Relays Usage
30 Climate Control System
31 Empty
32 Retained Accessory Power (RAP)
6-121