Page 381 of 480

{WARNING:
Storing the tire sealant and compressor kit or
other equipment in the passenger compartment of
the vehicle could cause injury. In a sudden stop or
collision, loose equipment could strike someone.
Store the tire sealant and compressor kit in its
original location.
If this vehicle has a tire sealant and compressor kit,
there may not be a spare tire, tire changing equipment,
and on some vehicles there may not be a place to store
a tire.
The tire sealant and compressor can be used to
temporarily seal punctures up to ¼ inch (6 mm) in the
tread area of the tire. It can also be used to inflate an
under inflated tire.
If the tire has been separated from the wheel, has
damaged sidewalls, or has a large puncture, the
tire is too severely damaged for the tire sealant and
compressor kit to be effective. See Roadside
Assistance Program on page 8‑6. Read and follow all of the tire sealant and compressor
kit instructions.
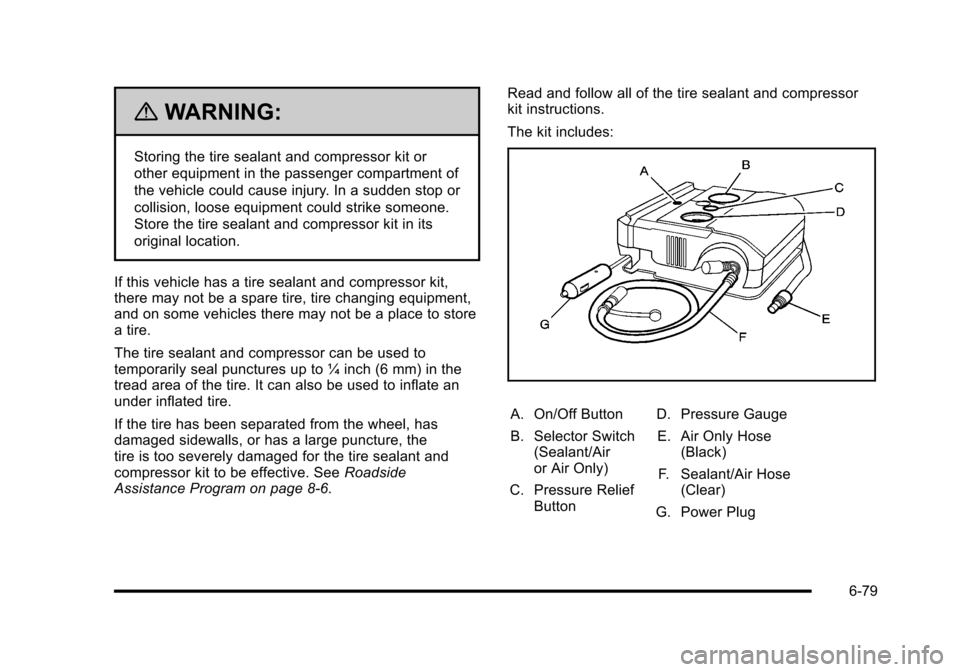
The kit includes:
A. On/Off Button
B. Selector Switch
(Sealant/Air
or Air Only)
C. Pressure Relief Button D. Pressure Gauge
E. Air Only Hose (Black)
F. Sealant/Air Hose (Clear)
G. Power Plug
6-79
Page 391 of 480
A. Wheel Block
B. Flat Tire
The following information explains how to use the jack
and change a tire.
Removing the Spare Tire and Tools
The jack, wheel wrench, and spare tire are stowed in
the rear of the vehicle, underneath the floor of the cargo
area. To remove the spare tire and tools: 1. Open the liftgate. See Liftgate
on page 3‑13for
more information.
2. Remove the cargo cover.
6-89
Page 392 of 480
3. Turn the retainer counterclockwise to remove thetire cover.
4. Remove the tire cover. 5. Remove the spare tire by placing your hands at the
four and eight o'clock positions. Gently pull it up
and out of the trunk. See Compact Spare Tire
on
page 6‑110.
6. Remove the wing nut that holds the jack. Then remove the jack, wheel wrench, and flat tire strap.
The tools needed are the jack (A) and wheel wrench (B).
6-90
Page 394 of 480
Removing the Flat Tire and
Installing the Spare Tire
(All Models Except SS)
1. Do a safety check before proceeding. SeeChanging a Flat Tireon page 6‑88for more
information.
2. Using the wheel wrench, loosen all the wheel nuts. Do not remove them yet.
3. Position the jack and raise the jack lift head to fitover the car flange under the down arrow markings
on the rocker panel.
6-92
Page 395 of 480
{WARNING:
Getting under a vehicle when it is jacked up is
dangerous. If the vehicle slips off the jack, you
could be badly injured or killed. Never get under a
vehicle when it is supported only by a jack.
{WARNING:
Raising your vehicle with the jack improperly
positioned can damage the vehicle and even
make the vehicle fall. To help avoid personal
injury and vehicle damage, be sure to fit the jack
lift head into the proper location before raising the
vehicle.
4. Raise the vehicle by turning the jack handleclockwise. Raise the vehicle far enough off the
ground so there is enough room for the compact
spare tire to fit underneath the wheel well.
6-93
Page 397 of 480
6. Remove any rust or dirtfrom the wheel bolts,
mounting surfaces and
spare wheel.
7. Place the compact spare tire on the wheel-mounting surface.
{WARNING:
Never use oil or grease on bolts or nuts because
the nuts might come loose. The vehicle's wheel
could fall off, causing a crash. 8. Reinstall the wheel nuts with the rounded end of
the nuts toward the wheel. Tighten each nut by
hand until the wheel is held against the hub.9. Lower the vehicle by turning the jack handle
counterclockwise. Lower the jack completely.
6-95
Page 398 of 480

{WARNING:
Wheel nuts that are improperly or incorrectly
tightened can cause the wheels to become loose
or come off. The wheel nuts should be tightened
with a torque wrench to the proper torque
specification after replacing. Follow the torque
specification supplied by the aftermarket
manufacturer when using accessory locking wheel
nuts. SeeCapacities and Specifications
on
page 6‑125
for original equipment wheel nut
torque specifications.
Notice: Improperly tightened wheel nuts can lead
to brake pulsation and rotor damage. To avoid
expensive brake repairs, evenly tighten the wheel
nuts in the proper sequence and to the proper
torque specification. See Capacities and
Specifications
on page 6‑125for the wheel nut
torque specification.
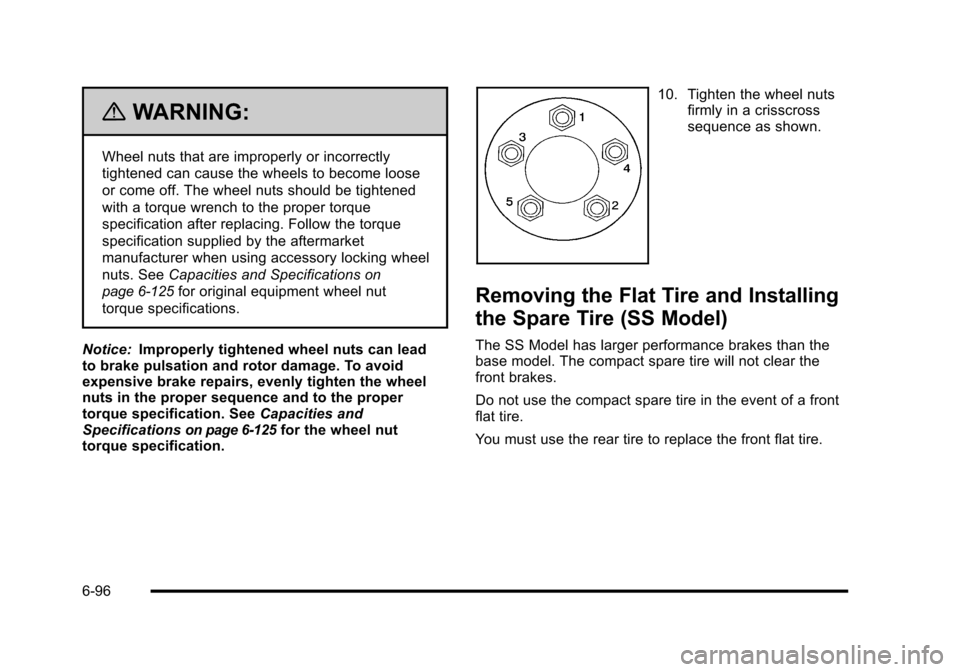
10. Tighten the wheel nuts
firmly in a crisscross
sequence as shown.
Removing the Flat Tire and Installing
the Spare Tire (SS Model)
The SS Model has larger performance brakes than the
base model. The compact spare tire will not clear the
front brakes.
Do not use the compact spare tire in the event of a front
flat tire.
You must use the rear tire to replace the front flat tire.
6-96
Page 400 of 480
{WARNING:
Raising your vehicle with the jack improperly
positioned can damage the vehicle and even
make the vehicle fall. To help avoid personal
injury and vehicle damage, be sure to fit the jack
lift head into the proper location before raising the
vehicle.
4. Raise the vehicle by turning the jack handleclockwise. Raise the vehicle far enough off the
ground so there is enough room for the compact
spare tire to fit underneath the wheel well.
6-98