2010 CHEVROLET HHR change wheel
[x] Cancel search: change wheelPage 351 of 480
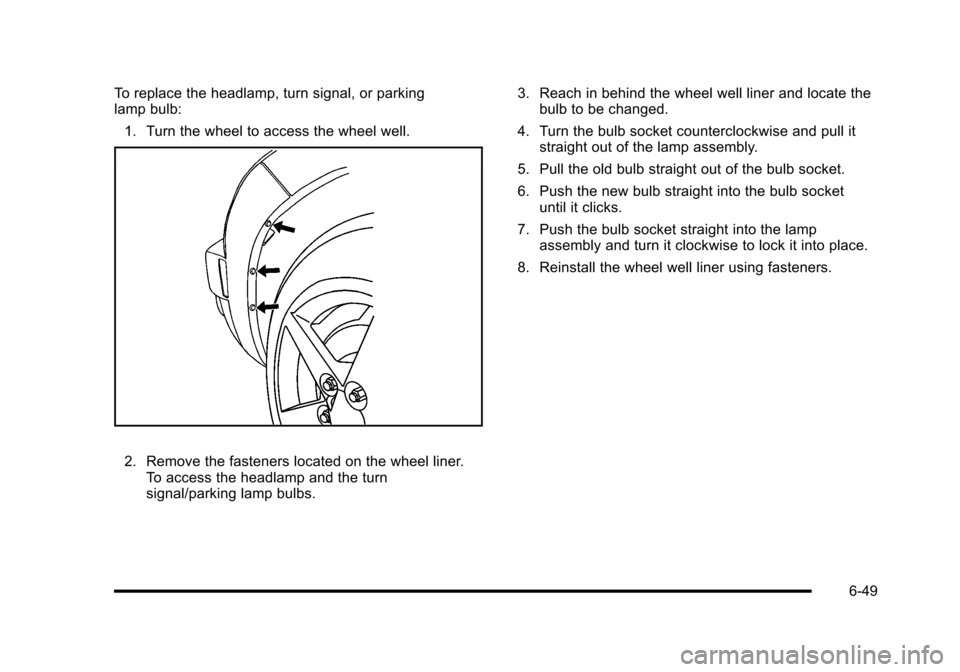
To replace the headlamp, turn signal, or parking
lamp bulb:1. Turn the wheel to access the wheel well.
2. Remove the fasteners located on the wheel liner. To access the headlamp and the turn
signal/parking lamp bulbs. 3. Reach in behind the wheel well liner and locate the
bulb to be changed.
4. Turn the bulb socket counterclockwise and pull it straight out of the lamp assembly.
5. Pull the old bulb straight out of the bulb socket.
6. Push the new bulb straight into the bulb socket until it clicks.
7. Push the bulb socket straight into the lamp assembly and turn it clockwise to lock it into place.
8. Reinstall the wheel well liner using fasteners.
6-49
Page 372 of 480
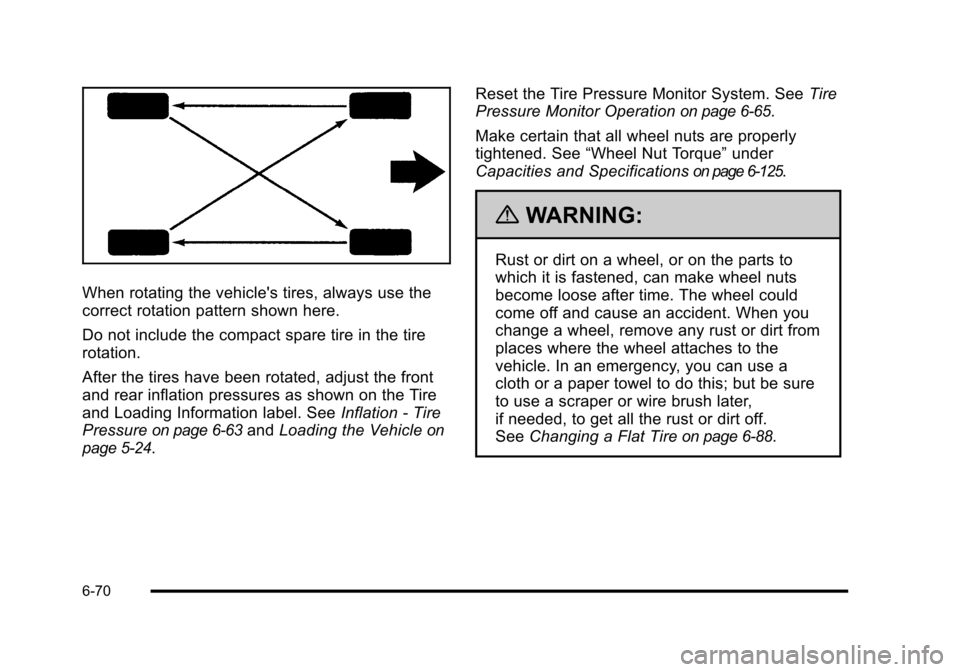
When rotating the vehicle's tires, always use the
correct rotation pattern shown here.
Do not include the compact spare tire in the tire
rotation.
After the tires have been rotated, adjust the front
and rear inflation pressures as shown on the Tire
and Loading Information label. SeeInflation - Tire
Pressure
on page 6‑63and Loading the Vehicleon
page 5‑24
. Reset the Tire Pressure Monitor System. See
Tire
Pressure Monitor Operation
on page 6‑65.
Make certain that all wheel nuts are properly
tightened. See “Wheel Nut Torque” under
Capacities and Specifications
on page 6‑125.
{WARNING:
Rust or dirt on a wheel, or on the parts to
which it is fastened, can make wheel nuts
become loose after time. The wheel could
come off and cause an accident. When you
change a wheel, remove any rust or dirt from
places where the wheel attaches to the
vehicle. In an emergency, you can use a
cloth or a paper towel to do this; but be sure
to use a scraper or wire brush later,
if needed, to get all the rust or dirt off.
See Changing a Flat Tire
on page 6‑88.
6-70
Page 390 of 480
Changing a Flat Tire
If a tire goes flat, avoid further tire and wheel damage
by driving slowly to a level place. Turn on the hazard
warning flashers. SeeHazard Warning Flashers
on
page 4‑3.
{WARNING:
Changing a tire can be dangerous. The vehicle
can slip off the jack and roll over or fall on you or
other people. You and they could be badly injured
or even killed. Find a level place to change your
tire. To help prevent the vehicle from moving:
1. Set the parking brake firmly.
2. Put an automatic transmission shift lever in P (Park), or shift a manual transmission to
1 (First) or R (Reverse).
(Continued)
WARNING: (Continued)
3. Turn off the engine and do not restart whilethe vehicle is raised.
4. Do not allow passengers to remain in the vehicle.
To be even more certain the vehicle will not move,
you should put blocks at the front and rear of the
tire farthest away from the one being changed.
That would be the tire on the other side, at the
opposite end of the vehicle.
When the vehicle has a flat tire (B), use the following
example as a guide to assist you in the placement of
wheel blocks (A).
6-88
Page 391 of 480
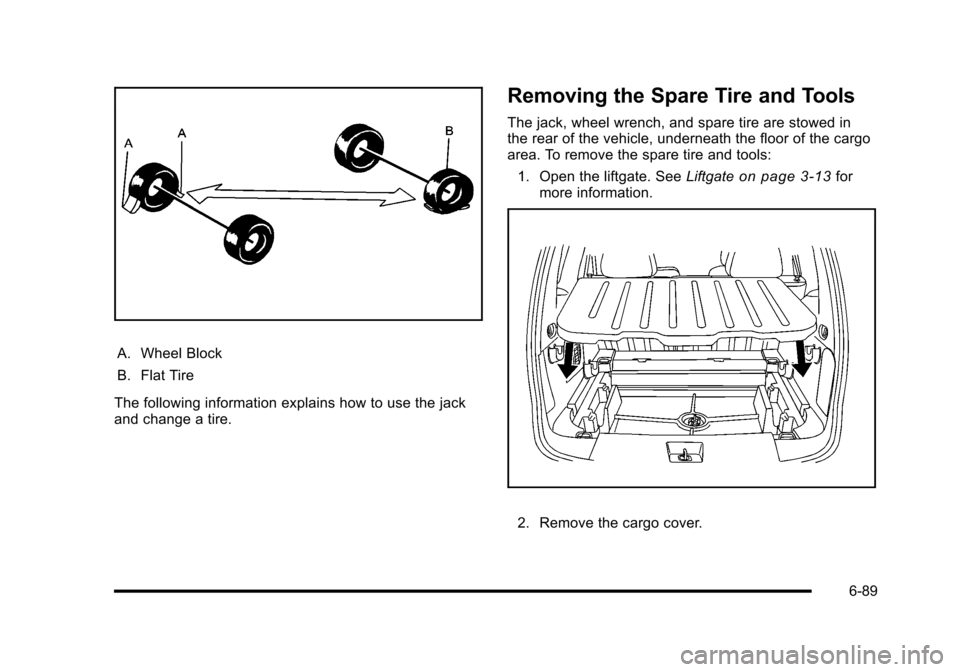
A. Wheel Block
B. Flat Tire
The following information explains how to use the jack
and change a tire.
Removing the Spare Tire and Tools
The jack, wheel wrench, and spare tire are stowed in
the rear of the vehicle, underneath the floor of the cargo
area. To remove the spare tire and tools: 1. Open the liftgate. See Liftgate
on page 3‑13for
more information.
2. Remove the cargo cover.
6-89
Page 399 of 480
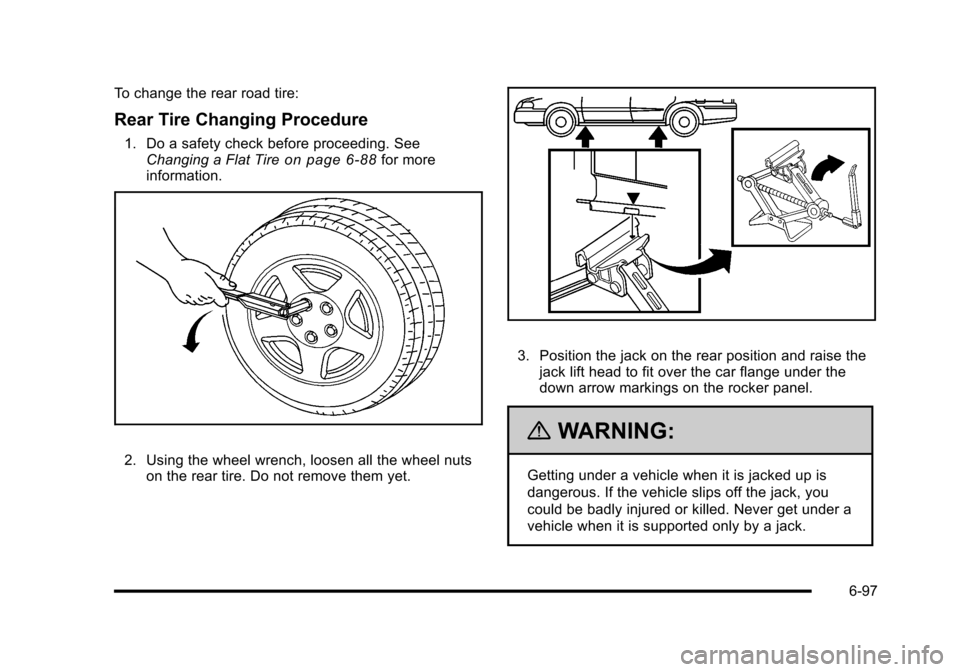
To change the rear road tire:
Rear Tire Changing Procedure
1. Do a safety check before proceeding. SeeChanging a Flat Tireon page 6‑88for more
information.
2. Using the wheel wrench, loosen all the wheel nuts on the rear tire. Do not remove them yet.
3. Position the jack on the rear position and raise thejack lift head to fit over the car flange under the
down arrow markings on the rocker panel.
{WARNING:
Getting under a vehicle when it is jacked up is
dangerous. If the vehicle slips off the jack, you
could be badly injured or killed. Never get under a
vehicle when it is supported only by a jack.
6-97
Page 403 of 480
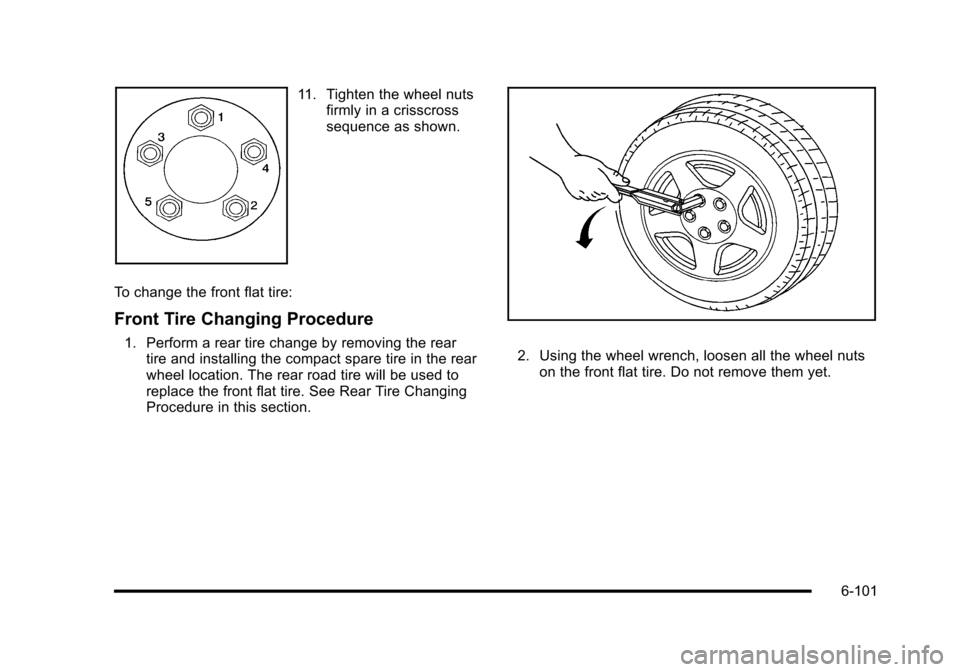
11. Tighten the wheel nutsfirmly in a crisscross
sequence as shown.
To change the front flat tire:
Front Tire Changing Procedure
1. Perform a rear tire change by removing the rear tire and installing the compact spare tire in the rear
wheel location. The rear road tire will be used to
replace the front flat tire. See Rear Tire Changing
Procedure in this section.2. Using the wheel wrench, loosen all the wheel nutson the front flat tire. Do not remove them yet.
6-101
Page 474 of 480

Service (cont.)Parts Identification Label . . . . . . . . . . . . . . . . . . . . . . . . 6-118
Publications Ordering Information . . . . . . . . . . . . . . . . . 8-14
Scheduling Appointments . . . . . . . . . . . . . . . . . . . . . . . . . . 8-8
Servicing Your Airbag-Equipped Vehicle . . . . . . . . . . . 2-76
Setting the Clock . . . . . . . . . . . . . . . . . . . . . . . . . . . . . . . . . . 4-61
Sheet Metal Damage . . . . . . . . . . . . . . . . . . . . . . . . . . . . . 6-117
Shifting Out of Park . . . . . . . . . . . . . . . . . . . . . . . . . . . . . . . . . . . . . . . 3-37
Shifting Into Park . . . . . . . . . . . . . . . . . . . . . . . . . . . . . . . . . . 3-36
Signals, Turn and Lane-Change . . . . . . . . . . . . . . . . . . . . .4-4
Spare Tire Compact . . . . . . . . . . . . . . . . . . . . . . . . . . . . . . . . . . . . . . . . . 6-110
Installing . . . . . . . . . . . . . . . . . . . . . . . . . . . . . . . . . . . . 6-92, 6-96
Removing . . . . . . . . . . . . . . . . . . . . . . . . . . . . . . . . . . . . . . . . 6-89
Storing . . . . . . . . . . . . . . . . . . . . . . . . . . . . . . . . . . . . . . . . . .6-106
Specifications and Capacities . . . . . . . . . . . . . . . . . . . . . 6-125
Speedometer . . . . . . . . . . . . . . . . . . . . . . . . . . . . . . . . . . . . . . 4-25
Split Folding Rear Seat . . . . . . . . . . . . . . . . . . . . . . . . . . . . 2-11
Start Vehicle, Remote . . . . . . . . . . . . . . . . . . . . . . . . . . . . . . .3-7
Starting the Engine . . . . . . . . . . . . . . . . . . . . . . . . . . . . . . . . 3-25
Steering . . . . . . . . . . . . . . . . . . . . . . . . . . . . . . . . . . . . . . . . . . . 5-13
Steering Wheel Controls, Audio . . . . . . . . . . . . . . . . . . . 4-92
Steering Wheel, Tilt Wheel . . . . . . . . . . . . . . . . . . . . . . . . . .4-3
Storage Areas Convenience Net . . . . . . . . . . . . . . . . . . . . . . . . . . . . . . . . . 3-51
Cupholders . . . . . . . . . . . . . . . . . . . . . . . . . . . . . . . . . . . . . . . 3-47
Floor Console Storage Area . . . . . . . . . . . . . . . . . . . . . . 3-47 Storage Areas (cont.)
Glove Box . . . . . . . . . . . . . . . . . . . . . . . . . . . . . . . . . . . . . . . . 3-47
Hideaway Rear Storage Bins . . . . . . . . . . . . . . . . . . . . . 3-51
Instrument Panel . . . . . . . . . . . . . . . . . . . . . . . . . . . . . . . . . 3-47
Rear . . . . . . . . . . . . . . . . . . . . . . . . . . . . . . . . . . . . . . . . . . . . . . 3-48
Rear Compartment Storage Panel/Cover . . . . . . . . . 3-48
Roof Rack System . . . . . . . . . . . . . . . . . . . . . . . . . . . . . . . . 3-50
Storing the Tire Sealant and Compressor Kit . . . . . . . . . . . . . . . . . . . . . . . . . . . . . . . . . . . . . . . . . . . . . . . . . . . 6-87
Stuck in Sand, Mud, Ice, or Snow . . . . . . . . . . . . . . . . . 5-23
Sun Visors . . . . . . . . . . . . . . . . . . . . . . . . . . . . . . . . . . . . . . . . . 3-18
Sunroof . . . . . . . . . . . . . . . . . . . . . . . . . . . . . . . . . . . . . . . . . . . . 3-52
T
Tachometer . . . . . . . . . . . . . . . . . . . . . . . . . . . . . . . . . . . . . . . . 4-25
Taillamps Turn Signal, Stoplamps and Back-up Lamps . . . . . . 6-51
Text Telephone (TTY) Users . . . . . . . . . . . . . . . . . . . . . . . . .8-5
Theft-Deterrent Feature . . . . . . . . . . . . . . . . . . . . . . . . . . . . 4-92
Theft-Deterrent Systems . . . . . . . . . . . . . . . . . . . . . . . . . . . 3-18 Content Theft-Deterrent . . . . . . . . . . . . . . . . . . . . . . . . . . 3-19
PASS-Key
®III+ Electronic Immobilizer . . . . . . . . . . . . 3-20
PASS-Key®III+ Electronic Immobilizer
Operation . . . . . . . . . . . . . . . . . . . . . . . . . . . . . . . . . . . . . . . 3-20
Tilt Wheel . . . . . . . . . . . . . . . . . . . . . . . . . . . . . . . . . . . . . . . . . . . .4-3
Time, Setting . . . . . . . . . . . . . . . . . . . . . . . . . . . . . . . . . . . . . . 4-61
i - 12
Page 475 of 480

Tires . . . . . . . . . . . . . . . . . . . . . . . . . . . . . . . . . . . . . . . . . . . . . . . 6-54Aluminum or Chrome-Plated Wheels,
Cleaning . . . . . . . . . . . . . . . . . . . . . . . . . . . . . . . . . . . . . . . 6-116
Buying New Tires . . . . . . . . . . . . . . . . . . . . . . . . . . . . . . . . . 6-72
Chains . . . . . . . . . . . . . . . . . . . . . . . . . . . . . . . . . . . . . . . . . . . . 6-77
Changing a Flat Tire . . . . . . . . . . . . . . . . . . . . . . . . . . . . . . 6-88
Cleaning . . . . . . . . . . . . . . . . . . . . . . . . . . . . . . . . . . . . . . . . . 6-117
Compact Spare . . . . . . . . . . . . . . . . . . . . . . . . . . . . . . . . . . 6-110
Different Size . . . . . . . . . . . . . . . . . . . . . . . . . . . . . . . . . . . . . 6-74
If a Tire Goes Flat . . . . . . . . . . . . . . . . . . . . . . . . . . . . . . . . 6-77
Inflation - Tire Pressure . . . . . . . . . . . . . . . . . . . . . . . . . . . 6-63
Inspection and Rotation . . . . . . . . . . . . . . . . . . . . . . . . . . 6-69
Installing the Spare Tire . . . . . . . . . . . . . . . . . . . . 6-92, 6-96
Pressure Light . . . . . . . . . . . . . . . . . . . . . . . . . . . . . . . . . . . . 4-35
Pressure Monitor Operation . . . . . . . . . . . . . . . . . . . . . . 6-65
Pressure Monitor System . . . . . . . . . . . . . . . . . . . . . . . . . 6-64
Removing the Flat Tire . . . . . . . . . . . . . . . . . . . . . 6-92, 6-96
Removing the Spare Tire and Tools . . . . . . . . . . . . . . . 6-89
Sealant and Compressor Kit . . . . . . . . . . . . . . . . 6-78, 6-87
Sidewall Labeling . . . . . . . . . . . . . . . . . . . . . . . . . . . . . . . . . 6-56
Storing a Flat or Spare Tire and Tools . . . . . . . . . . .6-106
Terminology and Definitions . . . . . . . . . . . . . . . . . . . . . . 6-60
Uniform Tire Quality Grading . . . . . . . . . . . . . . . . . . . . . 6-74
Wheel Alignment and Tire Balance . . . . . . . . . . . . . . . 6-76
Wheel Replacement . . . . . . . . . . . . . . . . . . . . . . . . . . . . . . 6-76
When It Is Time for New Tires . . . . . . . . . . . . . . . . . . . . 6-71 Towing
Recreational Vehicle . . . . . . . . . . . . . . . . . . . . . . . . . . . . . . 5-30
Towing a Trailer . . . . . . . . . . . . . . . . . . . . . . . . . . . . 5-32, 5-40
Your Vehicle . . . . . . . . . . . . . . . . . . . . . . . . . . . . . . . . . . . . . . 5-29
Traction Control System (TCS) . . . . . . . . . . . . . . . . . . . . . . . . . . . . . 5-9
Limited-Slip Differential . . . . . . . . . . . . . . . . . . . . . . . . . . . 5-13
Traction System Enhanced . . . . . . . . . . . . . . . . . . . . . . . . . . . . . . . . . . . . . . . . 4-32
Transmission Fluid, Automatic . . . . . . . . . . . . . . . . . . . . . . . . . . . . . . . . . . 6-27
Fluid, Manual . . . . . . . . . . . . . . . . . . . . . . . . . . . . . . . . . . . . . 6-28
Transmission Operation, Automatic . . . . . . . . . . . . . . . . 3-28
Transmission Operation, Manual . . . . . . . . . . . . . . . . . . 3-31
Transportation Program, Courtesy . . . . . . . . . . . . . . . . . . .8-9
Turn and Lane-Change Signals . . . . . . . . . . . . . . . . . . . . . .4-4
Turn Signal/Multifunction Lever . . . . . . . . . . . . . . . . . . . . . .4-4
U
Uniform Tire Quality Grading . . . . . . . . . . . . . . . . . . . . . . 6-74
Up-Shift Light . . . . . . . . . . . . . . . . . . . . . . . . . . . . . . . . . . . . . . 4-29
V
Vehicle Control . . . . . . . . . . . . . . . . . . . . . . . . . . . . . . . . . . . . . . . . . . . . 5-3
Loading . . . . . . . . . . . . . . . . . . . . . . . . . . . . . . . . . . . . . . . . . . . 5-24
Parking Your . . . . . . . . . . . . . . . . . . . . . . . . . . . . . . . . . . . . . . 3-38
i - 13