2010 CHEVROLET EQUINOX change wheel
[x] Cancel search: change wheelPage 248 of 394
8-44 Driving and Operating
Cruise Control
With cruise control, the vehicle can
maintain a speed of about 40 km/h
(25 mph) or more without keeping
your foot on the accelerator. Cruise
control does not work at speeds
below 40 km/h (25 mph).
If the brakes are applied, the cruise
control is turned off.
If the vehicle has a StabiliTrak
®or
traction control system and begins
to limit wheel spin while using
cruise control, the cruise control
automatically disengages. See
StabiliTrak System
on page 8‑43or
Traction Control System (TCS)on
page 8‑41. When road conditions
allow you to safely use it again, the
cruise control can be turned
back on.
{WARNING
Cruise control can be dangerous
where you cannot drive safely at
a steady speed. So, do not use
the cruise control on winding
roads or in heavy traffic.
Cruise control can be dangerous
on slippery roads. On such roads,
fast changes in tire traction can
cause excessive wheel slip, and
you could lose control. Do not use
cruise control on slippery roads.
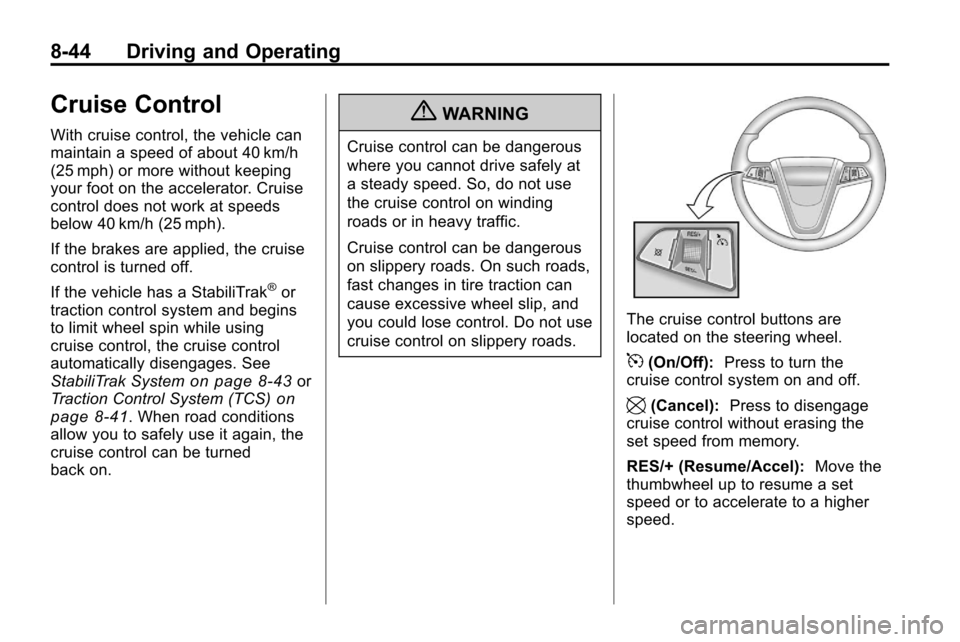
The cruise control buttons are
located on the steering wheel.
5(On/Off): Press to turn the
cruise control system on and off.
\(Cancel): Press to disengage
cruise control without erasing the
set speed from memory.
RES/+ (Resume/Accel): Move the
thumbwheel up to resume a set
speed or to accelerate to a higher
speed.
Page 262 of 394
8-58 Driving and Operating
For information on towing a disabled
vehicle, seeTowing the Vehicleon
page 9‑72. For information on
towing the vehicle behind another
vehicle —such as a motorhome,
see Recreational Vehicle Towing
on
page 9‑72.
Driving Characteristics
and Towing Tips
{WARNING
The driver can lose control when
pulling a trailer if the correct
equipment is not used or the
vehicle is not driven properly.
For example, if the trailer is too
heavy, the brakes may not work
well —or even at all. The driver
and passengers could be
seriously injured. The vehicle may
also be damaged; the resulting
repairs would not be covered by
(Continued)
WARNING (Continued)
the vehicle warranty. Pull a trailer
only if all the steps in this section
have been followed. Ask your
dealer for advice and information
about towing a trailer with the
vehicle.
The vehicle can tow a trailer when
equipped with the proper trailer
towing equipment. For trailering
capacity, see “Trailer Towing”
following in this section. Trailering
changes handling, acceleration,
braking, durability and fuel
economy. With the added weight,
the engine, transmission, wheel
assemblies and tires are forced to
work harder and under greater
loads. The trailer also adds wind
resistance, increasing the pulling
requirements. For safe trailering,
correctly use the proper trailering
equipment. The following information has
important trailering tips and rules for
your safety and that of your
passengers. Read this section
carefully before pulling a trailer.
Pulling A Trailer
Here are some important points:
.There are many laws, including
speed limit restrictions that apply
to trailering. Check for legal
requirements with state or
provincial police.
.Do not tow a trailer at all during
the first 1 600 km (1,000 miles)
the new vehicle is driven. The
engine, axle or other parts could
be damaged.
.During the first 800 km
(500 miles) that a trailer is
towed, do not drive over 80 km/h
(50 mph) and do not make starts
at full throttle. This reduces wear
on the vehicle.
.The vehicle can tow in D (Drive).
Use a lower gear if the
transmission shifts too often.
Page 263 of 394
Driving and Operating 8-59
.Do not use the Fuel Saver Mode
when towing.
.Obey speed limit restrictions.
Do not drive faster than the
maximum posted speed for
trailers, or no more than 90 km/h
(55 mph), to reduce wear on the
vehicle.
.For vehicles with the Ultra Rear
Parking Assist (URPA) system,
turn the system off when towing
a trailer. If the tow bar is
installed while not towing a
trailer, change the URPA system
to the“Tow Bar” setting. See
Ultrasonic Parking Assist
on
page 8‑46for more information.
Driving with a Trailer
Towing a trailer requires experience.
Get familiar with handling and
braking with the added trailer
weight. The vehicle is now longer
and not as responsive as the
vehicle is by itself. Check all trailer hitch parts and
attachments, safety chains,
electrical connectors, lamps, tires
and mirror adjustments. If the trailer
has electric brakes, start the vehicle
and trailer moving and then apply
the trailer brake controller by hand
to be sure the brakes are working.
During the trip, check regularly to be
sure that the load is secure, and the
lamps and trailer brakes are working
properly.
Towing with a Stability Control
System
When towing, the sound of the
stability control system might be
heard. The system is reacting to the
vehicle movement caused by the
trailer, which mainly occurs during
cornering. This is normal when
towing heavier trailers.
Following Distance
Stay at least twice as far behind the
vehicle ahead as you would when
driving the vehicle without a trailer.
This can help to avoid situations
that require heavy braking and
sudden turns.
Passing
More passing distance is needed
when towing a trailer. Because the
rig is longer, it is necessary to go
farther beyond the passed vehicle
before returning to the lane.
Backing Up
Hold the bottom of the steering
wheel with one hand. To move the
trailer to the left, move that hand to
the left. To move the trailer to the
right, move your hand to the right.
Always back up slowly and,
if possible, have someone
guide you.
Page 264 of 394
8-60 Driving and Operating
Making Turns
Notice:Making very sharp turns
while trailering could cause the
trailer to come in contact with the
vehicle. The vehicle could be
damaged. Avoid making very
sharp turns while trailering.
When turning with a trailer, make
wider turns than normal so the
trailer will not strike soft shoulders,
curbs, road signs, trees or other
objects. Use the turn signal well in
advance and avoid jerky or sudden
maneuvers.
Turn Signals When Towing
a Trailer
The turn signal indicators on the
instrument panel flash whenever
signaling a turn or lane change.
Properly hooked up, the trailer
lamps also flash, telling other
drivers the vehicle is turning,
changing lanes or stopping.
When towing a trailer, the arrows
on the instrument panel flash for
turns even if the bulbs on the trailer are burned out. Check occasionally
to be sure the trailer bulbs are still
working.
Driving On Grades
Reduce speed and shift to a lower
gear before starting down a long or
steep downgrade. If the
transmission is not shifted down, the
brakes might have to be used so
much that they would get hot and no
longer work well.
The vehicle can tow in D (Drive).
Use a lower gear if the transmission
shifts too often.
When towing at high altitude on
steep uphill grades, engine coolant
will boil at a lower temperature than
at normal altitudes. If the engine is
turned off immediately after towing
at high altitude on steep uphill
grades, the vehicle may show signs
similar to engine overheating. To
avoid this, let the engine run while
parked, preferably on level ground,
with the transmission in P (Park) for
a few minutes before turning the
engine off. If the overheat warning
comes on, see
Engine Overheating
on page 9‑18.
Parking on Hills
{WARNING
Parking the vehicle on a hill with
the trailer attached can be
dangerous. If something goes
wrong, the rig could start to move.
People can be injured, and both
the vehicle and the trailer can be
damaged. When possible, always
park the rig on a flat surface.
If parking the rig on a hill:
1. Press the brake pedal, but do not shift into P (Park) yet. Turn
the wheels into the curb if facing
downhill or into traffic if facing
uphill.
2. Have someone place chocks under the trailer wheels.
Page 290 of 394
9-22 Vehicle Care
Some driving conditions or climates
can cause a brake squeal when the
brakes are first applied or lightly
applied. This does not mean
something is wrong with the brakes.
Properly torqued wheel nuts are
necessary to help prevent brake
pulsation. When tires are rotated,
inspect brake pads for wear and
evenly tighten wheel nuts in the
proper sequence to torque
specifications inCapacities and
Specifications on page 11‑2.
Brake linings should always be
replaced as complete axle sets.
Brake Pedal Travel
See your dealer if the brake pedal
does not return to normal height,
or if there is a rapid increase in
pedal travel. This could be a sign
that brake service might be
required.
Brake Adjustment
Every time the brakes are applied,
with or without the vehicle moving,
the brakes adjust for wear.
Replacing Brake System Parts
The braking system on a vehicle is
complex. Its many parts have to be
of top quality and work well together
if the vehicle is to have really good
braking. The vehicle was designed
and tested with top-quality brake
parts. When parts of the braking
system are replaced, be sure to get
new, approved replacement parts.
If this is not done, the brakes might
not work properly. For example,
installing disc brake pads that are
wrong for the vehicle, can change
the balance between the front and
rear brakes —for the worse. The
braking performance expected can
change in many other ways if the
wrong replacement brake parts are
installed.
Brake Fluid
The brake master cylinder reservoir
is filled with DOT 3 brake fluid as
indicated on the reservoir cap. See
Engine Compartment Overview
on
page 9‑6for the location of the
reservoir.
There are only two reasons why the
brake fluid level in the reservoir
might go down:
.The brake fluid level goes down
because of normal brake lining
wear. When new linings are
installed, the fluid level goes
back up.
Page 292 of 394
9-24 Vehicle Care
Battery
Refer to the replacement number on
the original battery label when a
new battery is needed.
{DANGER
Battery posts, terminals, and
related accessories contain lead
and lead compounds, chemicals
known to the State of California to
cause cancer and reproductive
harm. Wash hands after handling.
Vehicle Storage
{WARNING
Batteries have acid that can burn
you and gas that can explode.
You can be badly hurt if you are
not careful. SeeJump Starting
on
page 9‑69
for tips on working
around a battery without
getting hurt. Infrequent Usage: Remove the
black, negative (−) cable from the
battery to keep the battery from
running down.
Extended Storage: Remove the
black, negative (−) cable from the
battery or use a battery trickle
charger.
All-Wheel Drive
Transfer Case
When to Check and Change
Lubricant
Refer to the Maintenance Schedule
to determine how often to check the
lubricant and when to change it.
See
Scheduled Maintenance
on
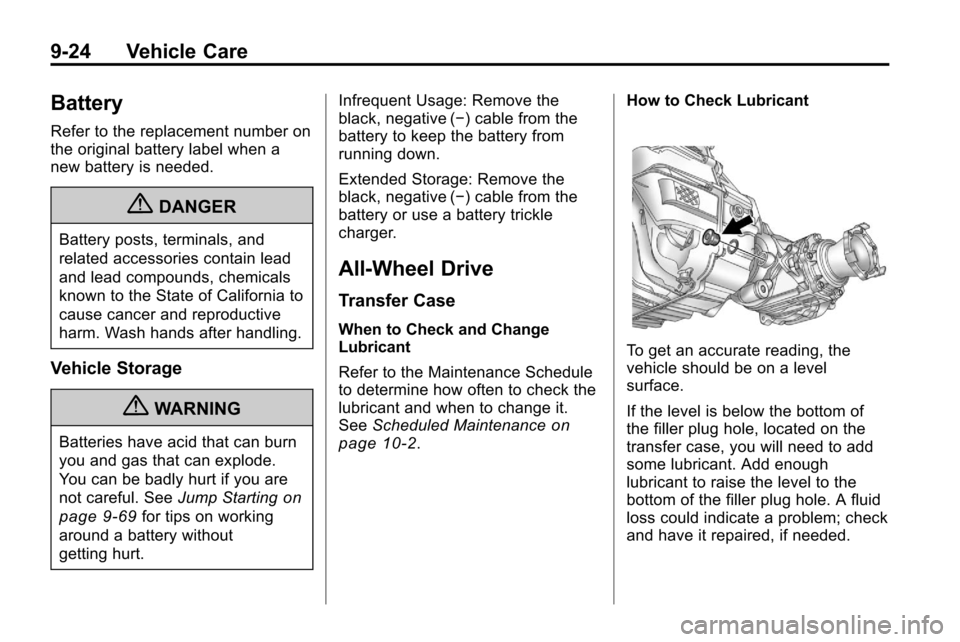
page 10‑2. How to Check Lubricant
To get an accurate reading, the
vehicle should be on a level
surface.
If the level is below the bottom of
the filler plug hole, located on the
transfer case, you will need to add
some lubricant. Add enough
lubricant to raise the level to the
bottom of the filler plug hole. A fluid
loss could indicate a problem; check
and have it repaired, if needed.
Page 328 of 394
9-60 Vehicle Care
If a tire goes flat, avoid further tire
and wheel damage by driving slowly
to a level place. Turn on the hazard
warning flashers. SeeHazard
Warning Flashers on page 5‑2.
{WARNING
Changing a tire can be
dangerous. The vehicle can slip
off the jack and roll over or fall on
you or other people. You and they
could be badly injured or even
killed. Find a level place to
change your tire. To help prevent
the vehicle from moving:
1. Set the parking brake firmly.
2. Put an automatic transmission shift lever in
P (Park), or shift a manual
transmission to 1 (First) or
R (Reverse).
(Continued)
WARNING (Continued)
3. Turn off the engine and donot restart while the vehicle
is raised.
4. Do not allow passengers to remain in the vehicle.
To be certain the vehicle will not
move, put blocks at the front and
rear of the tire farthest away from
the one being changed. That
would be the tire on the other
side, at the opposite end of the
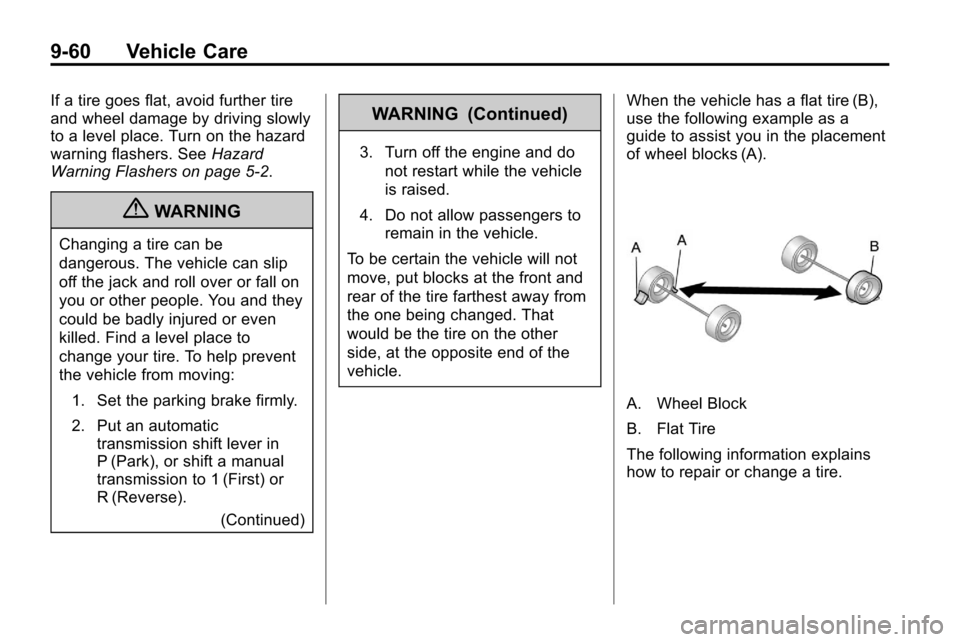
vehicle. When the vehicle has a flat tire (B),
use the following example as a
guide to assist you in the placement
of wheel blocks (A).
A. Wheel Block
B. Flat Tire
The following information explains
how to repair or change a tire.
Page 329 of 394

Vehicle Care 9-61
Tire Changing
Removing the Spare Tire and
Tools
To access the spare tire and tools:
1. Open the liftgate. SeeLiftgate
(Manual)
on page 1‑8or
Liftgate (Power) on page 1‑8.
2. Lift the load floor up.
3. Remove the extension (A), wheel wrench (B) and jack (C).
Place the tools next to the tire
being changed.
4. Turn the retainer nutcounterclockwise and remove
the spare tire.
5. Place the spare tire next to the tire being changed.
Removing the Flat Tire and
Installing the Spare Tire
1. Do a safety check beforeproceeding. See If a Tire Goes
Flat
on page 9‑59for more
information.
2. For vehicles with wheel nut caps, turn the wheel wrench
counterclockwise to loosen and
remove them.
Do not try to remove plastic caps
from the cover or center cap.
3. For vehicles with a wheel cover or center cap, pull the cover or
center cap away from the wheel
to remove it. Store the wheel
cover in the cargo area until you
have the flat tire repaired or
replaced.