2010 BUICK LACROSSE seats
[x] Cancel search: seatsPage 1 of 414

2010 Buick LaCrosse Owner ManualM
Keys, Doors and Windows. . . 1-1
Keys and Locks . . . . . . . . . . . . . . . 1-2
Doors . . . . . . . . . . . . . . . . . . . . . . . . . 1-11
Vehicle Security . . . . . . . . . . . . . . 1-13
Exterior Mirrors . . . . . . . . . . . . . . . 1-15
Interior Mirrors . . . . . . . . . . . . . . . . 1-16
Windows . . . . . . . . . . . . . . . . . . . . . 1-17
Roof . . . . . . . . . . . . . . . . . . . . . . . . . . 1-19
Seats and Restraints . . . . . . . . . 2-1
Head Restraints . . . . . . . . . . . . . . . 2-2
Front Seats . . . . . . . . . . . . . . . . . . . . 2-3
Rear Seats . . . . . . . . . . . . . . . . . . . . 2-9
Safety Belts . . . . . . . . . . . . . . . . . . 2-10
Airbag System . . . . . . . . . . . . . . . . 2-24
Child Restraints . . . . . . . . . . . . . . 2-40
Storage . . . . . . . . . . . . . . . . . . . . . . . 3-1
Storage Compartments . . . . . . . . 3-1
Additional Storage Features . . . 3-2 Instruments and Controls
. . . . 4-1
Instrument Panel Overview . . . . 4-4
Controls . . . . . . . . . . . . . . . . . . . . . . . 4-6
Warning Lights, Gages, and
Indicators . . . . . . . . . . . . . . . . . . . 4-12
Information Displays . . . . . . . . . . 4-25
Vehicle Messages . . . . . . . . . . . . 4-32
Vehicle Personalization . . . . . . . 4-38
OnStar System
®. . . . . . . . . . . . . . 4-43
Universal Remote System . . . . 4-45
Lighting . . . . . . . . . . . . . . . . . . . . . . . 5-1
Exterior Lighting . . . . . . . . . . . . . . . 5-1
Interior Lighting . . . . . . . . . . . . . . . . 5-5
Lighting Features . . . . . . . . . . . . . . 5-6
Infotainment System . . . . . . . . . 6-1
Introduction . . . . . . . . . . . . . . . . . . . . 6-2
Radio . . . . . . . . . . . . . . . . . . . . . . . . . 6-12
Audio Players . . . . . . . . . . . . . . . . 6-20
Rear Seat Infotainment . . . . . . . 6-34
Phone . . . . . . . . . . . . . . . . . . . . . . . . 6-42 Climate Controls
. . . . . . . . . . . . . 7-1
Climate Control Systems . . . . . . 7-1
Air Vents . . . . . . . . . . . . . . . . . . . . . . . 7-8
Maintenance . . . . . . . . . . . . . . . . . . . 7-8
Driving and Operating . . . . . . . . 8-1
Driving Information . . . . . . . . . . . . . 8-2
Starting and Operating . . . . . . . 8-17
Engine Exhaust . . . . . . . . . . . . . . 8-26
Automatic Transmission . . . . . . 8-27
Drive Systems . . . . . . . . . . . . . . . . 8-30
Brakes . . . . . . . . . . . . . . . . . . . . . . . 8-31
Ride Control Systems . . . . . . . . 8-34
Cruise Control . . . . . . . . . . . . . . . . 8-37
Object Detection Systems . . . . 8-40
Fuel . . . . . . . . . . . . . . . . . . . . . . . . . . 8-49
Towing . . . . . . . . . . . . . . . . . . . . . . . 8-54
Conversions and Add-Ons . . . 8-60
Vehicle Care . . . . . . . . . . . . . . . . . . 9-1
General Information . . . . . . . . . . . . 9-2
Vehicle Checks . . . . . . . . . . . . . . . . 9-4
Headlamp Aiming . . . . . . . . . . . . 9-30
Page 15 of 414

Keys, Doors and Windows 1-9
Vehicles with heated or heated and
ventilated front seats can have this
feature turn on automatically during
a remote start see“Remote Start
Heated Seats” and“Remote Start
Vented Seats” underVehicle
Personalization
on page 4‑38for
more information.
Extending Engine Run Time
For a 10 minute extension, repeat
Steps 1 and 2 while the engine is
still running. The remote start can
only be extended once.
When the remote start is extended,
the second 10 minutes will start
immediately.
For example, if the vehicle has
been running for five minutes, and
10 minutes are added, the engine
will run for a total of 15 minutes. A maximum of two remote starts or
remote start attempts are allowed
between ignition cycles.
The vehicle's ignition must be
turned on and then back off before
the remote start procedure can be
used again.
Shutting the Engine Off After a
Remote Start
To shut off the engine:
.Press/until the parking lamps
turn off.
.Turn on the hazard warning
flashers.
.Turn the ignition on and then
back off. Conditions in Which Remote Start
Will Not Work
The remote start will not operate if:
.The key is in the ignition
(Key Access) or the ignition is
in any position other than
OFF (Keyless Access).
.The transmitter is in the vehicle
(Keyless Access).
.The hood is not closed.
.The hazard warning flashers
are on.
.There is an emission control
system malfunction.
.The engine coolant temperature
is too high.
.The oil pressure is low.
.Two remote vehicle starts have
already been used.
.The vehicle is not in P (Park).
Page 18 of 414

1-12 Keys, Doors and Windows
Emergency Trunk Release
Handle
Notice:Do not use the
emergency trunk release handle
as a tie-down or anchor point
when securing items in the trunk
as it could damage the handle.
The emergency trunk release
handle is only intended to aid a
person trapped in a latched trunk,
enabling them to open the trunk
from the inside.
There is an emergency trunk
release handle located inside the
trunk on the trunk latch. On some
vehicles, the release handle can be
accessed by folding the rear seat
center seatback. See Rear Seats
on page 2‑9. Pull the release
handle to open the trunk from
the inside.
Rear Seat Pass-Through
The vehicle has a small door in the
rear seat. This door allows access
to the trunk from inside the vehicle.
The rear seat armrest must be down
for the pass-through door to open.
To release the pass-through door,
pull the release handle. To close the
door, raise it and push it until it
latches.
Page 21 of 414

Keys, Doors and Windows 1-15
If the keyless access transmitter
appears to be undamaged, try
another keyless access transmitter.
Or, you may try placing the
transmitter in the transmitter pocket
located in the center console. See
“No Remote Detected”underKey
and Lock Messages on page 4‑36.
If the engine does not start with the
other transmitter or when the
transmitter is on the pocket in the
center console, your vehicle needs
service. See your dealer/retailer
who can service the theft-deterrent
system and have a new transmitter
programmed to the vehicle.
Do not leave the key or device that
disarms or deactivates the theft
deterrent system in the vehicle.Exterior Mirrors
Power Mirrors
To adjust the mirrors:
1. Turn the control knob to the L (left) or R (right) selecting the
driver or passenger mirror.
2. Push the control knob to the left, right, up, or down to adjust the
mirror. Vehicles with the memory feature
can store a preferred mirror position.
See
“Memory Seats” underPower
Seat Adjustment
on page 2‑4for
more information.
Folding Mirrors
Manual Foldaway Mirrors
Vehicles with manual folded mirrors
are folded inward to prevent
damage when going through an
automatic car wash. To fold, pull the
mirror toward the vehicle. Push the
mirror outward, to return it to the
original position.
Automatic Dimming Feature
The driver outside mirror
automatically adjusts for the glare of
the headlamps behind you.
Page 27 of 414

Seats and Restraints 2-1
Seats and
Restraints
Head Restraints
Head Restraints . . . . . . . . . . . . . . . 2-2
Front Seats
Seat Adjustment . . . . . . . . . . . . . . 2-3
Power Seat Adjustment . . . . . . . 2-4
Lumbar Adjustment . . . . . . . . . . . 2-5
Reclining Seatbacks . . . . . . . . . . 2-6
Heated Front Seats . . . . . . . . . . . 2-8
Heated and Ventilated FrontSeats . . . . . . . . . . . . . . . . . . . . . . . . 2-8
Rear Seats
Rear Seats . . . . . . . . . . . . . . . . . . . . 2-9
Safety Belts
Safety Belts . . . . . . . . . . . . . . . . . . 2-10
How to Wear Safety BeltsProperly . . . . . . . . . . . . . . . . . . . . 2-13
Lap-Shoulder Belt . . . . . . . . . . . 2-19 Safety Belt Use During
Pregnancy . . . . . . . . . . . . . . . . . . 2-22
Safety Belt Extender . . . . . . . . . 2-23
Safety System Check . . . . . . . . 2-23
Safety Belt Care . . . . . . . . . . . . . 2-23
Replacing Safety Belt System Parts After a Crash . . . . . . . . . 2-24
Airbag System
Airbag System . . . . . . . . . . . . . . . 2-24
Where Are the Airbags? . . . . . 2-27
When Should an AirbagInflate? . . . . . . . . . . . . . . . . . . . . . 2-28
What Makes an Airbag Inflate? . . . . . . . . . . . . . . . . . . . . . 2-30
How Does an Airbag Restrain? . . . . . . . . . . . . . . . . . . . 2-30
What Will You See After an Airbag Inflates? . . . . . . . . . . . . 2-30
Passenger Sensing System . . . . . . . . . . . . . . . . . . . . . 2-32
Servicing the Airbag-Equipped Vehicle . . . . . . . . . . . . . . . . . . . . . 2-37 Adding Equipment to the
Airbag-Equipped Vehicle . . . 2-38
Airbag System Check . . . . . . . . 2-39
Replacing Airbag System Parts After a Crash . . . . . . . . . 2-39
Child Restraints
Older Children . . . . . . . . . . . . . . . 2-40
Infants and Young
Children . . . . . . . . . . . . . . . . . . . . 2-42
Child Restraint Systems . . . . . 2-45
Where to Put the Restraint . . . 2-46
Lower Anchors and Tethers for Children (LATCH
System) . . . . . . . . . . . . . . . . . . . . 2-48
Replacing LATCH System Parts After a Crash . . . . . . . . . 2-55
Securing Child Restraints (Rear Seat) . . . . . . . . . . . . . . . . . 2-55
Securing Child Restraints (Front Seat ) . . . . . . . . . . . . . . . 2-57
Page 28 of 414

2-2 Seats and Restraints
Head Restraints
The vehicle's front seats have
adjustable head restraints in the
outboard seating positions.
The vehicle's rear seats have
adjustable head rests in the
outboard seating positions.
{WARNING
With head restraints that are not
installed and adjusted properly,
there is a greater chance that
occupants will suffer a neck/
spinal injury in a crash. Do not
drive until the head restraints for
all occupants are installed and
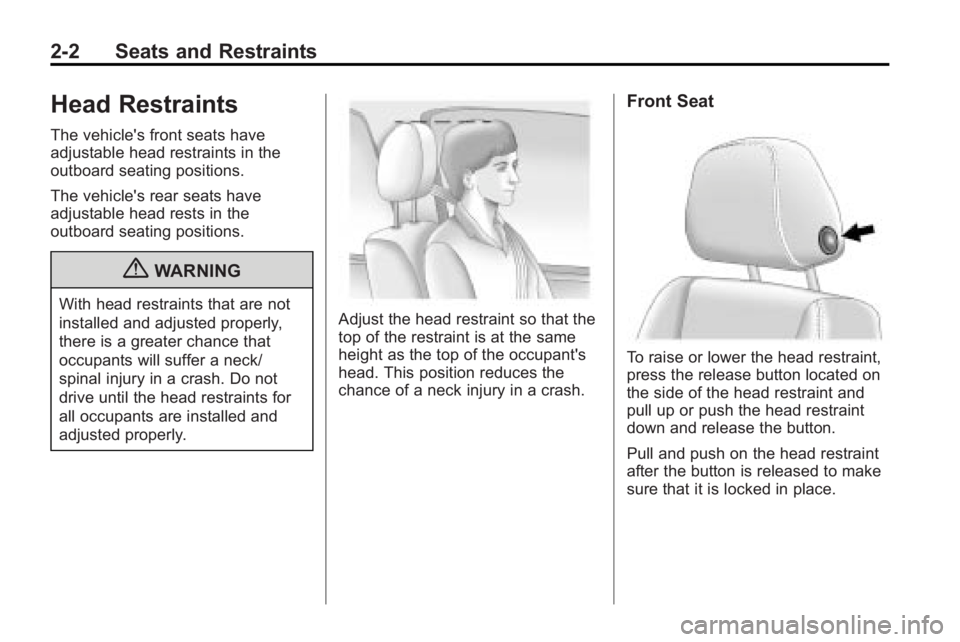
adjusted properly.Adjust the head restraint so that the
top of the restraint is at the same
height as the top of the occupant's
head. This position reduces the
chance of a neck injury in a crash.
Front Seat
To raise or lower the head restraint,
press the release button located on
the side of the head restraint and
pull up or push the head restraint
down and release the button.
Pull and push on the head restraint
after the button is released to make
sure that it is locked in place.
Page 29 of 414

Seats and Restraints 2-3
Rear Seat
Pull the head rest up to raise it. To
lower the head rest, press the
release button, located on the head
rest post on the top of the seatback,
while you push the head rest down.
Push down on the head rest after
the button is released to make sure
that it is locked in place.
This vehicle's head restraints and
head are not designed to be
removed.
Front Seats
Seat Adjustment
Manual Seat Adjustment
{WARNING
You can lose control of the
vehicle if you try to adjust a
manual driver's seat while the(Continued)
WARNING (Continued)
vehicle is moving. The sudden
movement could startle and
confuse you, or make you push a
pedal when you do not want to.
Adjust the driver's seat only when
the vehicle is not moving.
To adjust the seat position:
1. Pull the handle located at the front of the seat.
2. Move the seat forward or backward to adjust the seat
position.
3. Release the handle to stop the seat from moving.
Page 30 of 414

2-4 Seats and Restraints
Power Seat Adjustment
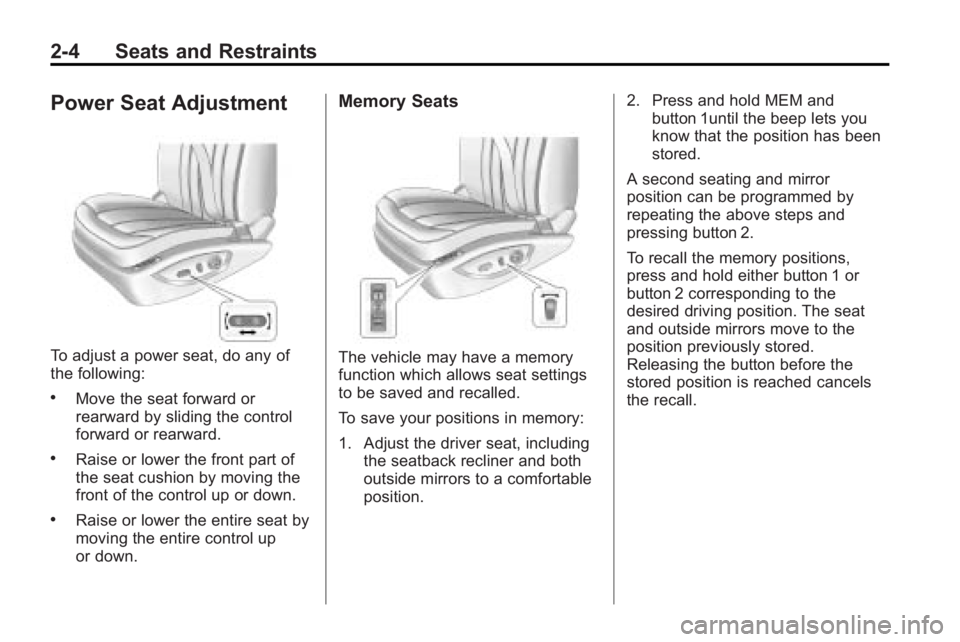
To adjust a power seat, do any of
the following:
.Move the seat forward or
rearward by sliding the control
forward or rearward.
.Raise or lower the front part of
the seat cushion by moving the
front of the control up or down.
.Raise or lower the entire seat by
moving the entire control up
or down.
Memory Seats
The vehicle may have a memory
function which allows seat settings
to be saved and recalled.
To save your positions in memory:
1. Adjust the driver seat, includingthe seatback recliner and both
outside mirrors to a comfortable
position. 2. Press and hold MEM and
button 1until the beep lets you
know that the position has been
stored.
A second seating and mirror
position can be programmed by
repeating the above steps and
pressing button 2.
To recall the memory positions,
press and hold either button 1 or
button 2 corresponding to the
desired driving position. The seat
and outside mirrors move to the
position previously stored.
Releasing the button before the
stored position is reached cancels
the recall.