2010 BUICK LACROSSE warning light
[x] Cancel search: warning lightPage 303 of 414

Vehicle Care 9-21
If No Steam Is Coming From
The Engine Compartment
If an engine overheat warning is
displayed but no steam can be seen
or heard, the problem might not be
too serious. Sometimes the engine
can get a little too hot when the
vehicle:
.Climbing a long hill on a hot day.
.Stopping after high-speed
driving.
.Idling for long periods in traffic.
.Towing a trailer.
If the overheat warning displays with
no sign of steam:
1. Turn the air conditioning off.
2. Turn the heater on to the highest temperature and to the highest
fan speed. Open the windows as
necessary. 3. In heavy traffic, let the engine
idle in N (Neutral) while stopped.
If it is safe to do so, pull off the
road, shift to P (Park) or
N (Neutral) and let the
engine idle.
If the temperature overheat gage is
no longer in the overheat zone or an
overheat warning no longer
displays, the vehicle can be driven.
Continue to drive the vehicle slow
for about 10 minutes. Keep a safe
vehicle distance from the vehicle in
front. If the warning does not come
back on, continue to drive normally.
If the warning continues, pull over,
stop, and park the vehicle
right away.
If there is no sign of steam, idle the
engine for three minutes while
parked. If the warning is still
displayed, turn off the engine until it
cools down. Also, see “Overheated
Engine Protection Operating Mode”
later in this section.
Overheated Engine
Protection
Operating Mode
This emergency operating mode
allows the vehicle to be driven to a
safe place in an emergency
situation. If an overheated engine
condition exists, an overheat
protection mode which alternates
firing groups of cylinders helps
prevent engine damage. In this
mode, there is significant loss in
power and engine performance. The
engine coolant temperature warning
light comes on the instrument panel,
to indicate the vehicle has entered
overheated engine protection
operating mode. The temperature
gage also indicates an overheat
condition exists. Driving
extended km (miles) and/or towing a
trailer in the overheat protection
mode should be avoided.
Page 306 of 414

9-24 Vehicle Care
Brakes
This vehicle has disc brakes. Disc
brake pads have built-in wear
indicators that make a high-pitched
warning sound when the brake pads
are worn and new pads are needed.
The sound can come and go or be
heard all the time the vehicle is
moving, except when applying the
brake pedal firmly.
{WARNING
The brake wear warning sound
means that soon the brakes will
not work well. That could lead to
an accident. When the brake
wear warning sound is heard,
have the vehicle serviced.
Notice: Continuing to drive with
worn-out brake pads could result
in costly brake repair. Some driving conditions or climates
can cause a brake squeal when the
brakes are first applied or lightly
applied. This does not mean
something is wrong with the brakes.
Properly torqued wheel nuts are
necessary to help prevent brake
pulsation. When tires are rotated,
inspect brake pads for wear and
evenly tighten wheel nuts in the
proper sequence to torque
specifications in
Capacities and
Specifications on page 11‑2.
Brake linings should always be
replaced as complete axle sets.
Brake Pedal Travel
See your dealer/retailer if the brake
pedal does not return to normal
height, or if there is a rapid increase
in pedal travel. This could be a sign
that brake service might be
required.
Brake Adjustment
Every time the brakes are applied,
with or without the vehicle moving,
the brakes adjust for wear.
Replacing Brake System Parts
The braking system on a vehicle is
complex. Its many parts have to be
of top quality and work well together
if the vehicle is to have really good
braking. The vehicle was designed
and tested with top-quality brake
parts. When parts of the braking
system are replaced, be sure to get
new, approved replacement parts.
If this is not done, the brakes might
not work properly. For example,
installing disc brake pads that are
wrong for the vehicle, can change
the balance between the front and
rear brakes —for the worse. The
braking performance expected can
change in many other ways if the
wrong replacement brake parts are
installed.
Page 307 of 414

Vehicle Care 9-25
Brake Fluid
The brake master cylinder reservoir
is filled with DOT 3 brake fluid as
indicated on the reservoir cap. See
Engine Compartment Overview
on
page 9‑6for the location of the
reservoir. There are only two reasons why the
brake fluid level in the reservoir
might go down:
.The brake fluid level goes down
because of normal brake lining
wear. When new linings are
installed, the fluid level goes
back up.
.A fluid leak in the brake
hydraulic system can also cause
a low fluid level. Have the brake
hydraulic system fixed, since a
leak means that sooner or later
the brakes will not work well.
Do not top off the brake fluid.
Adding fluid does not correct a leak.
If fluid is added when the linings are
worn, there will be too much fluid
when new brake linings are
installed. Add or remove brake fluid,
as necessary, only when work is
done on the brake hydraulic system.
{WARNING
If too much brake fluid is added, it
can spill on the engine and burn,
if the engine is hot enough. You
or others could be burned, and
the vehicle could be damaged.
Add brake fluid only when work is
done on the brake hydraulic
system.
When the brake fluid falls to a low
level, the brake warning light comes
on. See Brake System Warning
Light on page 4‑20.
Page 315 of 414

Vehicle Care 9-33
Bulb Replacement
For the proper type of replacement
bulbs, seeReplacement Bulbson
page 9‑37.
For any bulb changing procedure
not listed in this section, contact
your dealer/retailer.
Halogen Bulbs
{WARNING
Halogen bulbs have pressurized
gas inside and can burst if you
drop or scratch the bulb. You or
others could be injured. Be sure
to read and follow the instructions
on the bulb package.
High Intensity Discharge
(HID) Lighting
{WARNING
The low beam high intensity
discharge lighting system
operates at a very high voltage.
If you try to service any of the
system components, you could be
seriously injured. Have your
dealer/retailer or a qualified
technician service them.
The up–level vehicle has HID
headlamps. The park lamp function
is also a function of the HID
headlamp. After an HID headlamp
bulb has been replaced, the beam
might be a slightly different shade
than it was originally. This is normal.
Headlamps, Front Turn
Signal and Parking
Lamps
Base Headlamp Assembly
The base model vehicle has a
halogen high-beam headlamp, a
low-beam/Daytime Running Lamp
(DRL) headlamp and a turn signal/
parking lamp on the headlamp
assembly.
Page 337 of 414

Vehicle Care 9-55
Please note that the TPMS is
not a substitute for proper tire
maintenance, and it is the driver's
responsibility to maintain correct tire
pressure, even if under-inflation has
not reached the level to trigger
illumination of the TPMS low tire
pressure telltale.
Your vehicle has also been
equipped with a TPMS malfunction
indicator to indicate when the
system is not operating properly.
The TPMS malfunction indicator is
combined with the low tire pressure
telltale. When the system detects a
malfunction, the telltale will flash for
approximately one minute and then
remain continuously illuminated.
This sequence will continue upon
subsequent vehicle start-ups as
long as the malfunction exists.
When the malfunction indicator is
illuminated, the system may not be
able to detect or signal low tire
pressure as intended. TPMS
malfunctions may occur for a variety
of reasons, including the installation
of replacement or alternate tires orwheels on the vehicle that prevent
the TPMS from functioning properly.
Always check the TPMS malfunction
telltale after replacing one or more
tires or wheels on your vehicle to
ensure that the replacement or
alternate tires and wheels allow the
TPMS to continue to function
properly.
See
Tire Pressure Monitor
Operation
on page 9‑55for
additional information.
Federal Communications
Commission (FCC) and
Industry and Science Canada
See Radio Frequency Statement
(US, Can)on page 12‑16for
information regarding Part 15 of the
Federal Communications
Commission (FCC) Rules and
RSS-210/211 of Industry and
Science Canada.
Tire Pressure Monitor
Operation
This vehicle may have a Tire
Pressure Monitor System (TPMS).
The TPMS is designed to warn the
driver when a low tire pressure
condition exists. TPMS sensors are
mounted onto each tire and wheel
assembly, excluding the spare tire
and wheel assembly. The TPMS
sensors monitor the air pressure in
the vehicle's tires and transmits the
tire pressure readings to a receiver
located in the vehicle.
When a low tire pressure condition
is detected, the TPMS illuminates
the low tire pressure warning light
located on the instrument panel
cluster.
Page 338 of 414

9-56 Vehicle Care
At the same time a message to
check the pressure in a specific tire
appears on the Driver Information
Center (DIC) display. The low tire
pressure warning light and the DIC
warning message come on at each
ignition cycle until the tires are
inflated to the correct inflation
pressure. Using the DIC, tire
pressure levels can be viewed by
the driver. For additional information
and details about the DIC operation
and displays seeDriver Information
Center (DIC) on page 4‑25.
The low tire pressure warning light
may come on in cool weather when
the vehicle is first started, and then
turn off as you start to drive. This
could be an early indicator that the
air pressure in the tire(s) are getting
low and need to be inflated to the
proper pressure.
A Tire and Loading Information
label, attached to your vehicle,
shows the size of your vehicle's
original equipment tires and the
correct inflation pressure for your
vehicle's tires when they are cold. See
Vehicle Load Limitson
page 8‑12, for an example of the
Tire and Loading Information label
and its location on your vehicle.
Also see Tire Pressure
on
page 9‑53.
Your vehicle's TPMS can warn you
about a low tire pressure condition
but it does not replace normal tire
maintenance. See Tire Inspection
on page 9‑59,Tire Rotationon
page 9‑59and Tires on page 9‑46.
Notice: Liquid tire sealants could
damage the Tire Pressure Monitor
System (TPMS) sensors. Sensor
damage caused by using a tire
sealant is not covered by your
warranty. Do not use liquid tire
sealants.
TPMS Malfunction Light and
Message
The TPMS will not function properly
if one or more of the TPMS sensors
are missing or inoperable. When the
system detects a malfunction, the
low tire warning light flashes for
about one minute and then stays on
for the remainder of the ignition
cycle. A DIC warning message is
also displayed. The low tire warning
light and DIC warning message
come on at each ignition cycle until
the problem is corrected. Some of
the conditions that can cause the
malfunction light and DIC message
to come on are:
.One of the road tires has been
replaced with the spare tire. The
spare tire does not have a
TPMS sensor. The TPMS
malfunction light and DIC
message should go off once you
re-install the road tire containing
the TPMS sensor.
Page 358 of 414

9-76 Vehicle Care
1. Check the other vehicle. It musthave a 12-volt battery with a
negative ground system.
Notice: If the other vehicle's
system is not a 12-volt system
with a negative ground, both
vehicles can be damaged. Only
use vehicles with 12-volt systems
with negative grounds to jump
start your vehicle. 2. Position the two vehicles so that
they are not touching.
3. Set the parking brake firmly and put the shift lever in P (Park).
See Shifting Into Park
on
page 8‑23. Notice:
If you leave the radio or
other accessories on during the
jump starting procedure, they
could be damaged. The repairs
would not be covered by the
warranty. Always turn off the
radio and other accessories when
jump starting the vehicle.
4. Turn the ignition to LOCK/OFF
and switch off all lights and
accessories in both vehicles,
except the hazard warning
flashers if needed.
{WARNING
An electric fan can start up even
when the engine is not running
and can injure you. Keep hands,
clothing and tools away from any
underhood electric fan.
Page 359 of 414

Vehicle Care 9-77
{WARNING
Using a match near a battery can
cause battery gas to explode.
People have been hurt doing this,
and some have been blinded.
Use a flashlight if you need more
light.
Be sure the battery has enough
water. You do not need to add
water to the battery installed in
your new vehicle. But if a battery
has filler caps, be sure the right
amount of fluid is there. If it is low,
add water to take care of that
first. If you don't, explosive gas
could be present.
Battery fluid contains acid that
can burn you. Do not get it on
you. If you accidentally get it in
your eyes or on your skin, flush
the place with water and get
medical help immediately.
{WARNING
Fans or other moving engine
parts can injure you badly. Keep
your hands away from moving
parts once the engine is running.
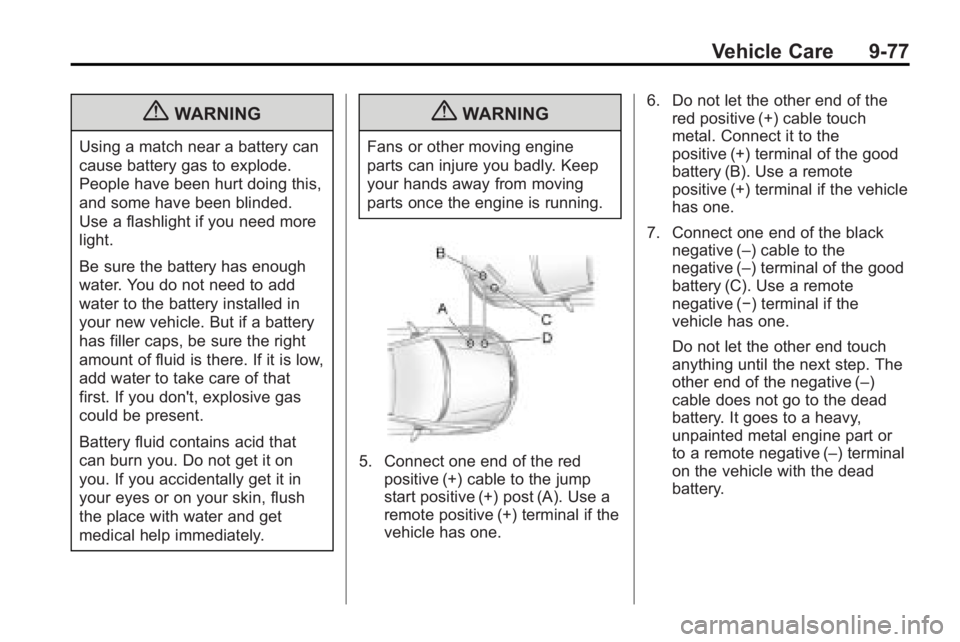
5. Connect one end of the redpositive (+) cable to the jump
start positive (+) post (A). Use a
remote positive (+) terminal if the
vehicle has one. 6. Do not let the other end of the
red positive (+) cable touch
metal. Connect it to the
positive (+) terminal of the good
battery (B). Use a remote
positive (+) terminal if the vehicle
has one.
7. Connect one end of the black negative (–) cable to the
negative (–) terminal of the good
battery (C). Use a remote
negative (−) terminal if the
vehicle has one.
Do not let the other end touch
anything until the next step. The
other end of the negative (–)
cable does not go to the dead
battery. It goes to a heavy,
unpainted metal engine part or
to a remote negative (–) terminal
on the vehicle with the dead
battery.